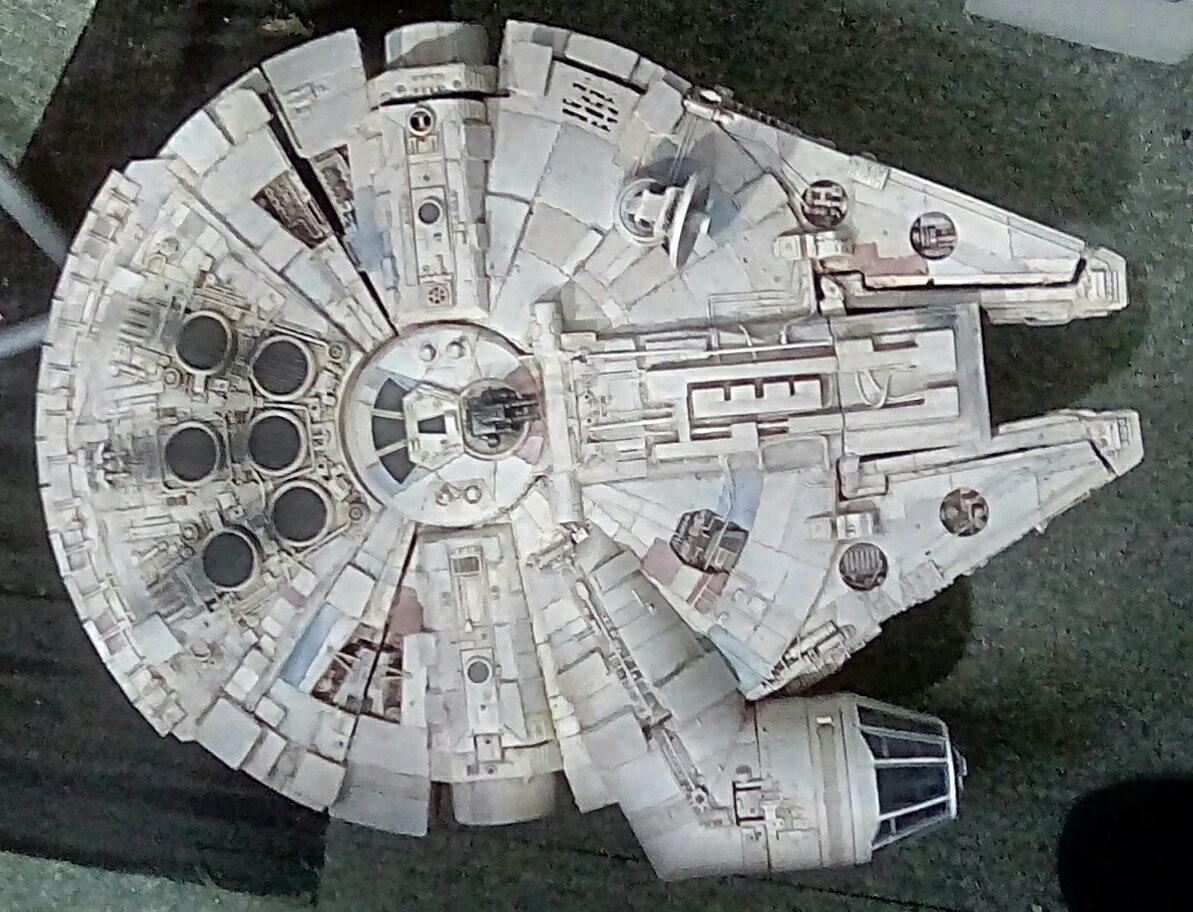
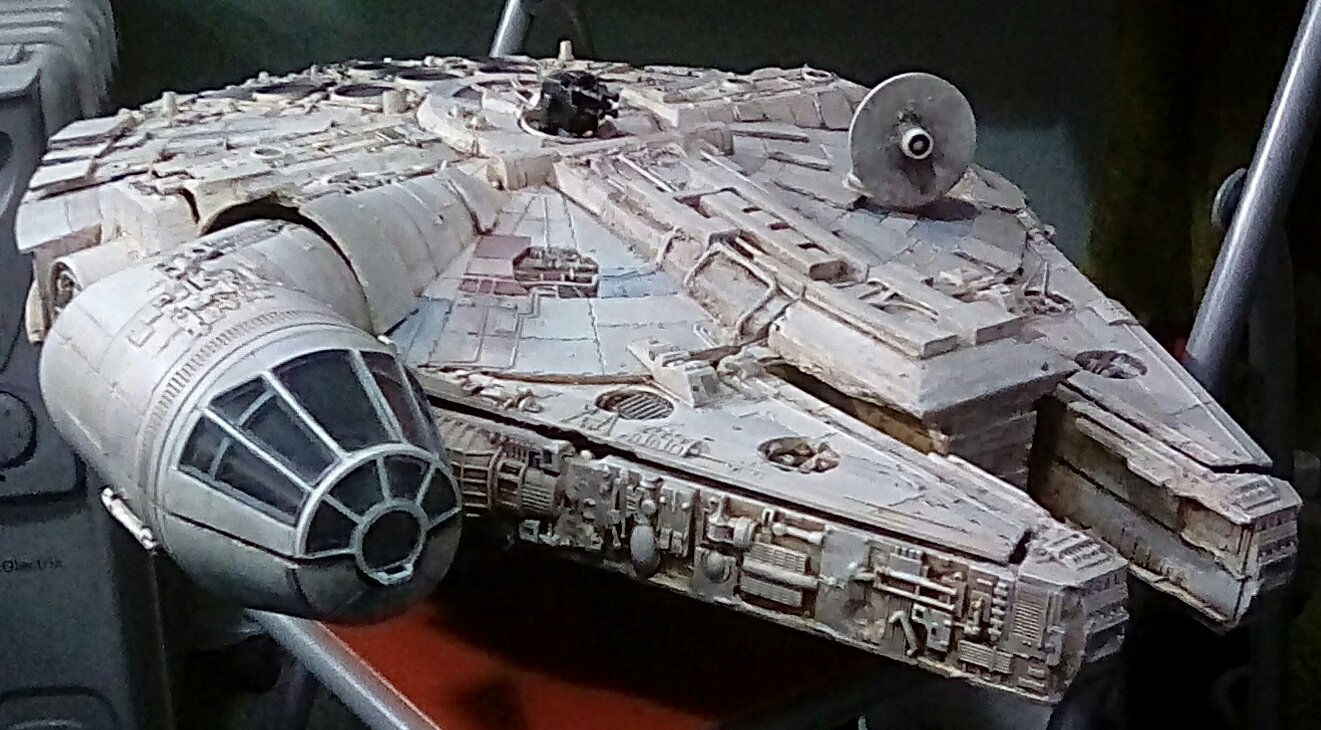
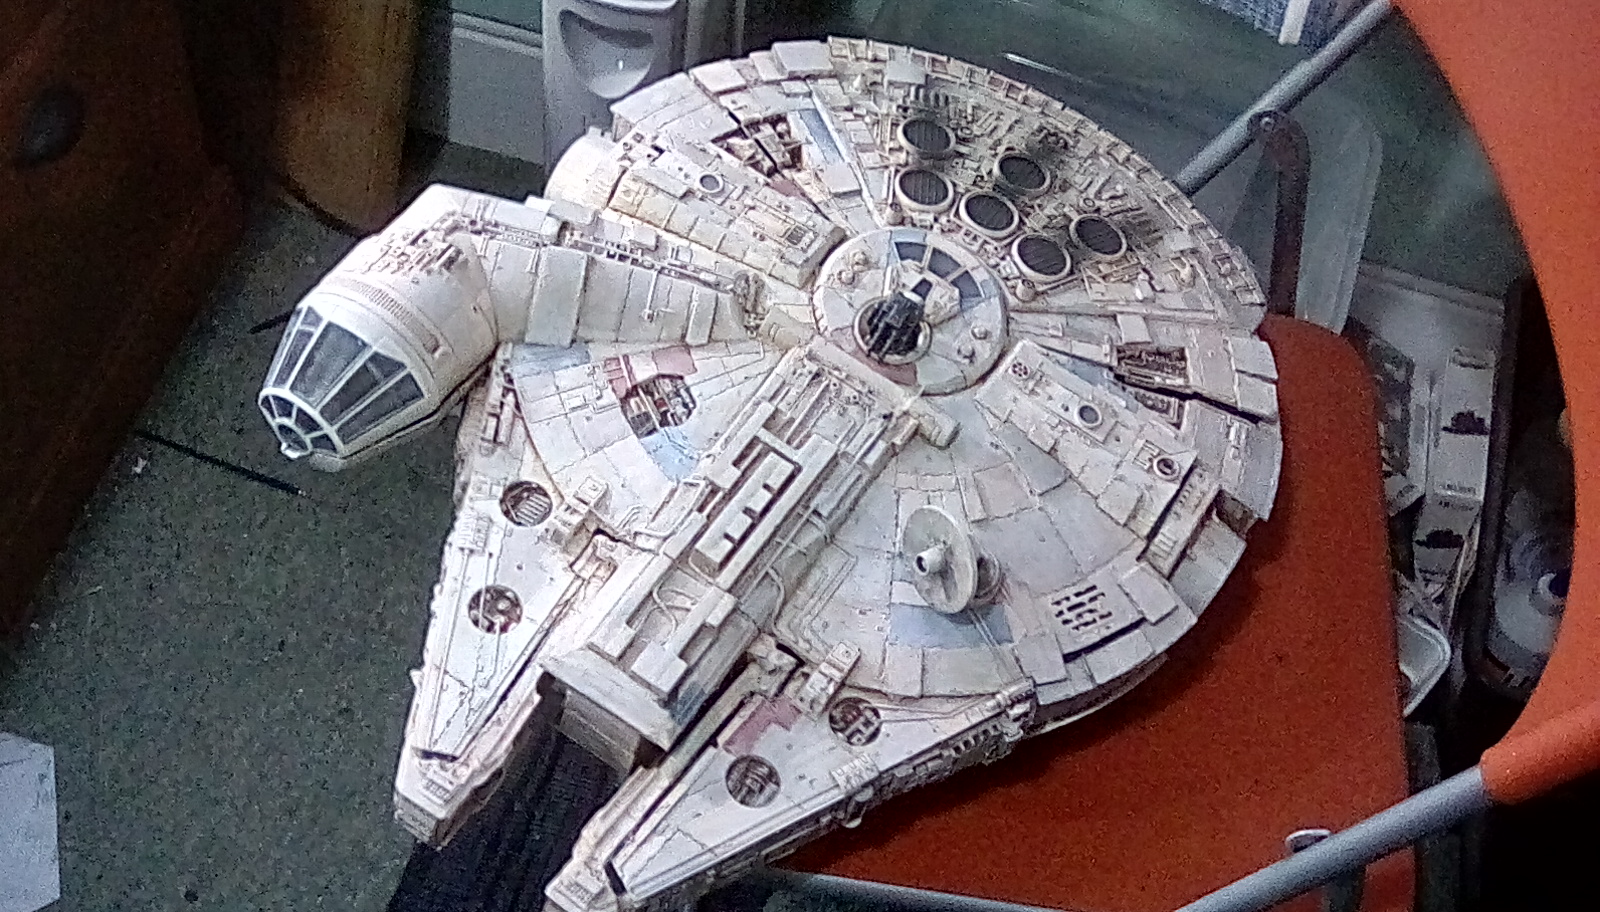
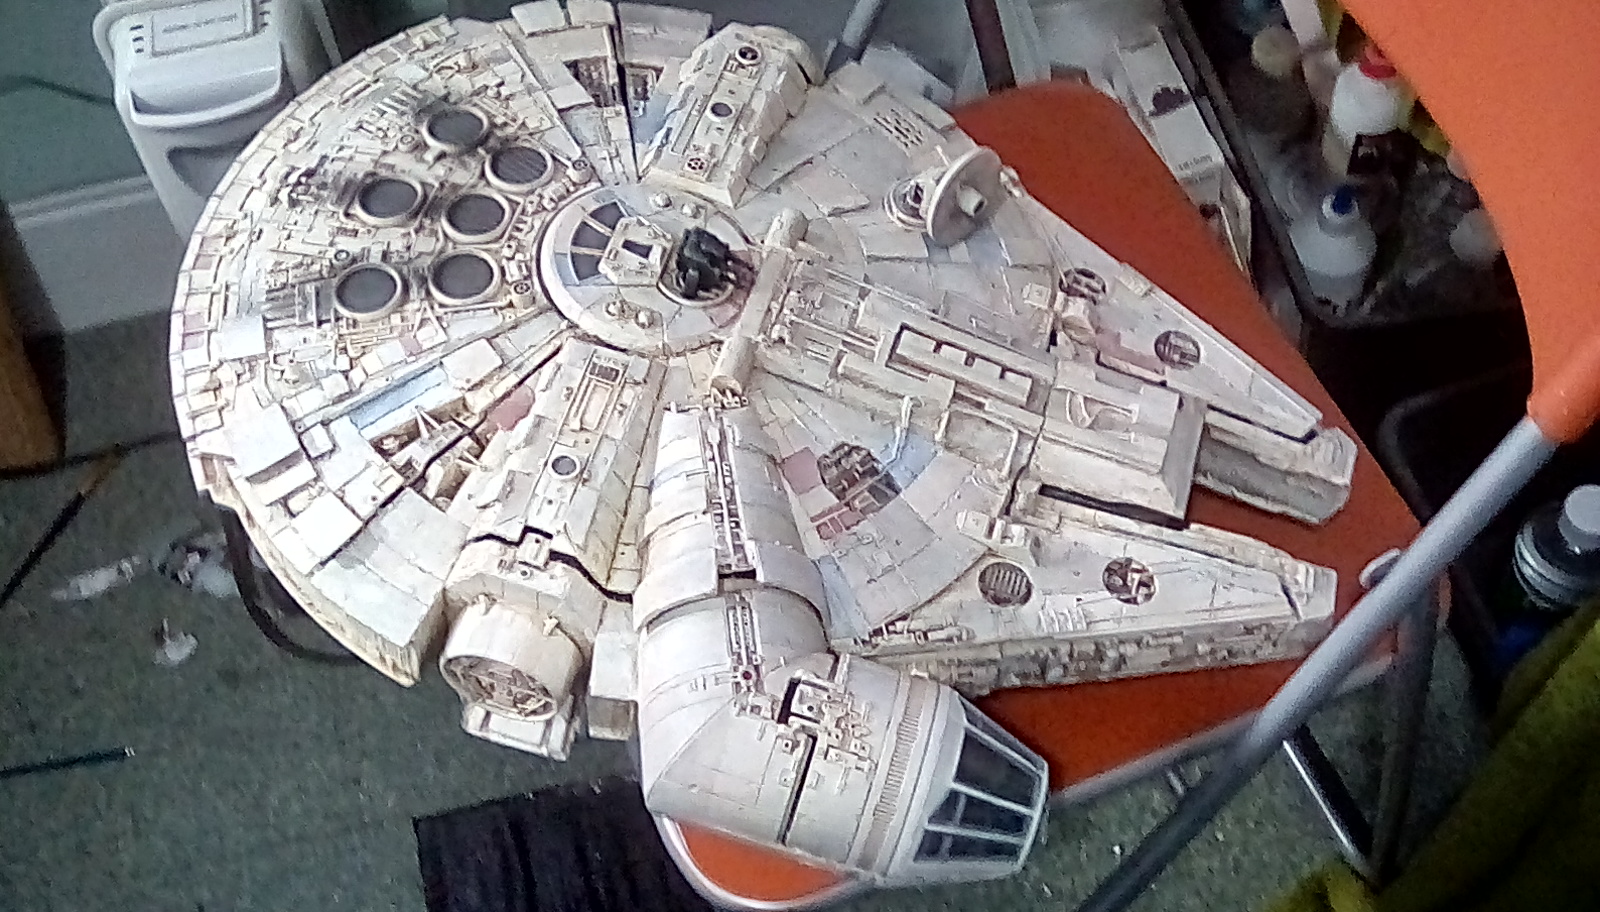
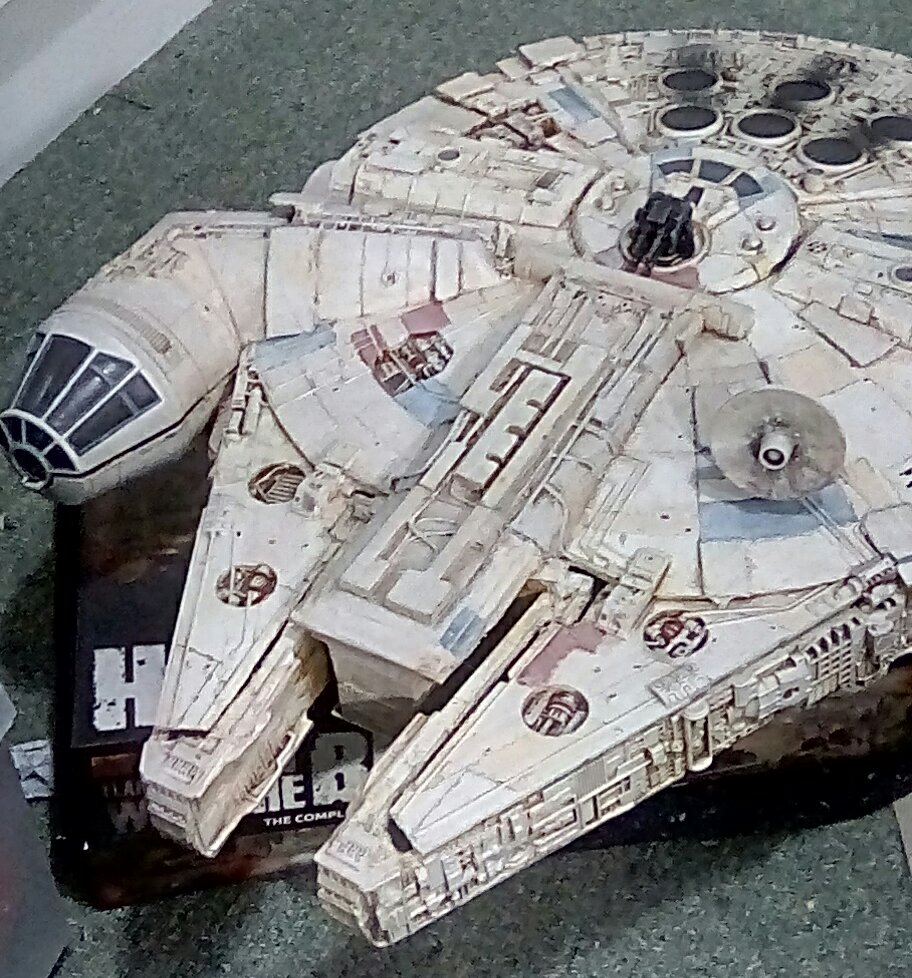
The Millennium Falcon


Recommendations: 276
About the Project
I am going to make a Millennium Falcon scenery set to use with Star Wars Legion figures, that includes internal rooms and corridors. I aim to show that with a bit of imagination and skill great results can be gotten on a limited budget.
Related Game: Star Wars: Legion
Related Company: Fantasy Flight Games
Related Genre: Science Fiction
Related Contest: Star Wars Hobby Weekend
This Project is On Hold
The Engines strike back... (Engines part two).
Having done the engine glow yesterday, now t that is dry I can do the rear mesh that covers the engine. In the films it looks to just be very simple upright struts, but I’m going to take a little artistic license with the design.
I had some plastic tops from a dehumidifier tub (the ones that use chemicals that pull water from the air) that I had been saving as airbrush stencils. I decide to add some of the oval mesh to add interest, as well as the expected upright struts (made from GW sprue peices) and some side pieces to make it look better where The blue glow of engines meet the side of the ship.
 Test fitting the struts.
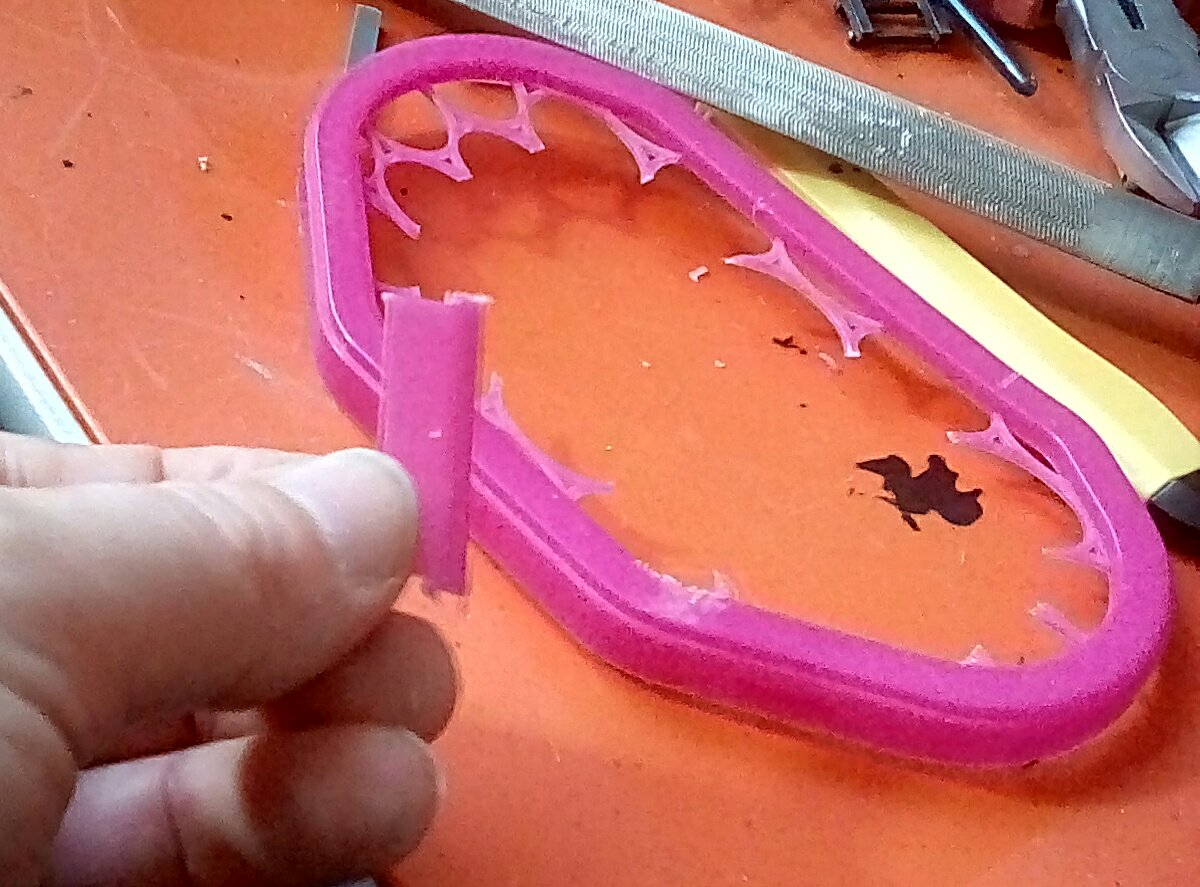 The side pieces are cut from the sides of the dehumidifier mesh.
 It's easier to paint the mesh, then cut it out.
The arts are prepared black, given a coat of Matt varnish (so they will contrast with the gloss varnished blue engine glow) and once dry are superglued in place.

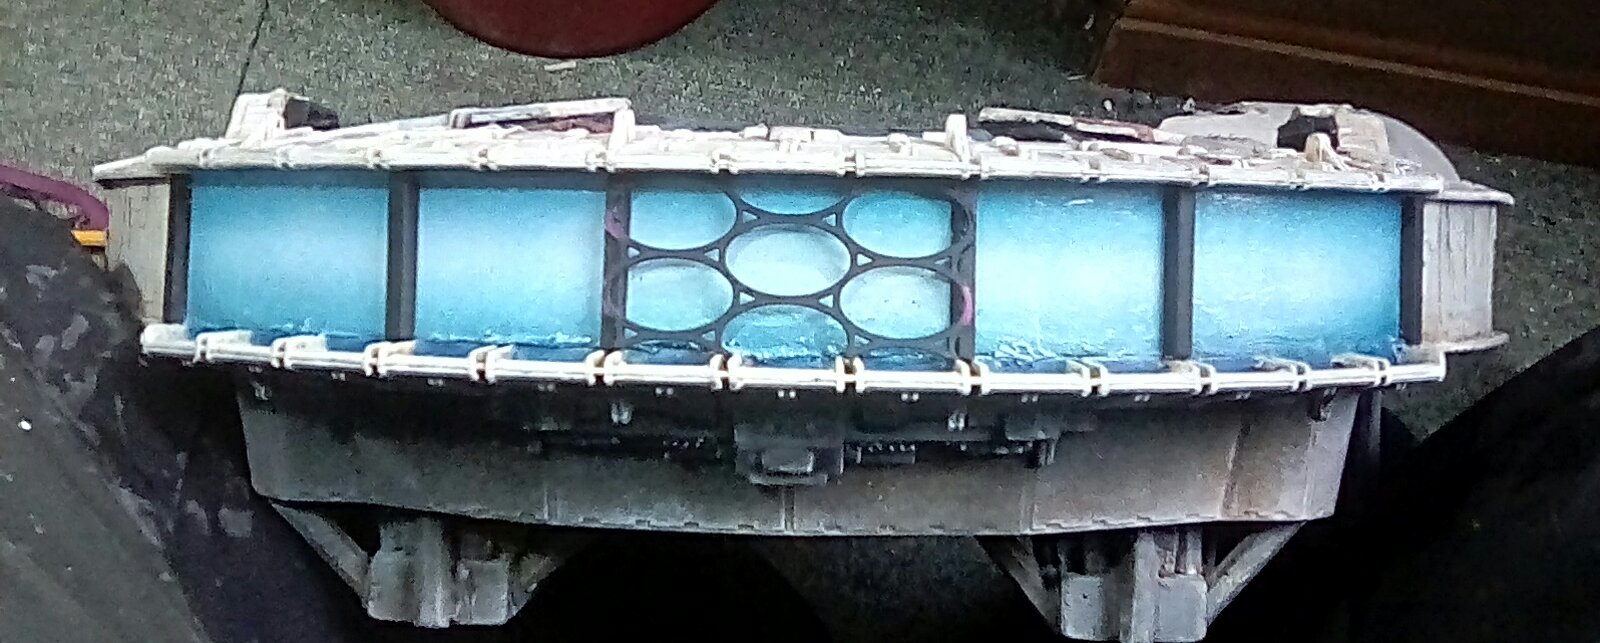
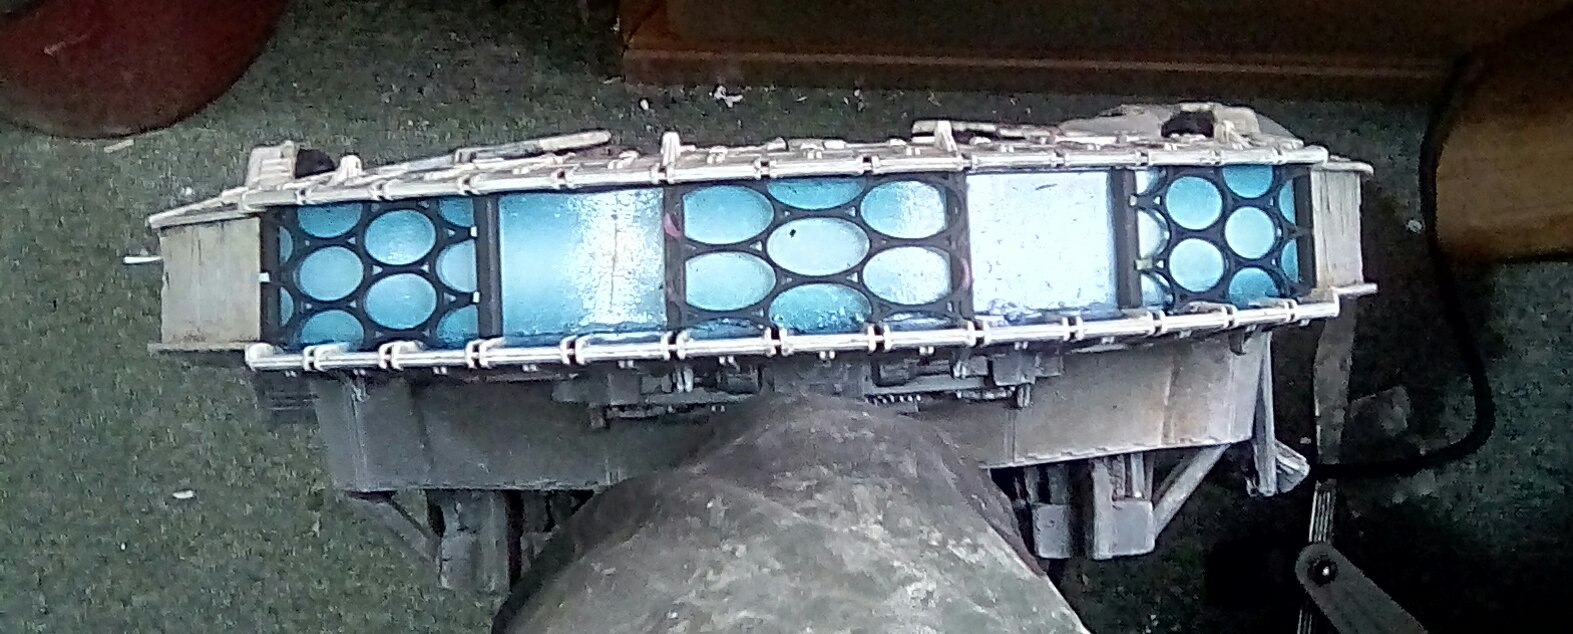
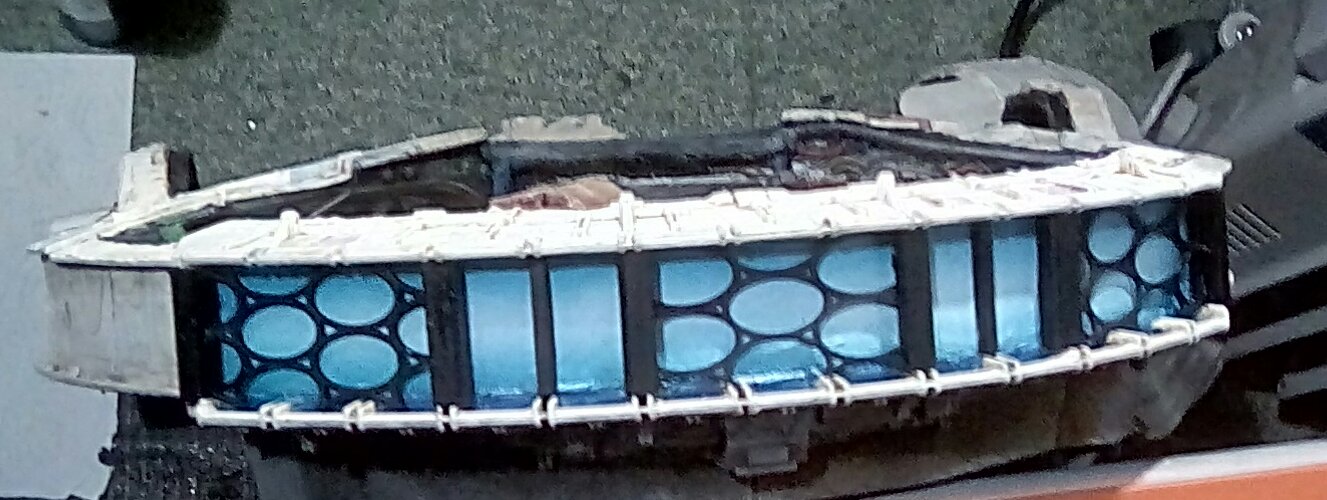
I use more of the prices cut from the sides of the dehumidifier tub tops to wrap around the sprue struts – this ensures that the mesh cannot come loose over time.
I’m pretty happy with the look of the rear engines now, and will move into doing the internal floors next.
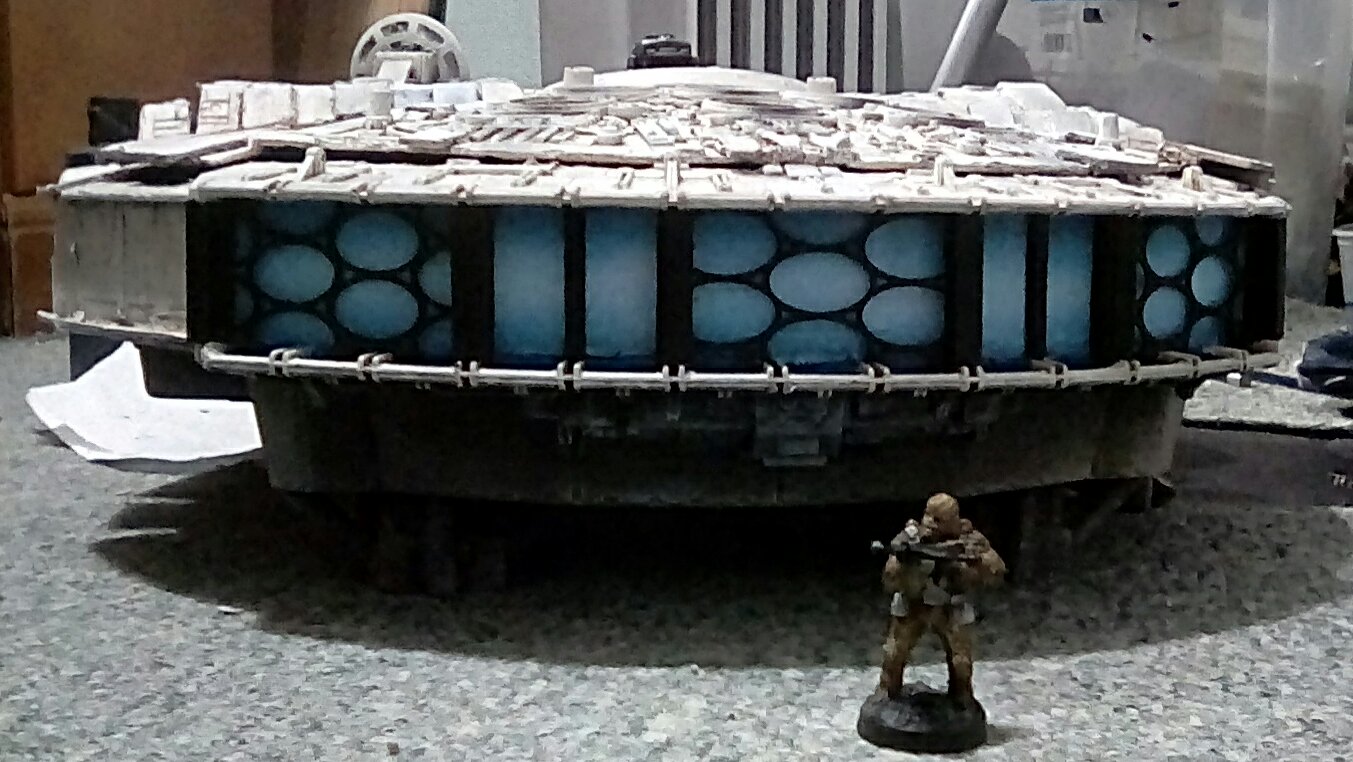
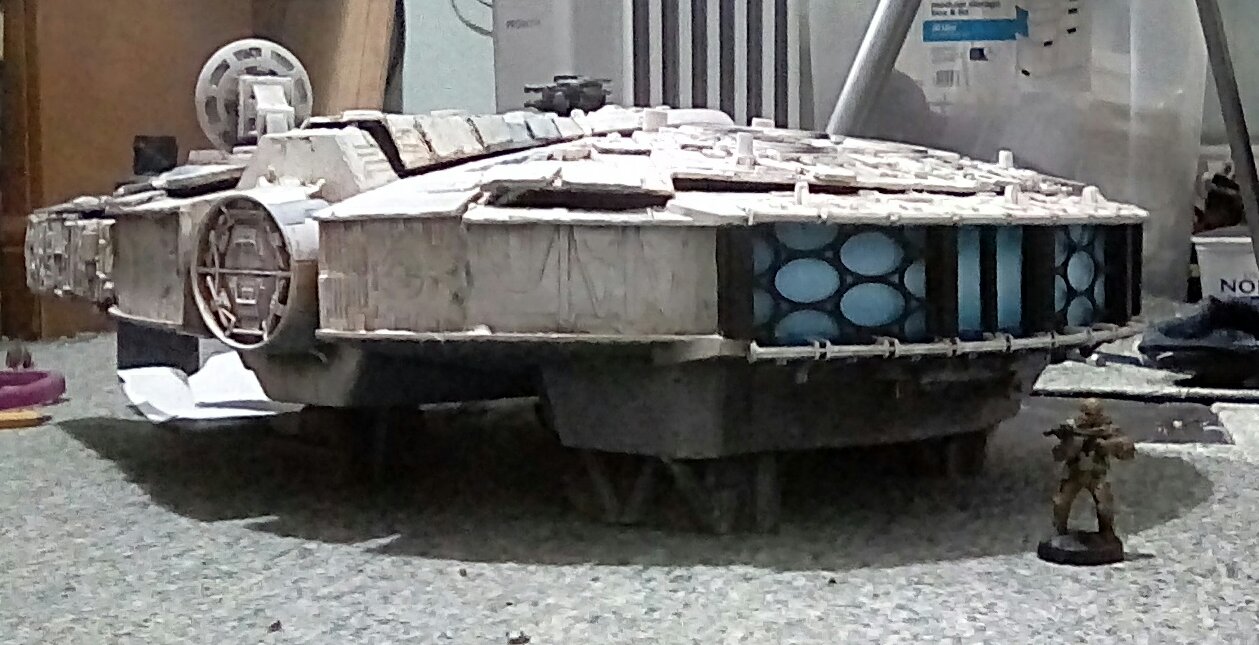
Start your engines....
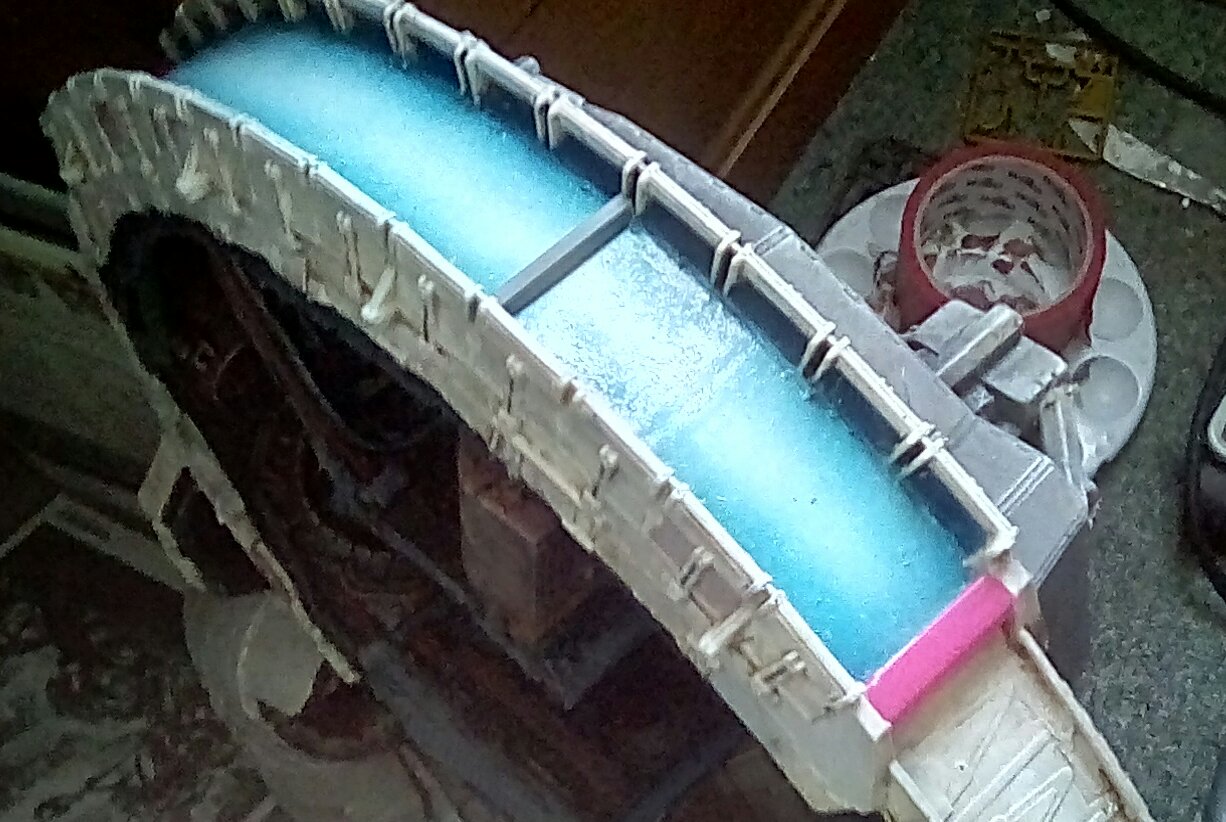
Although my Millenium Falcon is landed with it’s feet and ramp down, I have decided to paint the back of the ship to show the engines fired up – may be the engine is being turned over prior to take off! The engines are normally shown as blue (except in Bespin, where they glow pink for some reason) so I planned to use my airbrush to create the graduated blue flash going to near white in the centre.
 The paints I used for the engine glow
 OMasking tape is used to protect the already painted hull.
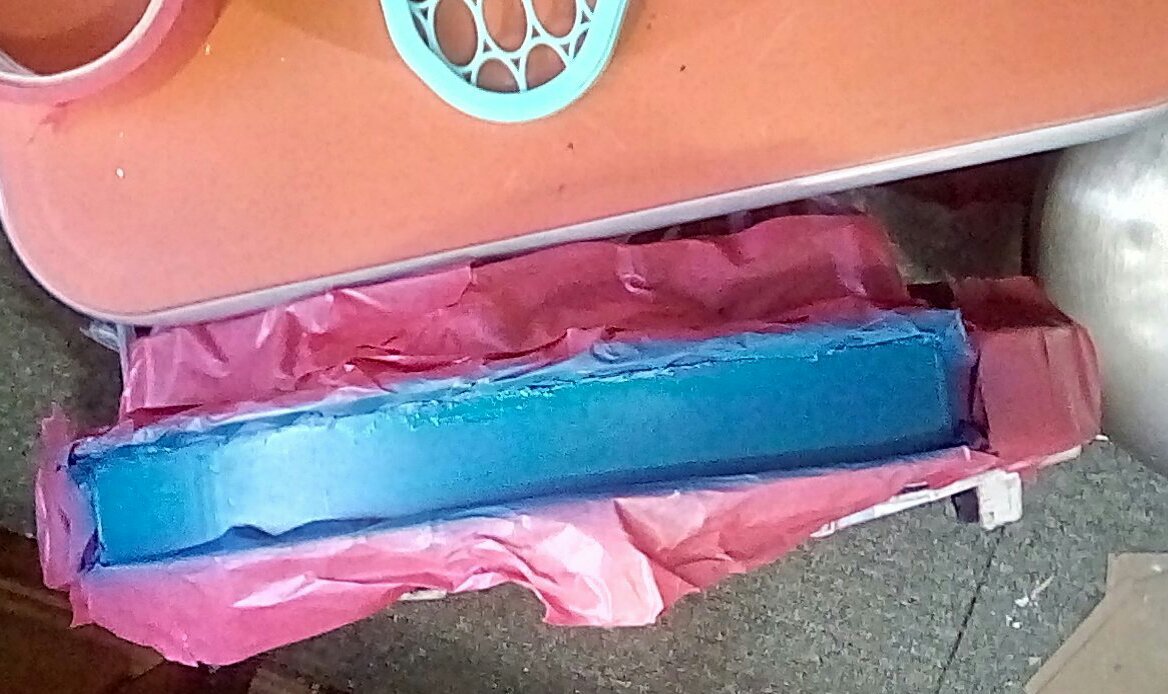
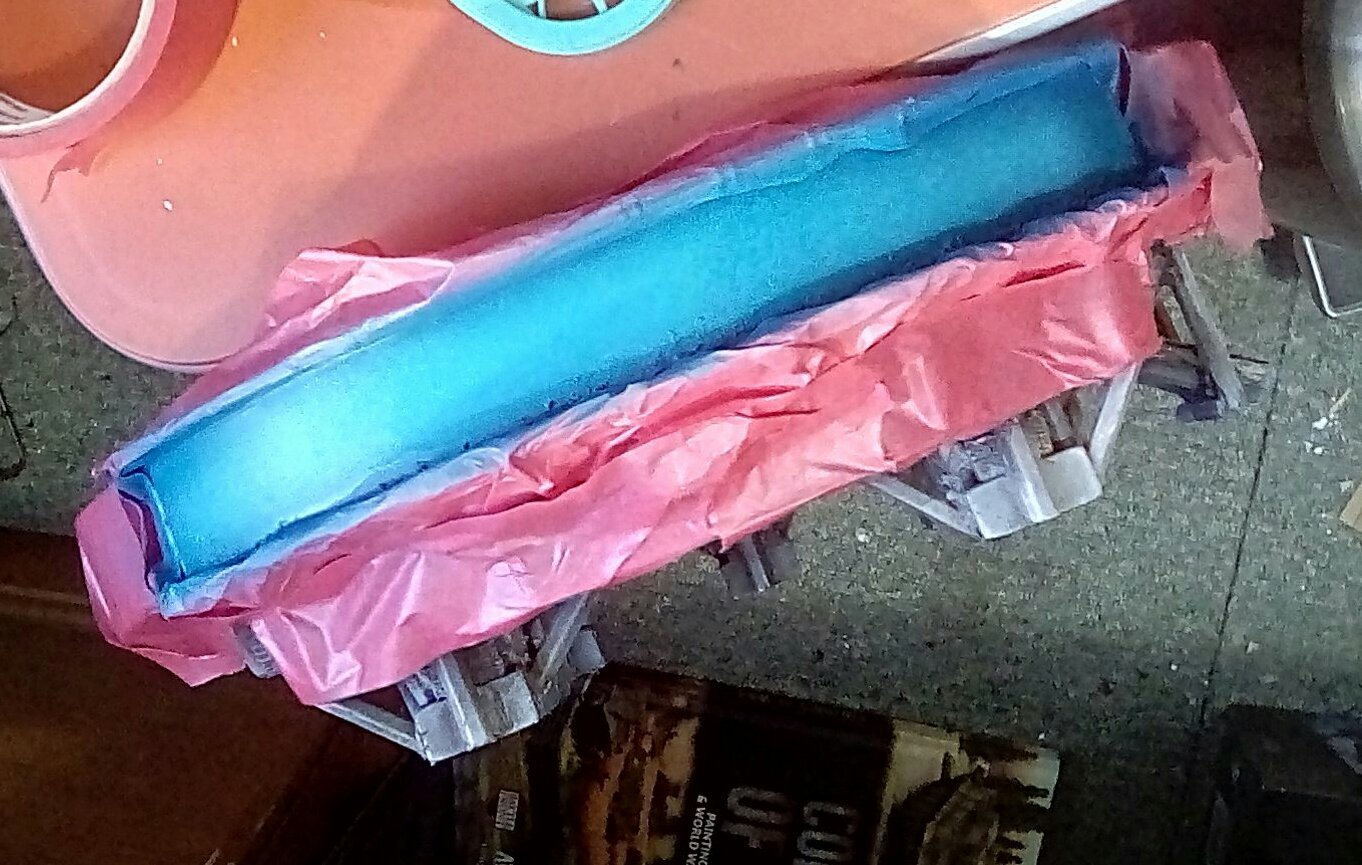

 Initially all looked well....
 Blue paint had leaked under the masking tape
I had a few problems with the palest ice blue and white paints. They were both very thick paints, and I had to use a lot of thinner to get them to go through my airbrush. They were so thin that instead of staying where sprayed unknown to me they ran down the sides of the painted hull.
this is not that major a problem – there are few problems with paint that cannot be rectified with a bit more paint.
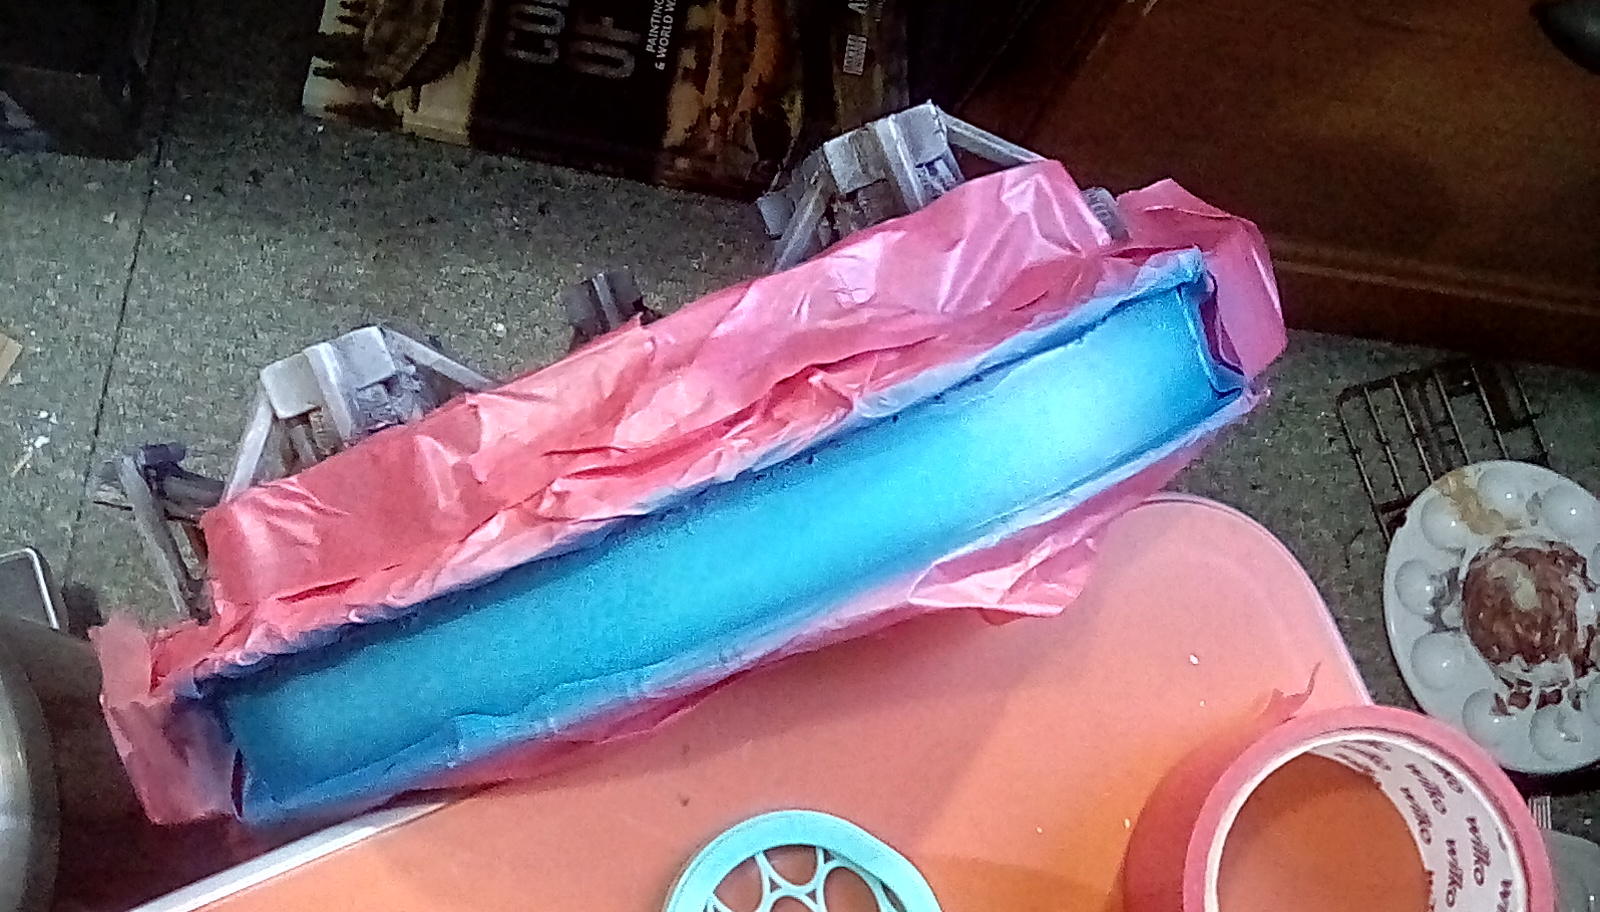
To finish the blue engine glow I stippled on the central white stripe with a brush, then once this had dried went over the edges of the white with an electric blue airbrushed paint layer to graduate the white edges. To get rid of the blue streaks on the hull I used chocolate brown (as it covers well on first coat) then once it was dry merged this into the existing paintwork on the hull with a light drybrushing of bone white, followed by a lighter drybrushing of off white on raised edges that would catch the light. I also added a brown shadow to the underside of the rear engine flaps. Problem solved.

 The final engine glow.
As a precaution against further mishaps I have given the engine glow a quick thin coat of yacht varnish, which will also give it a nice glossy sheen as well as protecting the paint.I
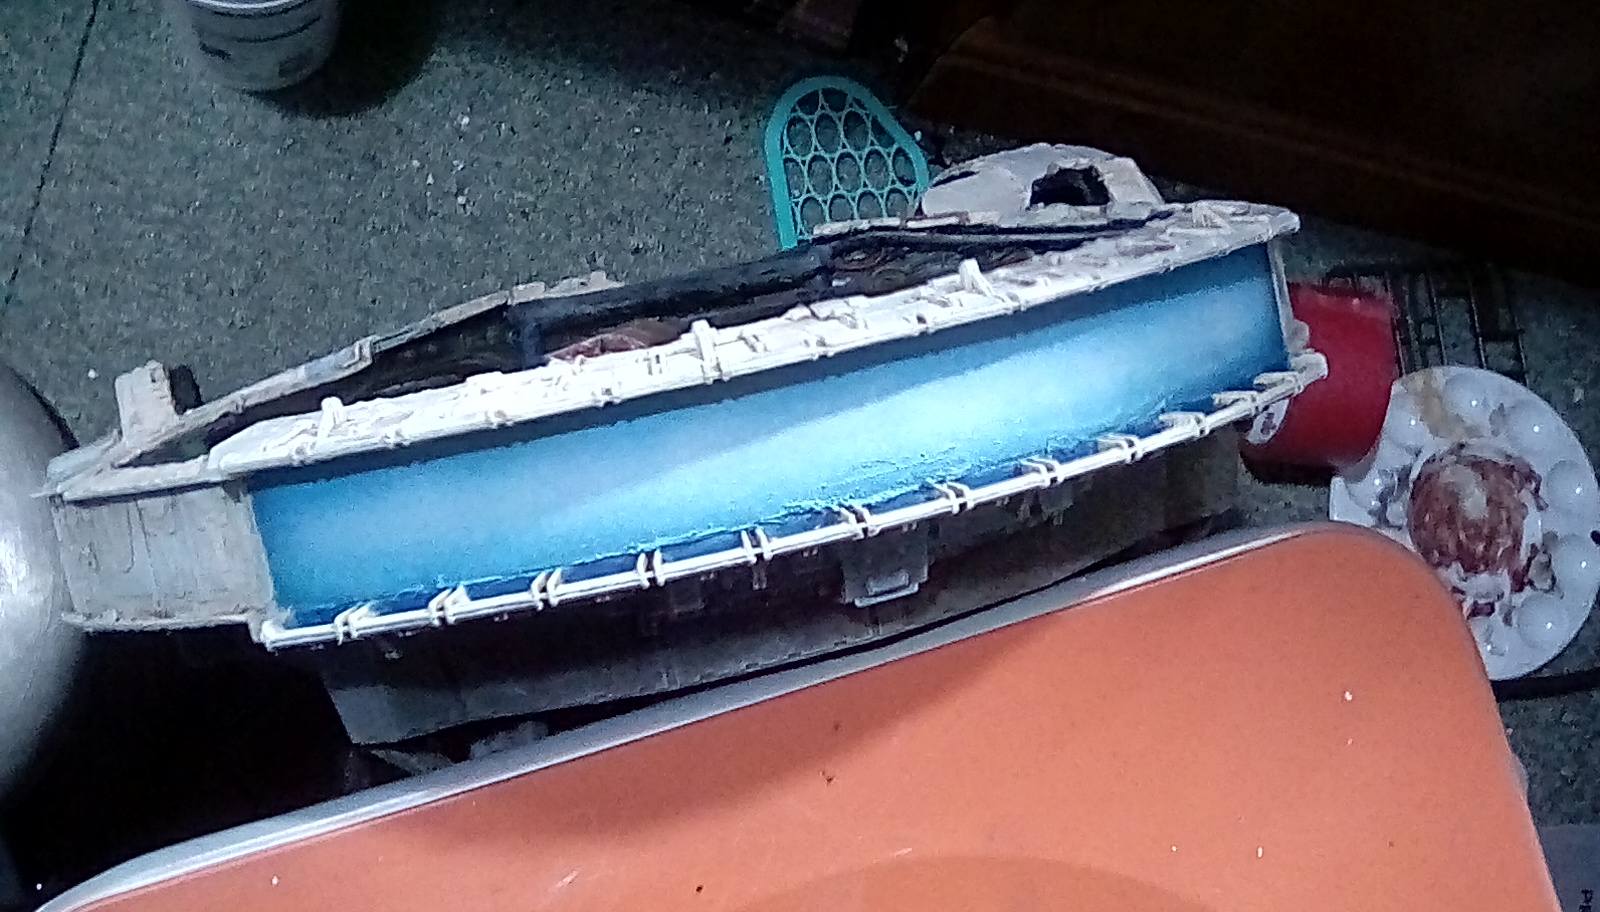
Once the varnish is dry I will be able to make the covering mesh that should finish the engines off nicely.
Yet more painting on the top hull
This is really the end of the previous entry, seems there is a limit to how much content can go in one entry and I must have reached the limit.
Anyway, after using a grey wash on the top hull yesterday, today I tidied it up and got rid of the inevitable tide marks. I use an off white to dull down any strident colours that are too vivid and add edge highlighting where I think any sharp edges would catch the light. When painting individual panels on the hill instead of adding solid.blocks of colour I blend outwards from.one corner to graduate the original colour. It is important to repeat this process in the sides of the ship so the whole ship looks uniform, although I let more of the Sepia remain on the front and rear the engines where I think the ship would be dirtier.
By adding the white like this I am still allowing each individual panel to be a slightly different colour, but from a distance the ship looks nearer to the overall colour of the original ship in the films. Probably I will continue tweaking the colours of hull panels whenever I am painting other things.
More painting and details...
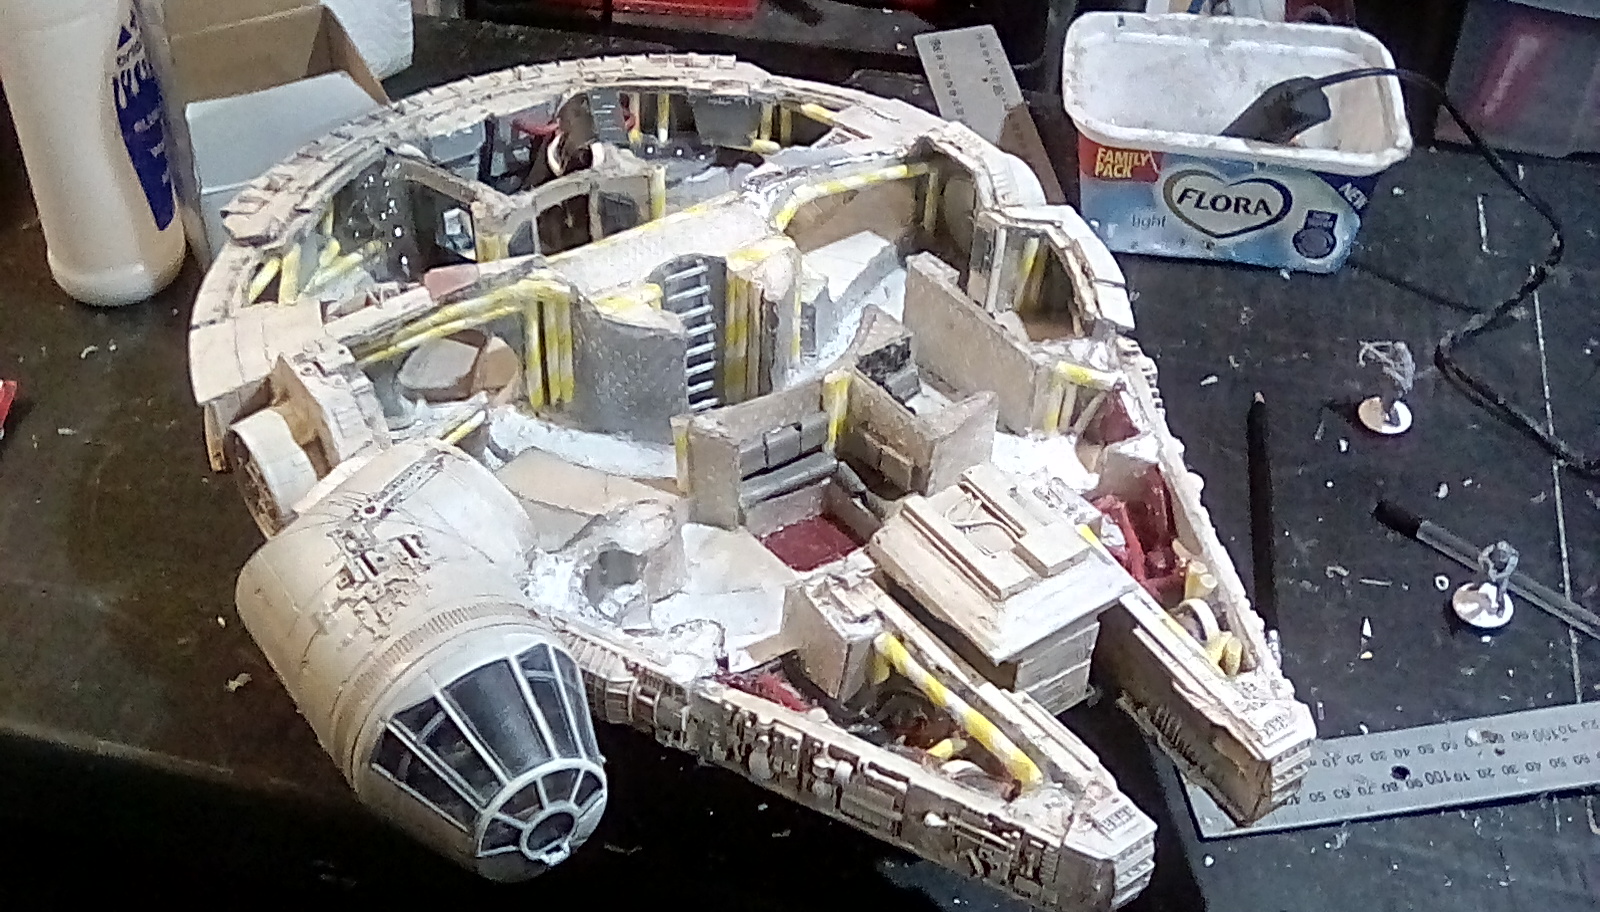
In this update I am going to group together a few little things I had to do to add vital details and correct a few little niggling things that have been bothering me.
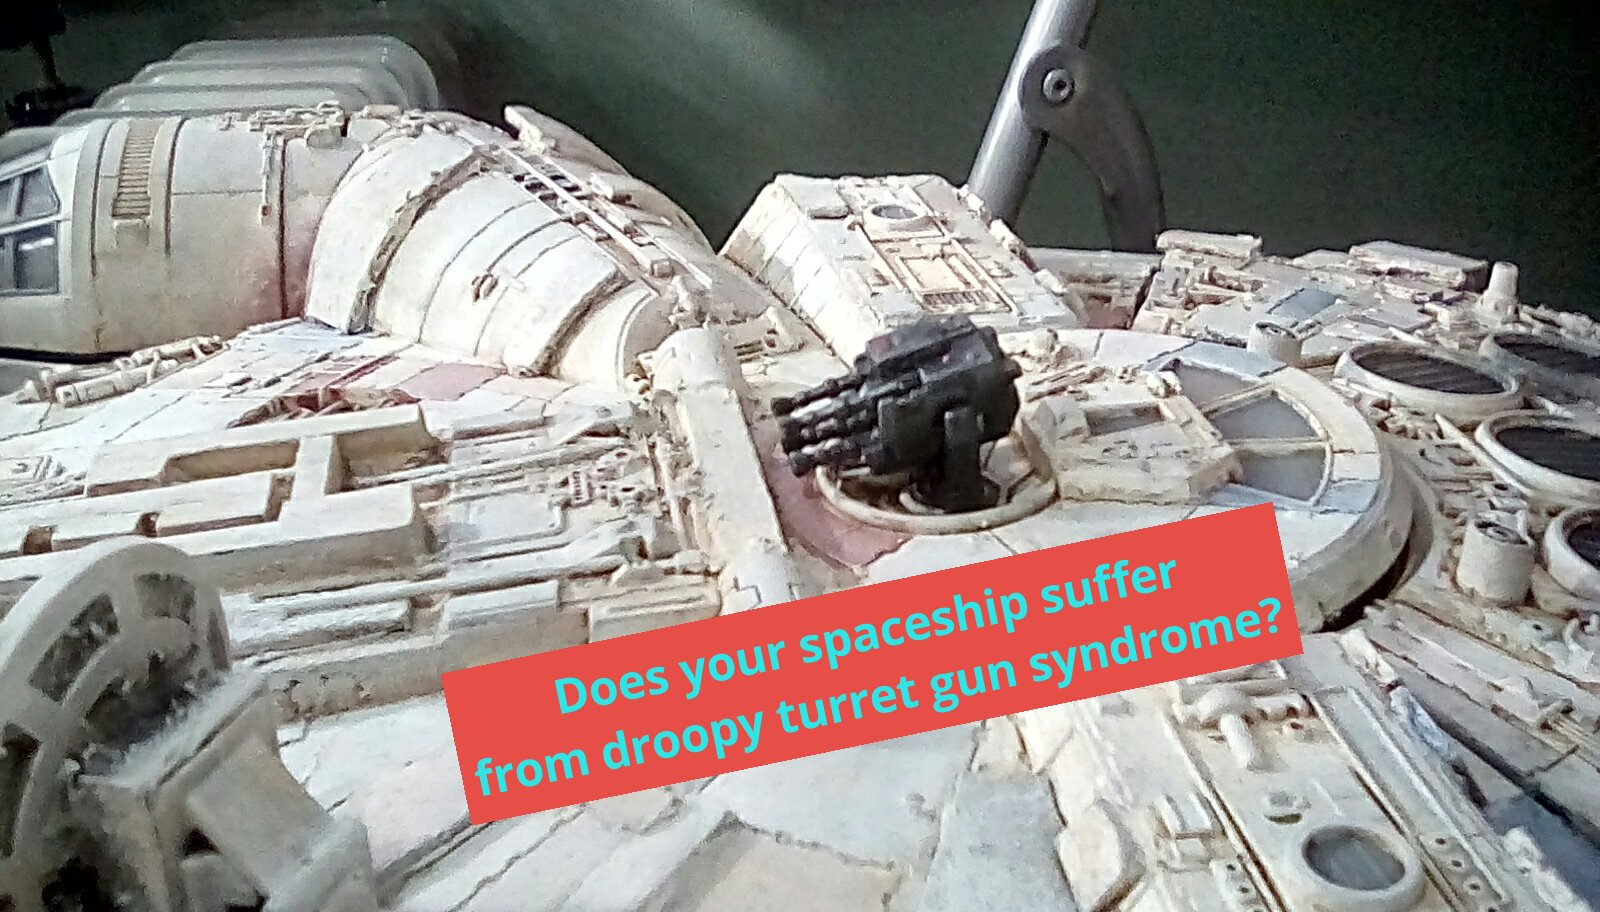
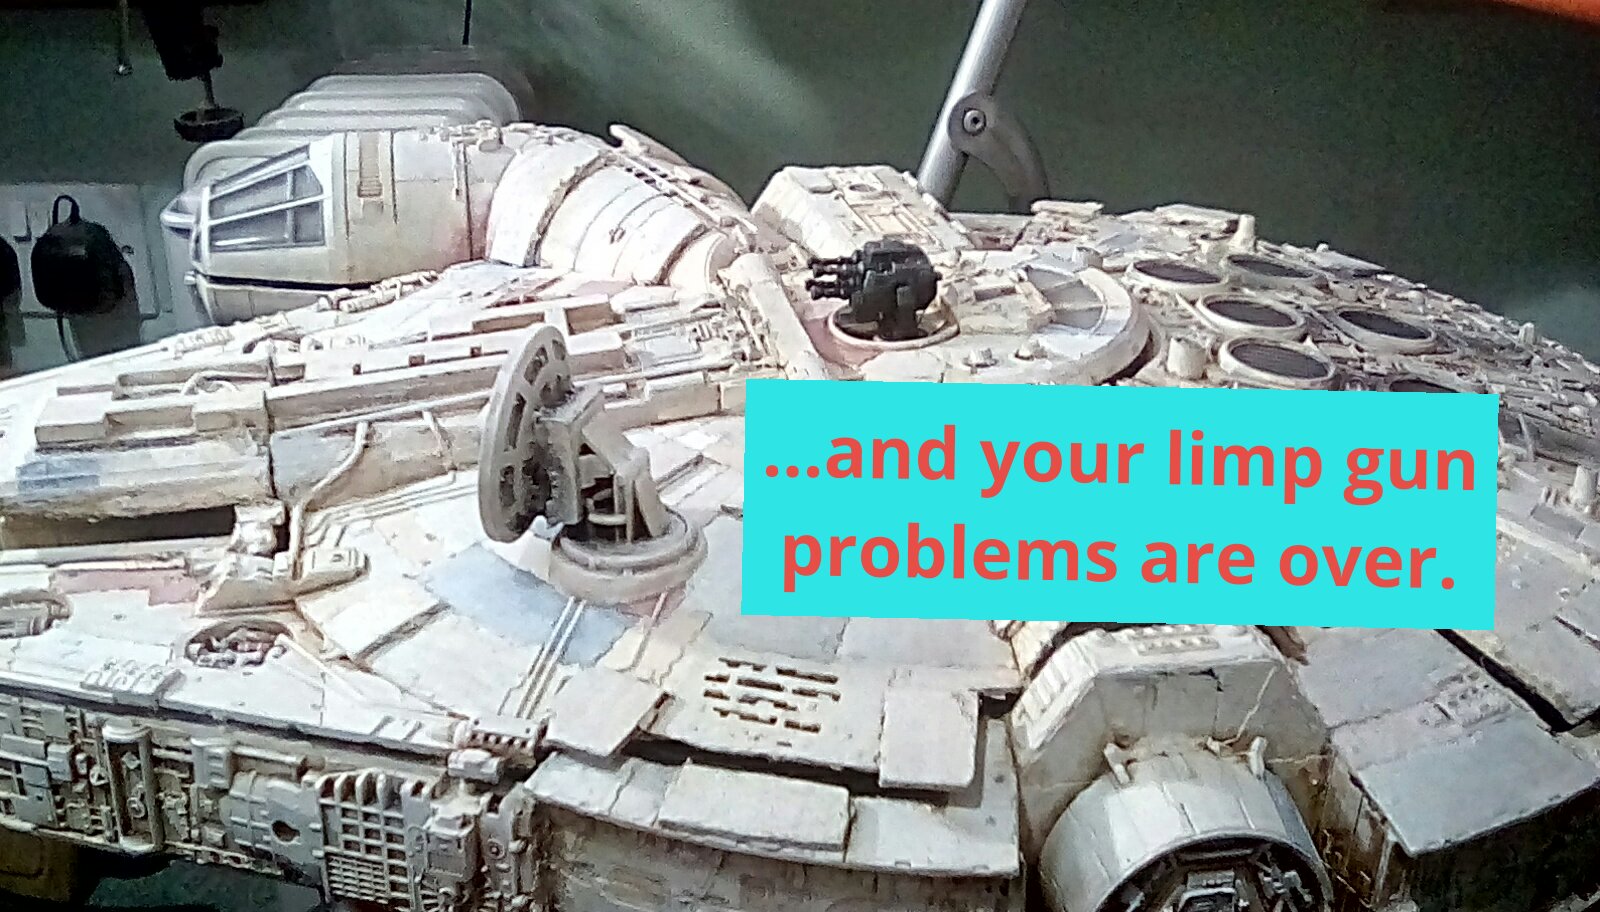
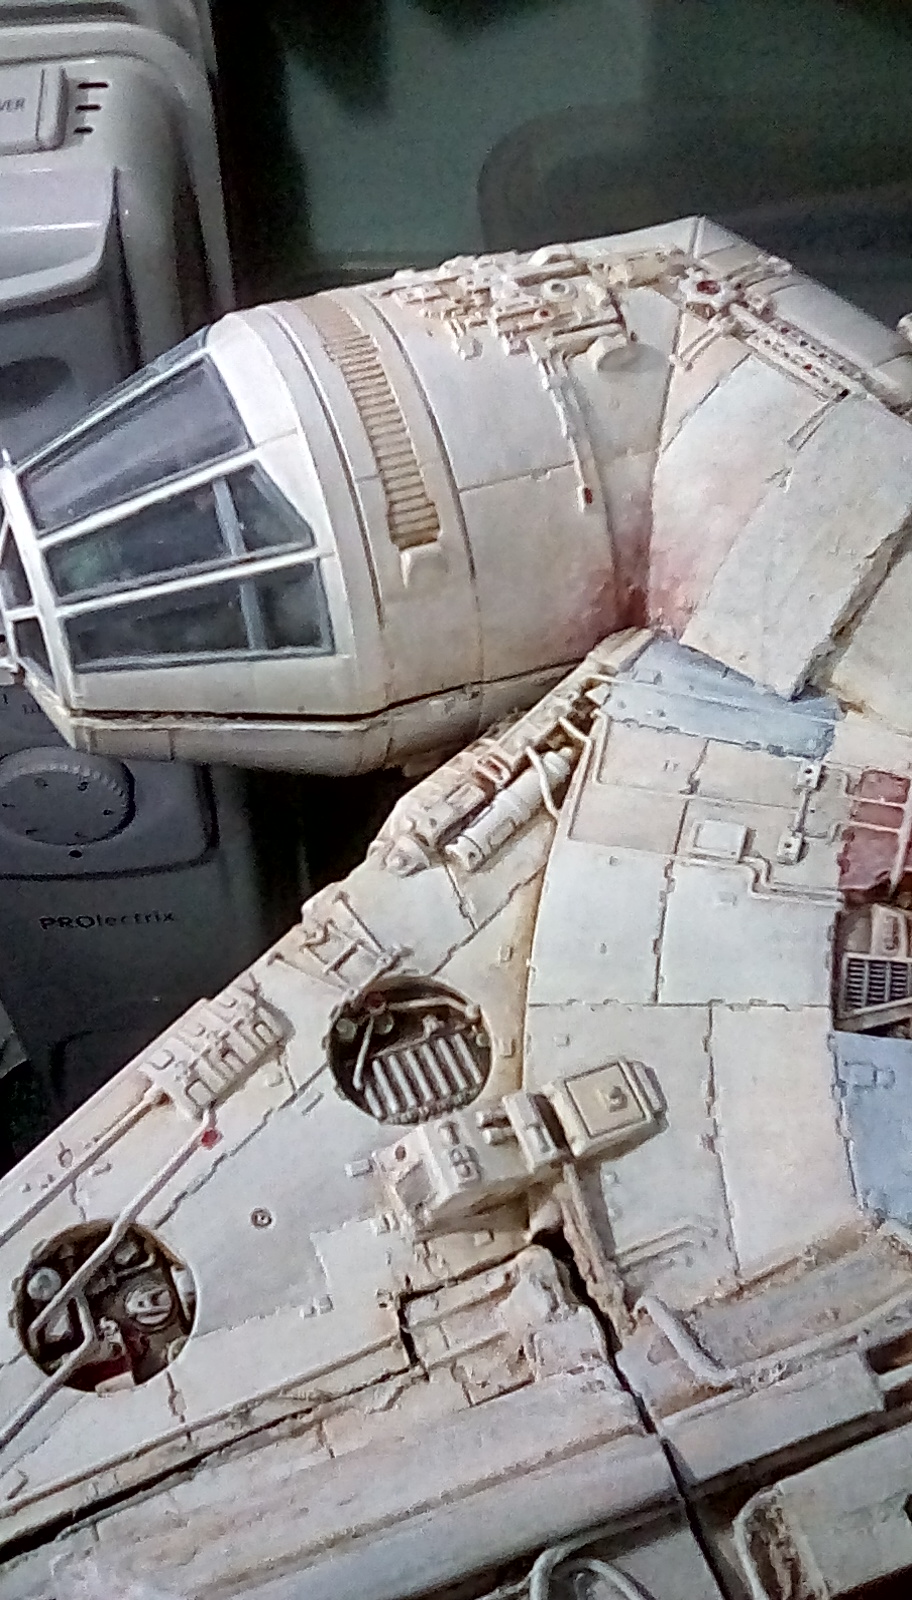
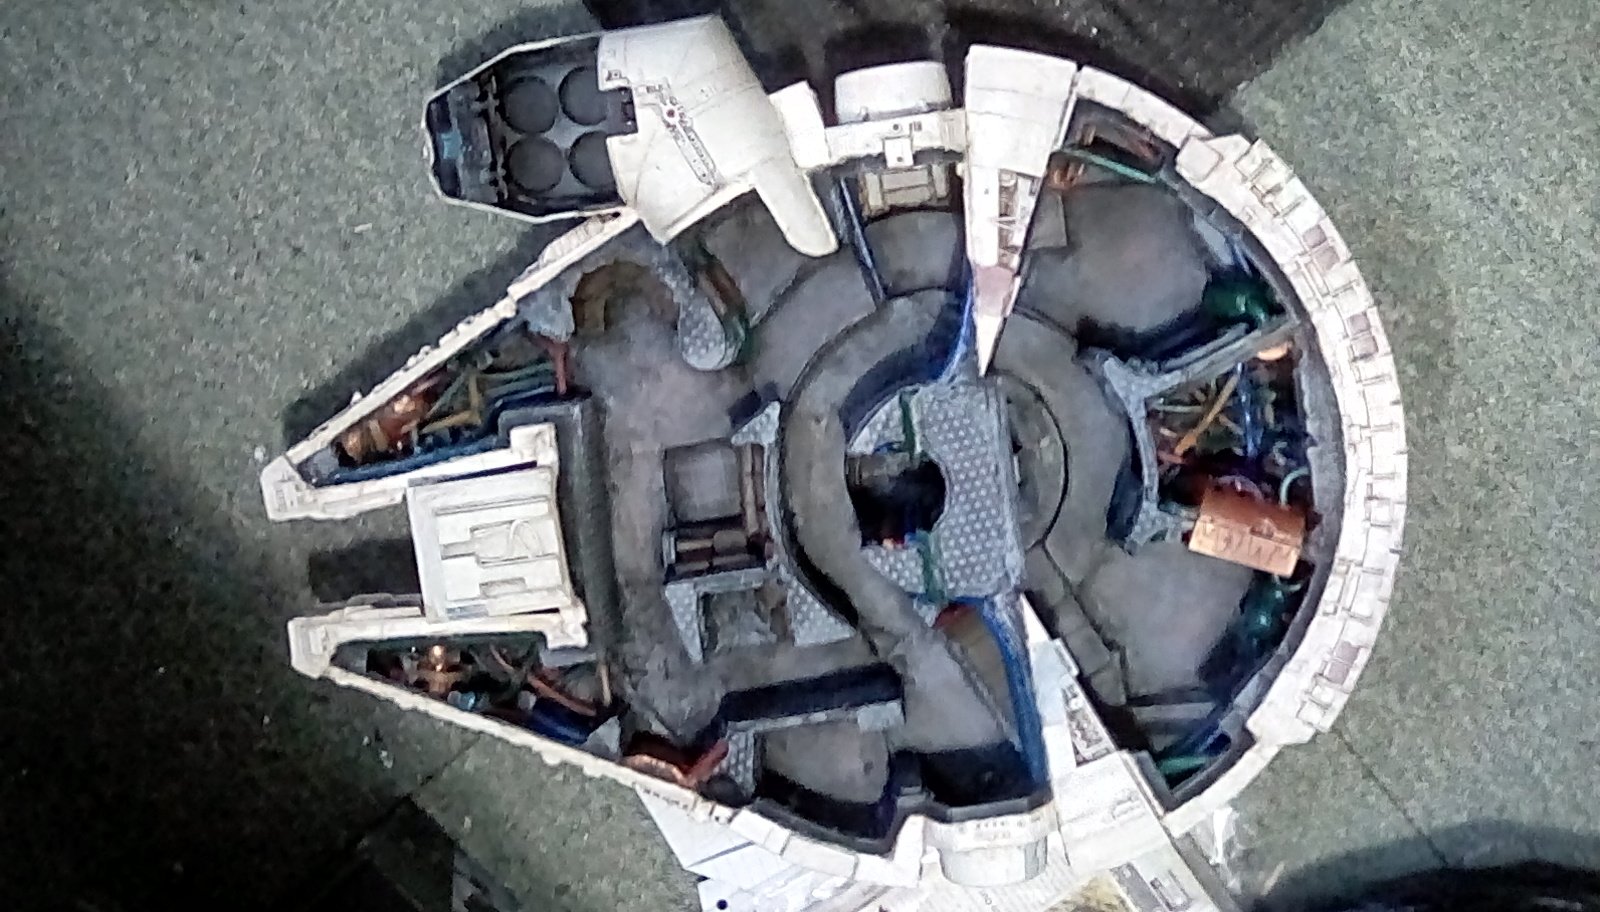
First up is the turret gun. I don’t know if it was a design fault, if my be built top hull is higher than the original was, or if a part is missing, but the turret gun drops too low – shot in that position it would blow a hole in the ship. I simply glue a piece of shaped sprue into place to stop the gun dropping down too low. I could have just glued it into a fixed position, but I quite like the fact the gun can move and wanted to keep that.

I add a bit rust. I don’t want to go too overboard with this, after all this is supposed to be the fastest ship in the galaxy and shouldn’t look like it will drop apart if it goes too fast. But as a neglected and dirty ship inevitably there would be a few bits of rust here and there. I add rust in the inner corner between the cockpit and the main hull (as a man who has had many old second-hand cars, this is surely the spot where rust would appear and make the Falcon eventually fail it’s space MOT). I reason the inner airlock doors might get a lot of condensation on them, so add rust here aswell. I had already plainted the corridor to the turrets and the inner airlock the same base colour as the hull, so they can be seen against the other dark details.
My method for adding rust is to stipple on a rust effect paint (I use valehjo rust air, but applied with a old brush), then once dry stippled over it with the original colour you were covering to feather the edges of the rust. Rinse & repeat until you are happy with how the rust looks.
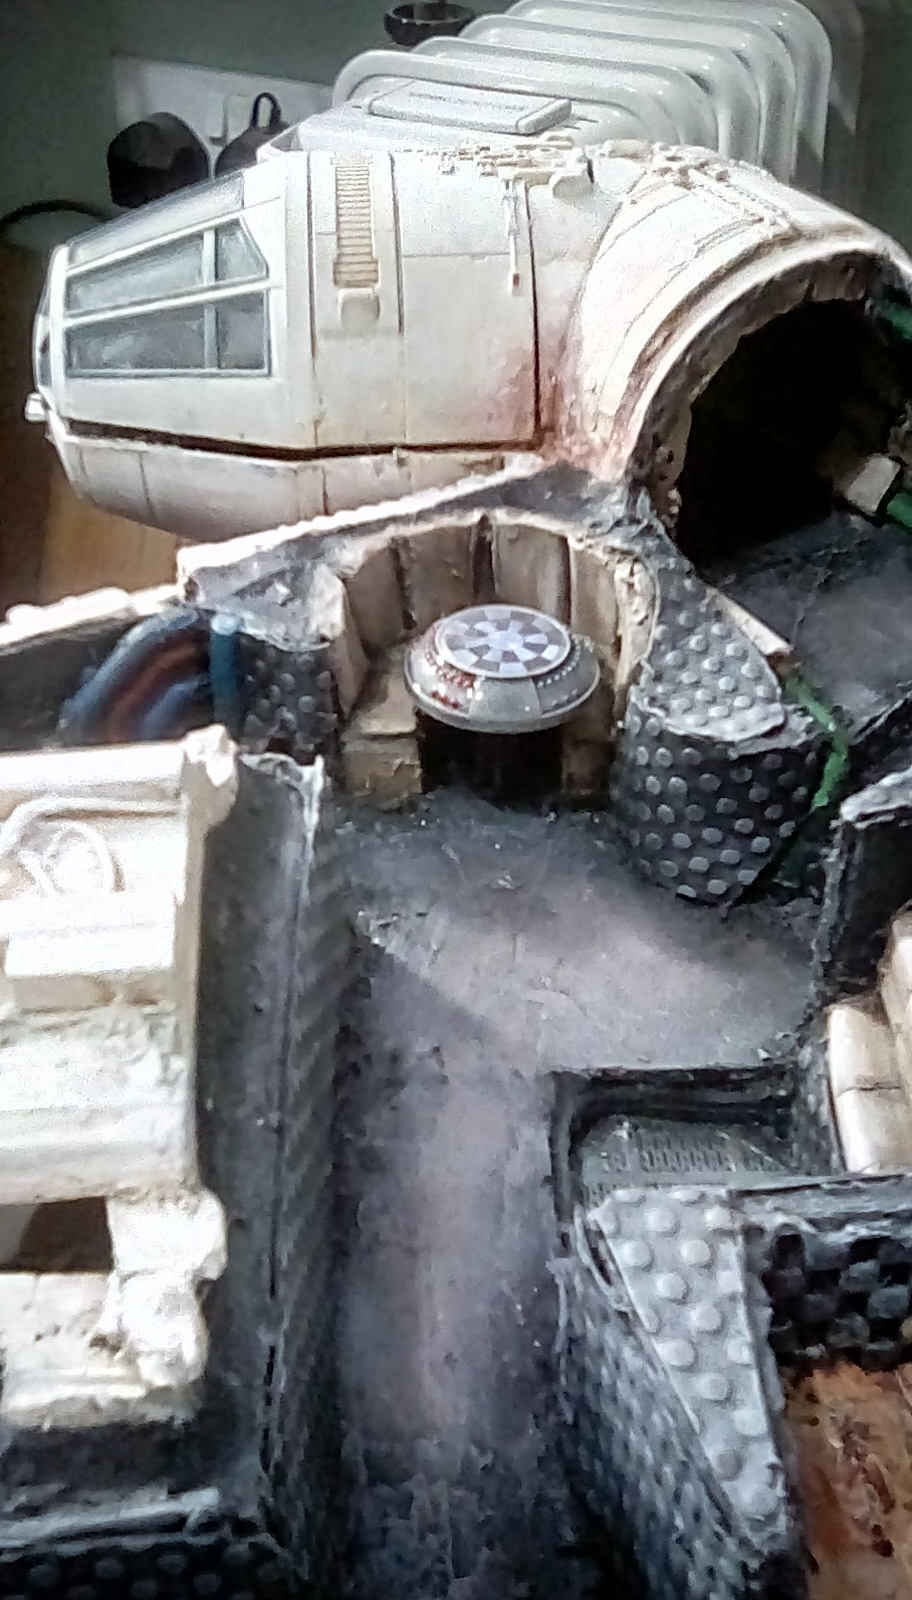
It was very important to me that the ship has Chewie’s halo chess table, and luckily the original toy spaceship still had this part. I cut the base down (so it’s not to scale, but as close as I can get it) and just painted the outer rim. The chequered chess board is the original sticker that I have vanished over to protect. At the moment it is just pinned in place, so I can still remove it while doing the floors later.
The cockpit roof gets some red and green display lights painted on – I paint similar lights in the rest of the ship where there are any molded details showing.
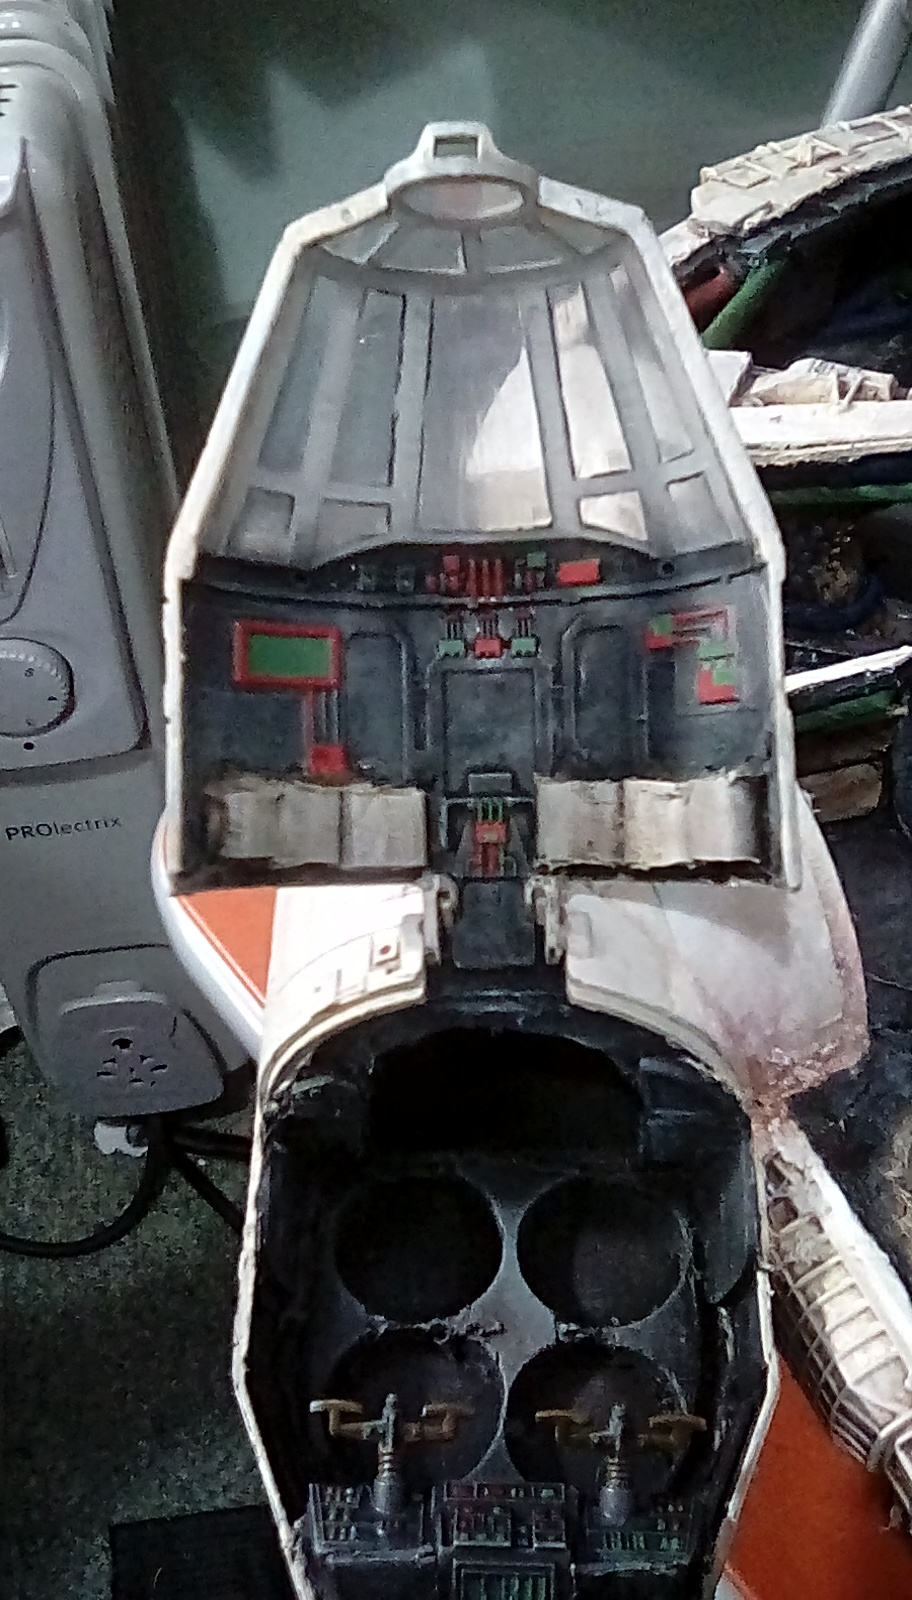
I found a resin ladder I had bought for another project. Although moulded as a fantasy wooden ladder, it looks suitably sci-fi painted black then Drybrushed with gun metal grey. Again, not glued in place yet as I may decide to paint the tube it is in to add more detail, but the dark ladder stands out well against the light background, which is more reminiscent of the film than my original colours where.
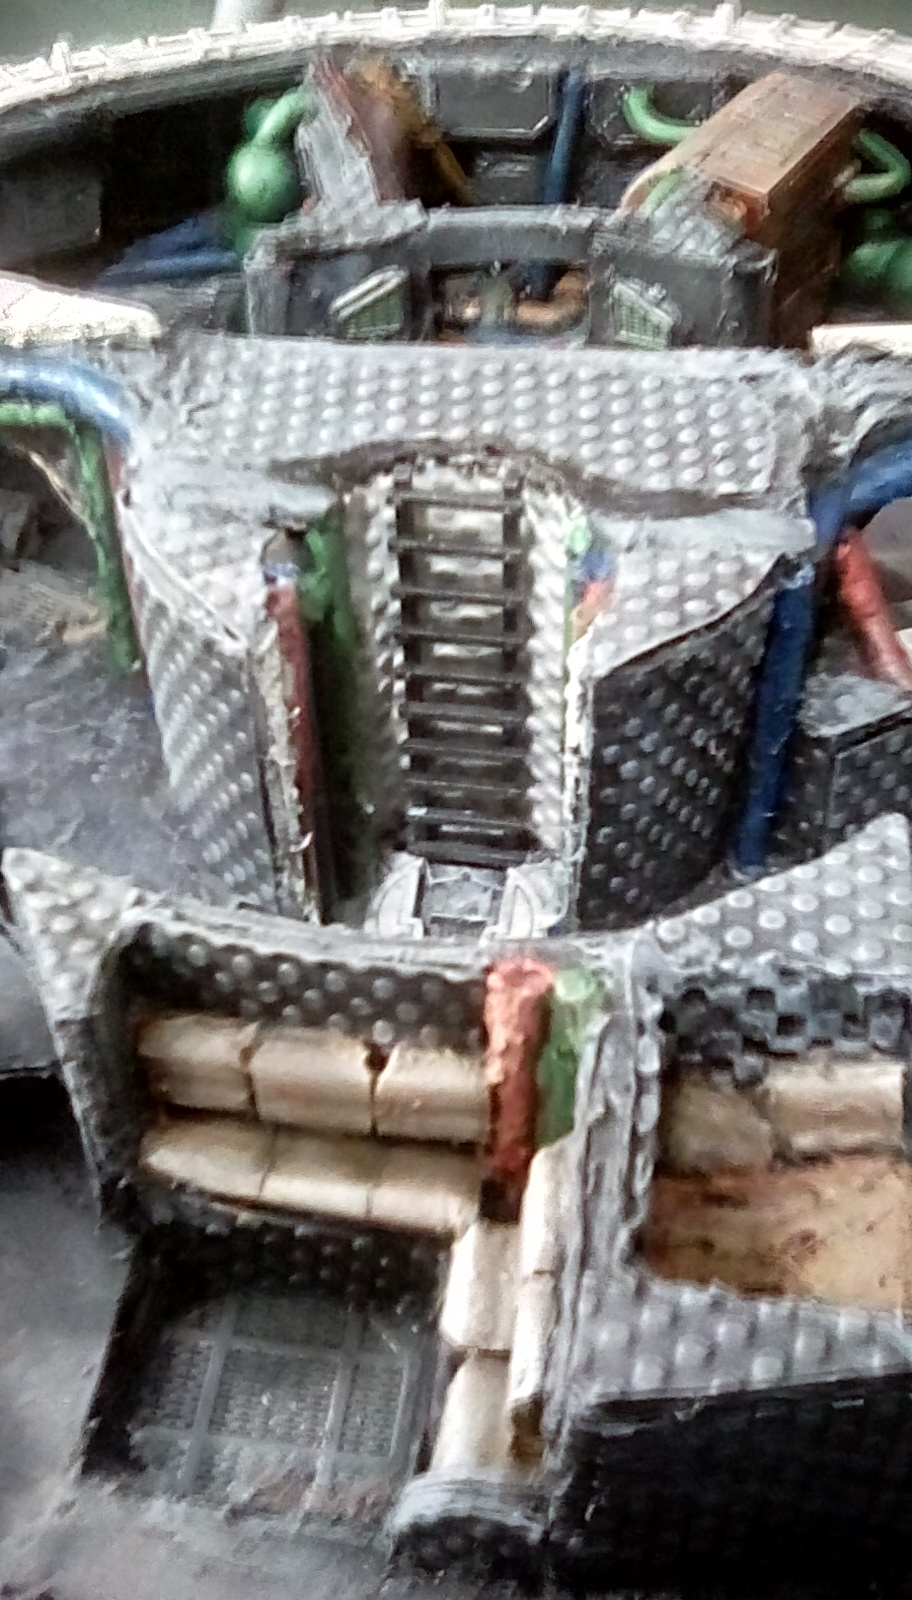
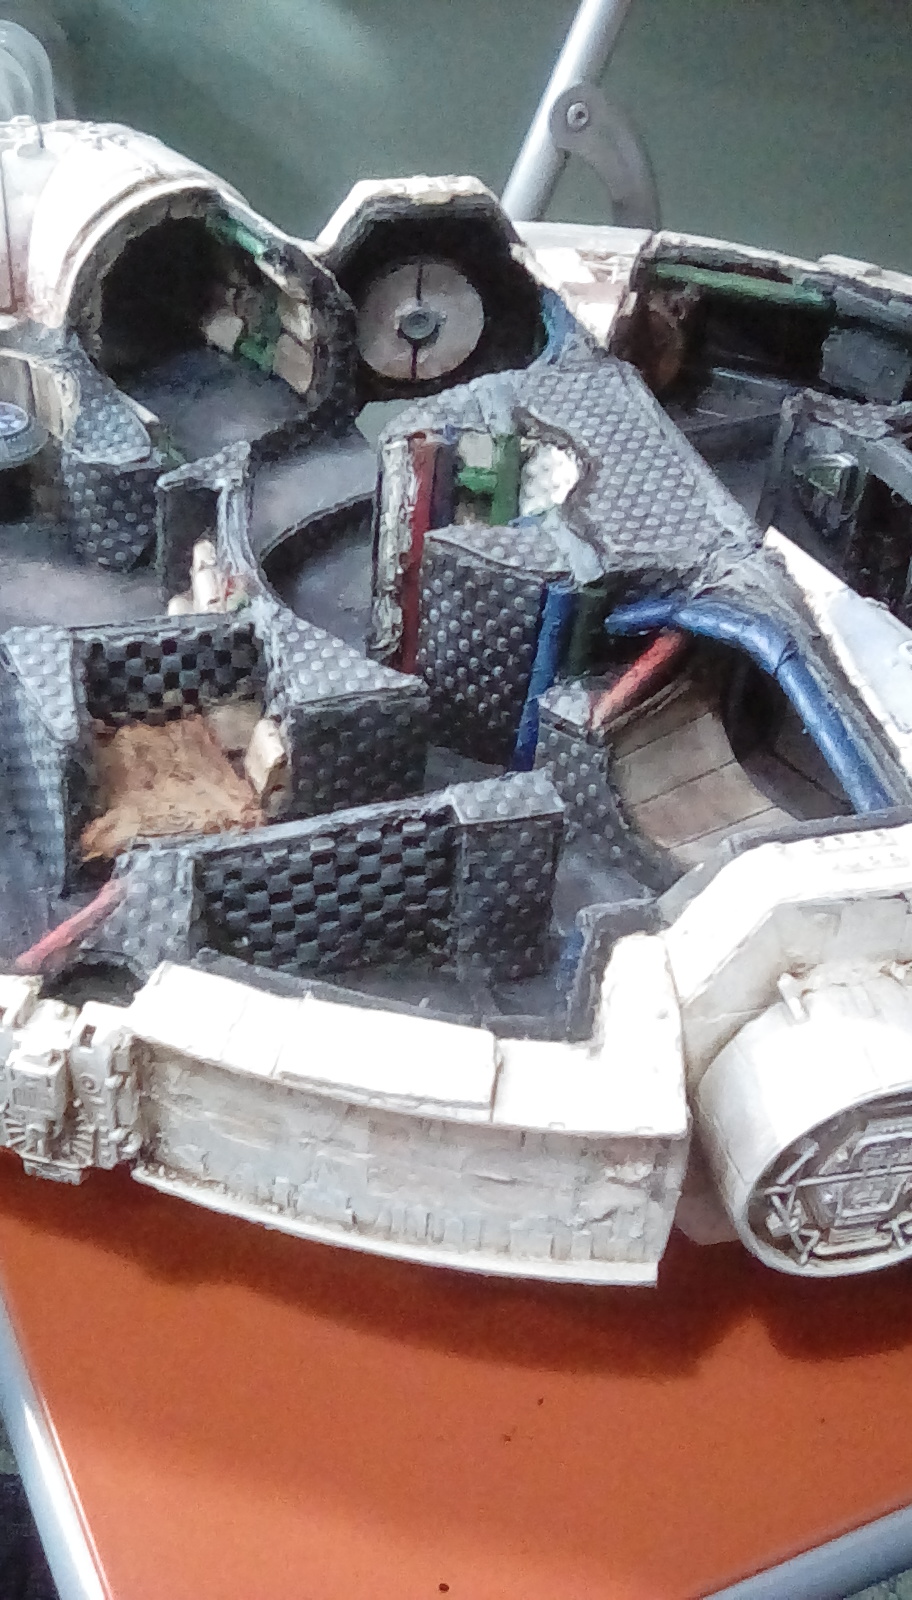
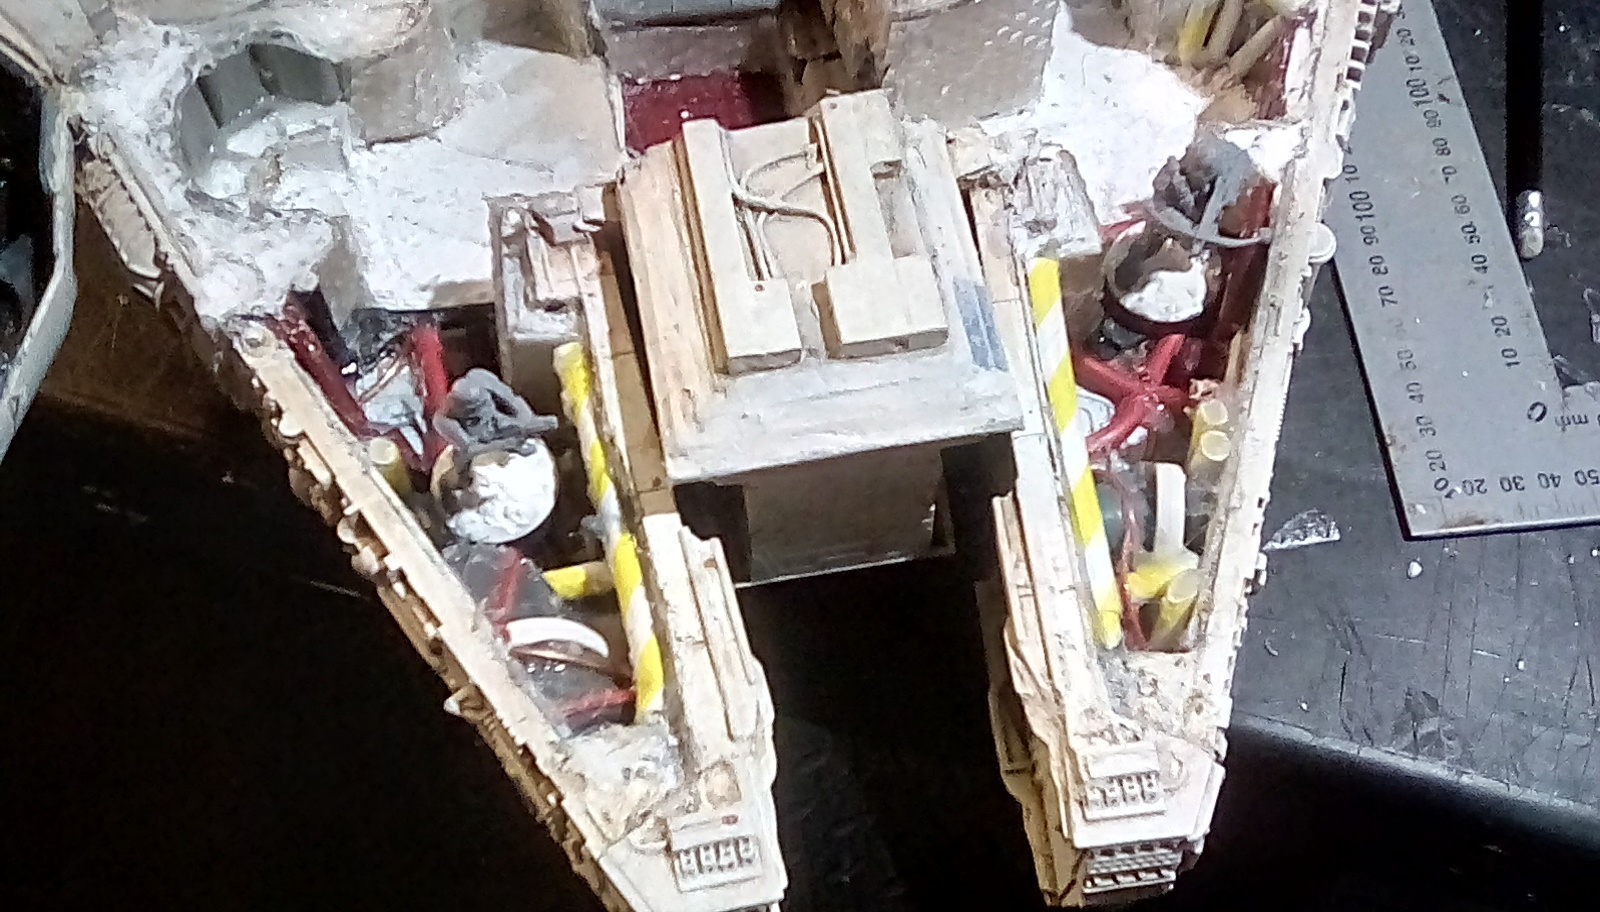
Having dulled down the bright pipes and wiring yesterday, I highlight their top edges today so they stand out against the darker walls and corridors. This may seem like a waste of time, but now the pipes have some shadow and look grimy on their undersides, while giving me that almost cartoon look of a cut-away diagram of a spaceship that I have decided I want. I’m not building a realistic diorama but a fun wargaming peice, so people have to be able to tell from a distance what each area of the ship is – without re-highlighting the pipes they just merged too much into the background. I also drybrushing surfaces that are supposed to be metal with gun metal grey – this is a vallejo paint that gives a darker finish than the natural steel I normally use.

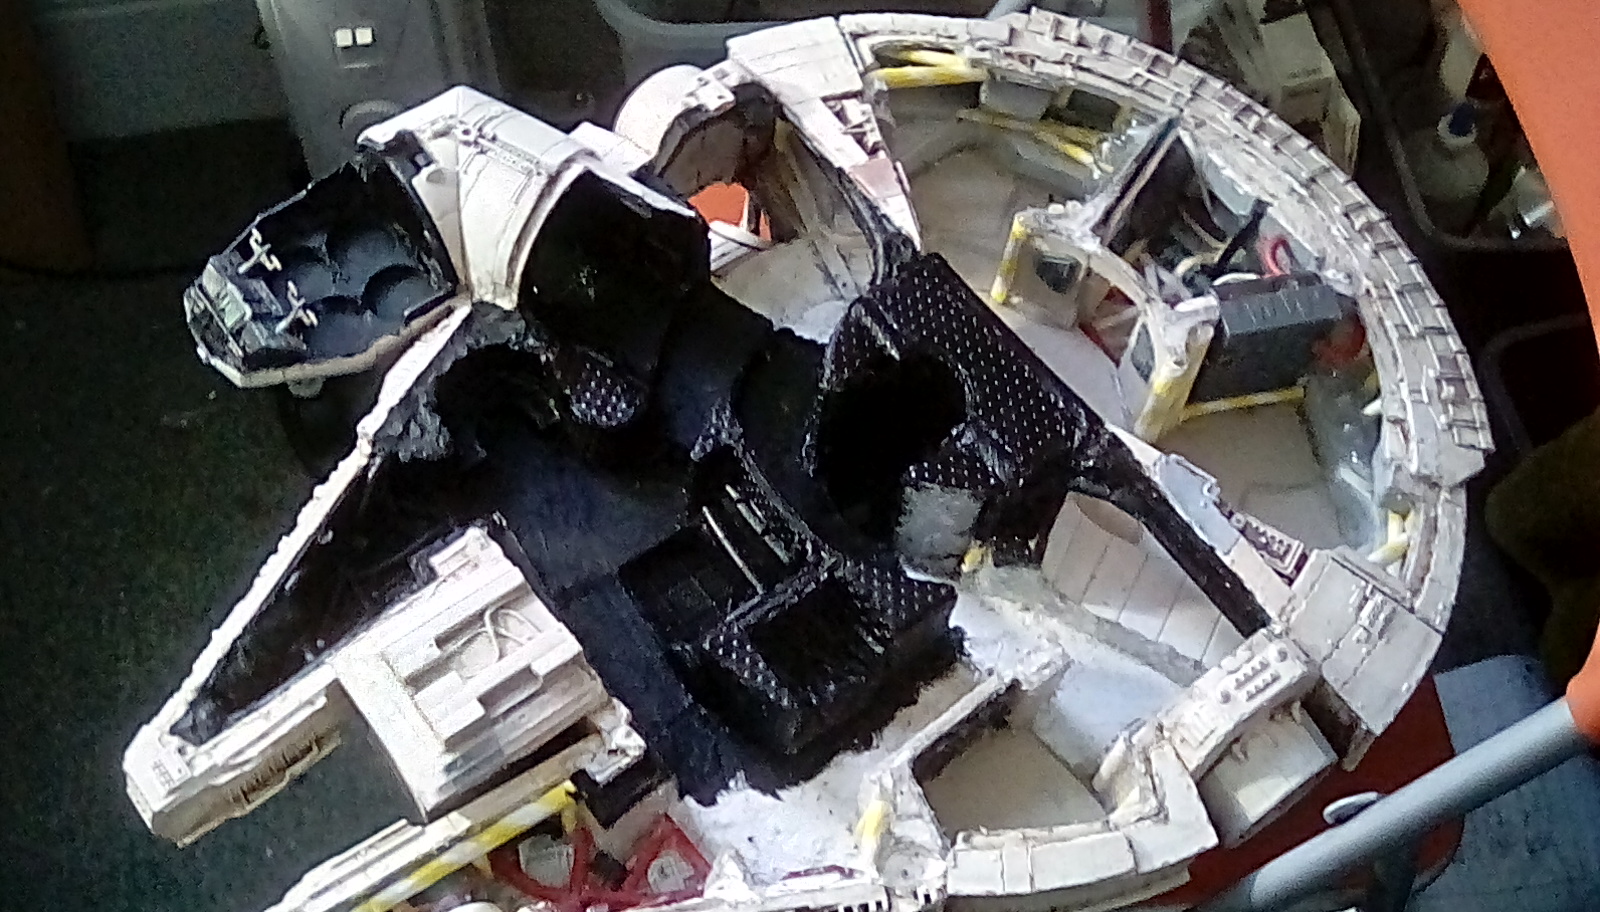
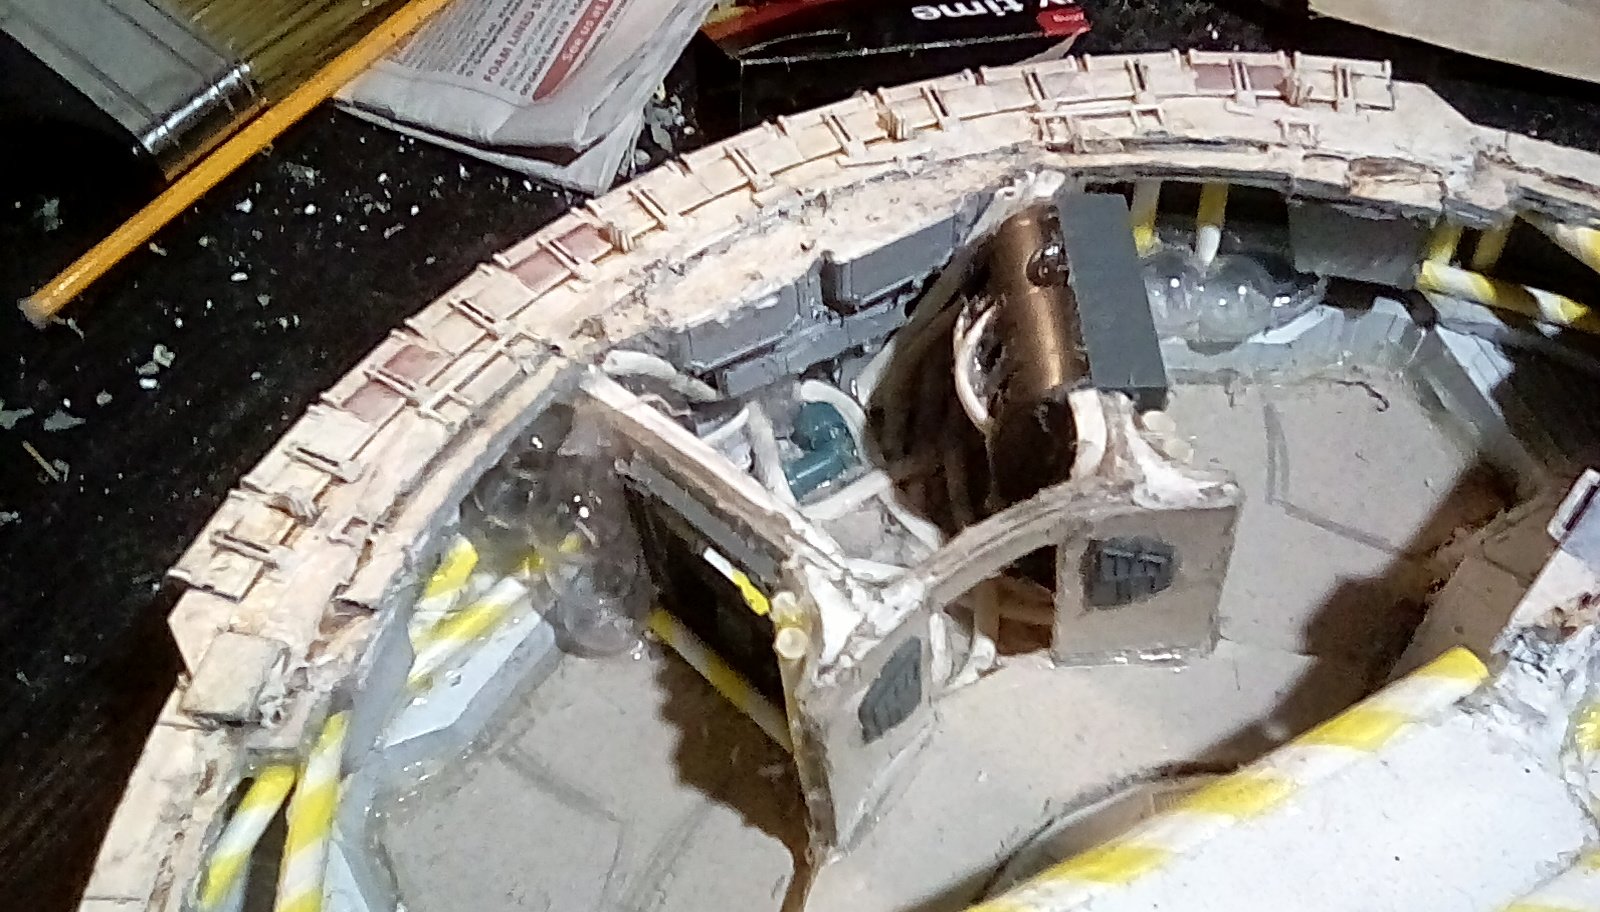
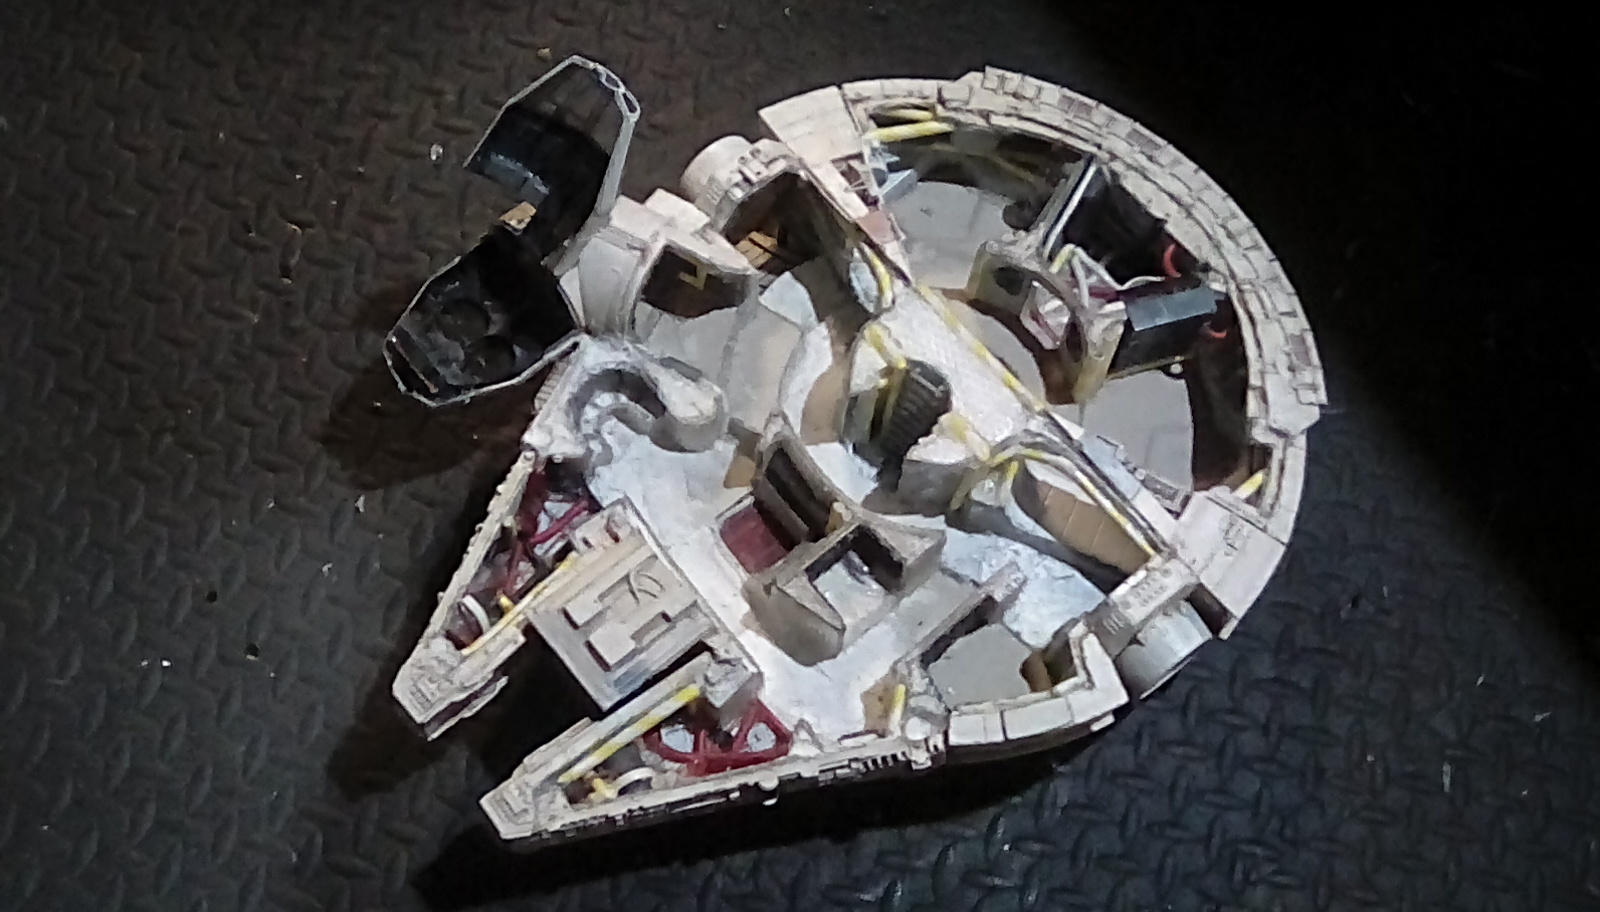
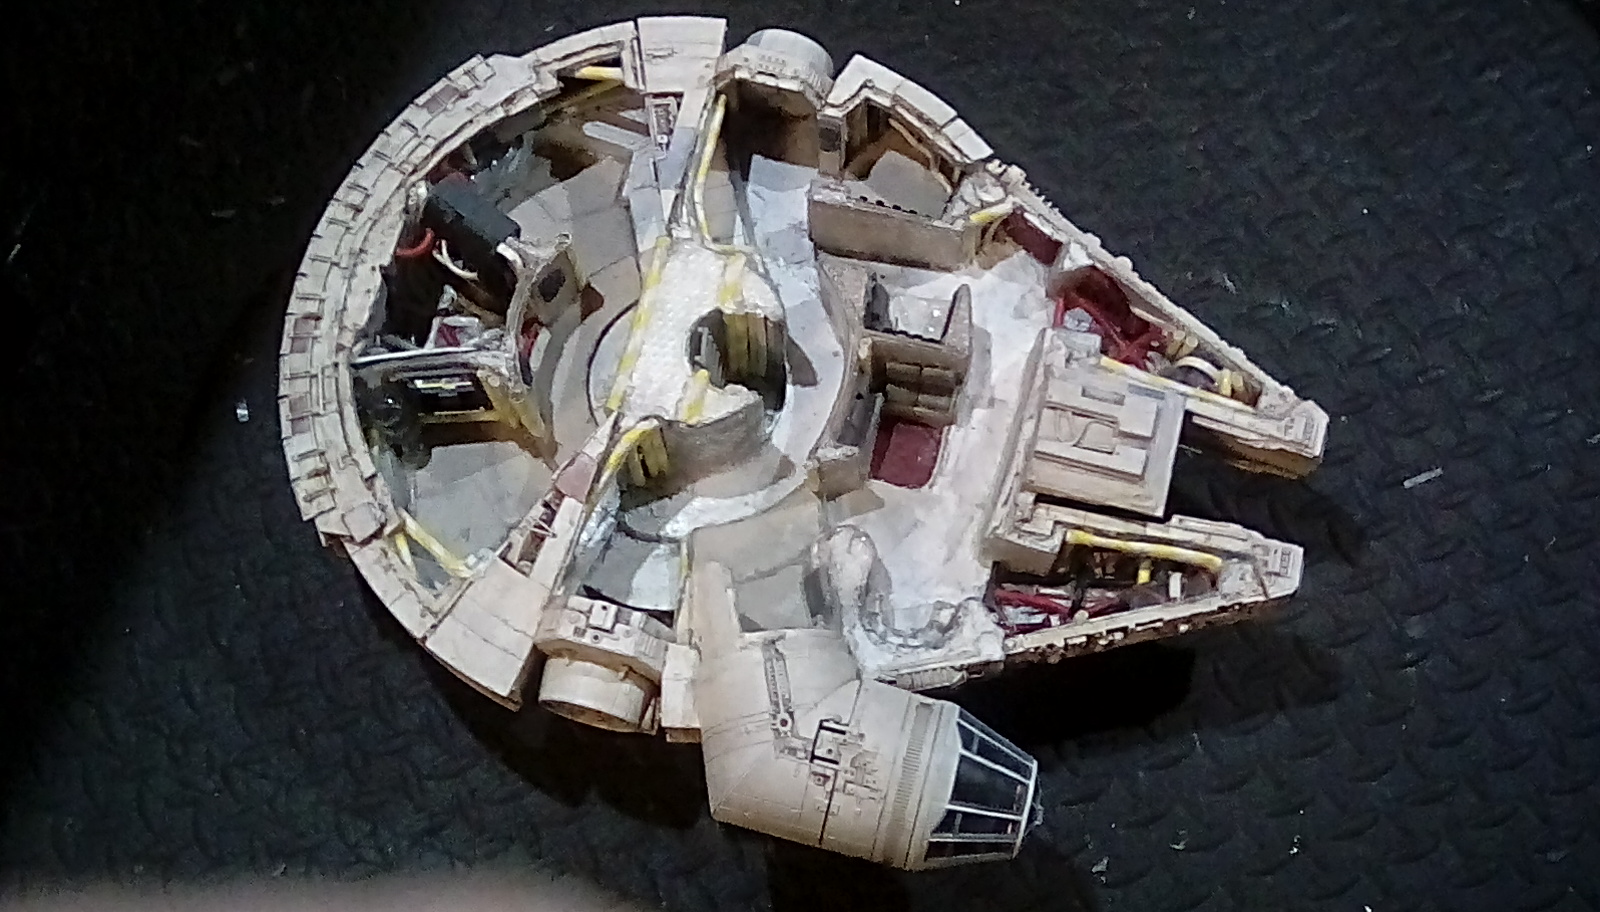
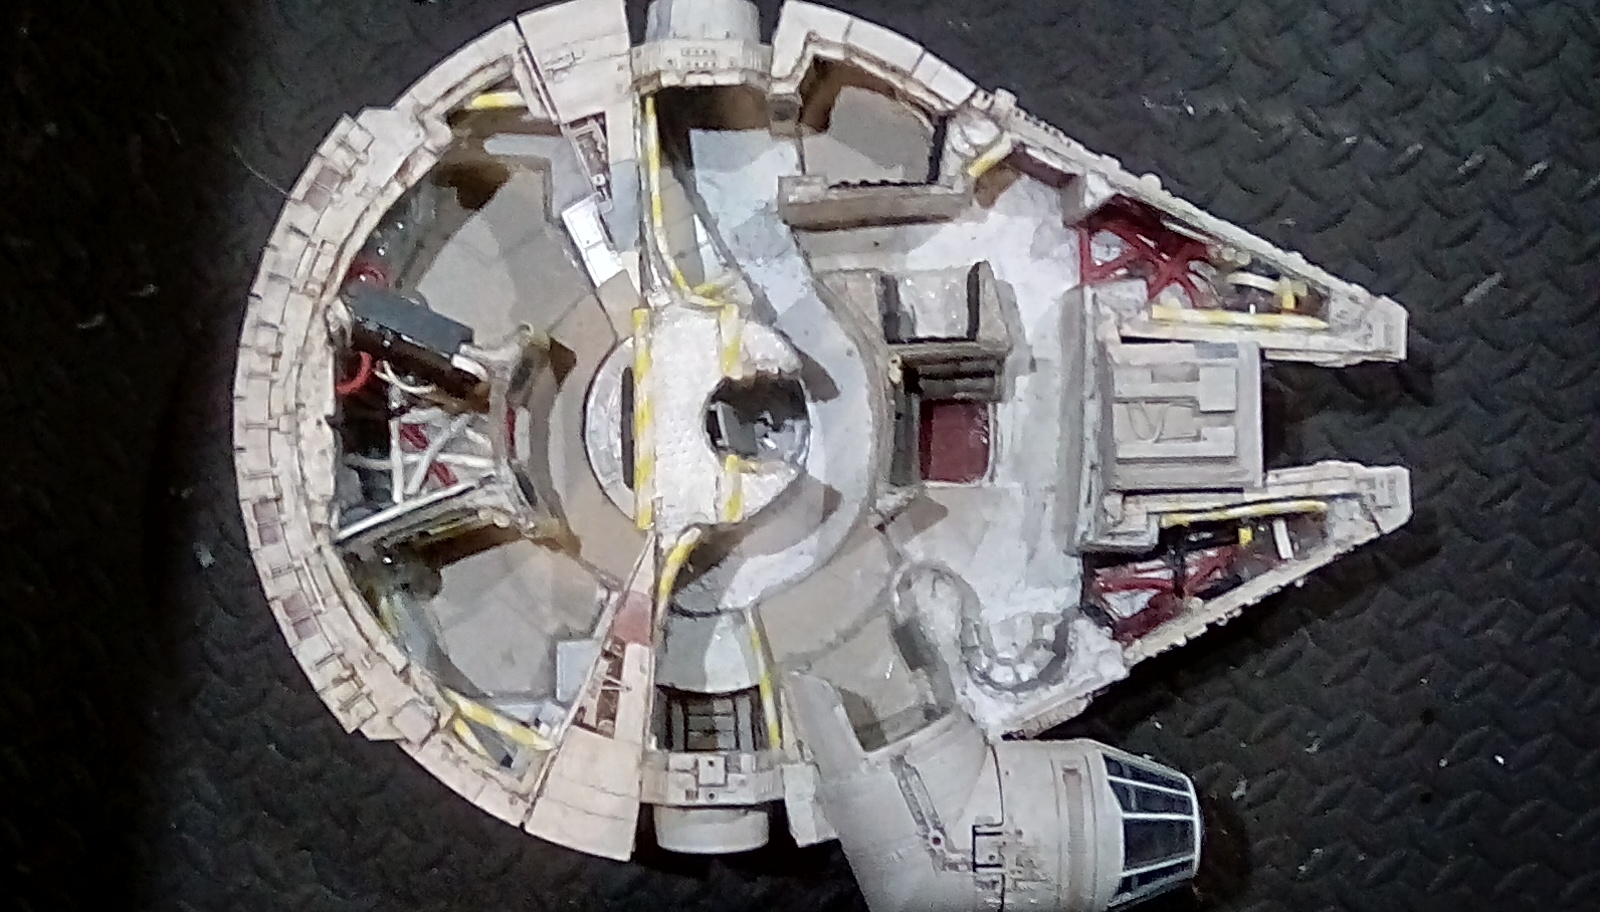
Starting painting the internal rooms, and changing the top hull colour balance
Starting the internal rooms.
The first thing I did was look at some images from the star wars films, to remind myself what couples the top inside your f the Millenium Falcon really was. Memory alone can play tricks on you. I am going to use the to decide on the feel I want, not slavishly follow the colour scheme.


What I take away from the source photos is that the insides of The Falcon are dark and dirty – the cushioned areas area sort of buff colour, and there are indicator lights everywhere.
First I prime the insides of the ship black.
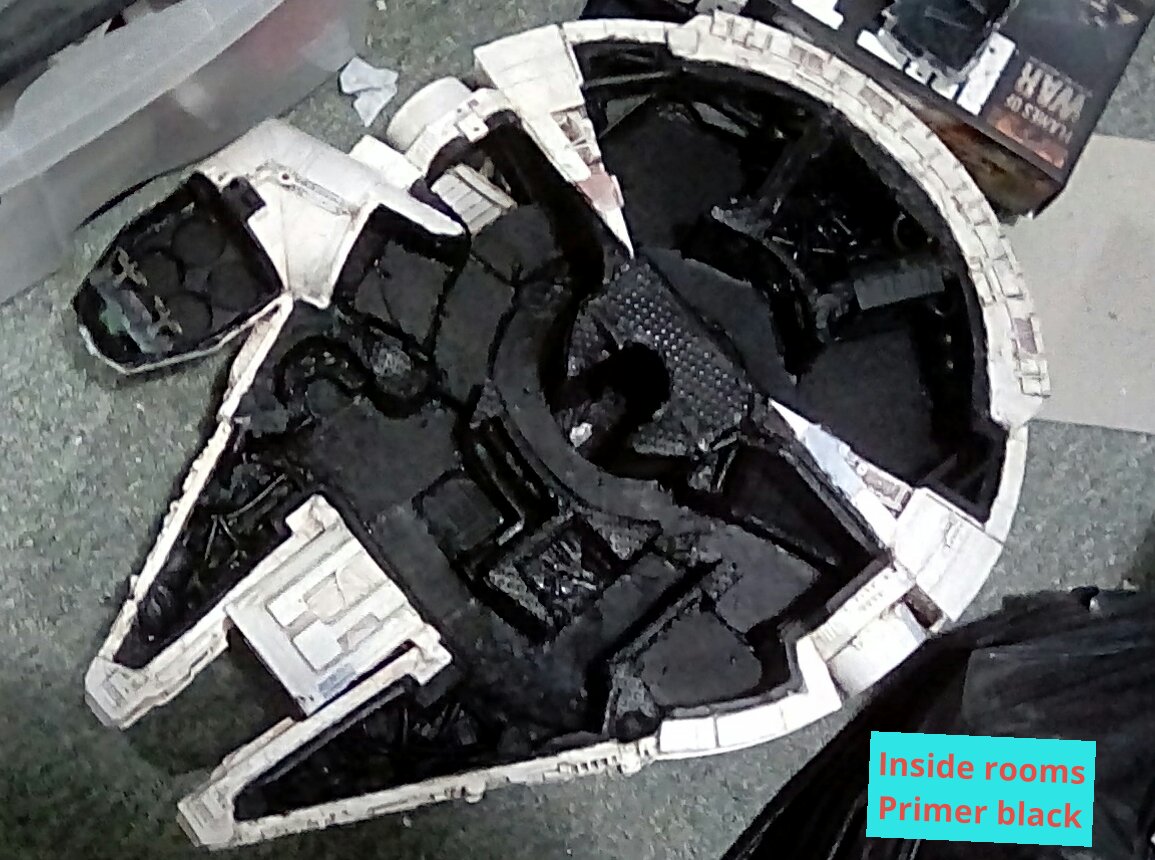
I like the sharp contrast between the black and the outside hull, so I’ll be keeping that at the edges. But black is too dark to easily see the walls and layout from a distance, so I drybush everything with a neutral grey. This also brings out the textures that I added earlier.

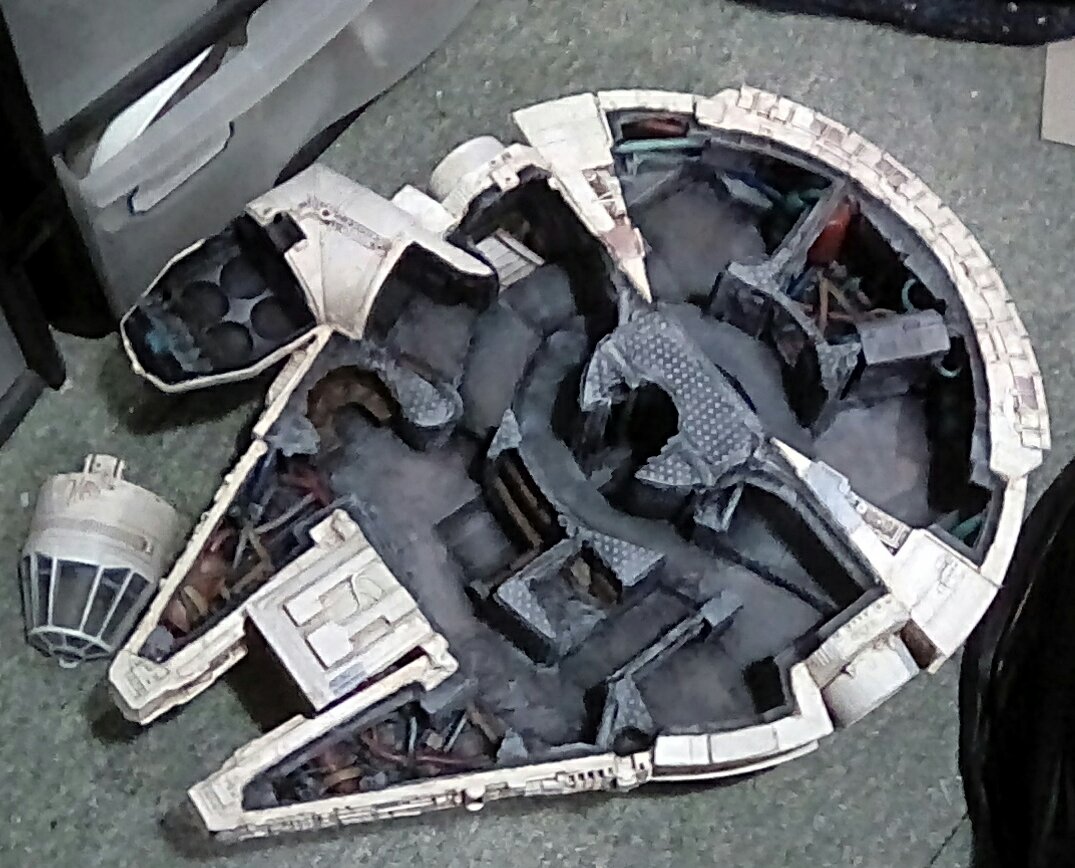
Now I take some artistic license and go away from the film’s colour scheme, as I need the wiring and pipes I created to stand out from the background so they can be seen from a distance. I used dark shades of primary colours, and later when I think they look too bright I dull the down with black shade (GW Nulin oil). This also helps the engineering and engine areas look dirty and oily.
Cushioning is painted chocolate brown, then Drybrushed with sucessively lighter colours until I work up to an edge highlight of bonewhite. Metal is Drybrushed with gun metal grey, and a few big bits of machinery painted cavalry Brown and weathered with rust effect paint and a bone drybrush. By no means finished, but now I can see what colours things are going to be and where I need t make changes.
Hopefully I have hit the right balance between capturing the mood of the film’s while having a piece of playable scenery that detail can be made out on from a distance – the true film colours would just be too dark and everything would merge into one dark mass.
I’ll add a few photos of the painting going thru the stages described above:

Changing the top hull colour balance
I am a bit concerned the the top Hull is looking too yellow from a distance. To fix this I use a very thin wash of 1 part sky grey paint To about 10 parts water, and apply this to some of the panels on the roof to town down any colours I think are too vivid and give them a cool grey cast. I also use this on some of the side details, just to pull everything together.
It may not show very well on the photos, but this pulls the ship into looking more grey from a distance.

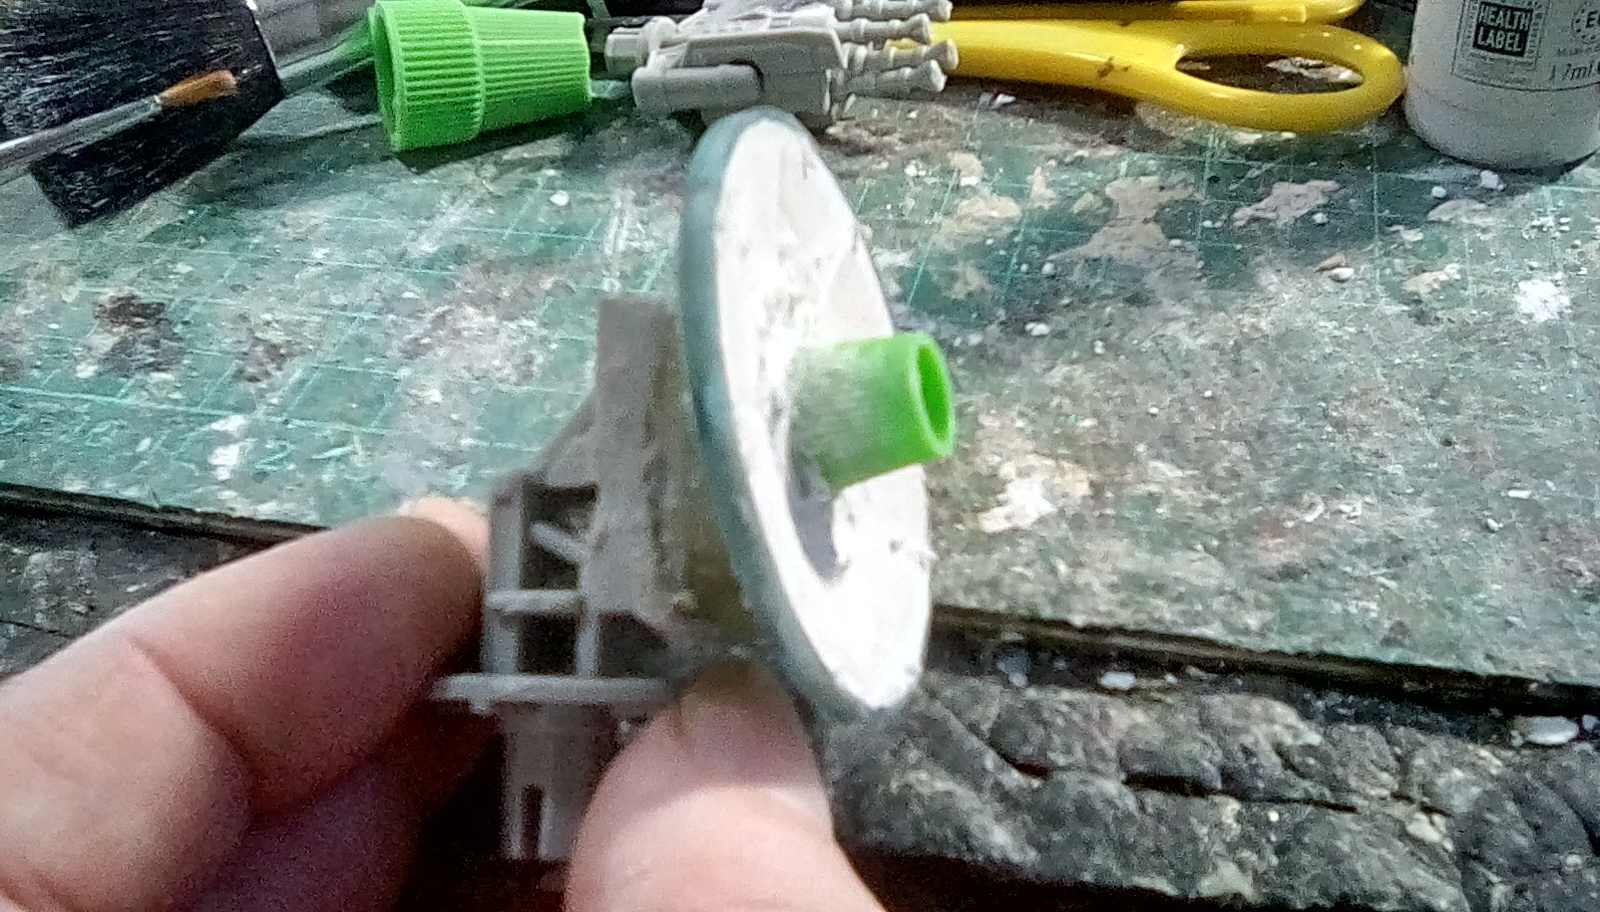
Radar Dish and gun
Next up, it’s time to work on the radar dish and gun that I saved from the original toy. The radar dish is the square one from The Last Jedi, so I decide to change this to the more traditional round dish using a Lego part I had left over from another project. I don’t have a problem with the Last Jedi film like some people seem to have, it’s just that I don’t want to fix my ship into that very short time period when the dish was square.
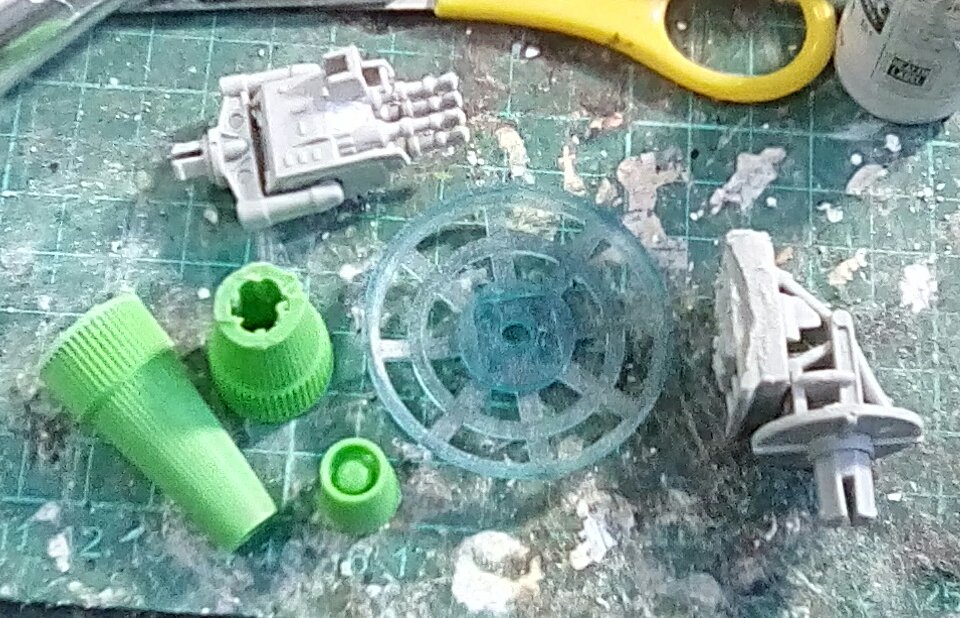
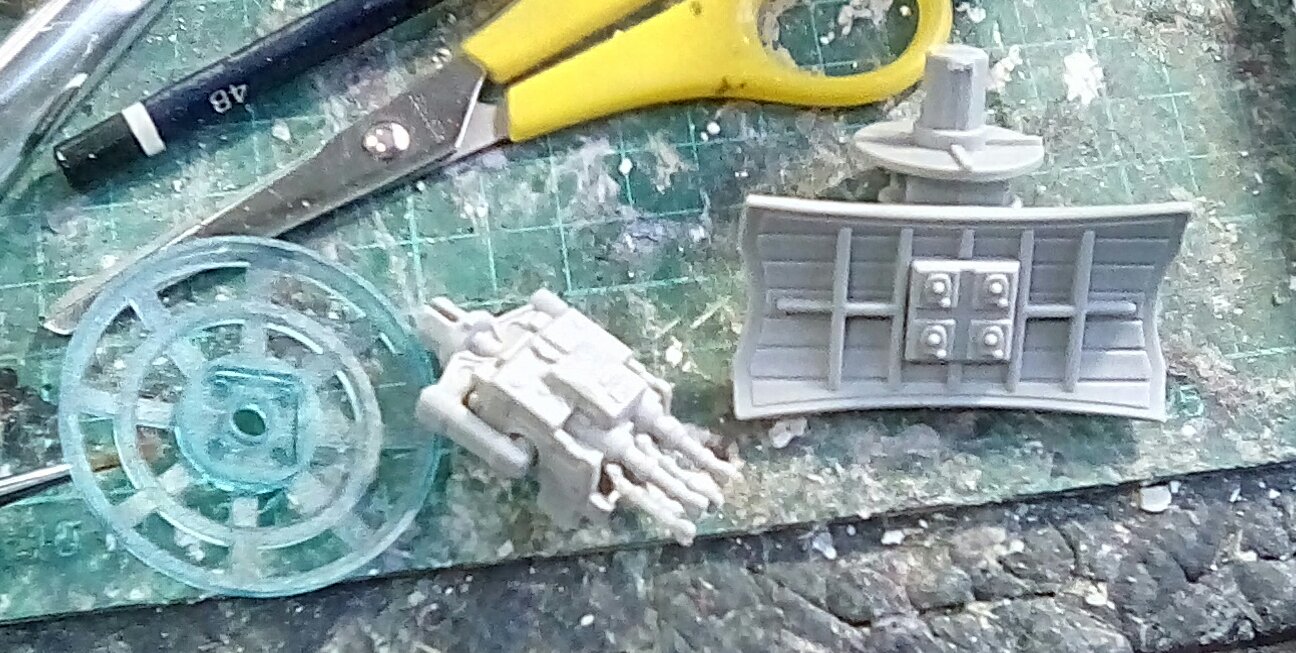 The parts I started with.
I use a cut down superglue top to make the central cone in the dish, and card to fill in the holes in the Lego part. I’ll be reusing the original base as that slots nicely into the hull, so why reinvent the wheel? I use a Dremel to cut away the square dish, leaving the base intact and shaped so the round Lego piece fits well.

After priming black, they are painted and ready to add to the top hull. The gun just needs a bit of drybrushing with grey on the top, the dish gets painted the same way the hull was, with some rust added as old tv dishes always seem to get a bit of rust on them.
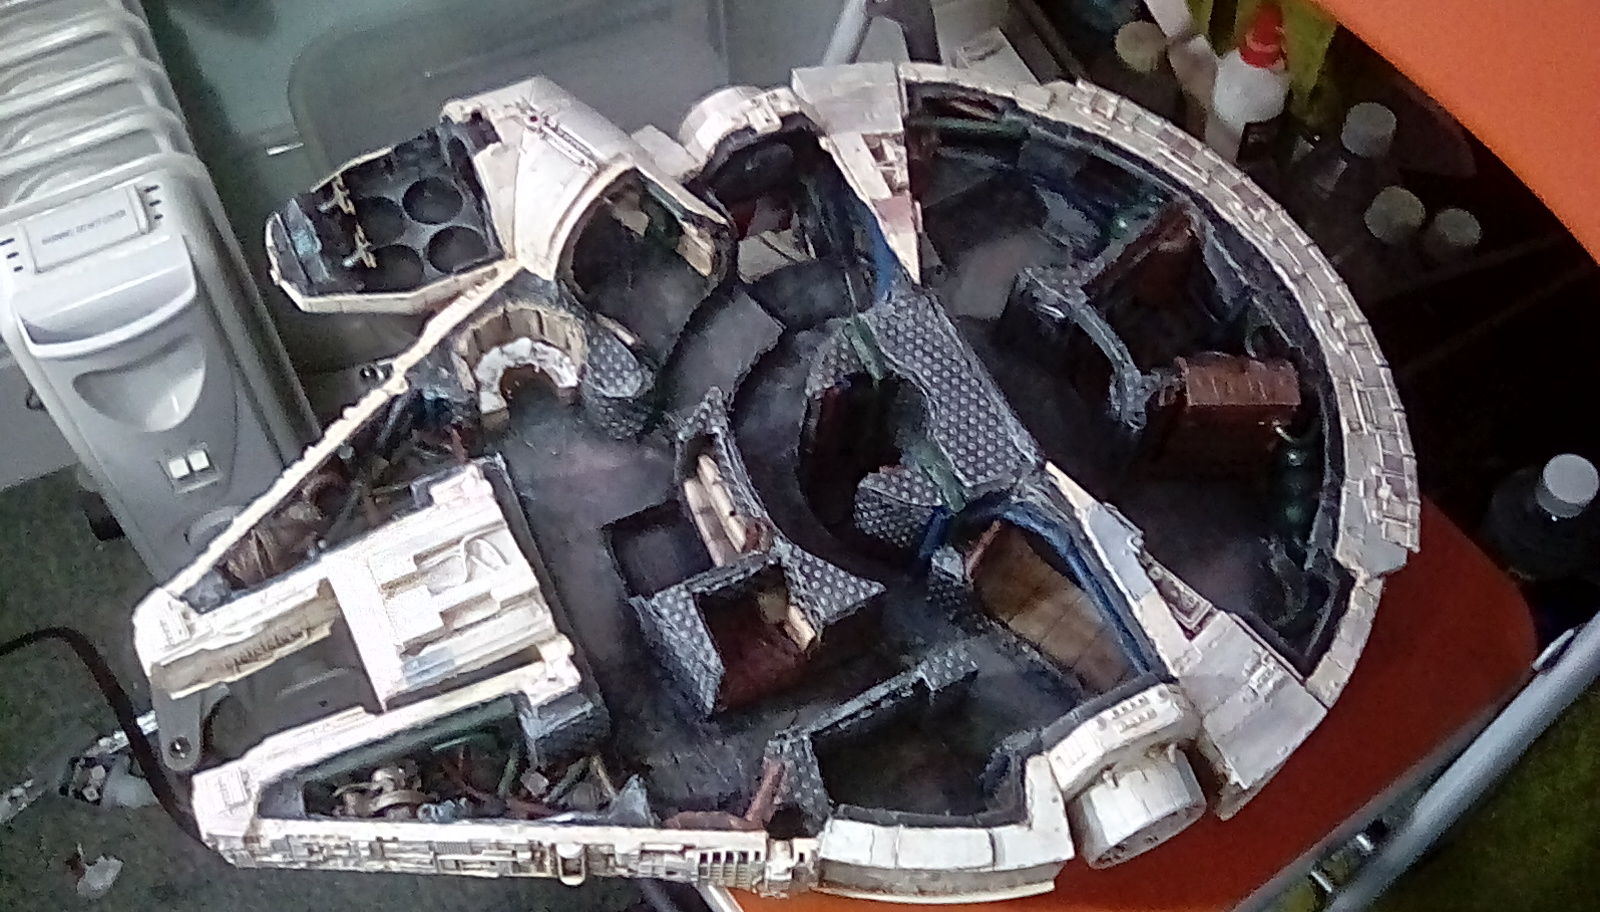
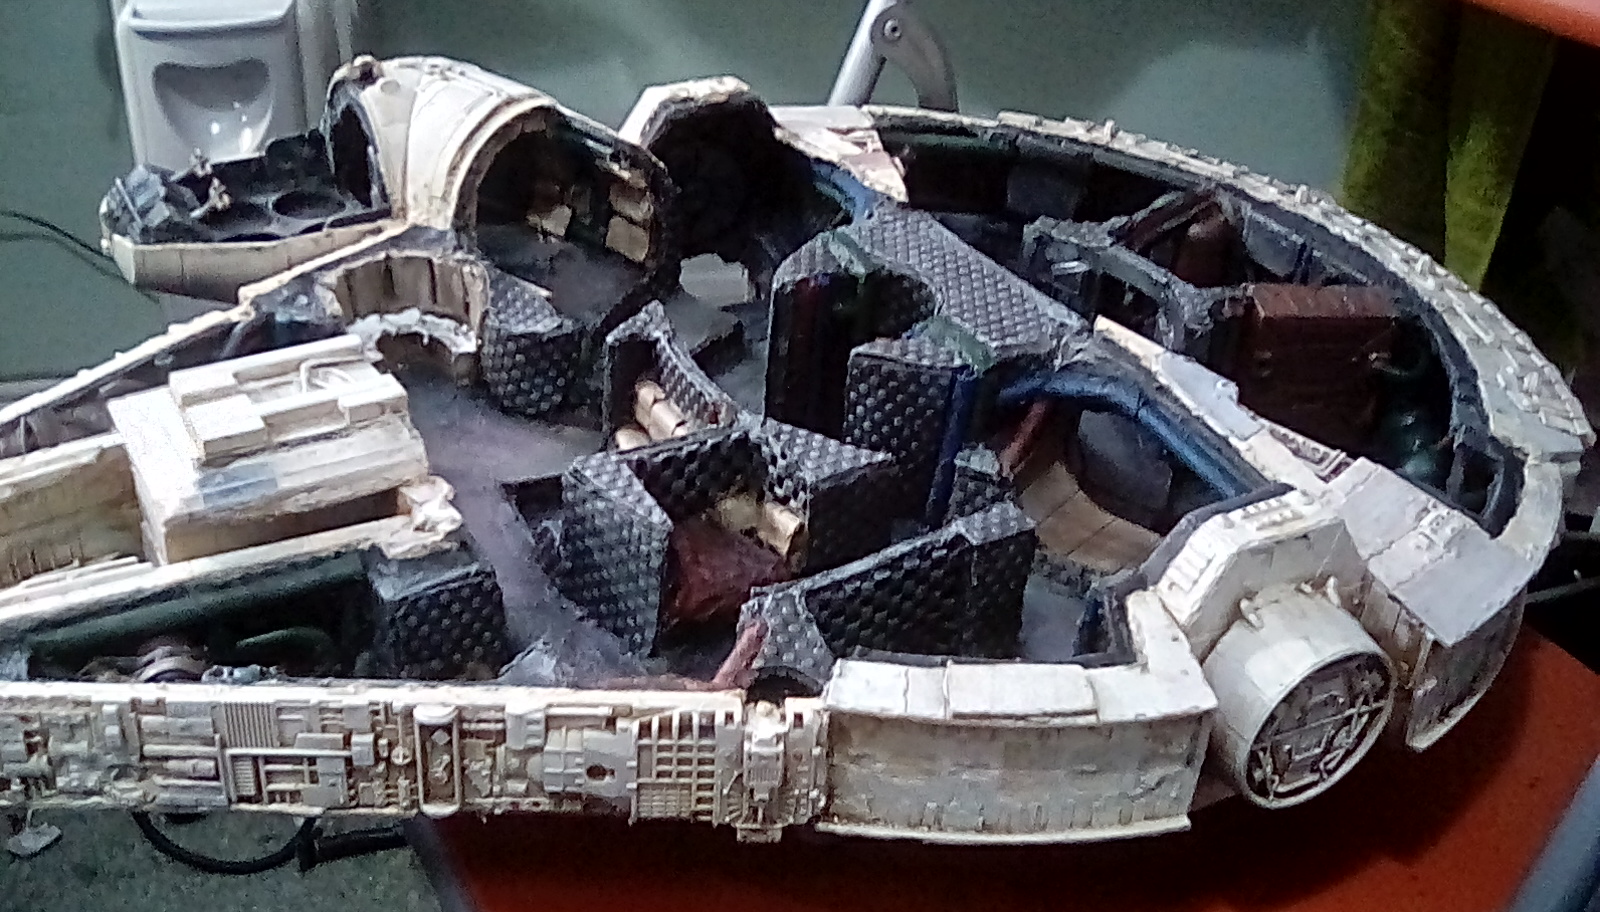
 View from the front
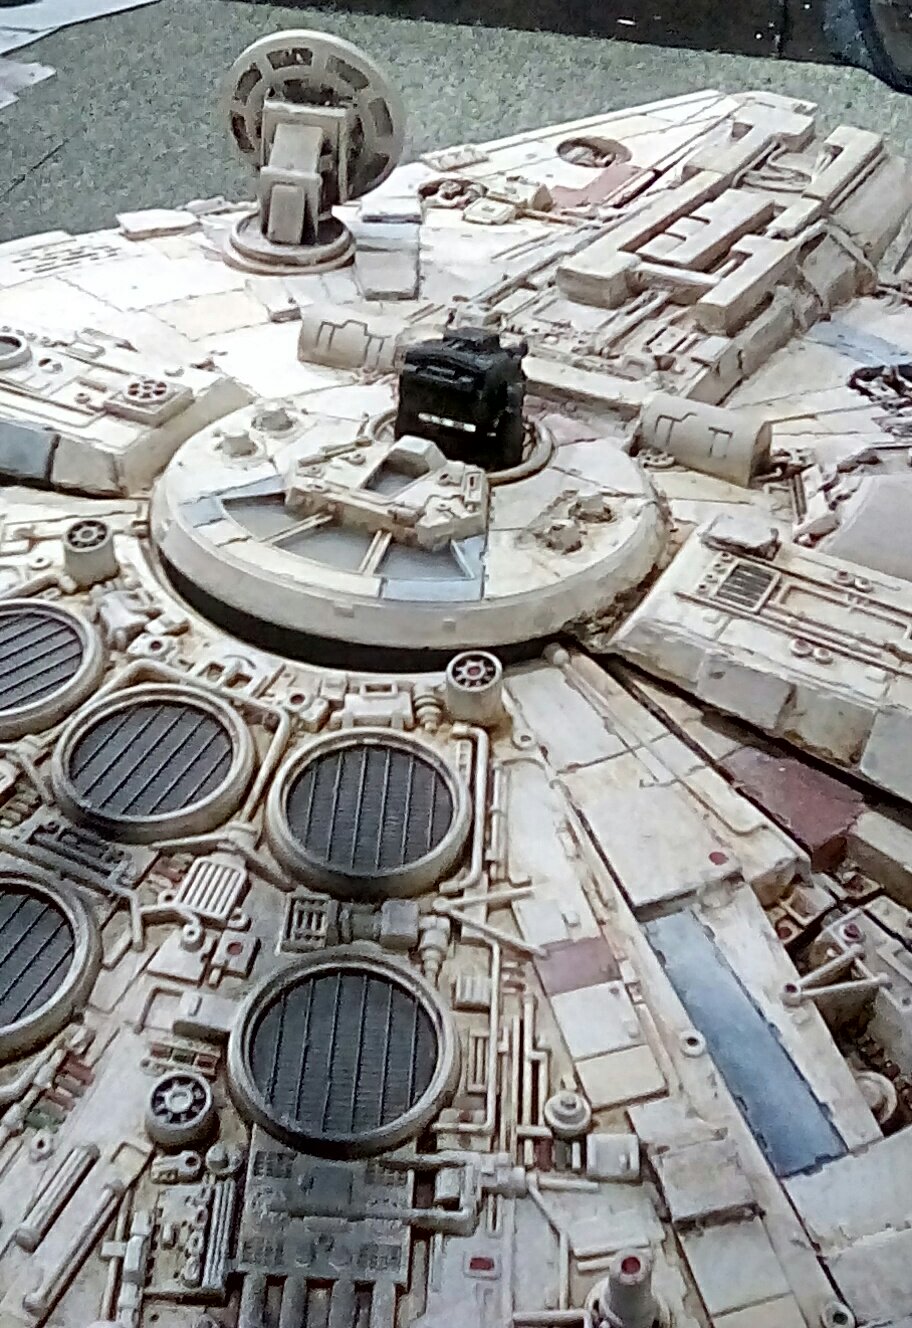 View from the back
 Wires and Texture
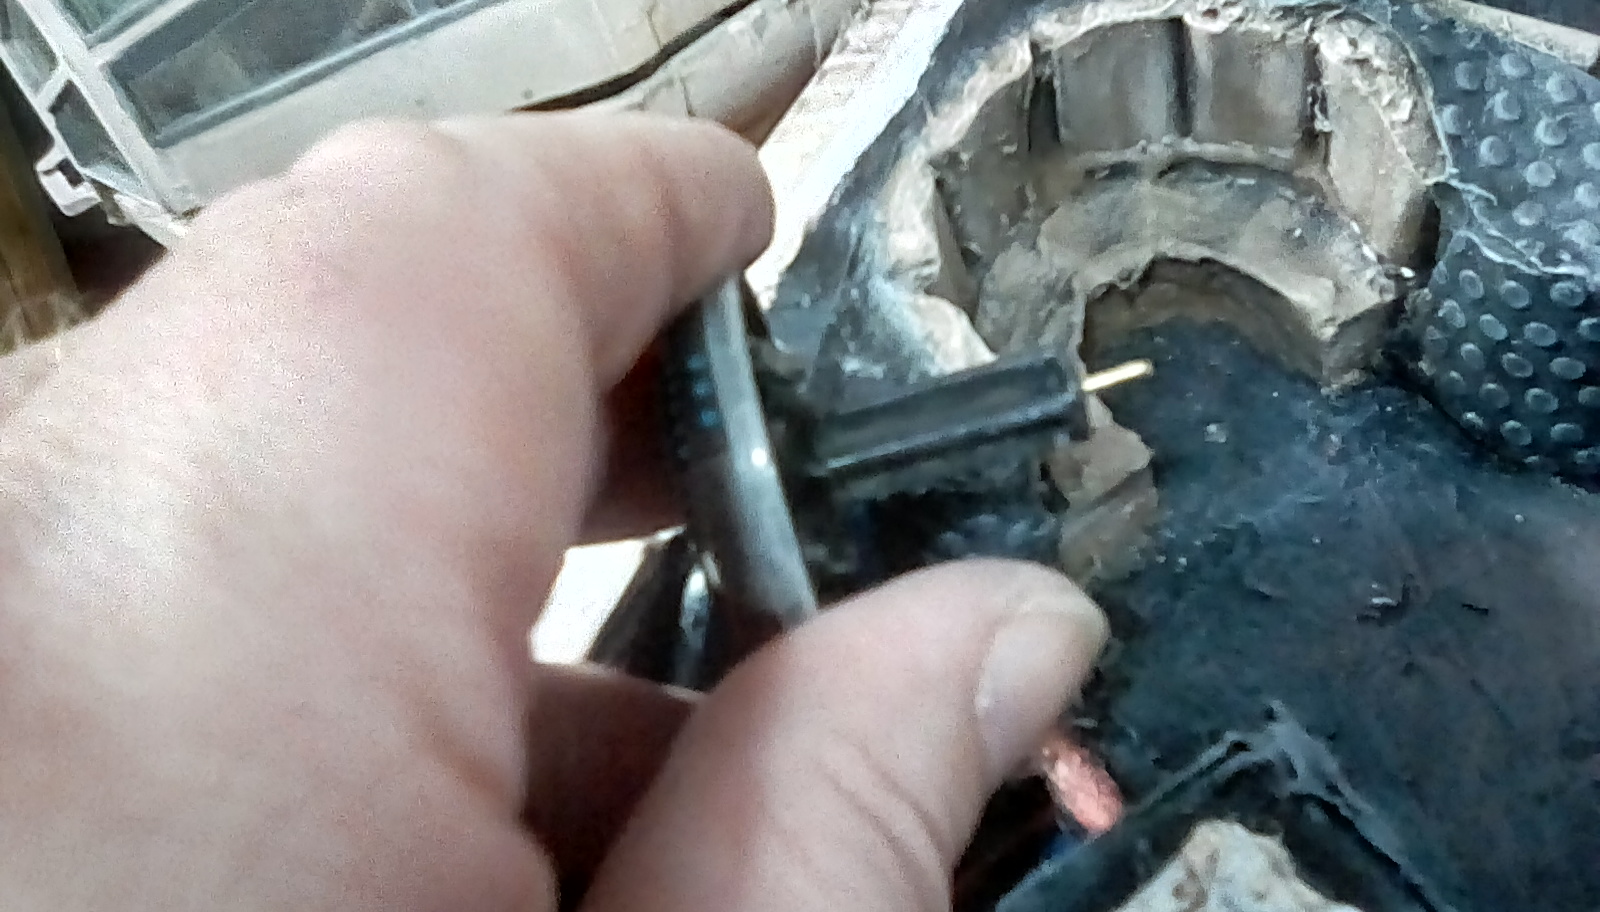
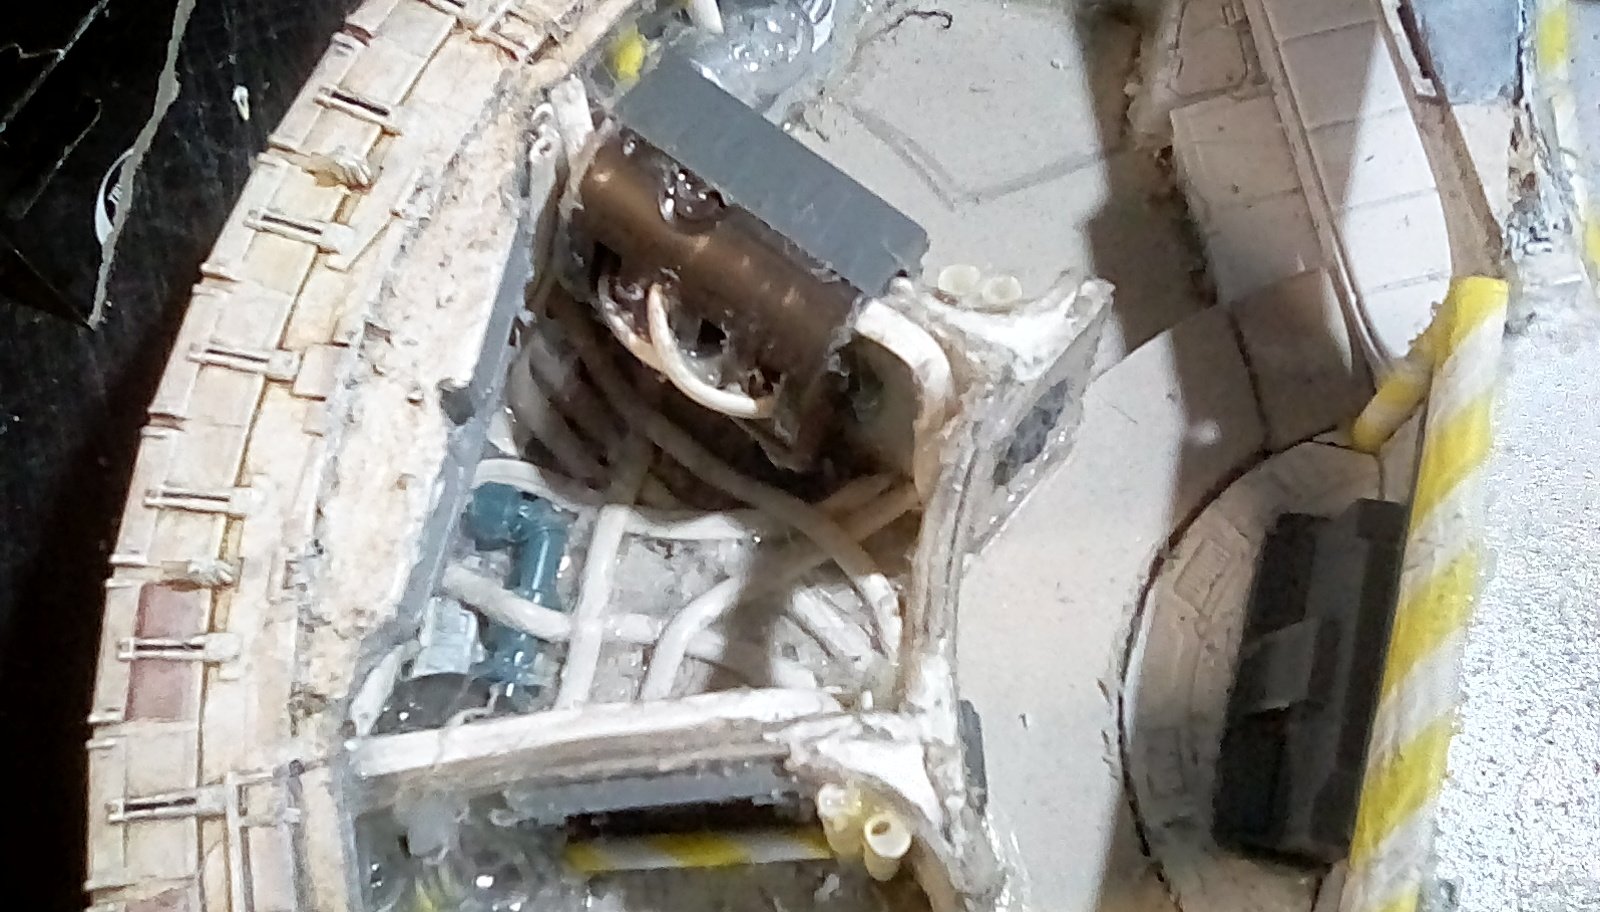
To simulate the Millenium Falcon’s knotted tangle.of wiring, I carefully glue in place actual wire. I use a 2 m telephone extention I would have never used again in this wireless age (It is very flexible, and has a flat side, so easy to glue in place). I wanted a real tangle in the engine room and the 2 triangular work I be areas at the front of the ship, but I don’t want actual loops that will snag on things and get torn off. I also want figures to be able to enter these areas, so my solution is to glue the tangled wiring to the floor, so miniatures can walk on top of the wiring (probably having to make an electrocution saving throw unless they are Han, Cheque and maybe Rey).
When the telephone extention run out, I used the inner wiring from some heavy 30amp wire offcuts an electrician left at my house. As a bonus, I realised that the grey wire sleeving could be used to make those iconic cushion pads that the Falcon has on its corridors. I also use it to make pillows for the bed and the seating area, to add some consistency to the different parts of the ship.

To get rid of any areas of large grey card before painting the insides, I cover the grey card walls with a bobbly clear plastic sheeting I found from somewhere – I guess it is intended to add grip to car dashboards. It probably doesn’t show up to great in the photos, being clear, but I am hoping it will give the walls a patterned metal look when primed and drybrushed. (I leave the floors as plain card, as I have something else planned for those later.)


 Texturing finally done.... Now the insides of the ship are ready to paint.
The Airlock internal.doors
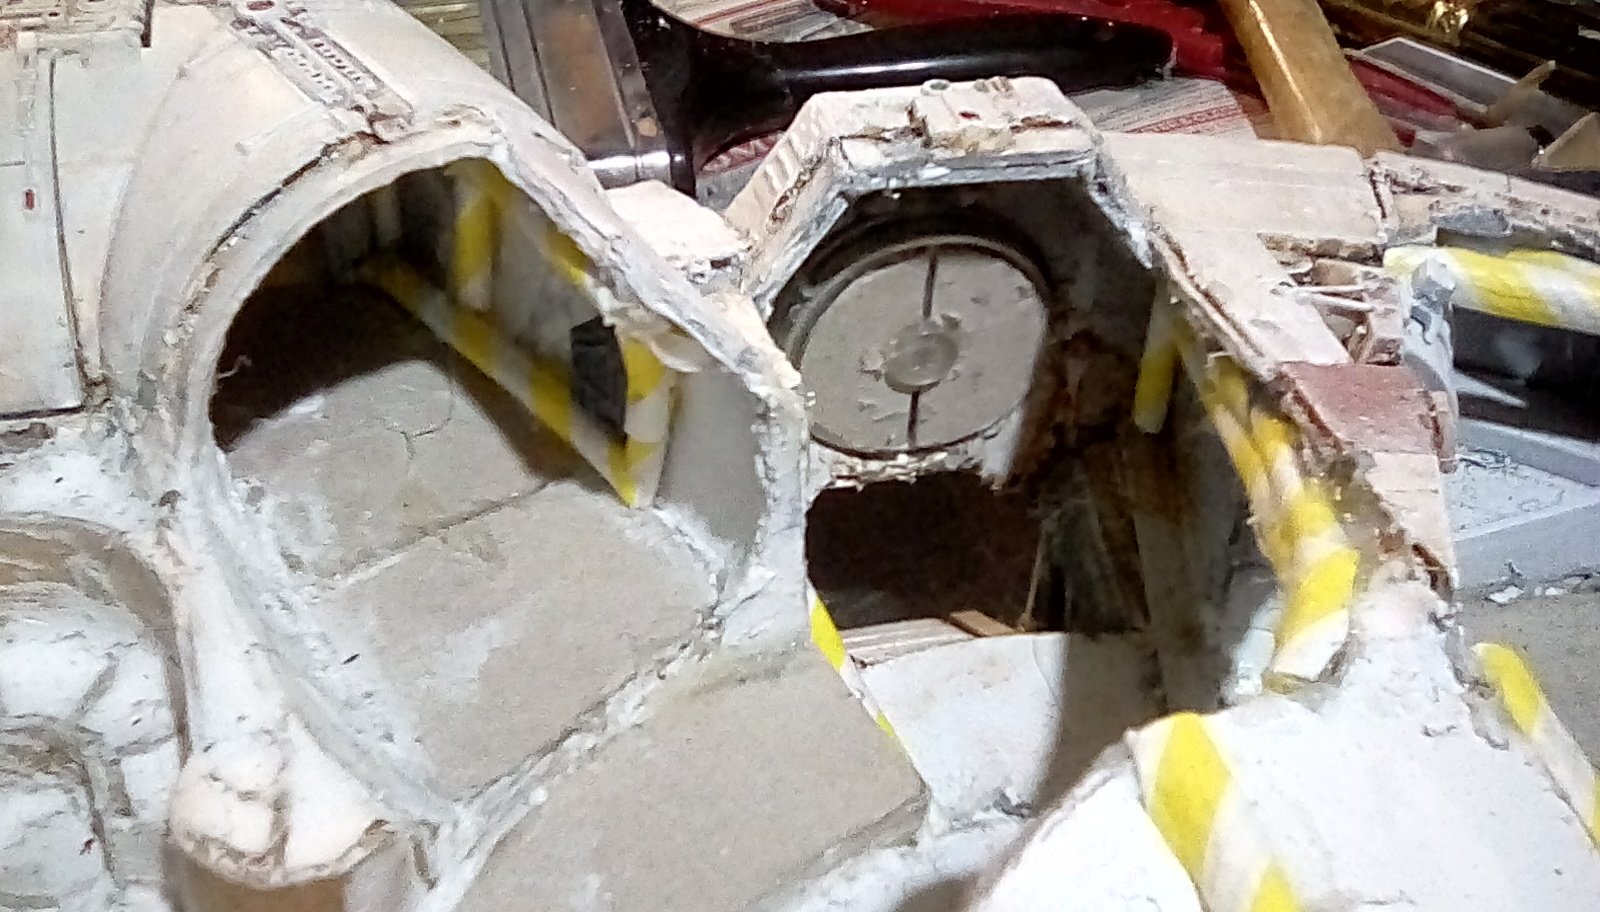
The inside of the airlocks (The round bits above the ramp and on the opposite side of the ship) are bothering me. There is no detailing on the inside, and have no width to them. This is easily solved….
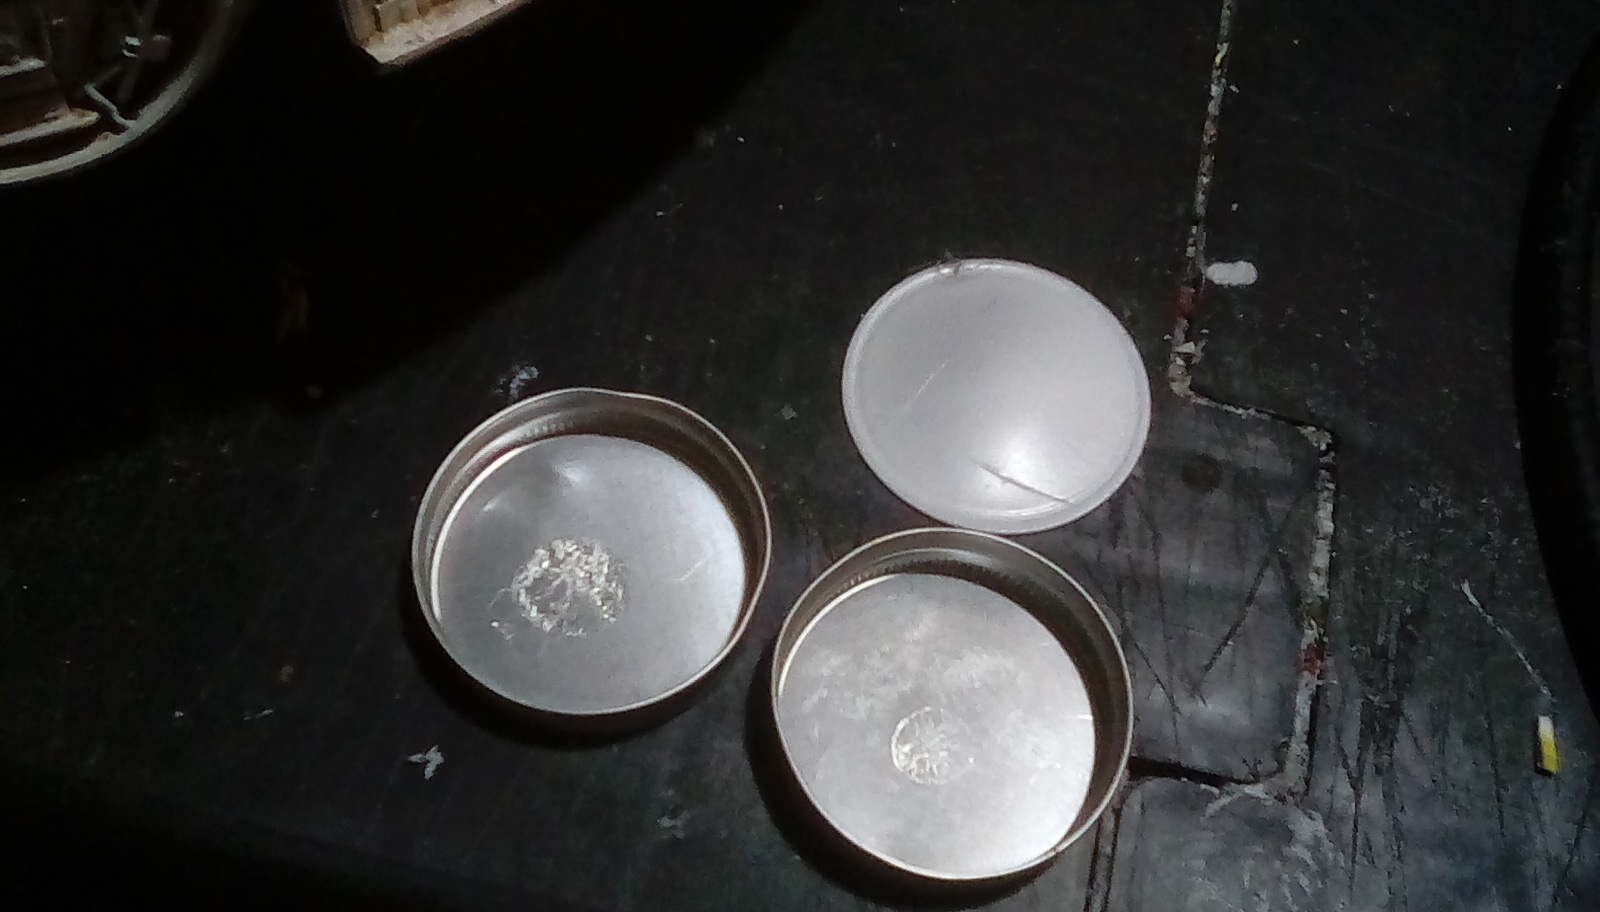 I find 2 round spice tub lids, that fit into the airlock perfectly. I use the circular inner seal as a.template for my card peices.
 2 half circles of card are glued on, leaving a gap down the middle, to represent the airlocks inner doors. To just add a bit of detail, I glue on a.small button to represent the doors lock..