


![How To Paint Moonstone’s Nanny | Goblin King Games [7 Days Early Access]](https://images.beastsofwar.com/2024/12/3CU-Gobin-King-Games-Moonstone-Shades-Nanny-coverimage-225-127.jpg)


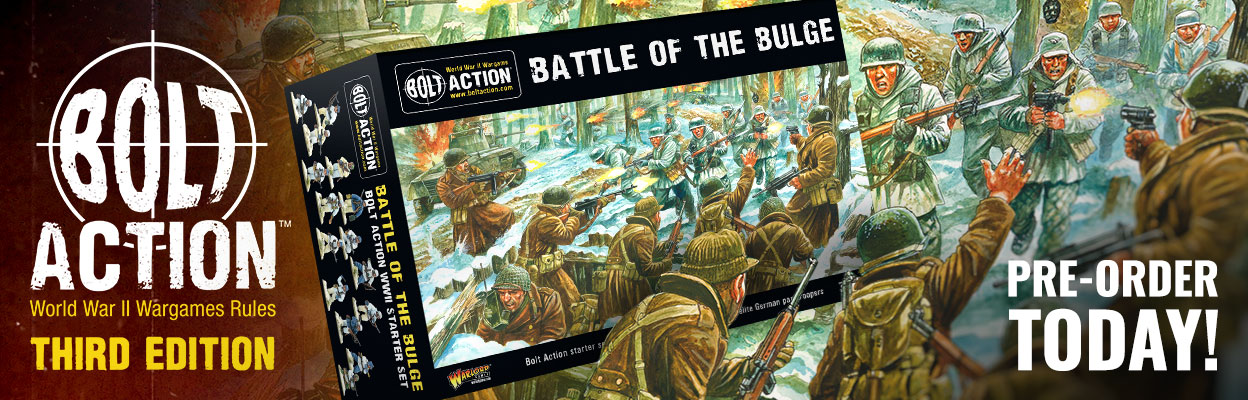
The Desert War: Bolt Action Boot Camp Preparation // Part Two: Early Gambits
August 27, 2018 by brennon
In preparation for the upcoming Bolt Action Boot Camp, we continue our journey through the North African campaigns of World War II.
If you’re just joining us, please check out Part One, where we overview of the Desert War and examine its opening campaigns.
Read The Original Article Series Here
But for now, pull on your sand goggles and climb back in that turret, it’s time once more to brave the windswept desert!
In Part One, we saw how the Italian Tenth Army, striking out of their colony in Libya, invaded the British protectorate of Egypt in September 1940. Despite a huge advantage in numbers, Marshal Rudolfo Graziani’s 200,000+ men (compared to just 30-35,000 of General Richard O’Connor’s “Western Desert Force,” or WDF) advanced only as far as Sidi Barrani, about sixty miles inside Egypt. There they stopped and simply dug in.
There were many reasons for Italian hesitation. The Tenth Army was almost completely unmotorized, and 200,000 men can’t just walk across the Egyptian desert. Also, many Italian commanders only wanted to establish a foothold in Egypt so they could claim it when the Germans forced England to surrender.
But of course Britain didn’t surrender, and O’Connor was soon ready to strike back with a plan he called Operation “Compass.”
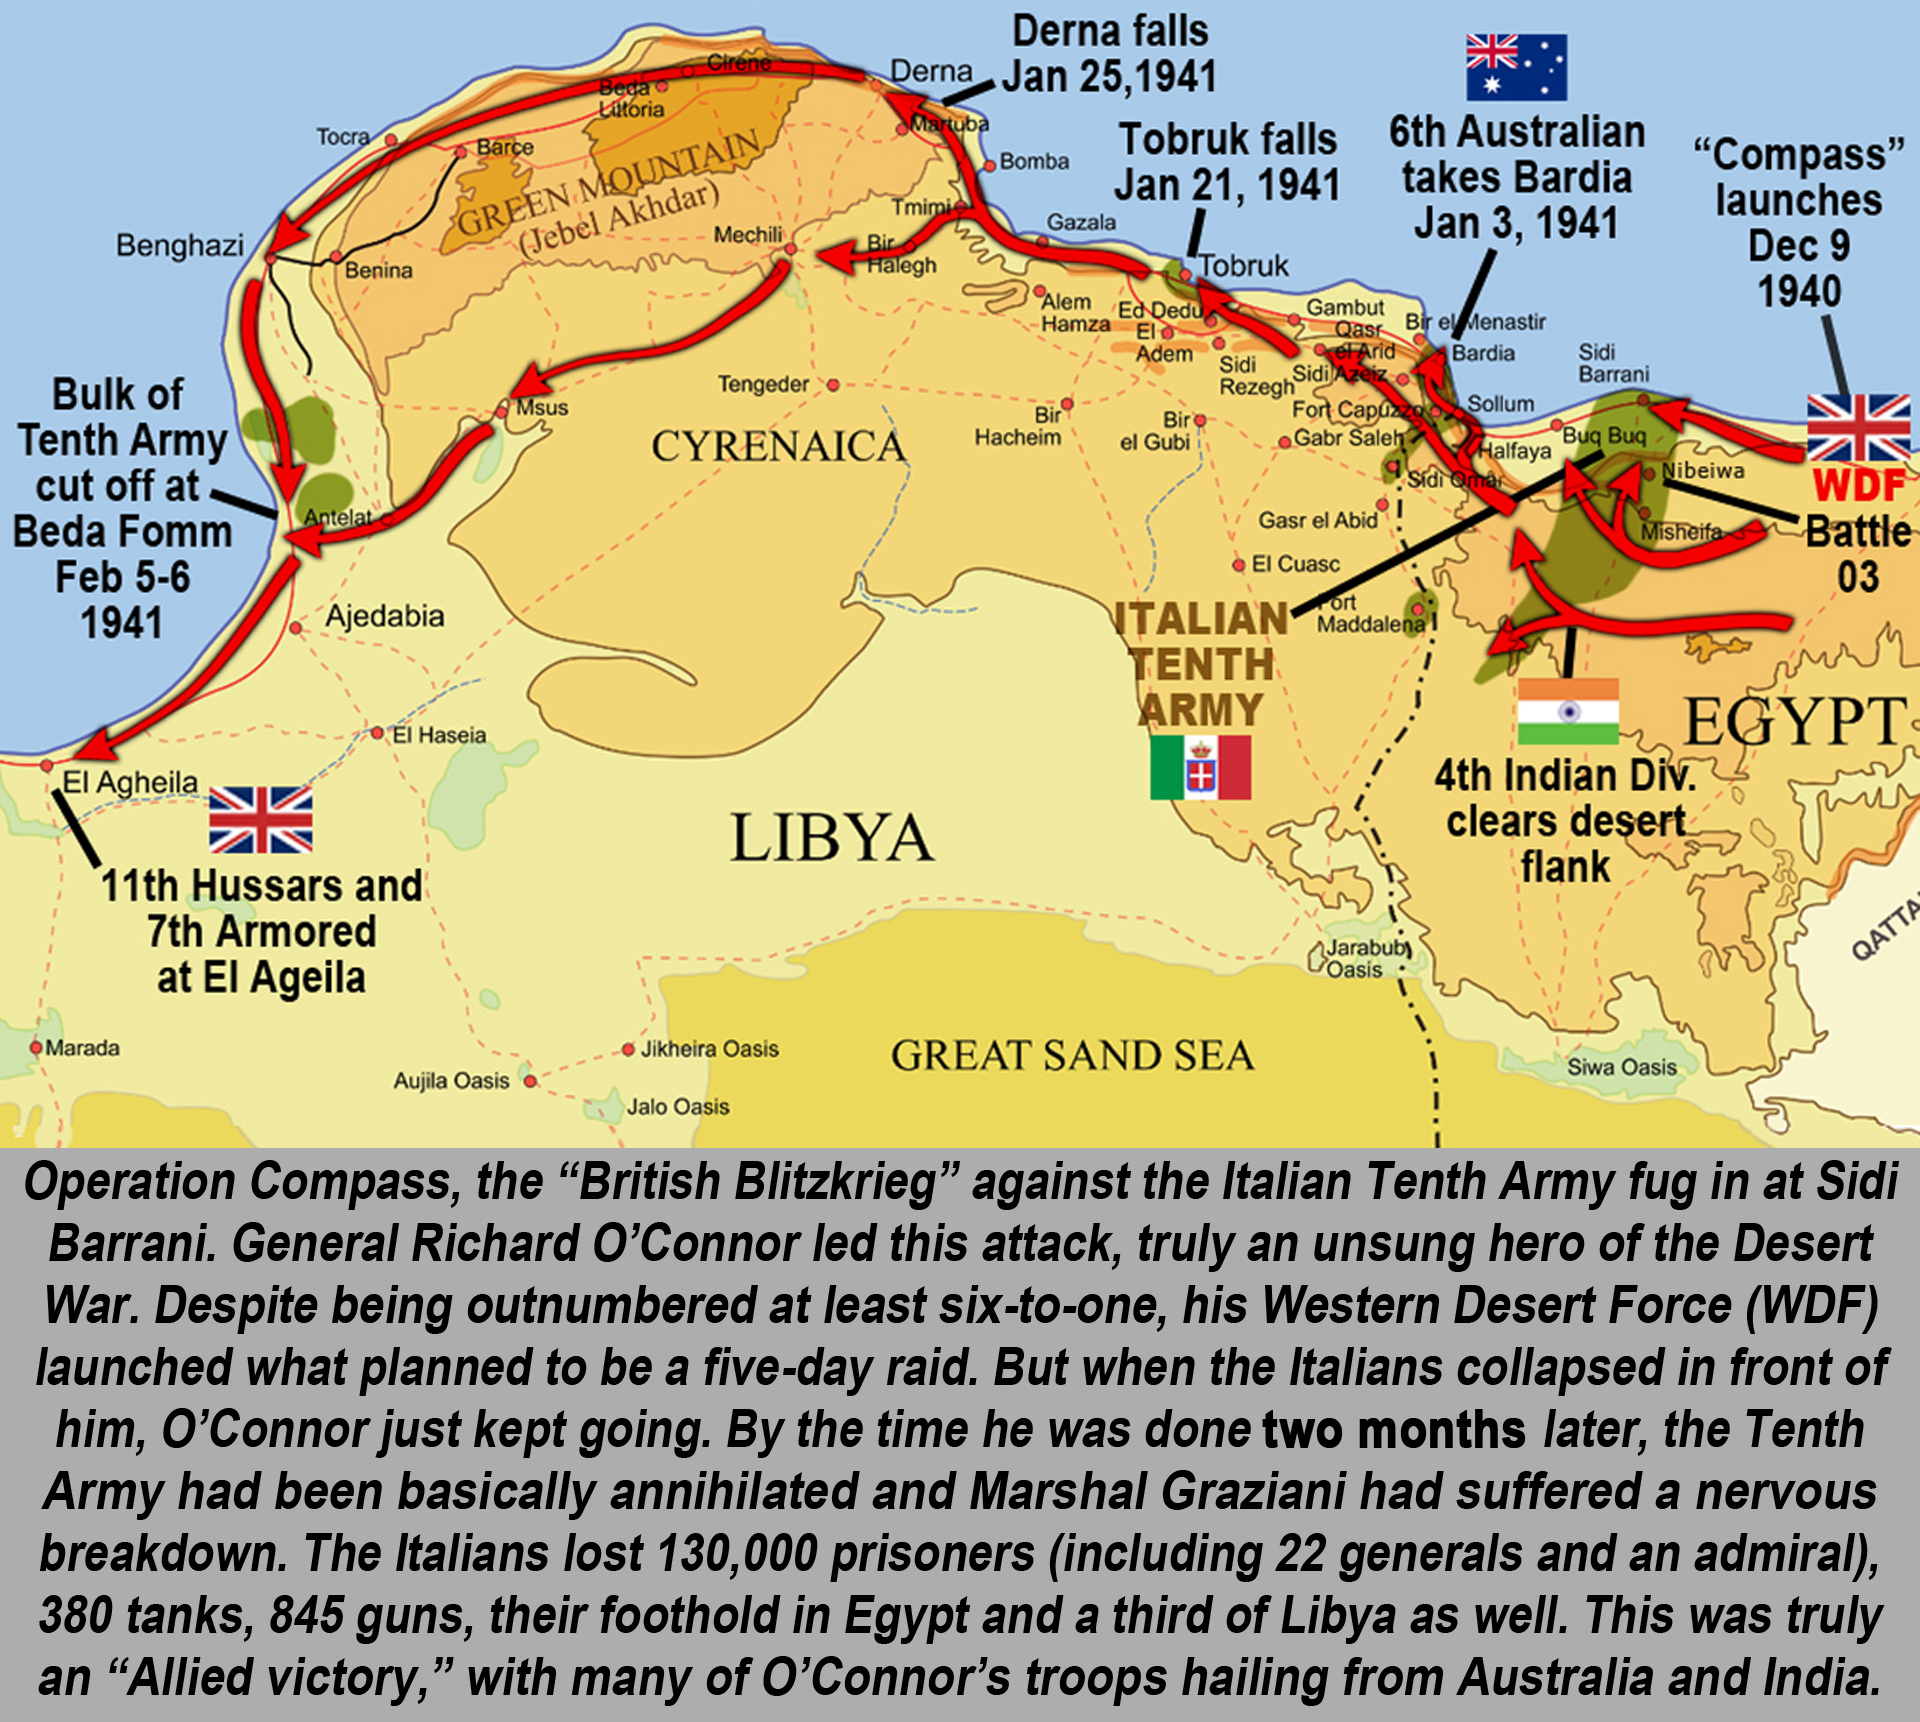
One of the first big engagements of Operation Compass was the “The Battle of the Camps,” where Commonwealth forces would hit the Italian encampments around Sidi Barrani in a series of flanking attacks. Italian positions were too widely dispersed, allowing British attacks to slipe between them and attack from the sides and rear.
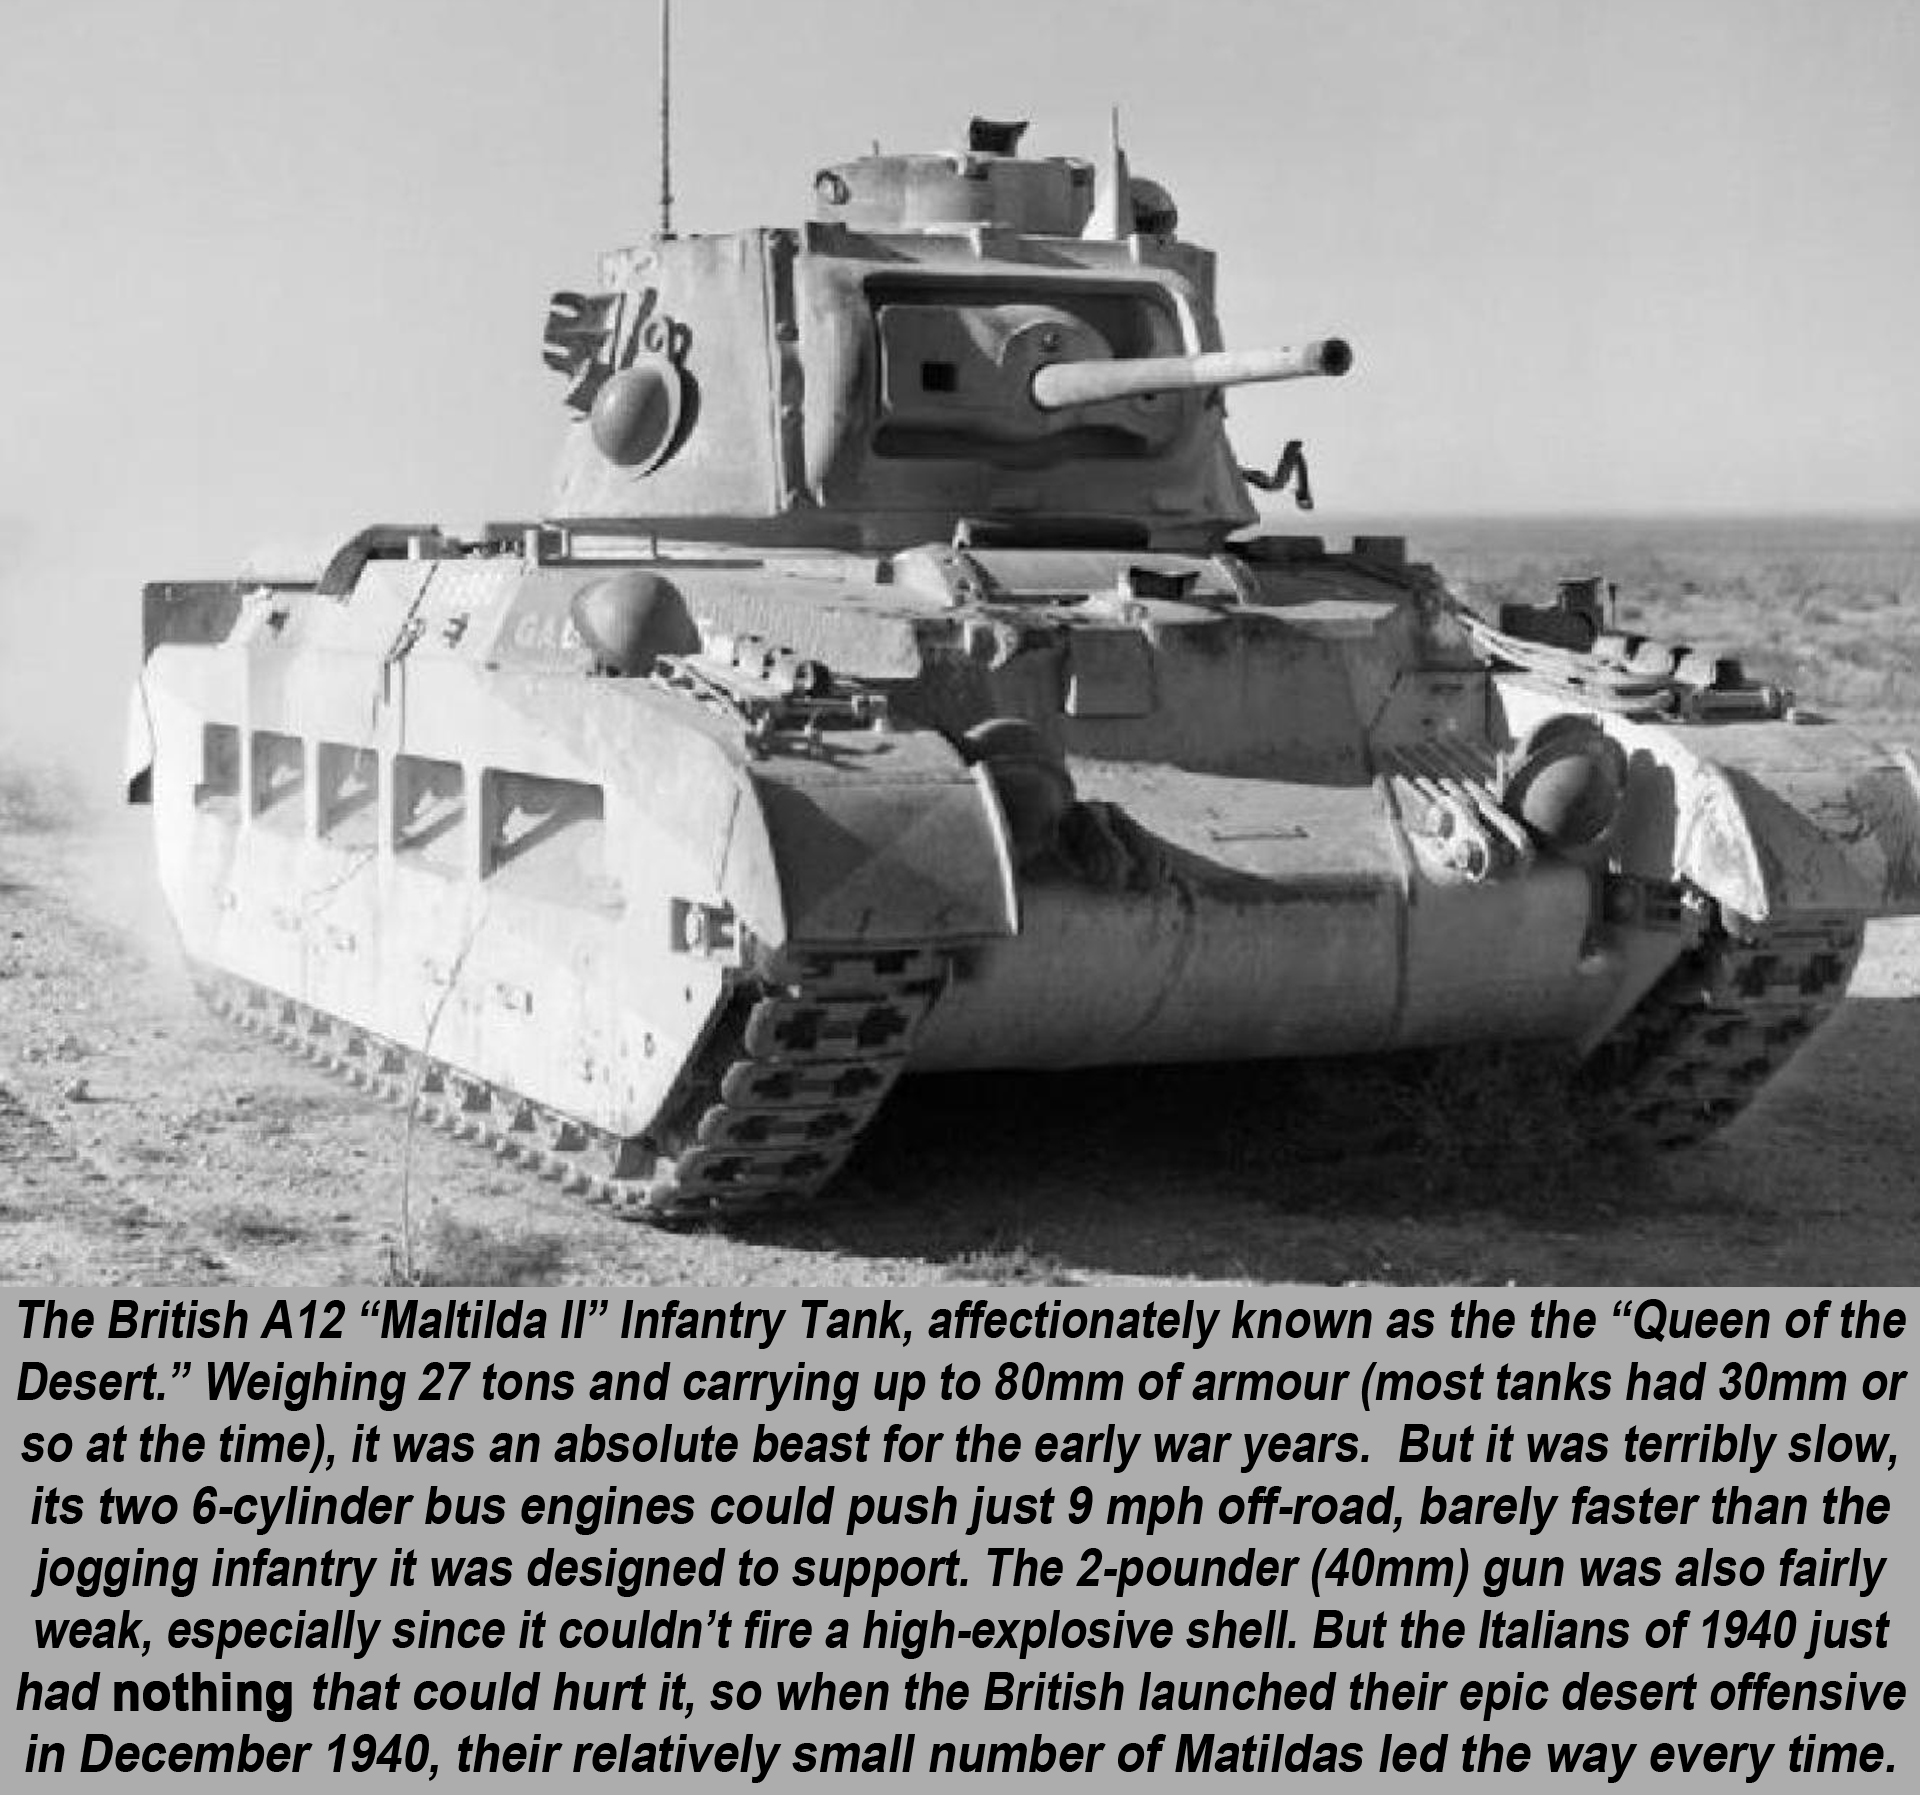
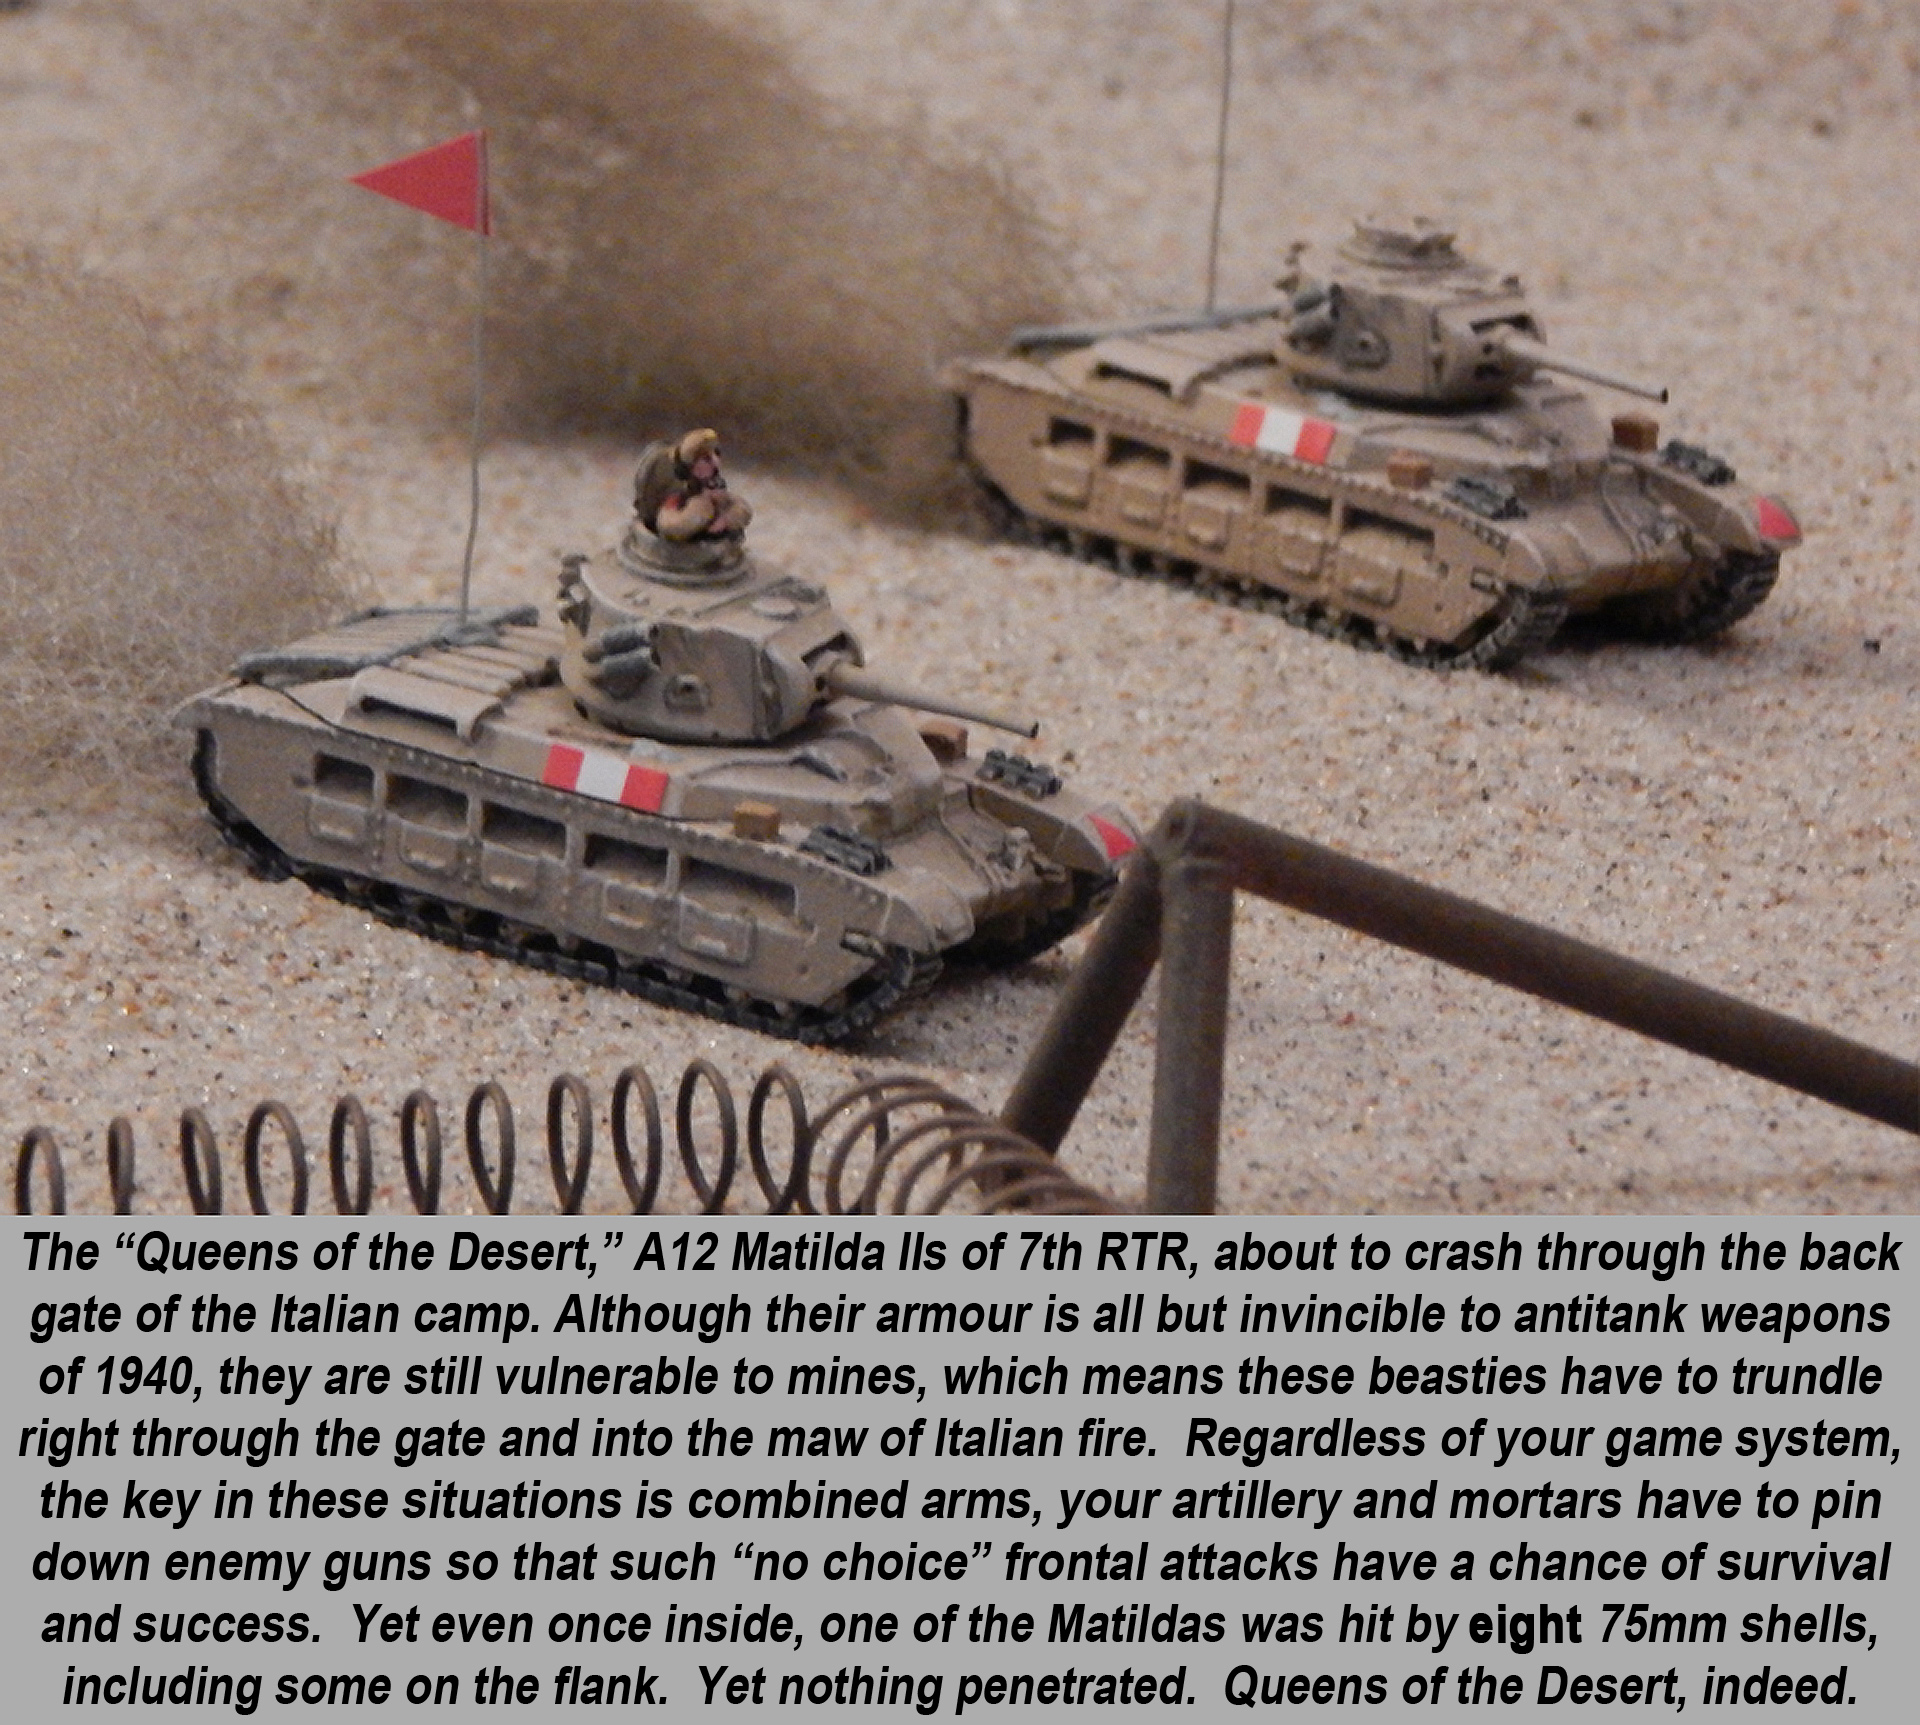
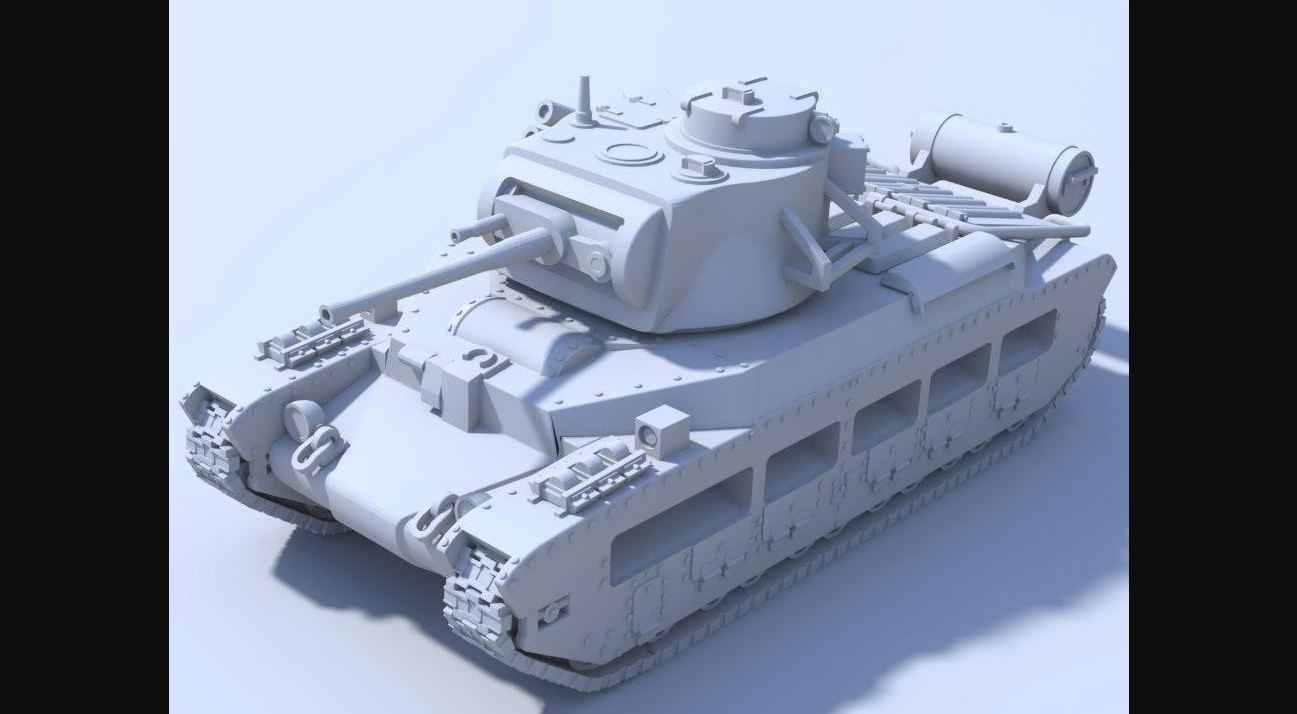
Among these was O’Connor’s heaviest striking unit, the 7th Battalion/Royal Tank Regiment (about fifty of the heavy Matilda II tanks), hitting the encampment of the Italian “Maletti Group” near Nibeiwa, Egypt.
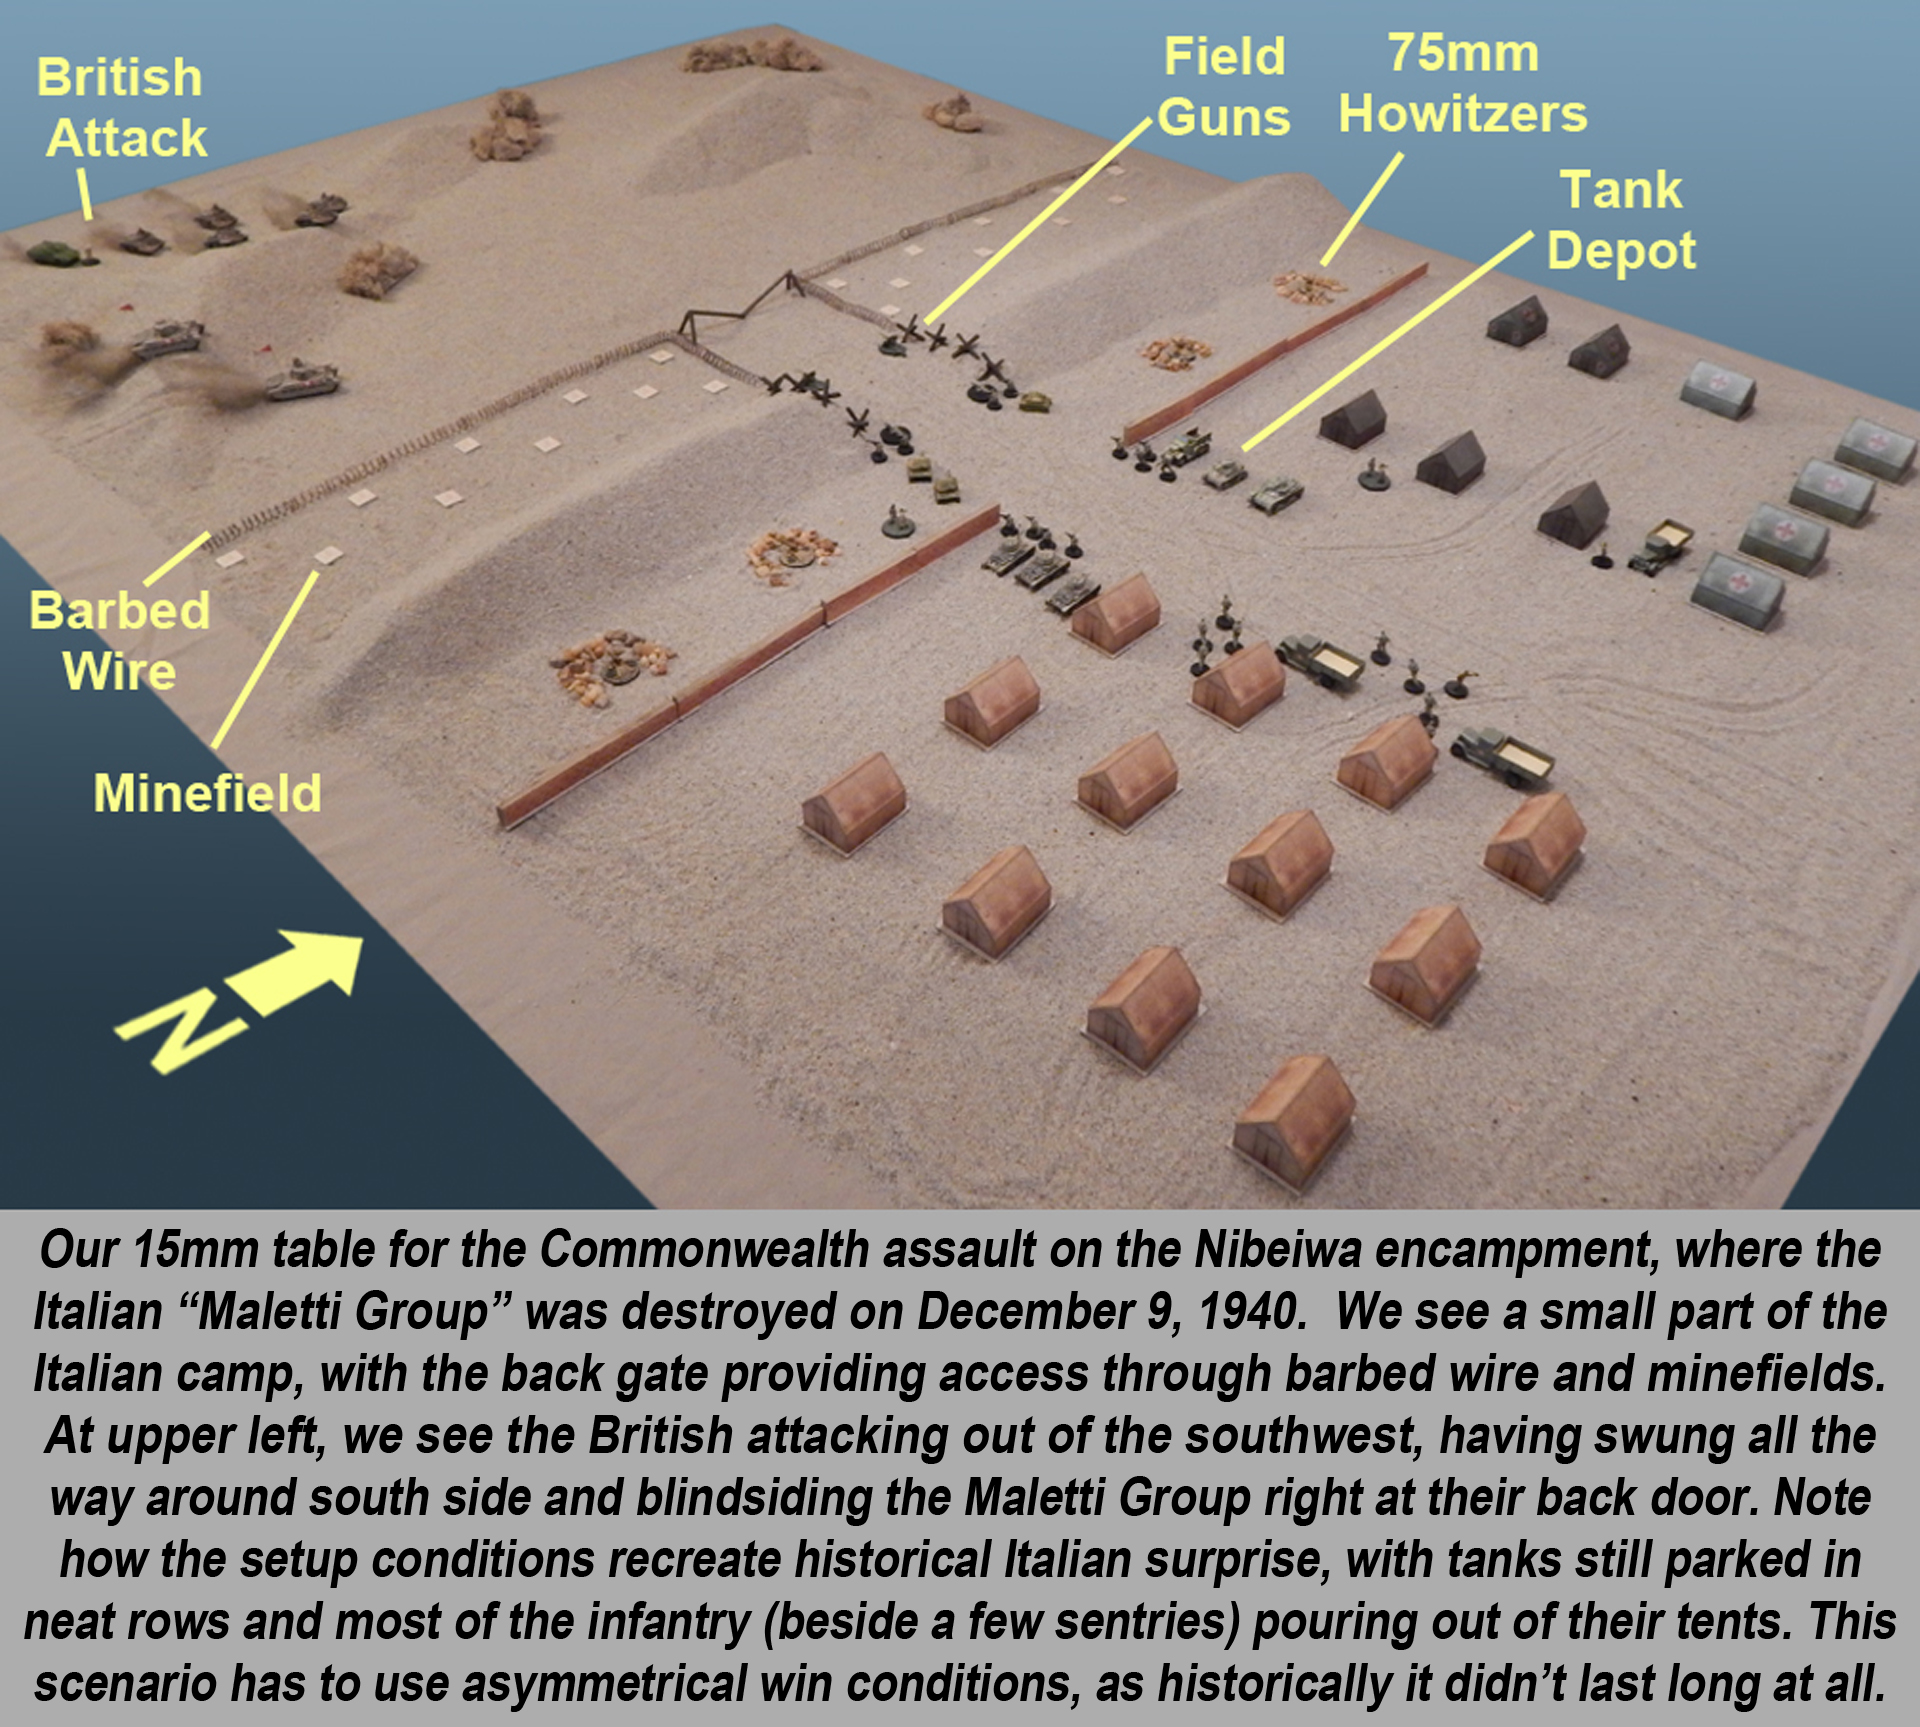
Essentially, the Italian camp was set up like a Roman fort of old, with a square perimeter and neatly arranged “streets” of tents arrayed within. The perimeter was well-braced with barbed wire and mines, but a lane was left through the minefield in the back of the fort to allow Italians to enter and exit. This was the fatal gap that the British were aiming at, having swung easily around the camp’s southern flank to strike it from behind.
The 7th Bn/RTR was a very special unit. At the time it comprised the only heavy armour in North Africa, and these fifty Matilda II tanks were half of those available to the entire British army. Attached first to the 4th Indian Division, then 6th Australian Division at Bardia, and finally the 7th Armoured Division, they spearheaded virtually every attack in Operation Compass.

As discussed above, Operation Compass was an unqualified success. Originally envisioned only as a raid, it wound up turning into a full-scale invasion that not only threw the Italians out of Egypt, but basically annihilated the Tenth Army and took a vast slice of northern Libya as well.
This was the first major Allied land victory of World War II. By the time it was over, O’Connor’s troops were reporting POWs taken in “acres” (e.g., “we have five acres of officers and 200 acres of other ranks”). It could have kept going, perhaps to take all of Libya and end the Desert War almost before it started. So why didn’t it?
First, the machines couldn’t take it. The Matildas of 7th/RTR (those that remained after two months of solid combat) were falling apart. Significant forces were also needed for the British counter-invasion of Italian East Africa (taking Ethiopia, Italian Somalia, and Eritrea, and retaking British Somalia). At a stroke, O’Connor lost the 4th Indian Division, a third of his force.
But the real deathblow for Compass came from Winston Churchill himself. Back in Europe, the Germans were preparing invasions of Yugoslavia (the pro-German Croatian government had been ousted by anti-German Serbs) and Greece. Determined to hold the eastern Mediterranean and protect the Suez Canal, Churchill ordered the 6th Australian Division to the Balkans, where it was largely destroyed in the hopeless battles of Greece and Crete.

This left O’Connor with only one division, the 7th Armoured, and it had shaken itself to pieces in “Compass.” So while it was refitting back at Alexandria, the British could only dig in at their forward positions in El Agheila. Some replacement units were sent, but these were far too few and badly underequipped.
To add to British woes, meanwhile, a new player was just then arriving in North Africa: Erwin Rommel and the “Afrika Korps” … along with the first few units of what would eventually become the legendary “Deutsches Afrika Korps,” or DAK.
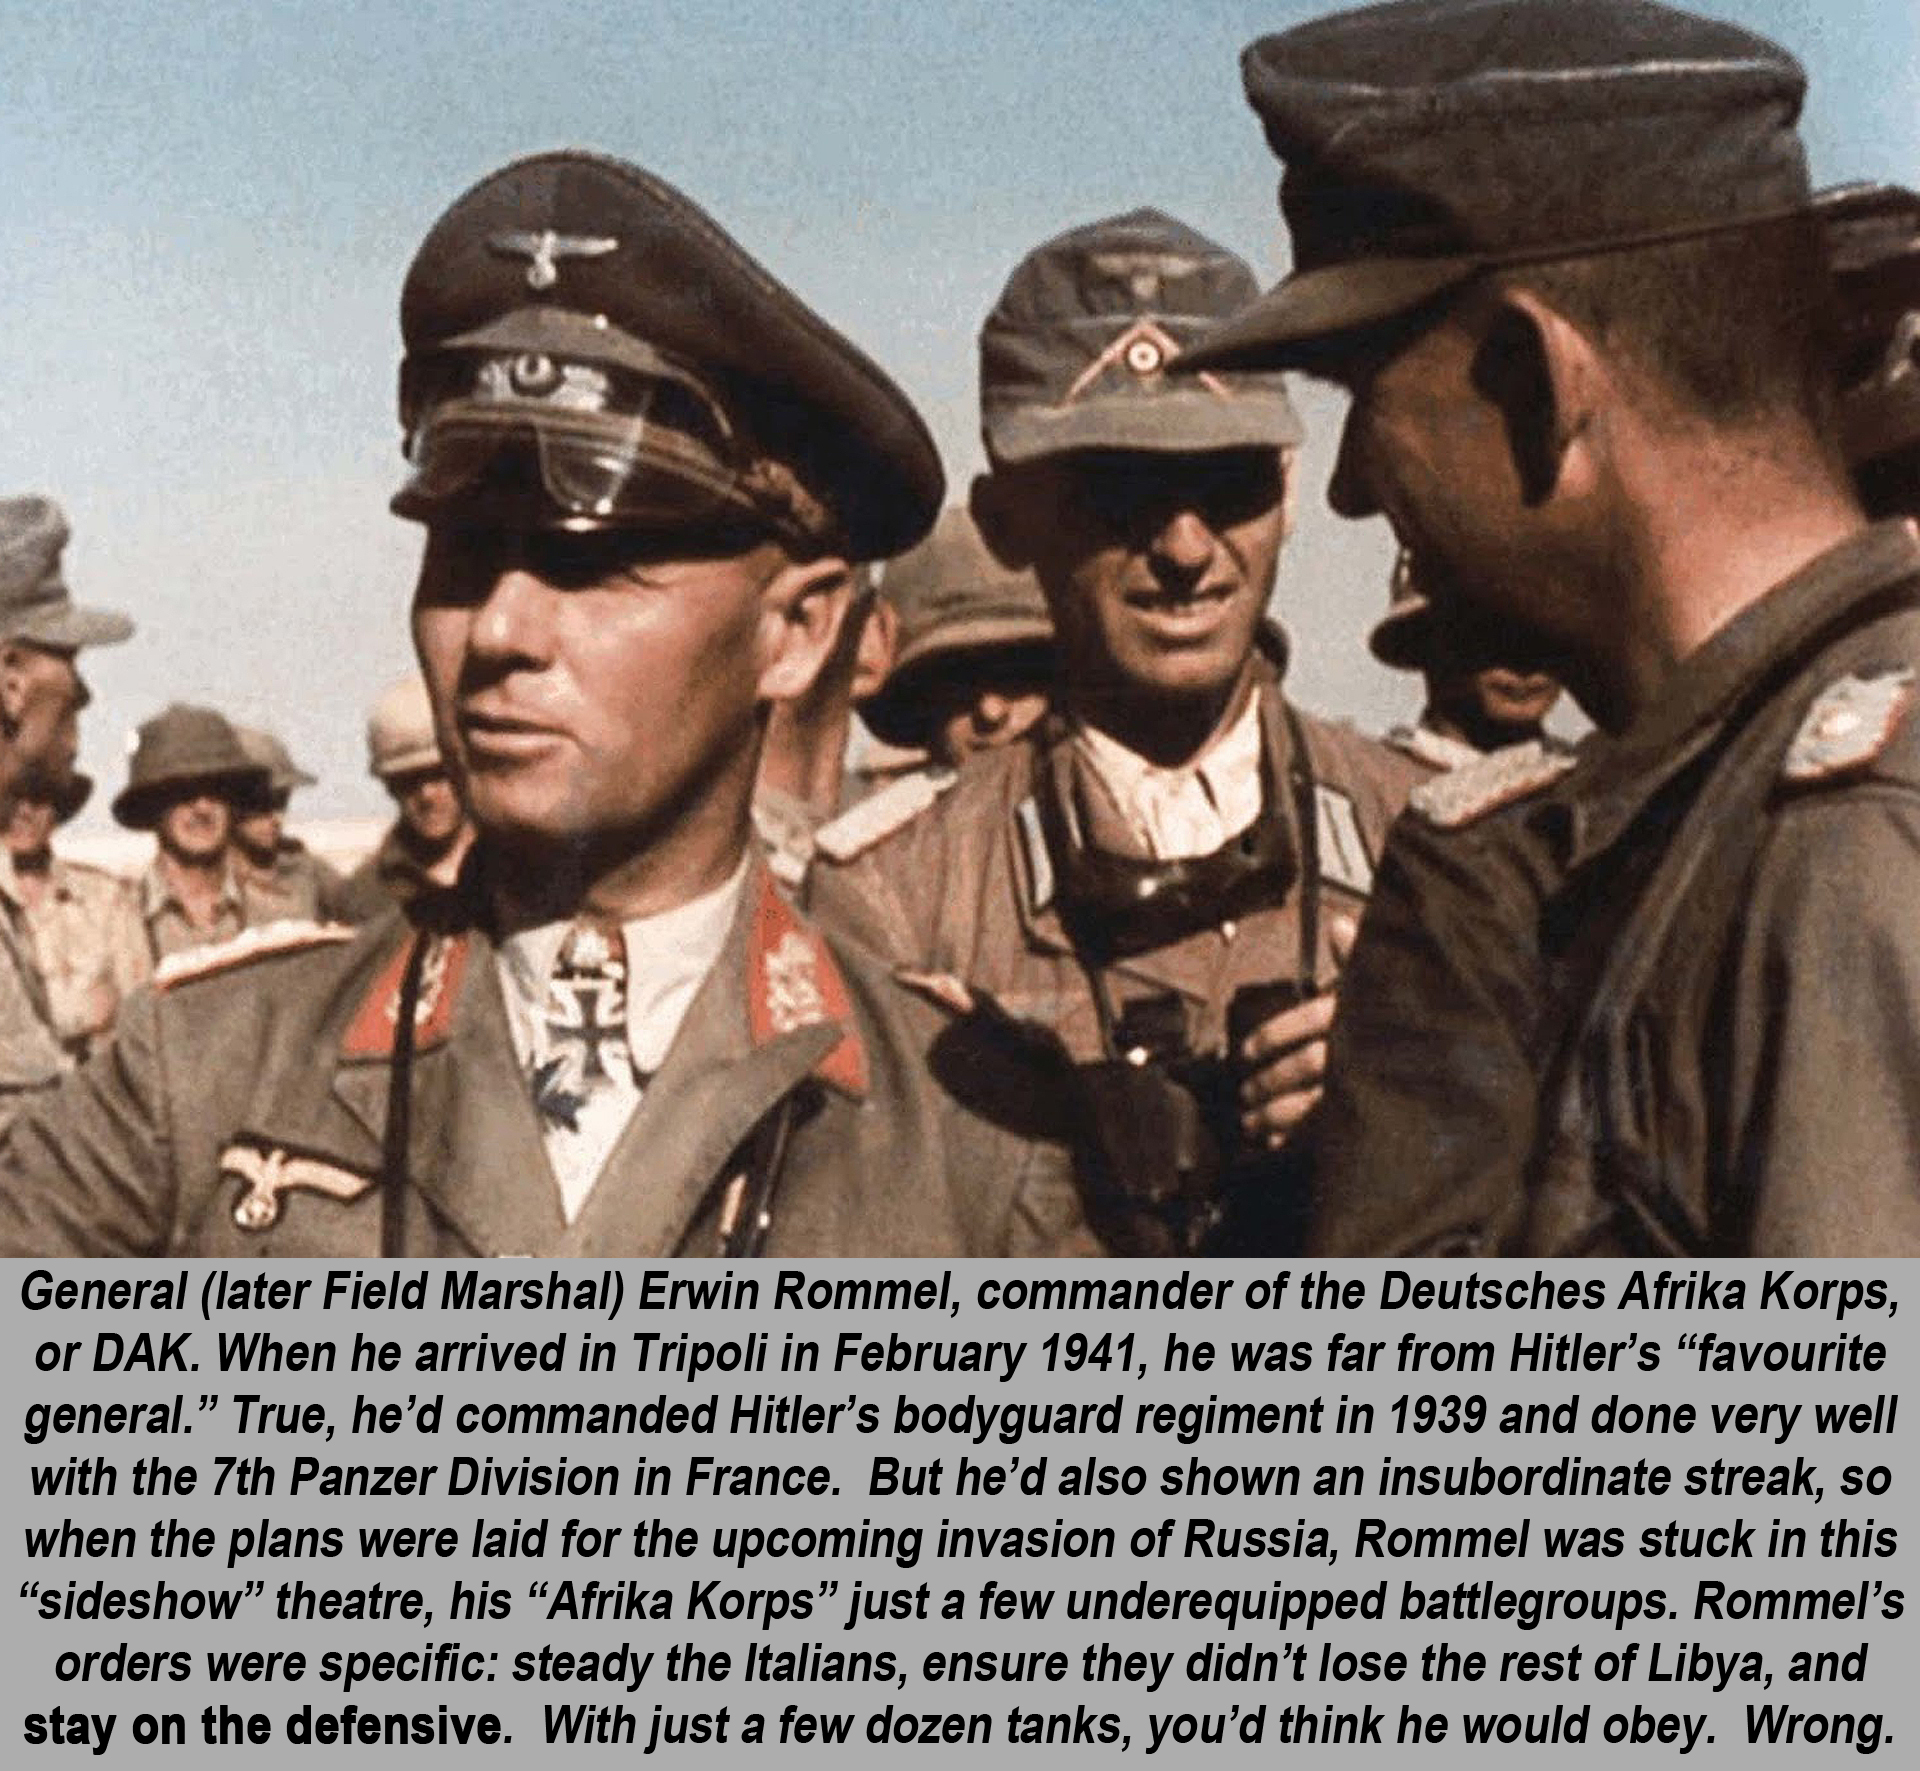
Despite his orders to remain on the defensive, Rommel immediately started planning for the attack. This was especially daring considering that most of his “Afrika Korps” hadn’t even arrived yet, and he started his first big offensive with only two battalions of the 5th Light Division.
It bears noting that the vast bulk of Rommel’s forces throughout all his time in the desert would be Italian divisions. None of Rommel’s victories would have been possible without them, holding defensive sectors of the front or bracing his flanks, freeing his panzers and mobile infantry for the audacious attacks everyone loves reading about.
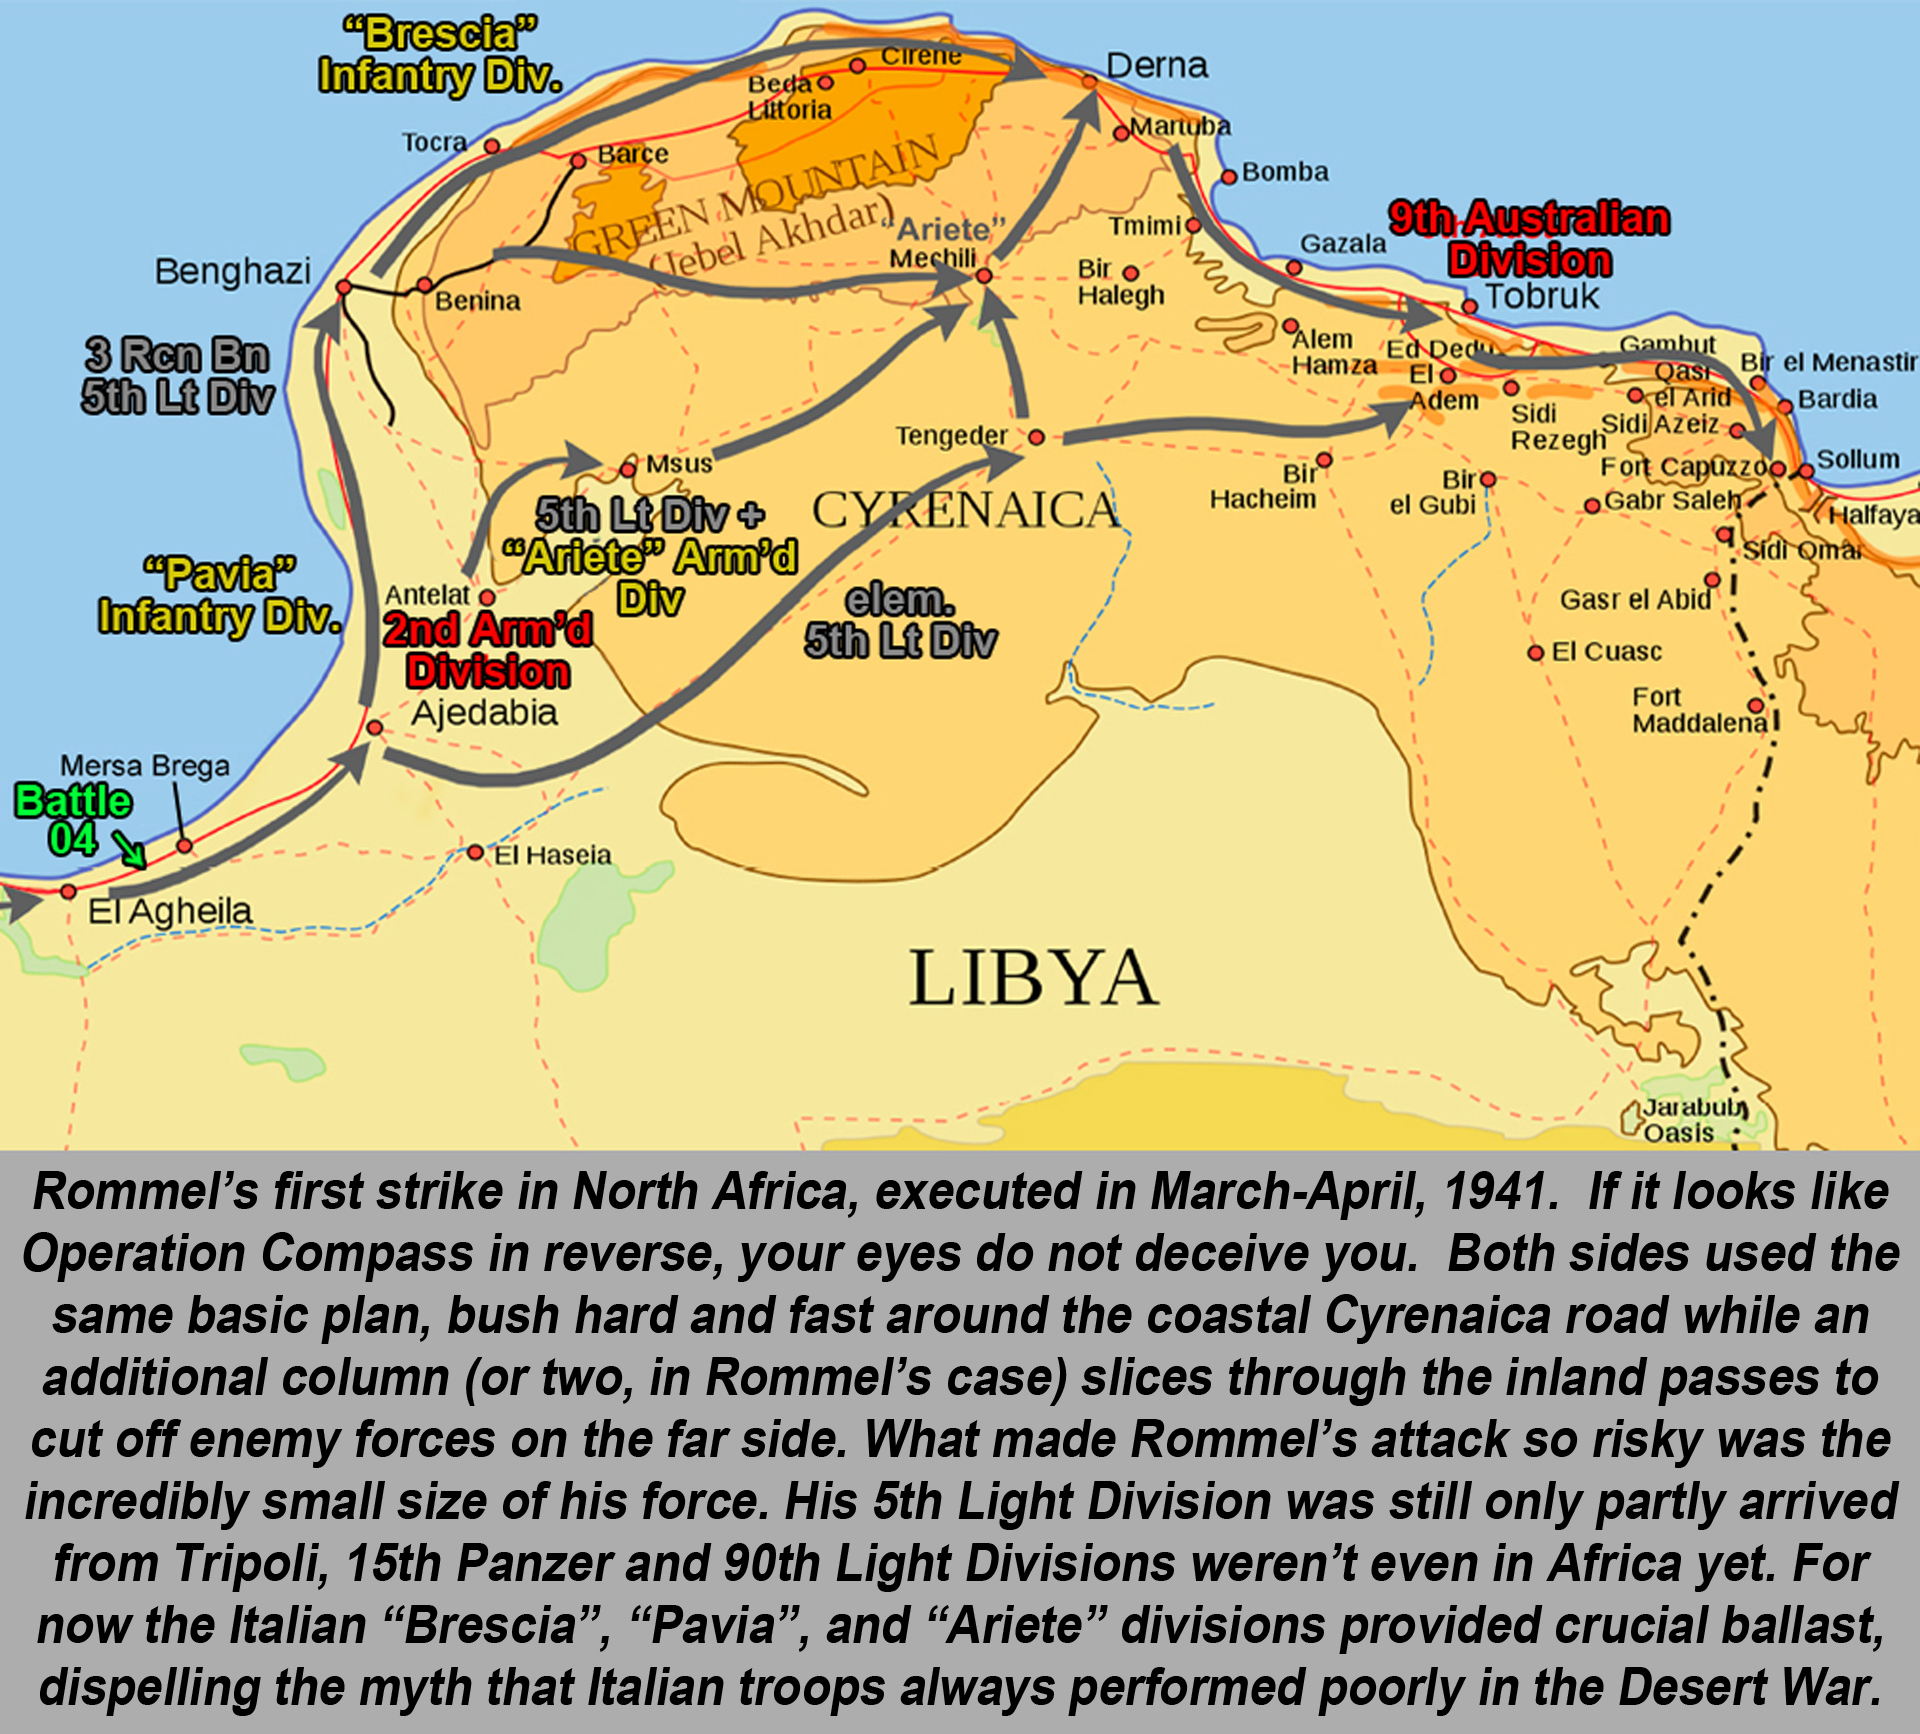
Fortunately for Rommel, the British were in even worse shape. To replace the 4th Indian Division (transferred to East Africa), the 6th Australian (being chewed up in Greece and Crete), and 7th Armoured (refitting in Alexandria), they brought in the 9th Australian and 2nd Armoured Divisions.
Now while the 9th Australian would later become one of the most famous units of the Desert War, here the division was inexperienced, incomplete, and underequipped. The 2nd “Armoured” was even worse, they hardly had any tanks and had to use wretched M13/40s captured from the Italians during Operation Compass.
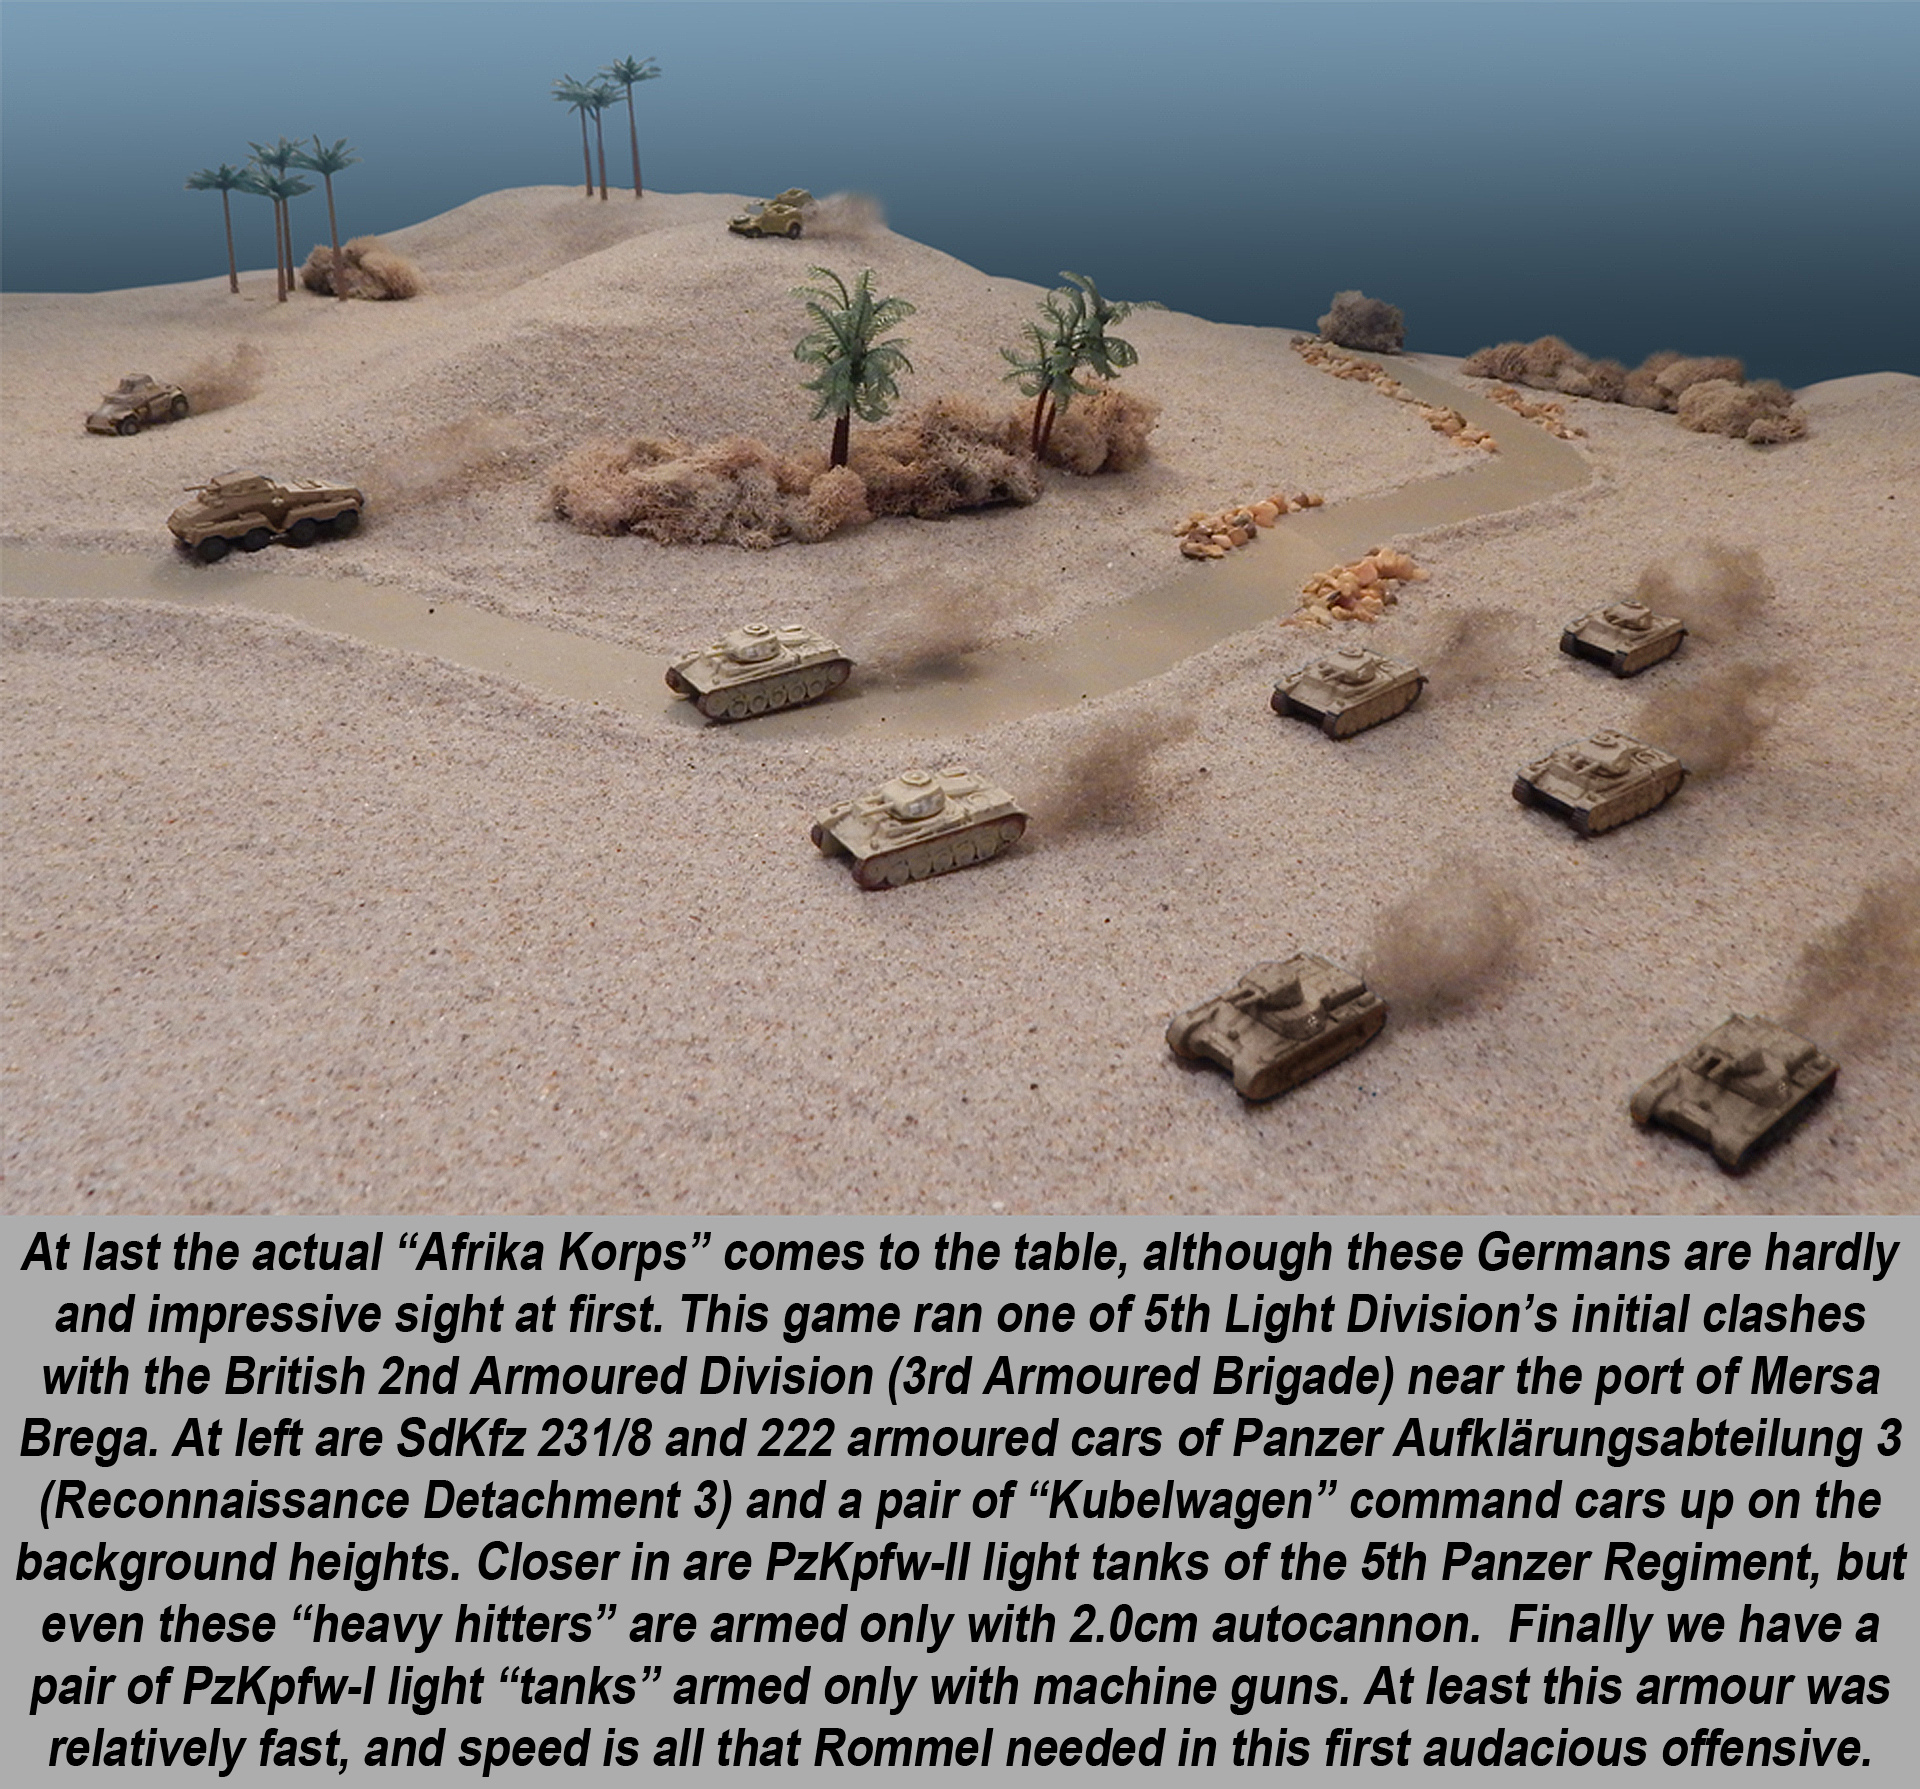
The first scraps involving the Germans in North Africa came in late February 1941, with skirmishes of armoured cars and motorcycles running into British and Australian patrols near El Agheila. Later, as 5th Panzer Regiment of the 5th Light Division arrived, Rommel grew more aggressive.
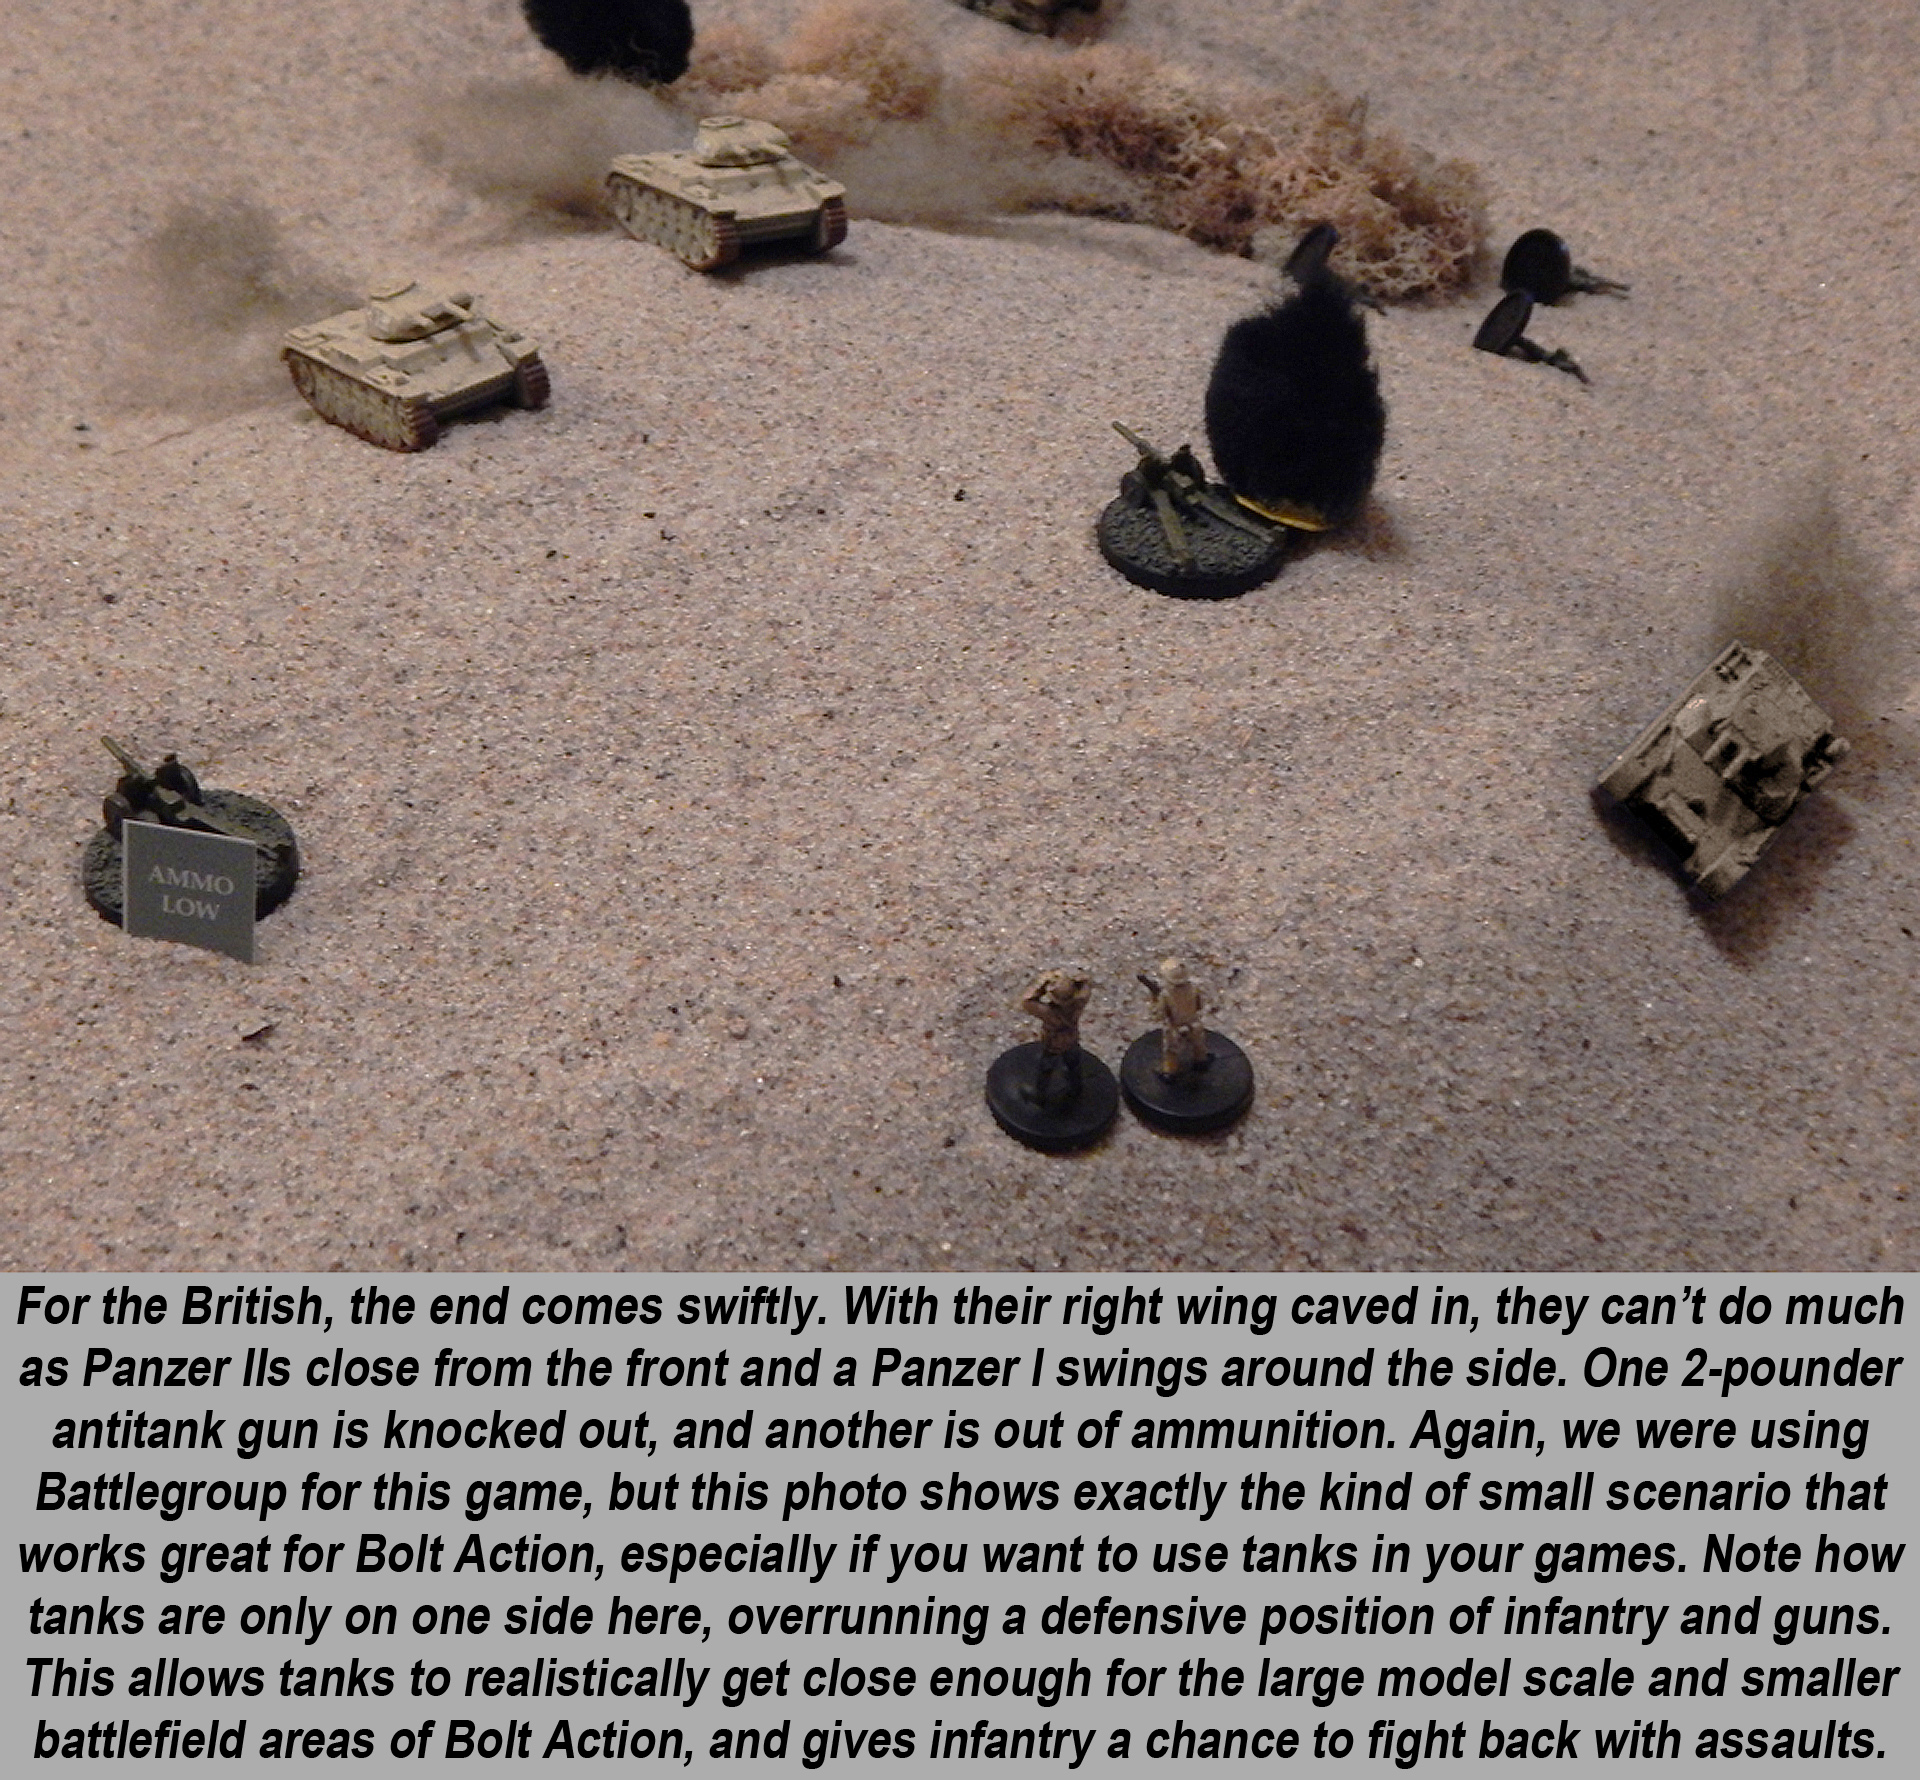
In late March he ordered 5th Light Division’s commander (General Johannes Streich) to break through the British positions at El Agheila and capture the port of Mersa Brega. This is the first real German-British battle of what history would commonly remember as the “Desert War.”
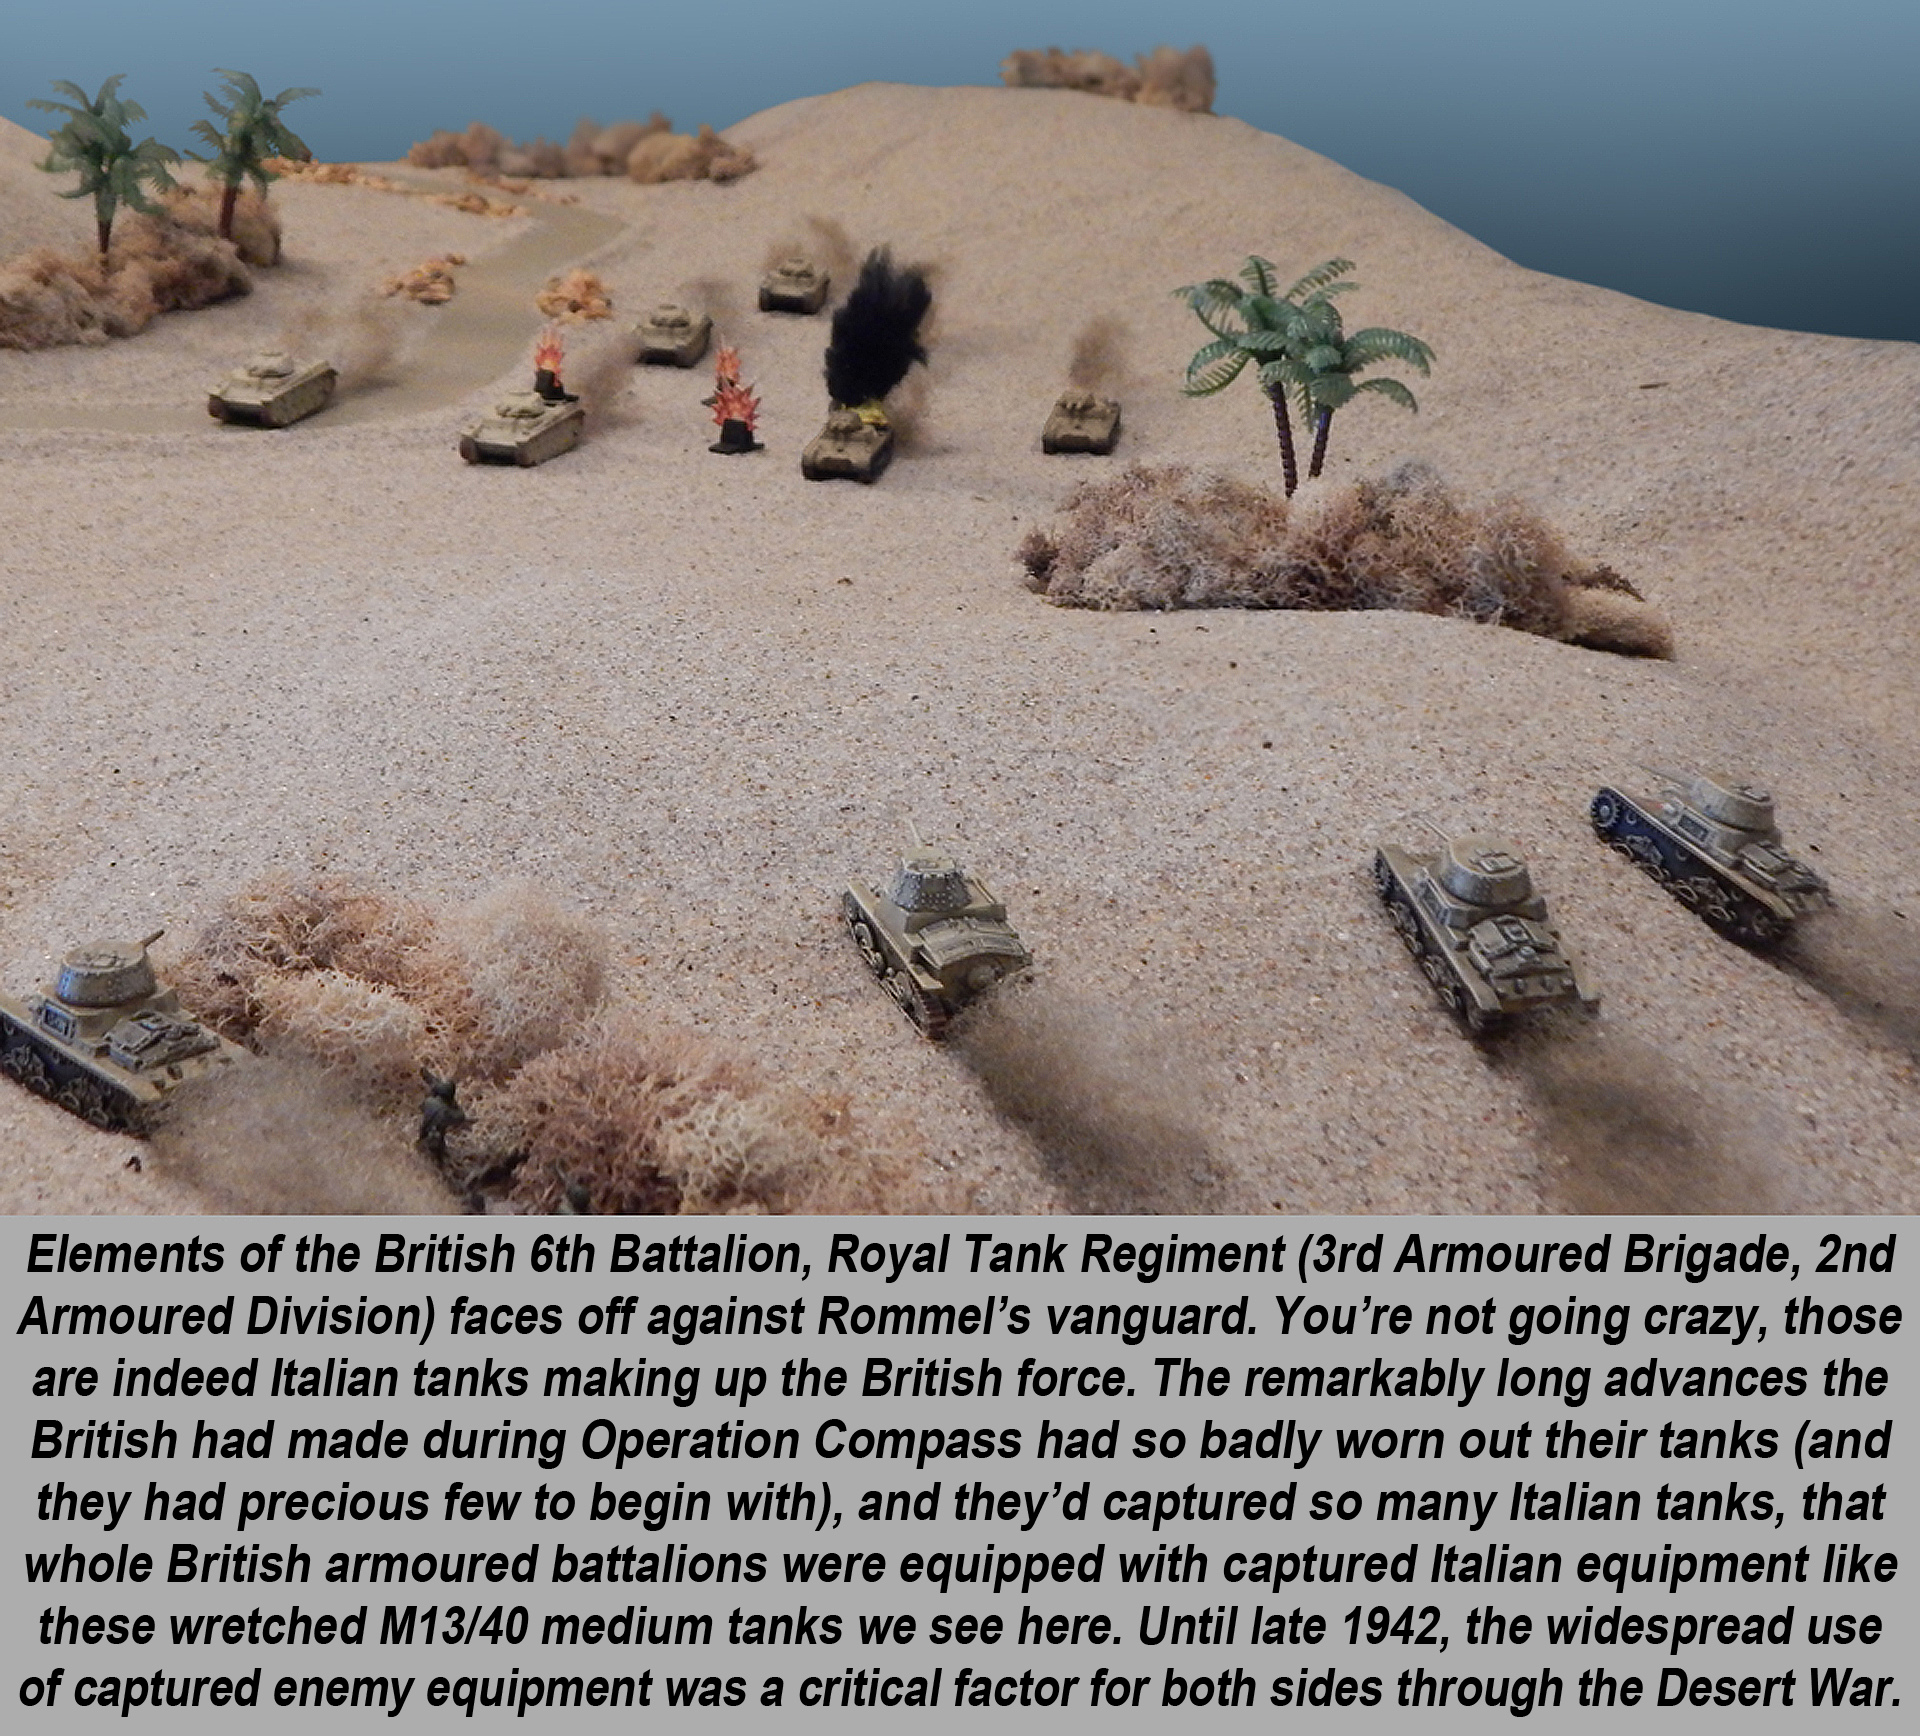
In past article series, we have played wargames that recreated part of this action along the El Agheila-Mersa Brega road, fought on March 30, 1941. The Germans fielded part of the 5th “Panzer” Regiment, made up of extremely light Panzer I and II tanks.
But with only captured Italian M13/40s and a light screen of 2-pounder anti-tank guns, the inexperienced 6th Royal Tank Regiment (2nd Armoured Division) was unable to stop them.

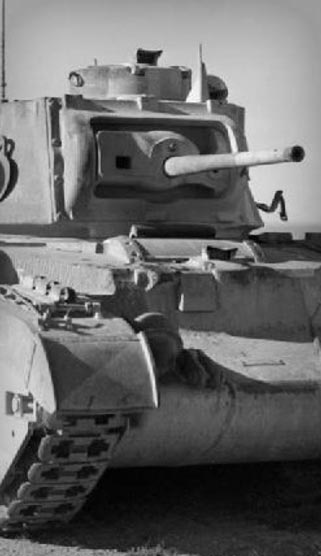
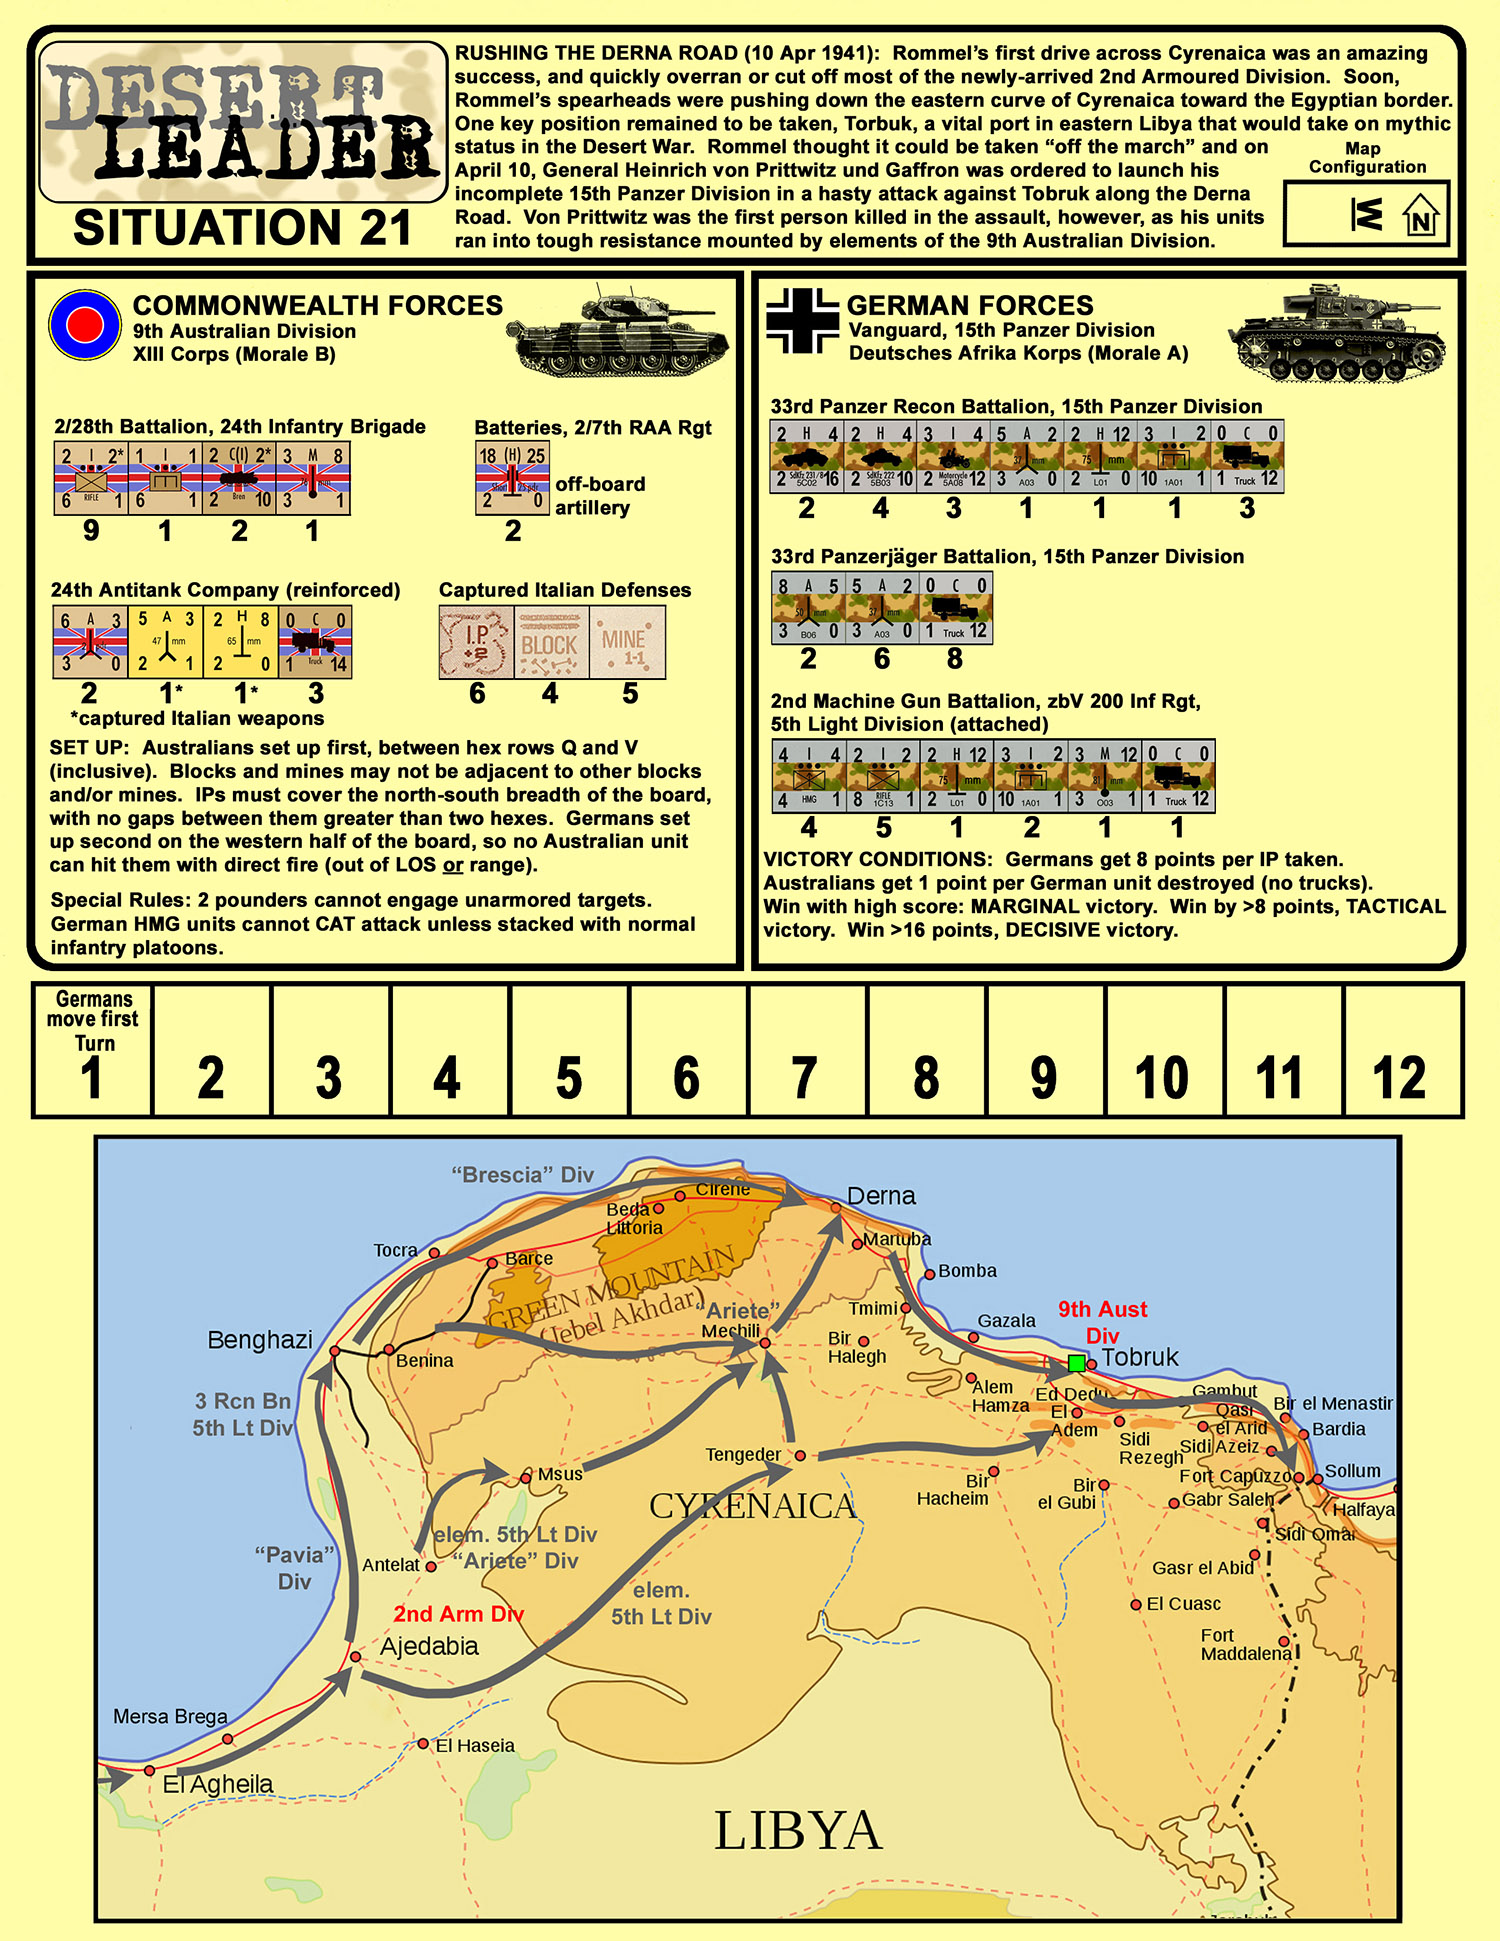
Once it began, the German blitz back to the Egyptian border was unstoppable. Tobruk was cut off and bypassed. On April 10, Rommel tried to take it on the fly with parts of his newly-arrived 15th Panzer Division but the 9th Australian gave him a bloody nose for his trouble (killing the battlegroup commander, a German count of all things). Nevertheless, the 9th Australian was bottled up in the city, and the historic “Siege of Tobruk” had begun.
There was more bad news for the British. The German offensive through Libya was so fast that their commander, General Richard O’Connor, was actually captured along with a good part of this staff. Yet once he reached the Egyptian border, Rommel was compelled to stop just as the British had been against the Italians. Supply lines could only be stretched so far, and Rommel’s “corps” of divisions was still woefully incomplete.
Of course, the Desert War was far from over. On the contrary, it was rapidly growing from a colonial scuffle to a full-fledged “front” of World War II. But as both sides tried to reinforce their armies, they ran into the cruel limitations of what could be accomplished in such a harsh environment, especially with enemy aircraft, warships, and submarines sinking so many supply ships.
Such factors further evolved the Desert War into a full air-land-sea campaign, one of the most complex and misunderstood areas of World War II. Next week we’ll be taking a look at the next stage of the campaign, including the dazzling successes of “Operation Crusader” and Gazala...where both sides captured stunning successes, only to see them turn to sand in their hands.
Have you taken on these early engagements of World War II before?
"One of the first big engagements of Operation Compass was the “The Battle of the Camps"..."
"Of course, the Desert War was far from over. On the contrary, it was rapidly growing from a colonial scuffle to a full-fledged “front” of World War II..."


Great article and photos! I love the dust clouds behind the tanks.
Thanks very much, @gladesrunner – Just little “pulls” of white stuffing from the craft store (not so much cotton balls from the drug store, but the larger stock for pillows and quilts, etc), with a dusting of desert sand spray paint. VERY sticky until it completely dries, however. Make a few dozen of these, big one for tanks and smaller ones for trucks and armored cars. They’ll last well though through a campaign or two (10-15 games) – but hardly what I’d consider “permanent” game pieces.
Have you see the flicker candle’s from dollar store’s put them in the destroyed marker youll have a great look like Burning vehicles. @oriskany
You don’t like my black smoke poofs, @zorg ? 😀 Just kidding, my issue there is the base of those faux-candles (at least here in the states) are a little too big and tough to “hide” in 15mm.
Probably more for 28mm table’s then ?
They would work great for buildings and larger tanks in 15mm. Also, the available faux-candles might be different here than there. And finally,everything looks better in 28mm. 😀
Yes there around 30Mm by 20mm plus the flame in size over in the UK.
Yeah, that would be kinda big for 15mm models. 🙂
nice for kill shots replacing the model with a burning black plum ?
Some games require the model to remain on the board. Wrecks (especially armored vehicles) can block roads, bridges, bottleneck terrain, and also count as “short cover” or “obscuring cover” for further fire between other units.
Excellent article as always. Looking forward to the rest. Following your presentation on Saturdays weekender I have just picked up “Panzer Commander” by Hans von Luck, looks like a great read thanks for mentioning it.
Thanks very much, @gremlin – Indeed, Panzer Commander by Hans von Luck is a memoir both @johnlyons and I have brought up a few times. It’s not perfect, to be sure, but that’s part of what a great memoir. Personally I like the *ahem* “friends” he makes among the working girls of the French coast, his love for wine, and on a more serious note, his retelling of the first time his recon unit is under fire from Polish troops on DAY ONE of the WW2. His retelling of the confusion and scramble at 21st Panzer Division the night D-Day… Read more »
It’s certainly a great story… how much of ‘Panzer Commander’ is reality and how much is fiction, or the two intermixed, is debatable though.
Well worth a read, but perhaps taken with a healthy pinch of salt at times…
Couldn’t agree more. This is an issue run across (to varying degrees) with just about any memoir. The first-person perspective in invaluable (and irreplaceable), but the hard-core facts are probably best left to people who were NOT there, and thus have no attachment or personal stake in the events under discussion.
I don’t know, sometimes even the “experts” with access to all the records the people that were there didn’t have access to can come into this with an “agenda”. I’ve seen this to an extent with books about the German equipment and organisation (and how good it was, yet highlighting non of the downsides). A friend of mine calls it “Panzer P0rn”, it’s written specifically for an audience (and to sell), “history” can be subjective at the best of times, but some of these publications do slant things by the method of omission. So authors can and do sometimes have… Read more »
@phaidknott – I think you hit on a really great point there, and it’s an issue I always have not only with historical media I watch / read … but also admittedly media I PRODUCE, either with articles or video interviews, etc. The error, slant, and misrepresentation isn’t always in what you say, its in what you DON’T say. The issue for us as content producers is we have constraints on how long the videos can be, how long the articles can be, etc. Sooner or later we have to summarize, approximate, round off … and sometimes (intentional or not)… Read more »
A good example of author bias is David Irving who wrote ‘The Trail of the Fox’, at the time a well regarded autobiography of Rommel. Several years later Irving revealed himself as a neo-nazi revisionist and holocaust denier and his work became ‘questionable’.
It’s amazing this guy was ever considered a historian. A Holocaust denying “historian” is a contradiction of terms, to be blunt.
One of the engagements I would like to investigate further would be the 9th Australian division’s defence of Tobruk. You could quite easily recreate combat patrols, defensive positions, German probing attacks, pretty much every type of engagement at a skirmish level without going too tank/artillery heavy until all of the boot camp participants are up to speed with the basic rules. You would need lots of wire and mines though but you could ignore that and just accept that the opposing force had breached the outer defences. As I understand it the Aussies used a lot of fox hole style… Read more »
Thanks @brucelea – One of the engagements I would like to investigate further would be the 9th Australian division’s defence of Tobruk. That would indeed be interesting to look at. This particular series deals more with the battles around Tobruk (especially during the Brevity / Skorpion / Battleaxe / Crusader period). I do have one scenario in my Desert Leader writing that deals with Rommel’s initial attempt to take Tobruk off the march when his initial offensive was just wrapping up. Of course this assault fails, at some cost (including one of Rommel’s colonels or brigadier generals, I can’t remember… Read more »
Hi @oriskany,
The SAS & SBS certainly did a lot of work monitoring the Iraqi MSRs and Scud hunting, generally being a true pain in the arse in the traditions of the UK special forces.
We definitely heard stories at the time, along with US Green Berets, Marine Recon, French Foreign Legion, etc. 😀
Would that be the (infamous?) ‘Bravo Two Zero’ story ?
https://en.wikipedia.org/wiki/Bravo_Two_Zero
We heard about the US Green Berets and US Marine Recon. I would defer to @brucelea on British SAS.
Yes that was probably the most well publicised action @limburger
The successes remain secret, the “FUBAR” missions get all the publicity.
Unless there’s a propaganda opportunity to be had …
😀
@oriskany funny you should mention this, Just started re-reading ‘Tobruk the Great Siege Reassessed by Frank Harrison who was a signalman in the Seige. Just getting to the account of Rommel’s 1st attempt to bounce Tobruk.
@bobcockayne – Here is Rommel’s first attempt to “bounce” Tobruk with von Prittwitz und Gaffron’s rush up the Derna Road: Note the use of captured Italian weapons by the Australians.
Historical / Panzer Leader
Thats literally the next chapterI have to read
Interesting to think about, @bobcockayne . If Rommel had managed to grab this road and take Tobruk “on the go” before a protracted defense could be set up (notice I don’t call it a siege, I don’t think Tobruk was ever really under “siege” with complete access to the British-dominated sea for reinforcement and supply) … how might this have effected battles through the rest of 1941? Rommel would have more strength at the front without having to invest this bastion in his rear. Also, the British wouldn’t have been under such immediate pressure to throw Rommel back and relieve… Read more »
@oriskany He probably would have managed it if Moreshead hadn’t been Garrison commander.Book I’m really calls him the ‘Shotgun’.
Yeah, @bobcockayne , he was definitely a badass. Started off WW2 as a brigade commander, wound up commanding corps in New Guinea and Borneo.
@oriskany well got to read the about the initial attacks on Tobruk, his 1st attack after above, seemed to be awfully familiar on reading it, and it brought images to mind, then remembered had watched the 50’s British (Australian) movie with Richard Burton and James Mason(pre his classic Rommel), and realised they portrayed in the movie that attack reasonably accurately. Only missing out the role of the tank brigade, but as movie was from the perspective of Aussie infantry possibly forgivable.
Chewing through some new sources on this campaign, specifically Rommel’s first Cyrenaica camapign of March-April 41, culminating with his early attempts to take Tobruk and the commencement of the “siege.”
A wider-scale tactical look at one of the first assault attempts bear King’s Cross.
Above is a matchs Moresheads battle plan map in the movie, going to watch it again tonight as found good copy,
There are several maps in this book, including the successive Axis break in attempts garrison dispositions, and Commonwealth attempts to relieve the garrison with operations like “Brevity” and “Battleaxe.” Stops before “Crusader”, though, that would probably get its own book. 😀
Rommel really proved his insubordination and his ‘chancer’ streak with these first operations, if the commonwealth had just a little more ability to resist in place the ‘Afrika Korp’ could have been a ‘two minute wonder’.
Couldn’t agree more. I’m not really a Rommel fan-boy, to be honest, I feel he’s greatly overrated. Furthermore, I feel a soldier’s first and most important qualification should be an ability to follow orders, an area in which Rommel fails spectacularly … and repeatedly. His superior, Kesselring, is often blamed for Rommel’s failures, while his part in Rommel’s successes go unrecognized. I think it was in 2007 when American Heritage Magazine interviewed a panel of German military historians, asking them to list their “top five German generals of WW2.” Twenty or so historians, Rommel’s name didn’t come up once. I… Read more »
After reading this great part two of this series I did away with a prejudice I had with the beginning of the African war, that is it was boring and kind of hollow. The British attack on the Italian camp, defeating a large army with only a very small force, all this is interesting. It´s really a pity they don´t have as yet made plastic kits for panzer I, panzer II, Italian M13/40 in 1/56 scale. 1/100 is no problem. Question: 1. Did the Italians have any flamethrowers or flame-tanks to use, especially to use against impenetrable tanks? 2. Is… Read more »
Thanks very much, @jemmy – Very sorry to hear that they don’t make plastic 1/56 for these early war tanks. Early war is where the “range problems” endemic to 1/56 are the least pronounced, to say nothing of the “imbalance of arms” between infantry and armor. In other words, I feel this is where 28mm games would work best, at least if you were serious about “historically proper” use of armour on the tabletop. 1) No Italian flamethrower tanks in Africa. I have pretty comprehensive OOBs for these forces, and I’ve never seen it. Of course someone else might know… Read more »
Just for you @oriskany FJ-Brigade Ramcke (originally Fallschirmjäger-Brigade Afrika) fought from around El Alamein till its surrender in Tunisia in May 43, though by then Ramcke had long returned to Germany and it was called Luftwaffen-Jäger-Brigade 1 by the end it was more a reinforced company after the retreat from Egypt. It was composed as follows; Kampfgruppe Kroh–I/FJR 2 Kampfgruppe von der Heydte–I/FJR 3 Kampfgruppe Hübner–II/FJR 5 Kampfgruppe Burckhardt–Fallsch Lehr-Bataillion Burckhardt’s Lehr-Bataillion had previously served in Libya in January-March 1942,then redeployed back to Germany. FJR 5 were deployed around Tunis in November 42 and were partly formed from the remnants… Read more »
All right, @jemmy – there you go! I told you, @piers would not let us down re: fallschirmjäger in Africa! 😀
The more I read about him, the more I think this O’Connor guy is a bad ass. Did anybody ever make a movie about him?
Not that I know of. I know he did some interview segments after the war in the classic “World at War” series. From what I know he was captured almost by chance. It really is a “shame” historically that he and Rommel never really got to face off. As we see in Compass – where his “five day raid” turned into a two-month British Blitzkrieg that almost ended the Desert War practically before it started … this was a fast-thinking, flexible, agile, aggressive commander … much like Rommel himself. Both the WDF and the DAK at the time were terribly… Read more »
The book Castle of Eagles by Mark Felton which about O’Connors and others escape has had the rights sold for a film
Rights sold for a film but never made? Maybe we should initiate a Kickstarter! 😀
The book was only published in 2017
All right, we’ll give then a year. Just ONE YEAR … then we take over! 😀
Agreed. I’ll get the flip chart ready
I’ll get to work on the “elevator pitch.” 😀
@oriskany always one of the great what if’s , in the’ Whale has Wings’ series, its reversed and Rommel gets captured by O’Conner and survives the war. He never finished the series of books, shame as it was heading for combined American/British fleets preparing to stop the Japs at Midway where it stops.
I also like some of the Turtledove alternate history. 😀
@gladesrunner would be interesting the early war here, his time as prisoner, he later appears on release in Normandy,
Just had “Microsoft Susan” read this to my while I built a Bren carrier. While she does not know what she is talking about she done an understandable narration. Another section of the desert war I am completely naive about. Great to go through in preparation for the boot camp. Finding this weird going through and finding myself reading books and looking deeper into the history. Thanks!
Awesome. So my words being spoke by a disembodied female? Not sure if that sounds creepy or if I’m just old fashioned. 😀 Glad to hear we may have another historical research convert! Bwahahaha! 😀
@jemmy have you tried blitzkrieg miniatures http://www.blitzkriegminiatures.com/html%20pages/Main%20Pages/56%20scale%20tanks%20menu.html
This thing must be a beast in 28mm. 😀
The Italian L3/35 had a flamethrower conversion
Not seeing any records of these deployed with Maletti Group in Africa, though. Or 2nd tank Group at Sidi Barrani, or 4th CCNN 3 Gennaico Division, or even 1st Tank Group back at Tobruk.
Pignato in his book Italian Medium Tanks in Action states The L3 Lf saw action in Abyssinia, Spain, France, the Balkans, North Africa, and Italian East Africa. From 1936 each CV/L3 company had a single L3 Lf platoon.
I can’t speak for the rest of these locations, but does your source say which units in North Africa, and when? Because I’ve gone through the entire Tenth Army for Sidi Barrani / Compass and haven’t found them: Tenth Army (Bardia) Tenth Army Misc troops Babini Armored Brigade XX Corps (Giovanni Berta) 60th Sabratha Division Libyan Group (Sidi Barani) 2nd Tank Group 1st Libica Sibella Division 2nd Libica Pescatori Division Maletti Group 4th CCNN 3 Gennaico Division XXI Corps (Sofafi) Tank Battalions 63rd Cirene Division 64th Cantanzaro Division XXII Corps (Tobruk) 1st Tank Group 61st Sirte Division XXIII Corps (Bardia)… Read more »
I found a reference to the book on the wiki page on the L3/35. That’s as far as I got
Gotcha. I now own the book. I’m looking and see … The CV 3 evolved into the L 3/33-35 (Leggero, light, 3mt, standardizes in 1933 and modified in 1935), which was armed with two gimbal-mounted 8mm Breda machine guns. Approximately 2000 CV3s and L 3/33-35s were delivered to the Royal Italian Army and Export customers. These vehicles included a radio-equipped command, flamet-thrower, and bridgelayer variants, and saw action in the Italian invasion of Ethiopioa (Abyssinia) in 1935-36, with the Nationalists in the Spanish Civil War of 1936-39, and Italy’s conquest of Albania in 1939. While I was researching, I ran… Read more »
Sonetimes Wikipedia is right
Right, yes. Just incomplete. And as historical editor, I really do my best to n to rely on Wikipedia too much. I mean they outright misquoted the Pignato source.
It’s good for quick double-checks (is it Rudolpho or Rodolpho Graziani …) and also to help FIND “real” sources.
I use it as a very basic beginning if I want to know about something. If it’s something interesting I’ll then go find a book about it
Indeed – same here. So I now have a specific unit – the 132nd “Ariete” Division – “32nd Regiment Carrista.” In February 1941, when the first German units under the command of General Rommel tarted to arrive in Libya, there were only 46 L 3 still available with the IV and V light-tank battalions, hurriedly sent from Italy in December 1940. Between 24 January and 26 February 1941 the whole of the Ariete armoured division followed, with its three light-tank battalions (I–III, followed by the VII, equipped with medium tanks), and a total of 93 machine-gun-armed and 24 flamethrower L… Read more »
@oriskany cant say blame you, particularly as it can be edited, such a the kind gentleman who decided to take of any WW2 games rules written by British Authors for some reason, Remember Richard Clark suddenly found all the entry’s for ‘I Aint been shot Mom ‘had been removed.
Indeed @bobcockayne – Wikipedia has gotten better overt he years, and is often a good STARTING point for research, but depending on how serious you’re trying to get, it is definitely a STARTING point. I don’t use it as a source so much as a place to start looking to FIND the actual sources.
A great article ! Always love your war articles @oriskany . I better read this one again, to prepare for the bootcamp. Favorite tank in this article Matilda II 😀
“Queen of the Desert” – @svboel – indeed these things were awesome for the time …if indeed a little slow. Okay, make that REALLY slow.
I’ve never used one in Bolt Action, but in Panzer Leader and Battlegroup they are nigh-invincible to just about anything the Italian Tenth Army. Like all tanks, though, they’re still vulnerable to mines, breakdown, and infantry close assault.
We 1st used them in Panzer in and Early war battle with Italians, no rule for breakdowns so they pretty much dominated the game, even if the M13/40 sat behind one it was not guaranteed to penetrate.
Richard Clark gave them a break down chance in ‘I aint been shot Mum, but with careful use you could avoid that. Think we tried a later game with semovente 75mm and even then it wiped the floor with them.
Thanks, @bobcockayne – The photos in this article were originally from a Battlegroup game, where these Matilda IIs were damned near immortal. One did get taken out by a short-range hit from an Italian 75mm field gun, a lucky hit, really. But really against Italian weapons in Operation Compass, it’s mines and infantry assault. Those Model 90/53 AA guns were not in theater yet at the time, I don’t think.
If you want to watch all 22 parts on you tube Bovington have been restoring a Matilda 2
https://youtu.be/5wM0KN27ano
Might be a good watch / listen through long hours of painting minis.
@oriskany and @torros : You guys rule!
We’ll get to the bottom of it eventually, @jemmy ! 😀 I just really hesitate to call the L3 / CV 33-35 a tank.
It would literally fit in most office cubicles.
A fireteam of Ethiopian infantry can flip one over.
Italian motorized battalions carried them into battle on the back of what were essentially pickup trucks.
Also, it looks like the flamethrower variant was used (confirmed) exactly once: 16-17 April 1941, vs. Australian 9th Infantry. POSSIBLY a few were included in the follow up attack 30 April – 4 May, but the source material doesn’t confirm.
Isn’t it officially a tankette?. I remember standing beside I think a TKS at Bovington and it came up to my chest
Yeah, so when @jemmy asked were there any flamethrower Italian Tanks in these particular battles, the answer technically is “no.” 😀
I’m sure you could have one attached to an infantry company as its parent company left it behind as it was being repaired and got caught up in the defence of particular place or requisitioned to help attack strong points
Oh, certainly. For game scenario purposes, and especially on the very small unit scale of Bolt Action, the possibilities are almost limitless.
Hell, you could have the Australians using a CAPTURED flamethrowing CV-33.
Either in combat …
…or to fire up some shrimp n’ ribs on th’ barbie!
G’Day!!
Have you ever played the Italians but used the German weapon stats to see if they fight harder @oriskany
Most games I play, the weapons and men are “together” in one unit. In most good games, whether a unit is “good or bad” doesn’t have much to do with whether the individual troops are “good or bad,” but morale of the unit, how the squads, platoons, companies, and battalions are organized, how they’re equipped, trained, the tactics used by their NCOs and low-level officers, and how the different levels of command work together. Many times these factors are amalgamated together into a generic, semi-abstract “troop quality” or “cophesion” or “morale” rating. So it can be tougher than just equipping… Read more »
This would be my experience as well. Most games I play will have 1 stand= platoon or squad and have an experience level and a morale value. Of course this can be changed before you play a particular scenario depending on supply etc
Yeah, I was kind of thinking of that as a round-about way of answering @zorg ‘s questions … basically playing Germans with lower cohesion / quality / morale values … but even that doesn’t really work because it doesn’t reflect how German-armed Italian companies would call in artillery from Italian regiment- and division-level artillery assets, air strikes, etc.
a great concise answer so workable but to many variables to be accurate.
Well here’s the thing we have to remember, especially super-grognards. 😀 All wargames are … in the end … an approximation. Sooner or later you always have to say, eh … close enough. 😀
lol
It’s on record, though, that Italian troops fought much better under German leadership than Italian leadership – suggesting many of the problems were related to Italian officer corps and not the soldiers themselves.
Could this have been respect of their skills or fear of German discipline @oriskany
@zorg – Sun Tzu wrote: “Know your enemy and yourself and in 100 battles you will b e ever victorious.” Sounds simple, but put another way – know what your army is good at, and what it ISN’T good at. And plan accordingly. Every army, even the German DAK, is terrible at something. The DAK, for example, never had the infantry strength (sheer numbers) to set up solid desert defenses. Big numbers was the only thing the Italian divisions had. So Rommel used them for that. NOT invading Egypt by simply walking into the country. Once troops and junior officers… Read more »
they do say you don’t control an area until you have boot on the ground so the additional troops the Italians added to the mix gave Rommel the power to do this to bigger areas.
Absolutely. You need an infantry base to hold a start-line, flanks, new ground taken, etc.
I’m reading Lucas’ Panzer Army Africa at the moment, and it talks about this aspect. While both the Italian and British high commands were mostly far away from the front lines, the Germans knew their commanders were there with them. Because of this the soldiers fought better knowing the commander was experiencing what they experienced as well as being able to respond to changes on the fly. There was a comment that Italian troops were poorly fed, if at all sometimes, while their commanders kilometers away ate great feasts like it was peace time. I suppose this shows that it… Read more »
Agree 100%. The Italian Army at the time was plagued by an officer corps largely staffed by “inherited” positions, widespread corruption, elitism, and other problems you usually read about in armies of previous centuries. Also, yes …equipment was a massive problem. The Italians weren’tintending to jump in this war, and when Mussolini thought he saw a quick opportunity for easy “cash in” on French and British collapses, they were drawn into a war for which they were at least 5-10 years away from being ready. Widespread supply and starvation were problems for the Italians invading southern France, the Balkans, and… Read more »
I’ve read the @Avernos , I read an account from a Reporter with the 7th Armoured in the early campaigns marvelling at the comforts and kit the Italian officers had compared to the rest of the pbi.
Highly recommend “From Alamein to Zem Zem” for first-hand accounts of 7th Armoured in action. 😀
https://en.wikipedia.org/wiki/Alamein_to_Zem_Zem
A little off topic but this is quite interesting
http://www.tanks-encyclopedia.com/campaigns-and-battles-in-east-africa-the-north-british-and-french-somaliland/
Eh … not really off topic. I mean this is most of what we covered back in Part 01 of this series. 😀
Umm…Err must have missed that bit
I guess I should be more specific. Article 01 was PARTIALLY about this – specifically the Italian invasion of British Somalialand. The British re-invasion of Abyssinia, Somalia, Eritrea … no, we didn’t get to cover all of that. We’d need another article series. 😀
Another great article @oriskany, especially as I am in the process of getting a Matilda II painted up, still have not decided on the final camo, it’s basically desert sand at the moment.. I may just leave it at that, I am not a fan of painting 28mm tanks.
I feel your pain. I’m still working on my first 28mm vehicle (LRDG trucks) and yeah … having many issues. Not a fan, although in all honestly I’m just not good at this scale yet. I do like the troops, though.
Thinking back when I did mine, I used a cheap light leather brown from a crafts shop, came in big bottles for undercoat, and then base coat and then had a happy half hour drybrushing sand over them.
Still leaves on of the best looking finishs if a bit time consuming, usually used to brush the underside of vehicle 1st to ensure most of the excess had come off , and nobody was going to look underneath. Though these days a base sand coat and then a brownish wash is the quicker way.
I tried a brownish wash and even after I cut it with water it went on too thick. Then re-filtered over it with thin coats of the original color, which softened the wash a bit. THEN put a light gray Vallejo wash over it, on the suggestion of @suetoniuspaullinus – which actually worked pretty great. Picked out some further details, now tonight I hope to put on a sandy dry brush, then back for the final detailing and pin washing over certain spots. 😀
@orisakany Brillent article as usual and more than a few titbits I didn’t know about, such as Rommel sent to Africa to get him out of the way.
In book I’m reading on Tobruk it certainly backs up your comment on borrowed kit, much of light AA at start of Seige was Italian , think they late used a lot of captured artillery as well.
I should mention that my characterization of Rommel’s assignment to North Africa is a little subjective. He certainly wasn’t “Hitler’s favorite” yet, so his assignment was passed down from OKW, and Rommel was frankly NEVER popular with other generals. Yes, captured equipment is a huge factor in the Desert War on both sides, especially earlier on. Once America’s fully involved, the British rely on captured equipment much less, but the Germans are using British and American vehicles, heavy artillery, etc right up until the end in May 43. The possible exception might be “jerry cans.” Originally designed and issued from… Read more »
My favourite British unit with captured weapons was one using captured 88mm Flak guns…
I also like the German batteries at Sidi Bou Zid / Kasserine using (in part) captured British 25-pounders.
Steal from the best, baby! 😀
Also lest we forget Germans dressed in British uniforms, in case anyone has picked British but want to be on the winning side 😉
Are people starting to defect already? 😀 Just remember how well the British did at the last desert war boot camp!
One battery also had British 3.7″ Mountain Guns!
@oriskany Have a photo of one of them in ‘Tanks at War’ by Imperial Was museum.
Will bring it with me for bootcamp, some interesting photos in it.
When 1st brought spent a happy afternoon on the couch with a snoring dog reading it.
Photo of which? The “British” 88s? “German” 25 pounders? 3.7″ mountain guns?
My bad, 25 pdrs!
We had them featured in the “Americans in Tunisia – Baptism of Fire 1943” series – Germans 25 pounders at El Guettar (had the wrong battles listed above – apologies).
@Oriskany Strangely enough, my mate (of Yarkshire Gamer) has just done Operation Compass a few weeks ago (I’m sure there’s some sort of weird trans-atlantic mind link thingy going on here. Some 28mm piccy’s on his blog….
http://yarkshiregamer.blogspot.com/
Epic, @phaidknott ! Yes, Compass is definitely one of those campaigns I’m surprised … and yet not surprised … isn’t done in wargaming more often. Surprised, because it’s awesome. 😀 Not surprised, because you have to get someone to play the Italians when they really are at their worst. You really have to nail asymmetrical victory conditions or your British, Australians, and Indians are going to stomp the Italians in games that frankly wouldn’t be fun.