


The Desert War: Bolt Action Boot Camp Preparation // Part Four: Turning The Tide
September 10, 2018 by oriskany
For the past three weeks, we’ve been gearing up for the imminent Bolt Action Boot Camp with this article series looking at some of the more decisive desert engagements of World War II, fought primarily in North Africa.
In a nutshell, our aim is to help players and hobbyists approach this subject with a little more confidence and perspective, offering as much background and context as they may be interested in before the event kicks off at the end of September.
Read The Original Article Series Here
For those just joining us, our progress thus far has been presented in Parts One, Two, and Three. We’ve seen the Italians start this war almost by accident, followed by the British coming within inches of victory only to have Rommel show up and hurl them back. Through the “Crusader” battles of late 1941 and the Gazala offensive of 1942, both sides have thrown heavy blows as the Desert War see-sawed bitterly back and forth.
But in the late summer of 1942, after two years of attack and counterattack, a crisis point has finally been reached. Having been thrown back halfway across Egypt, the Allies can retreat no further. Having exhausted their supplies and reinforcements, the Axis can wait no longer. The Allies are out of space, the Axis is out of time. One way or another, a decision will now be made at a tiny desert railroad town...called El Alamein.
As we saw last week, “Panzergruppe Afrika” roundly defeated the British and their Commonwealth allies at the Battle of Gazala. Rommel was thus able to overrun Tobruk (which had held out for 240 plus days the last time the Germans had been here) and push the Allies back into Egypt. The British attempted to make a stand at Mersa Matruh but were outflanked and defeated again. This time the retreat took them all the way back to El Alamein.
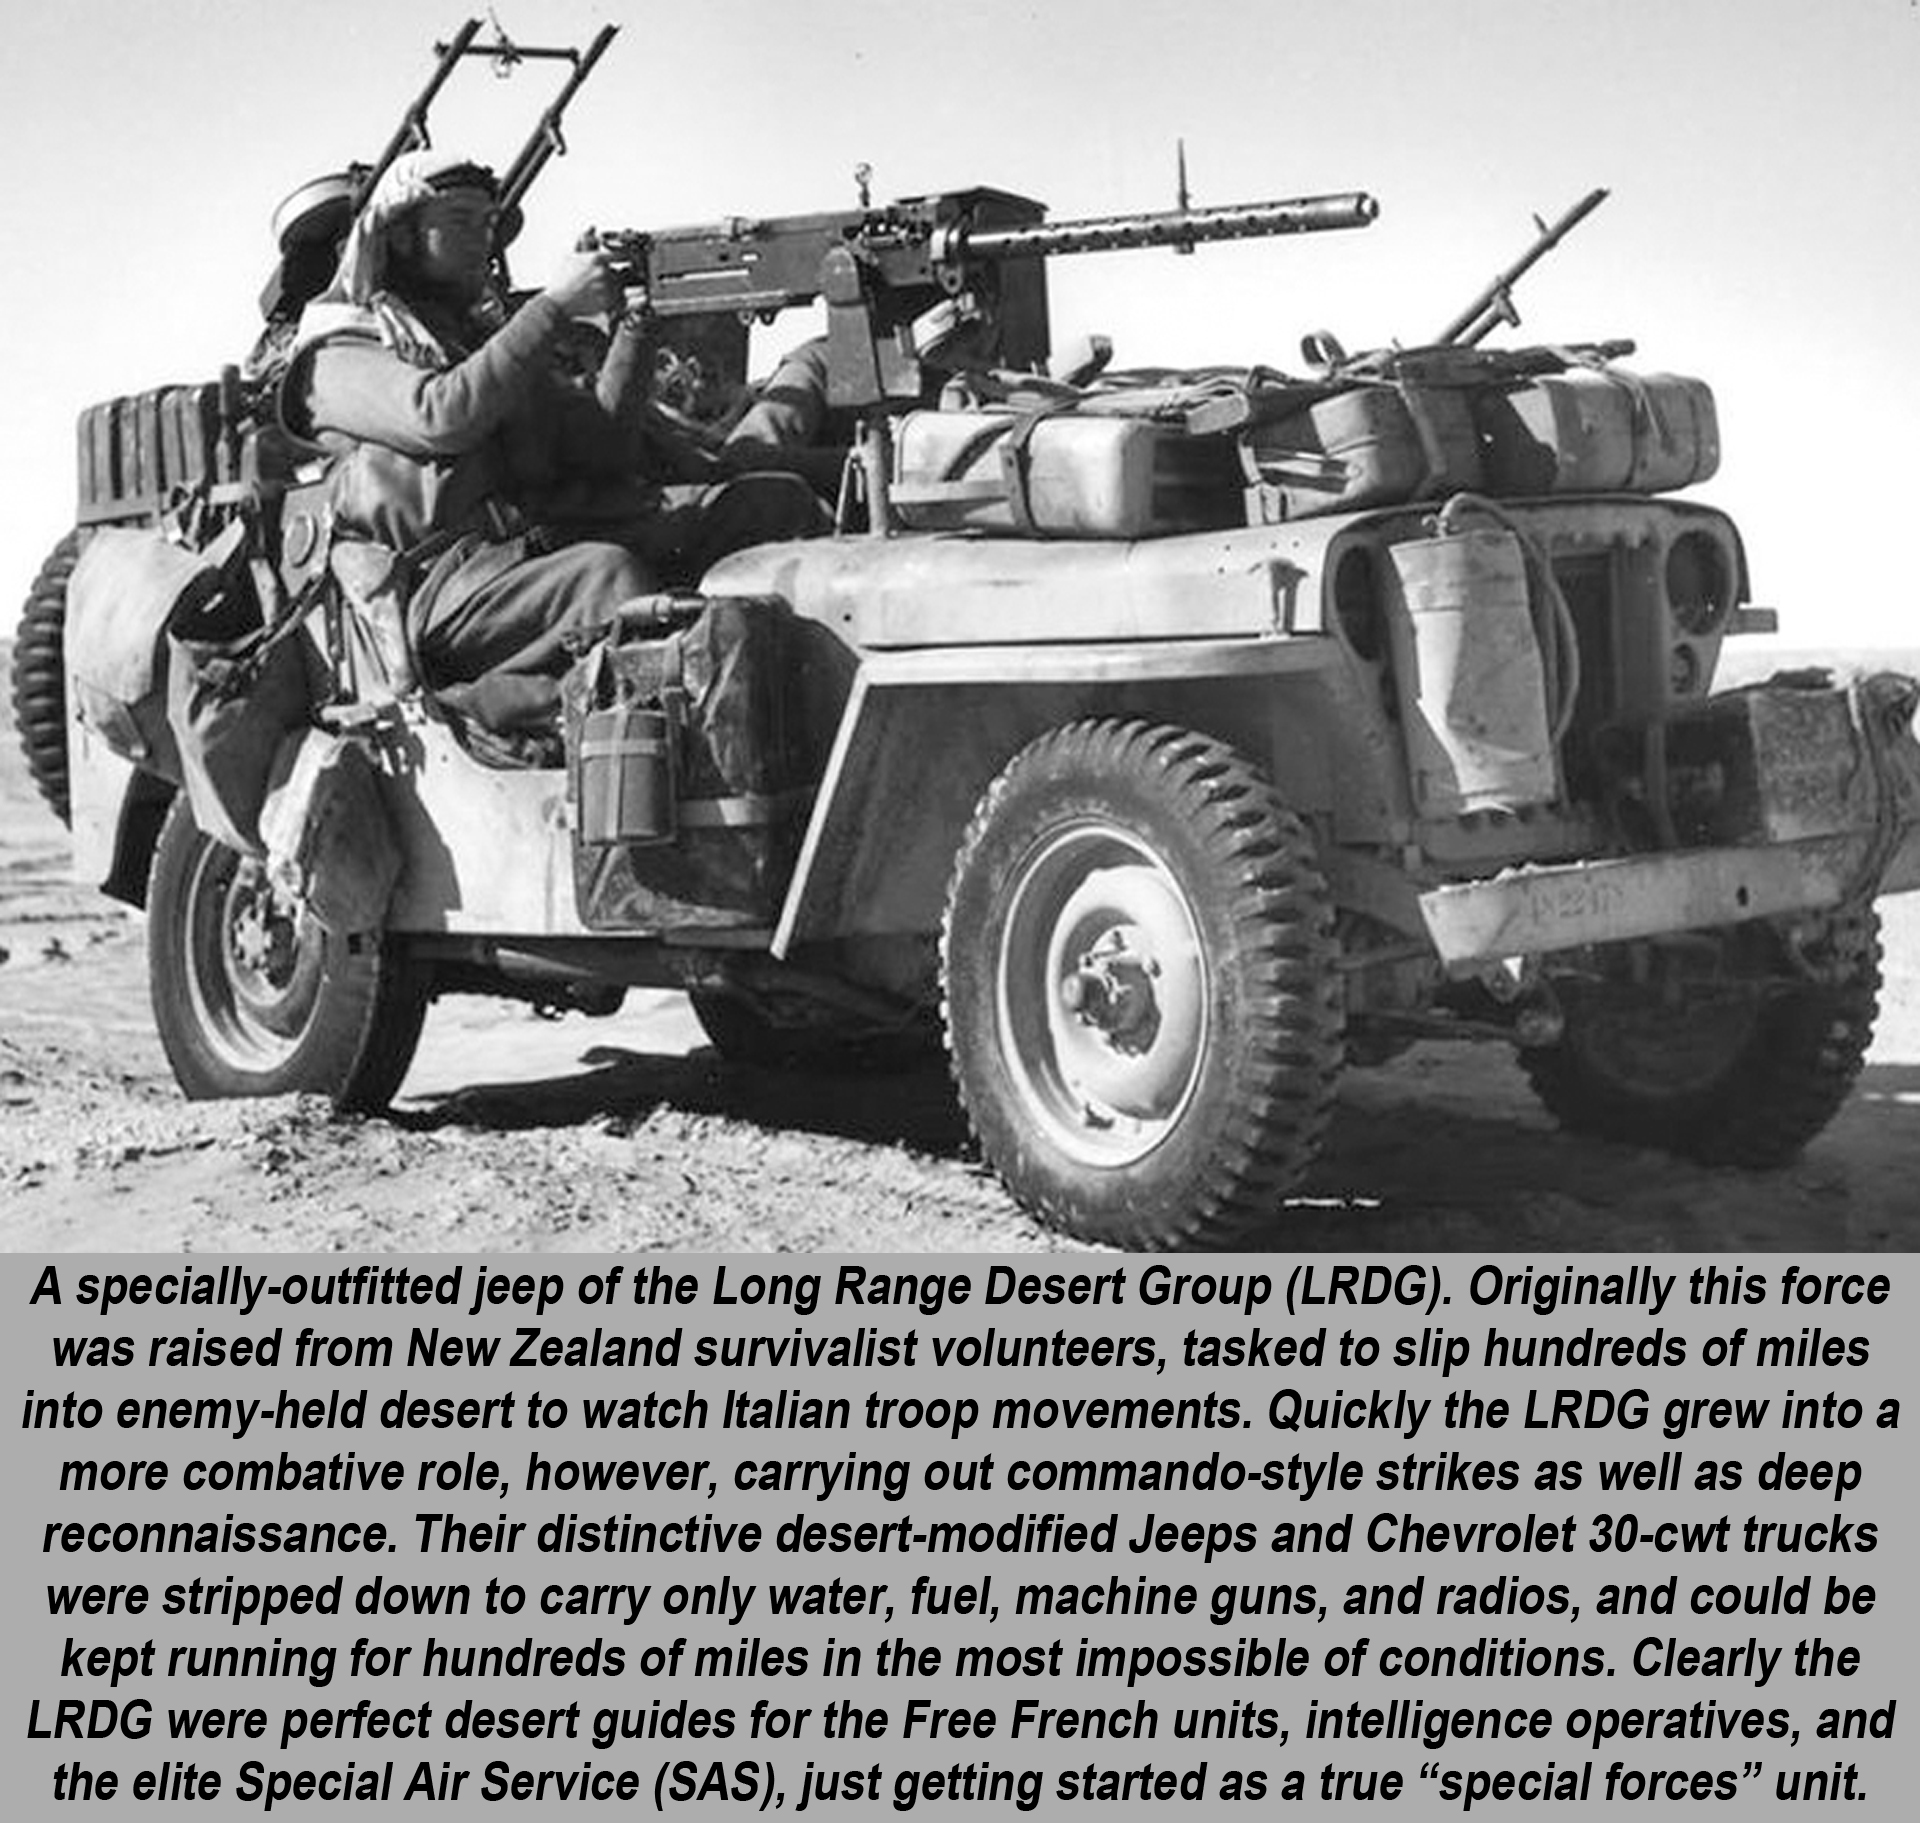
In direct violation of orders, Rommel went after them. His superiors knew this was a bad idea, to push this deep into Egypt against numerically superior forces would badly overstretch his already-vulnerable supply lines. The British knew it, too, and were using every weapon they had to strike at these supply routes. One of these weapons was the Long Ranged Desert Group (LRDG), which was about to carry out their most famous raid.
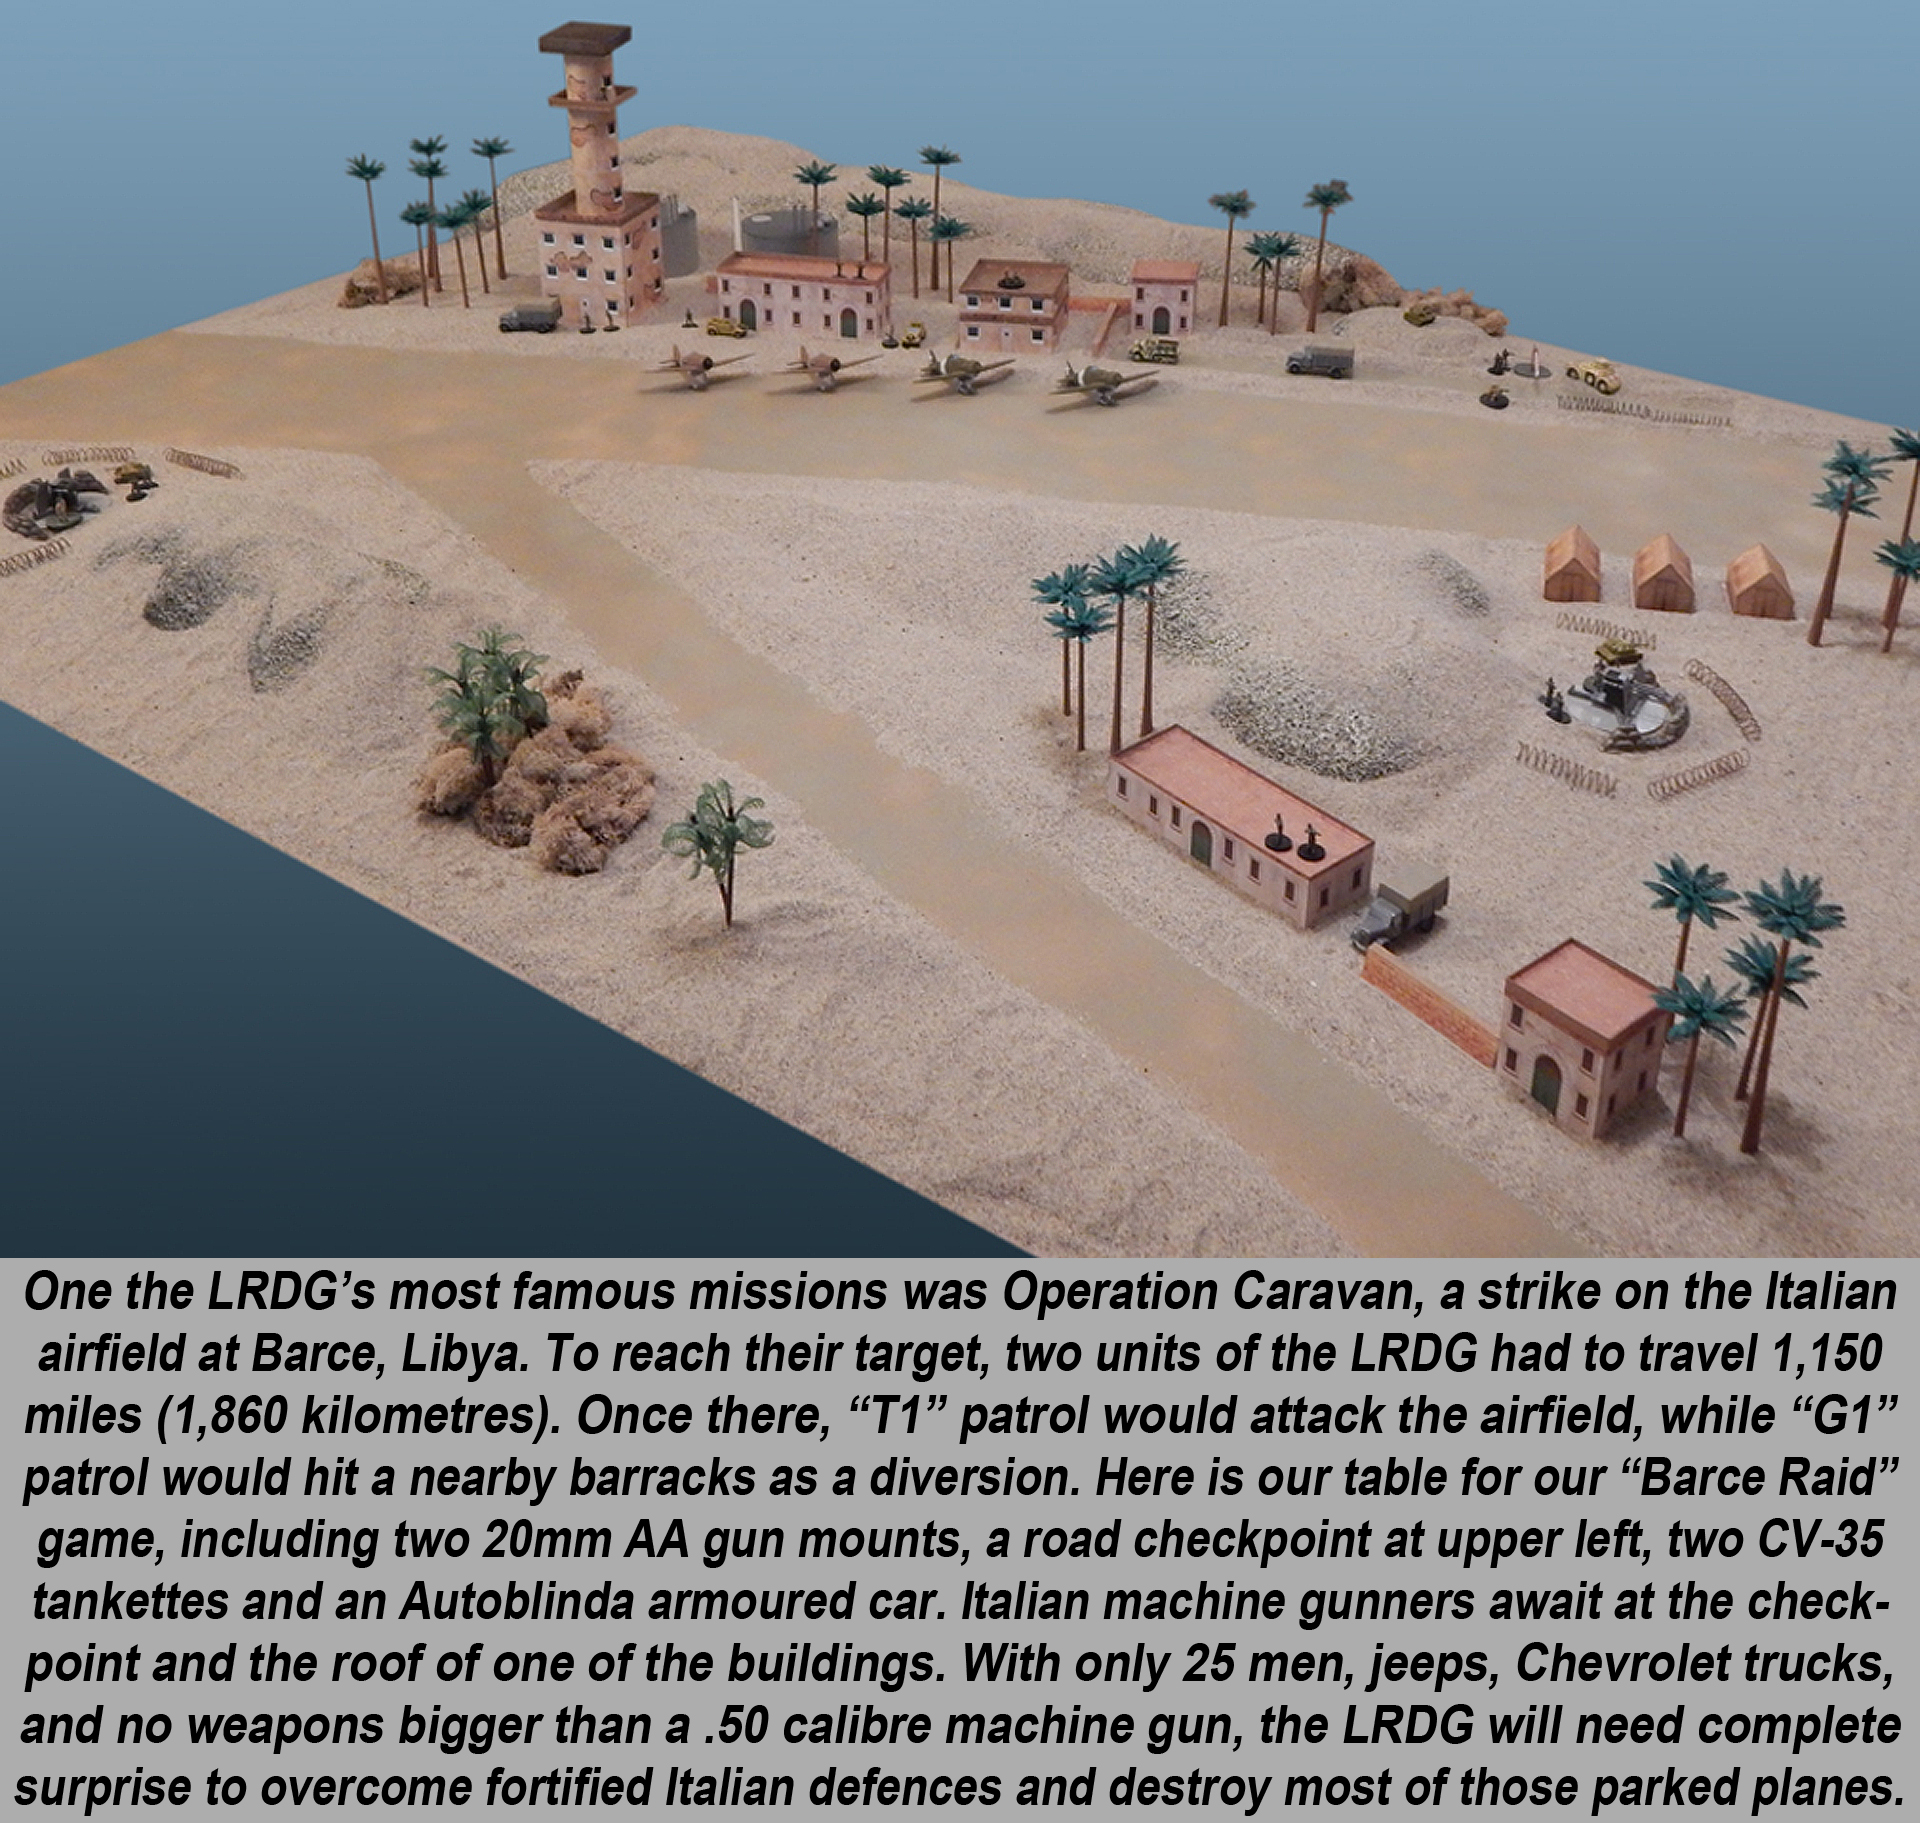
“Operation Caravan” was an LRDG strike at the Axis airfield at Barce, on the northern coast of Libya. It was part of a larger series of commando-type operations aimed at disrupting Panzerarmee Afrika’s lines of communication and supply, involving the SAS, British Commandos, the Royal Marines, the Royal Navy, and even a battalion of line infantry.
Interestingly, the Italians largely defeated all of these operations except Operation Caravan. The operation is also unusual because the LRDG was usually deployed as a reconnaissance force rather than a “commando strike” unit. Experts in desert navigation and survival, they often took the SAS to their targets, rather than strike the targets themselves. But as they certainly showed at Barce, the LDRG could “get messy” with the best of them.
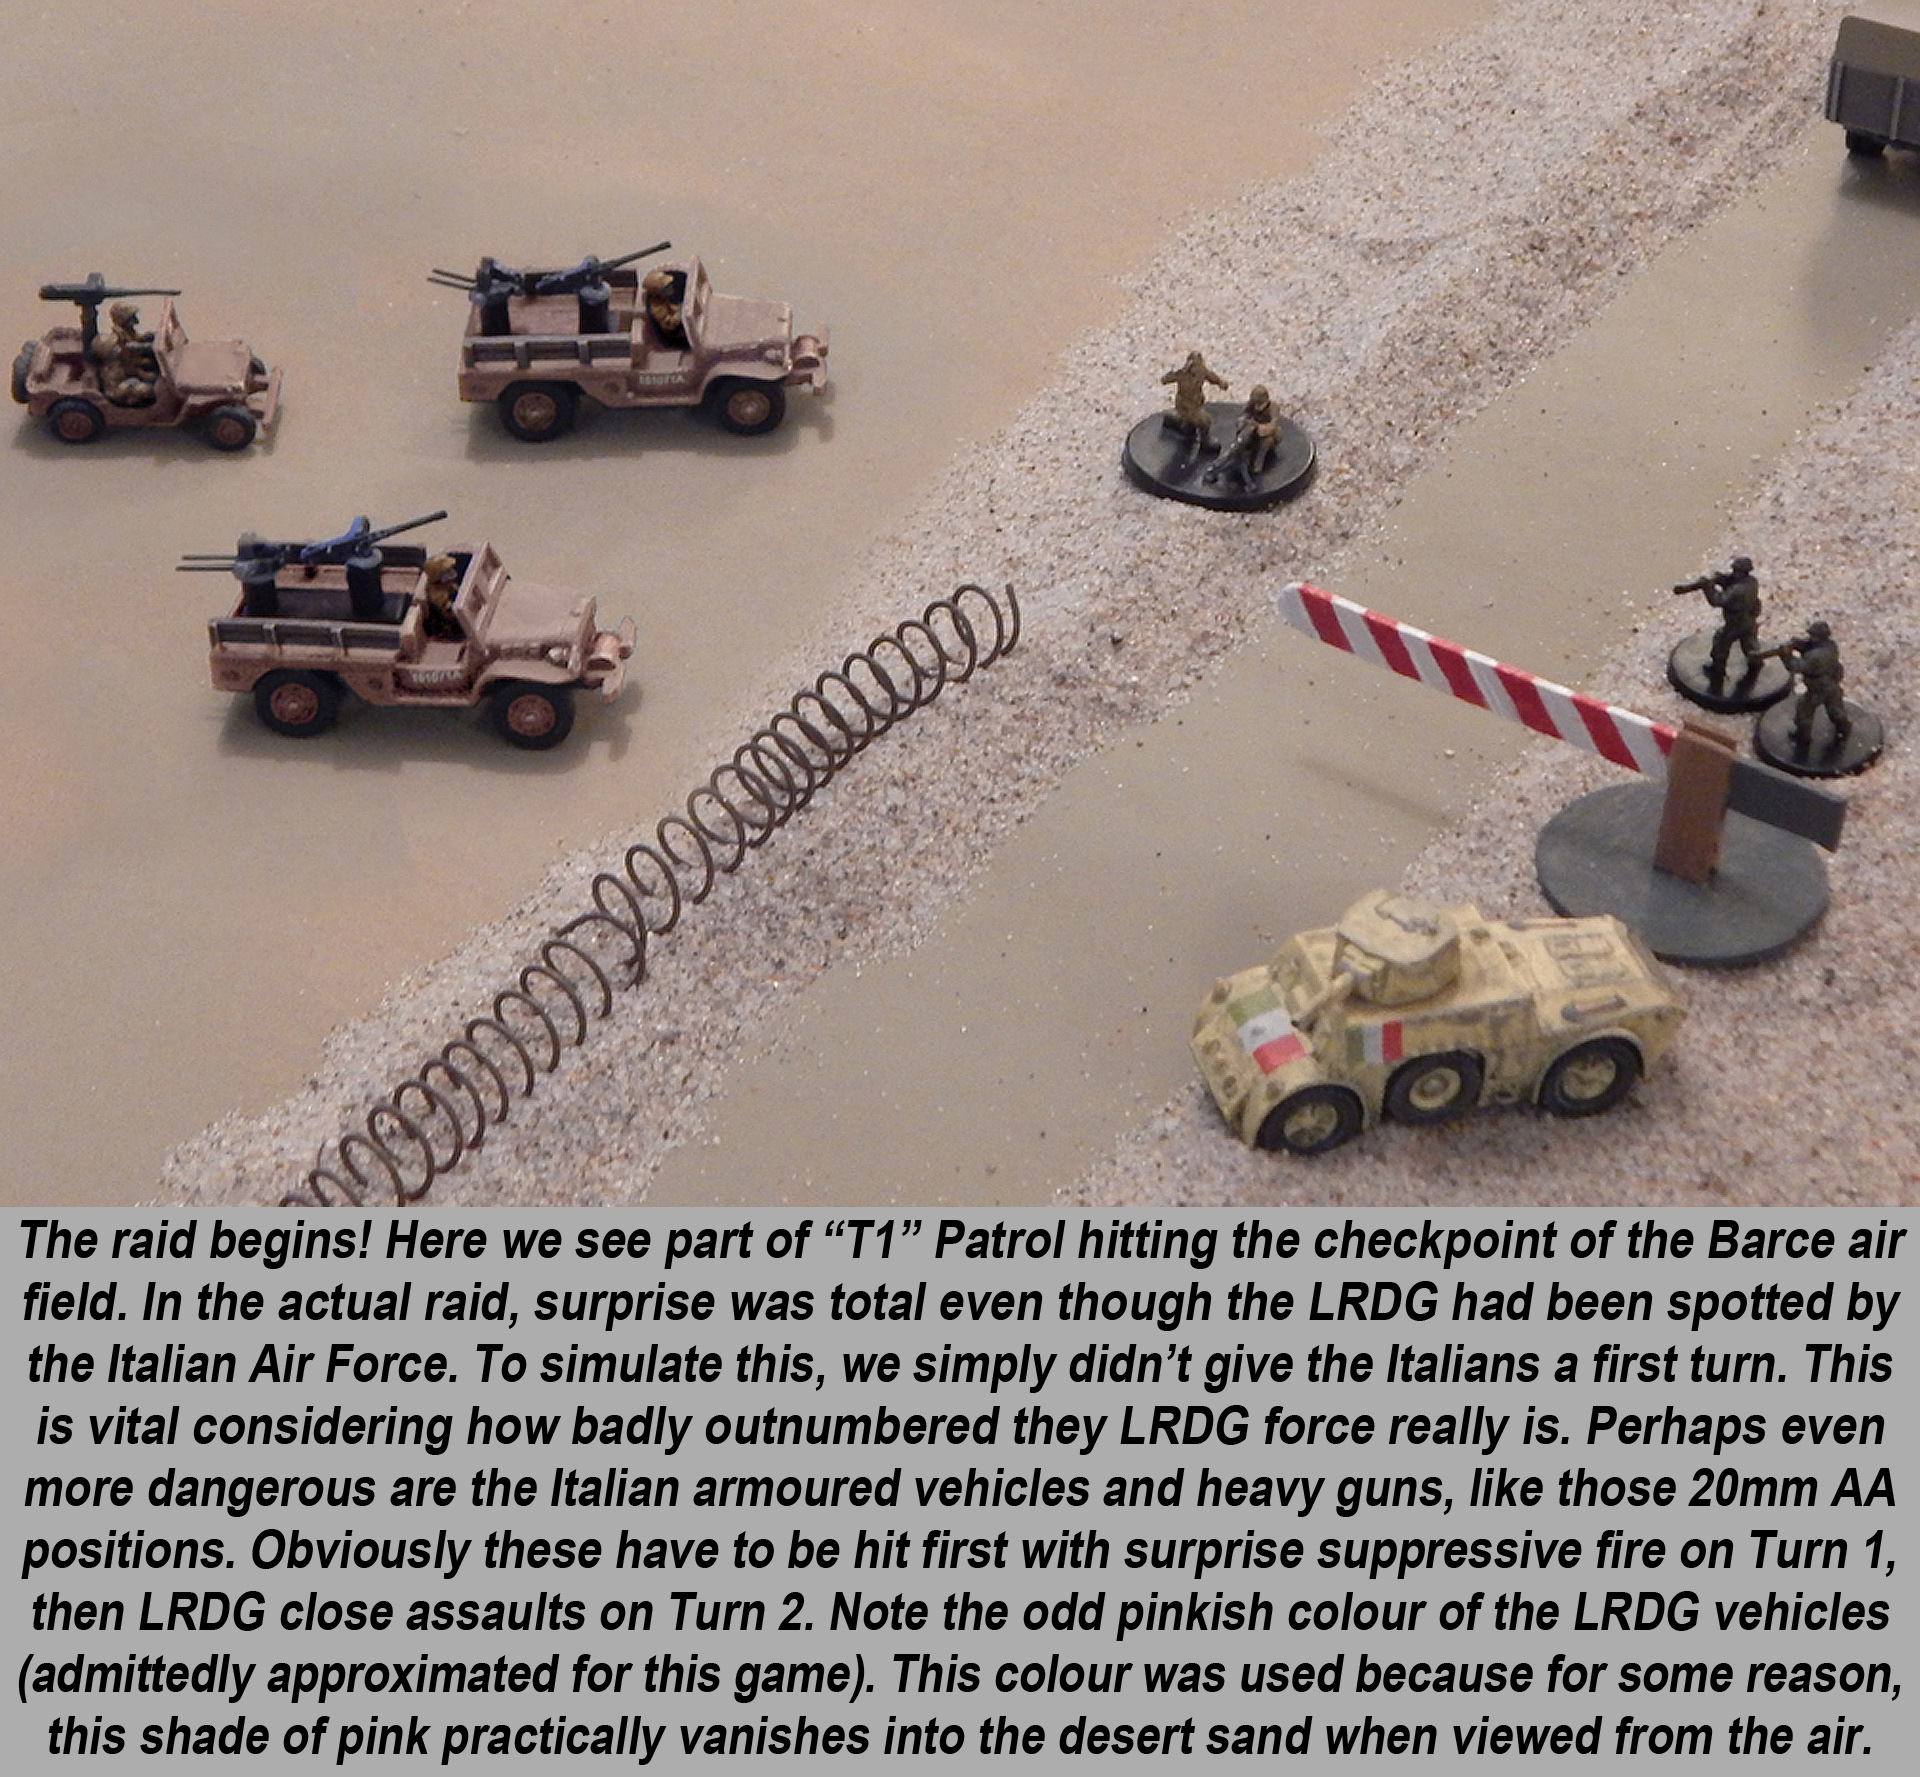
Ironically, the LRDG’s attack on the Barce was not a complete surprise, they’d actually been spotted some time ago by the Italian Air Force. Throughout the career of the LRDG, Italian air reconnaissance was almost always the biggest threat, besides of course the lethal conditions of the desert itself.
However, the Italians at the airfield did not expect the LRDG attack to come straight off the main road, especially since one of their own columns had just passed up that same road. These Italians and the LRDG actually passed each other in the night, going so far as to wave hello. Such was the “fog of war” in the desert, especially in darkness.
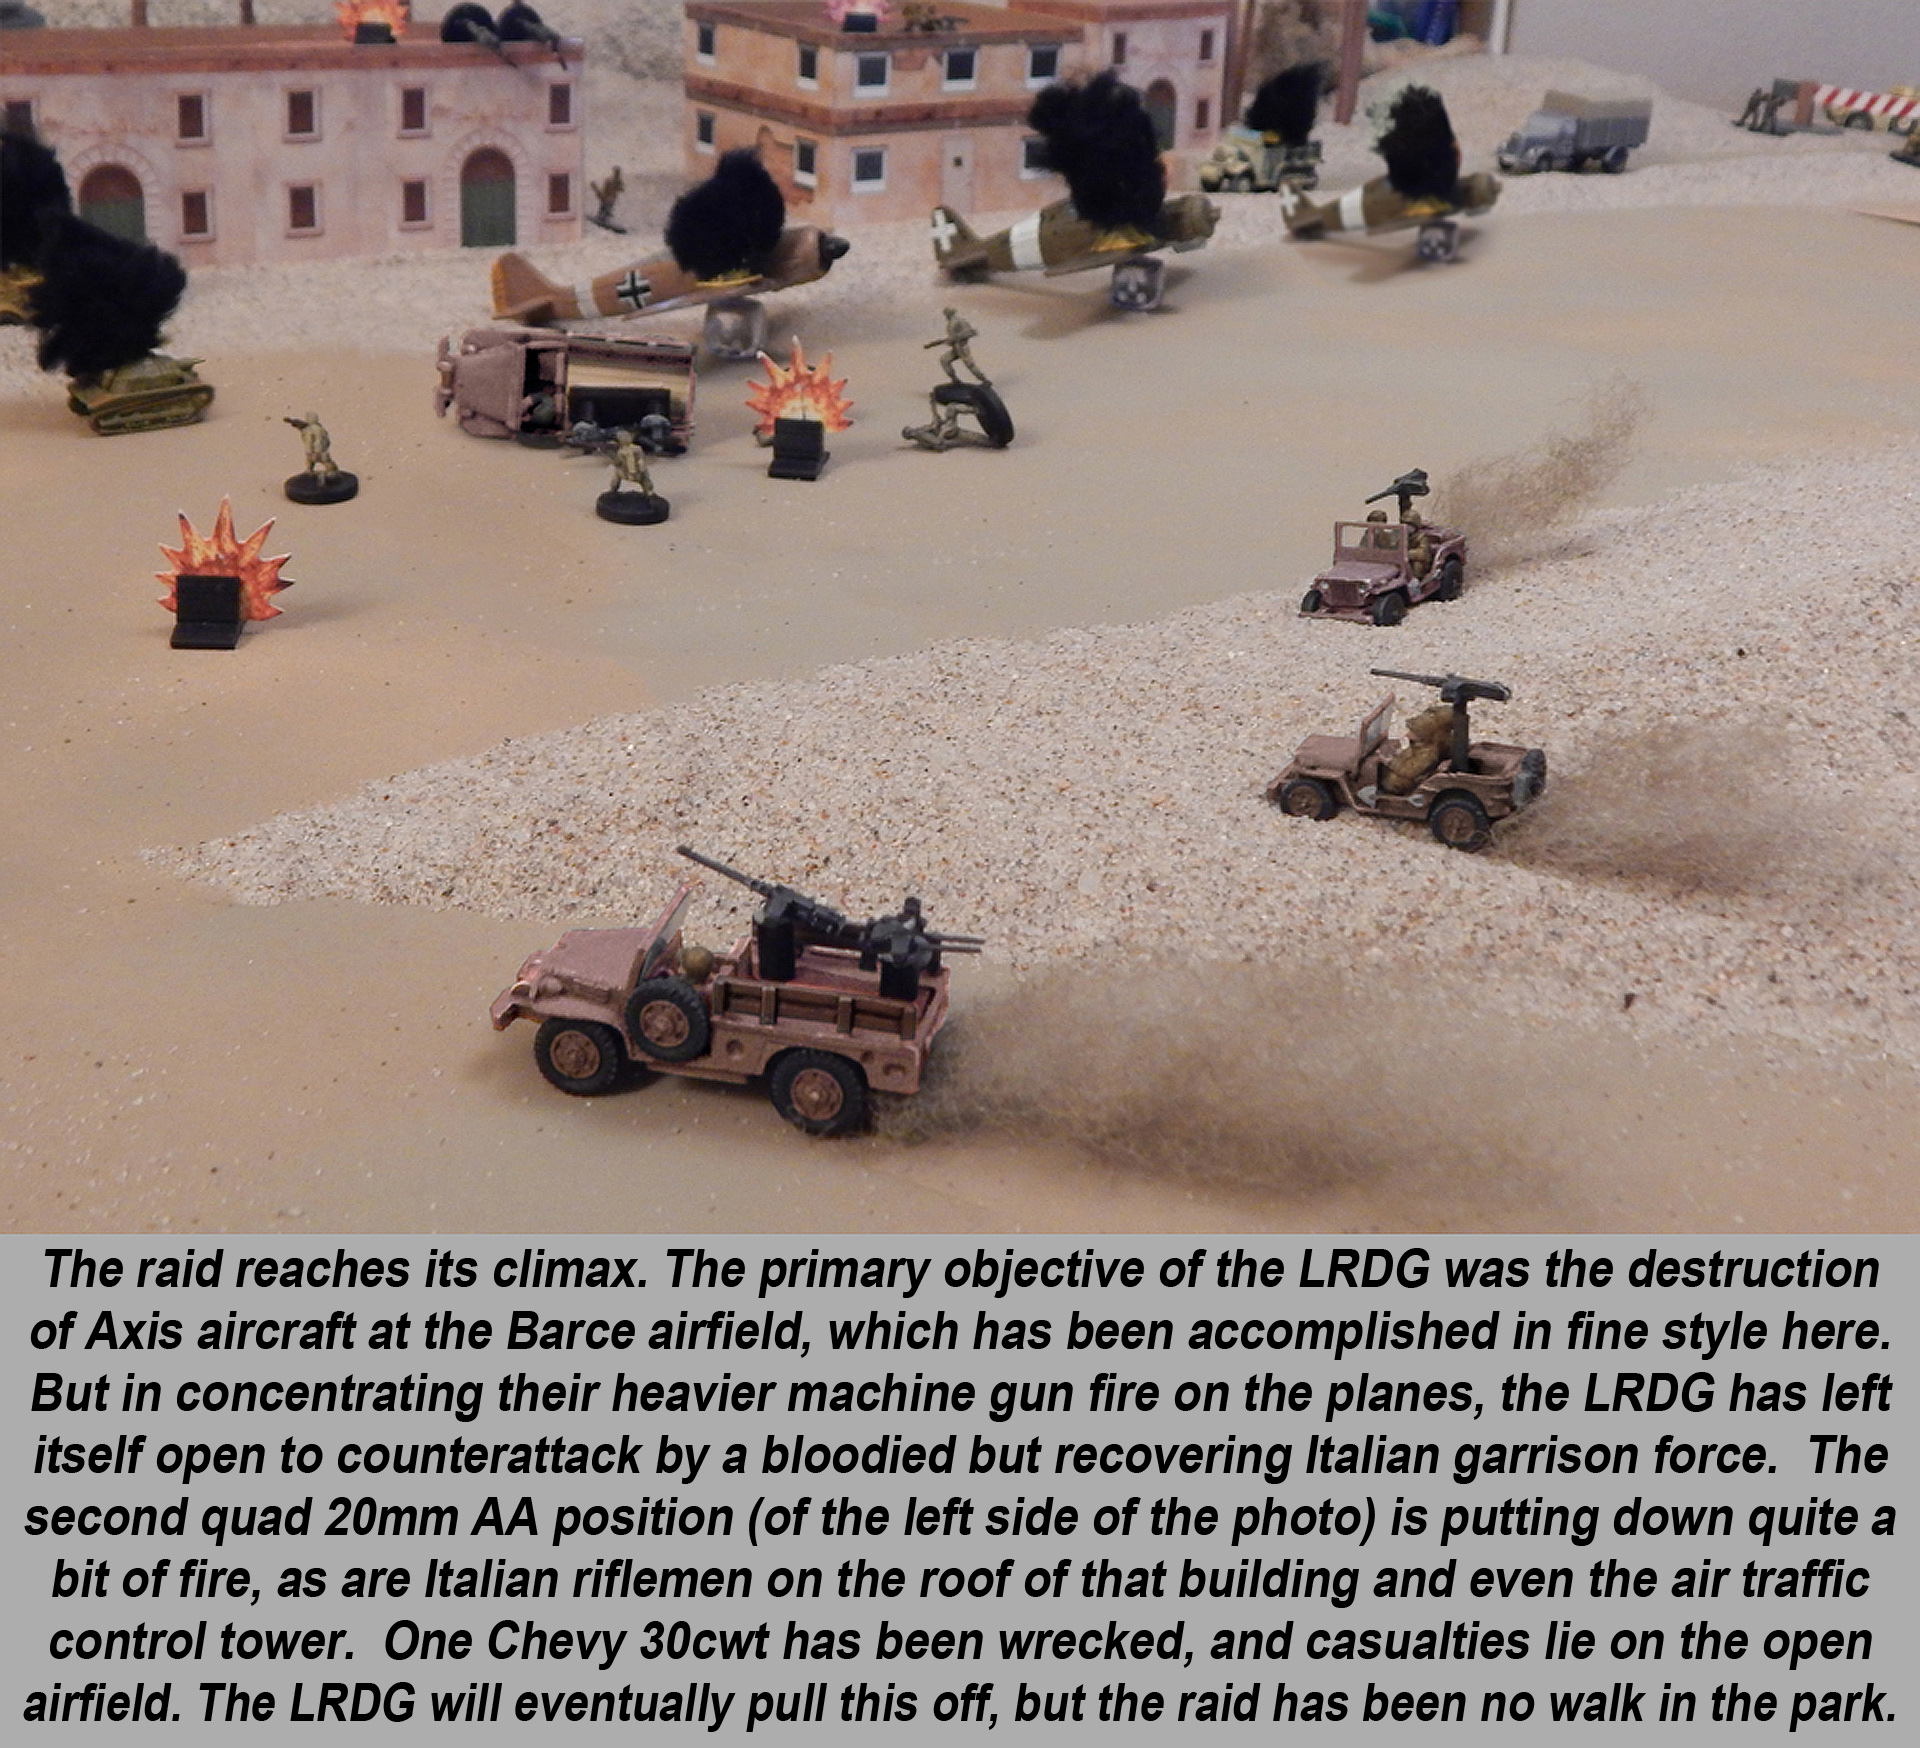
The raid was a success, with just four of the LRDG attackers wounded. Accounts vary on how much damage they did, ranging between 16 and 32 aircraft destroyed. But four LRDG vehicles had been wrecked, so many of the men had to walk across the desert back to other LRDG rendezvous points. They were attacked from the air and harried by Italian counterattacks, and some LRDG raiders were captured.
This just goes to show that, despite the movies, “special forces” are just as fragile as any other troops. As units, they’re even more fragile because of their small size and lack of heavy weapons support. These operations are complex and dangerous, and it doesn’t take much for something to go awry...especially with your ride home.
Lots of people are bringing LRDG-themed armies to the Boot Camp. Warlord has some great lists to work with if you’re interested in giving the LRDG a try. I’ve actually started building one myself – the very first 28mm miniatures I’ve ever worked with. This is just one of those units that screams Hollywood, reading their exploits sounds like the script to countless 60s and 70s action movies...except that for these men, the adventure was all too real.
Showdown At El Alamein
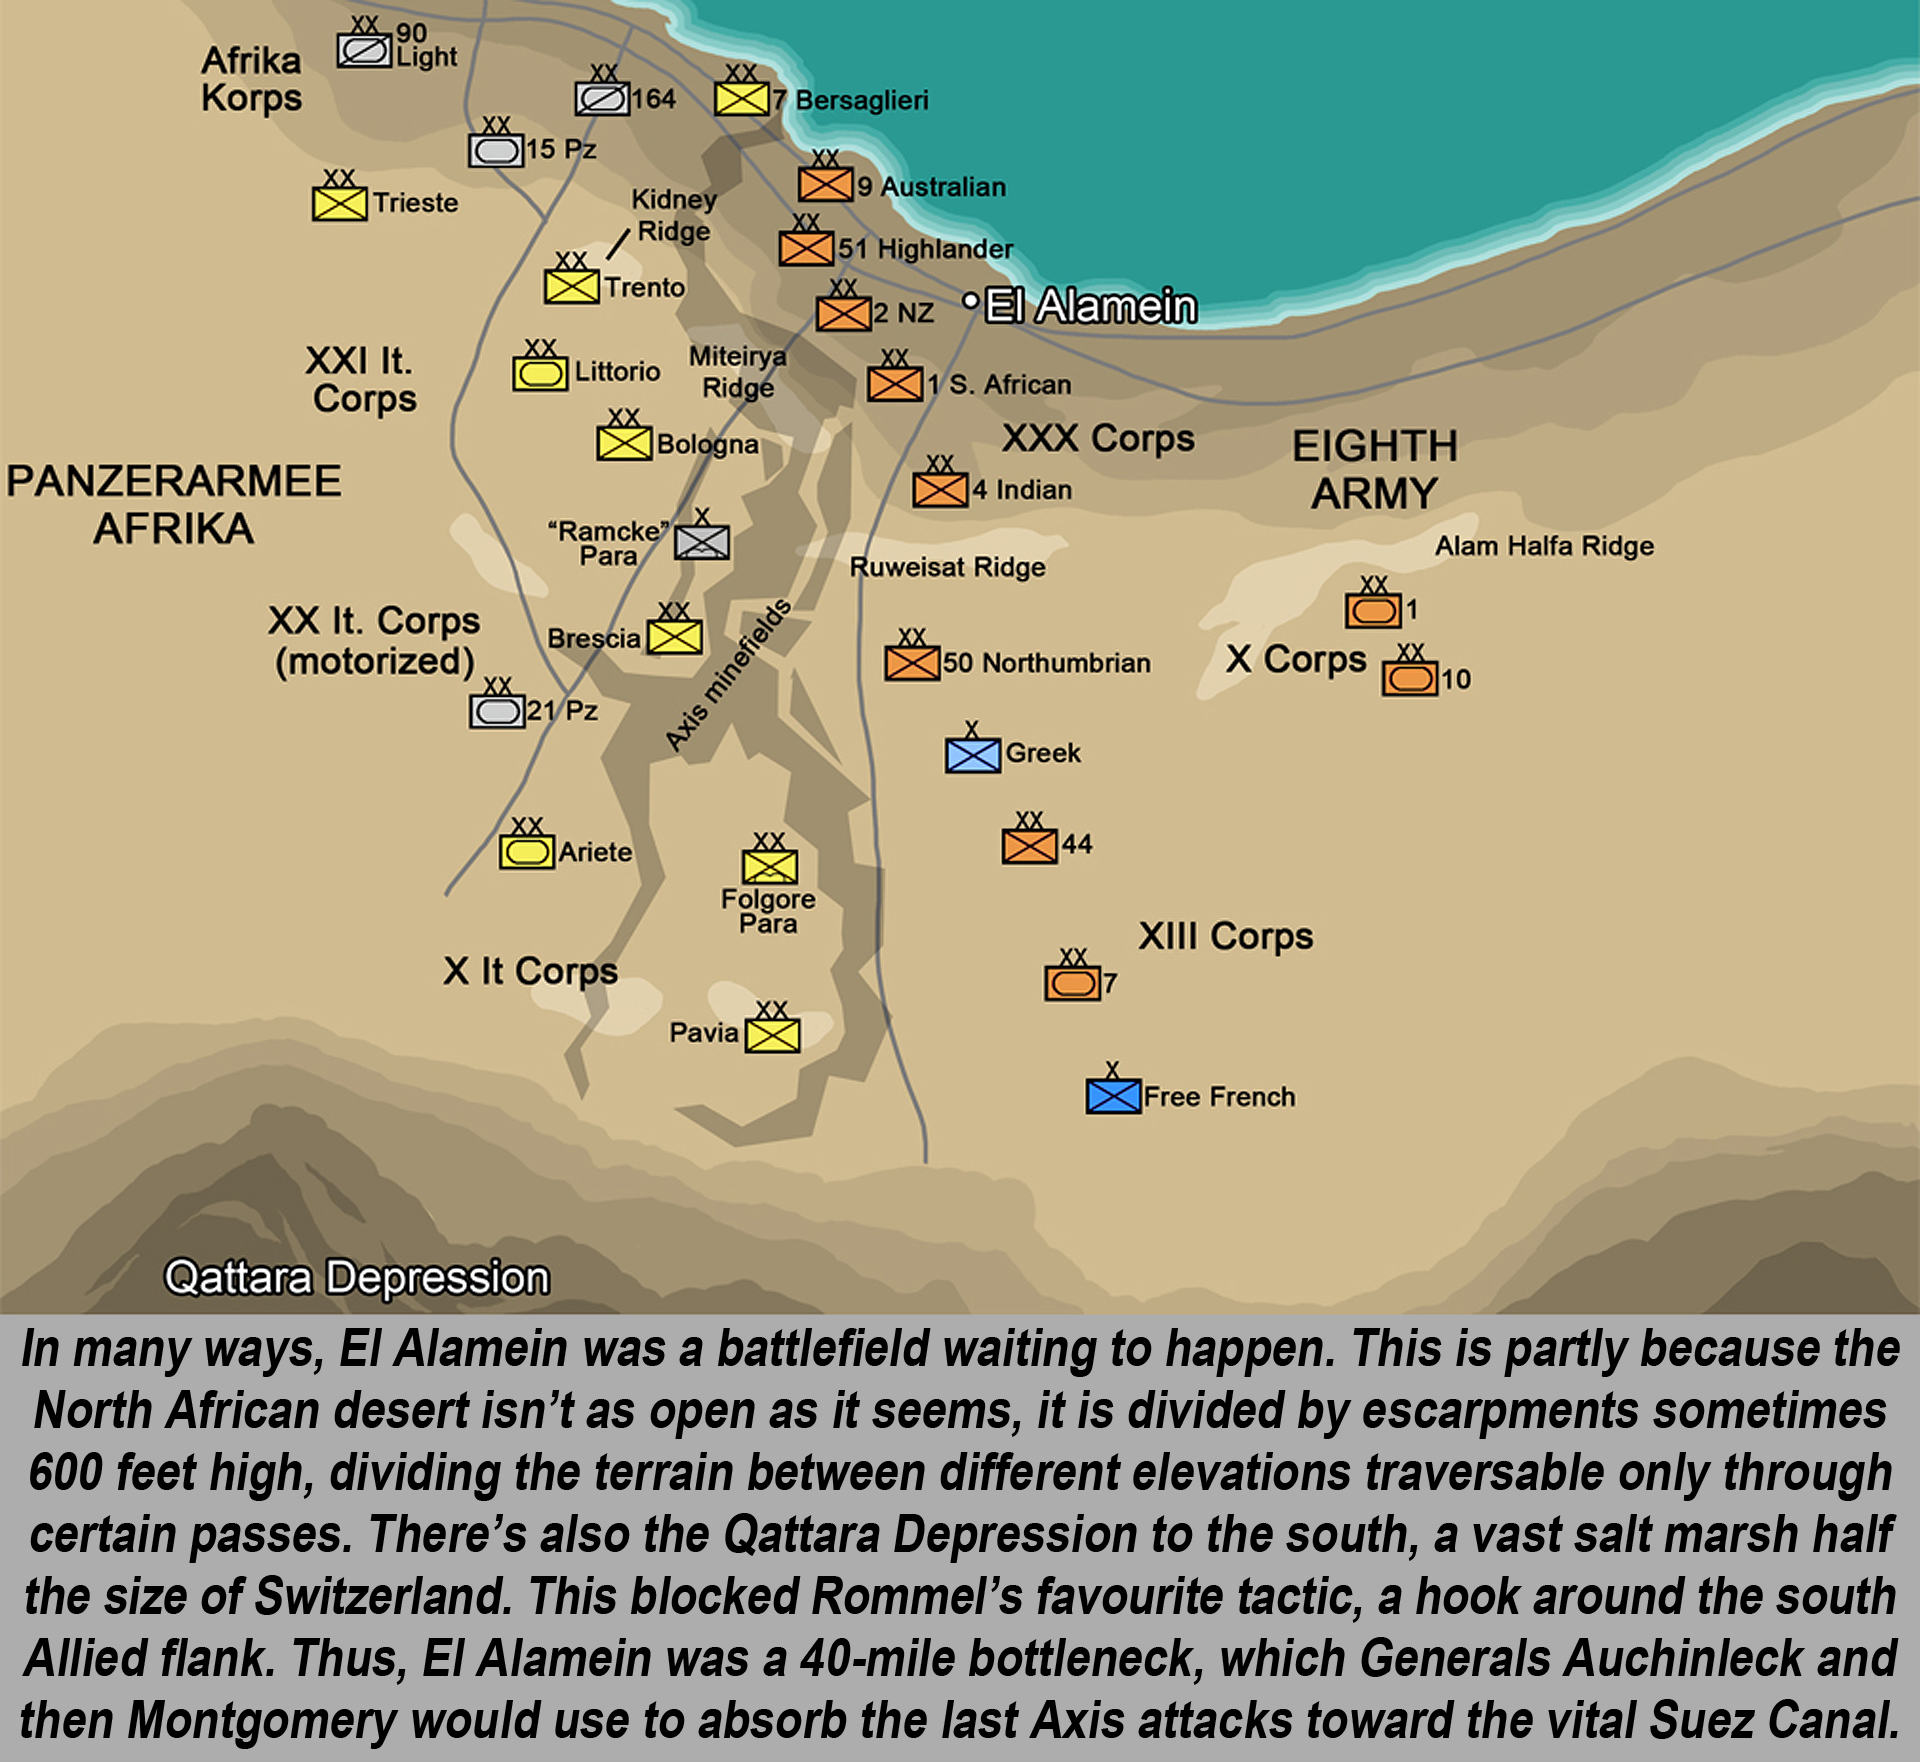
Back at the Alamein Line, meanwhile, the Eighth Army was trying to pull itself together after the twin disasters of Gazala and Mersa Matruh. Now set up at the superb defensive position at El Alamein, they knew there could be no further retreats. Alexandria was just ninety miles behind them, with Cairo, the Nile, and the Suez Canal beyond. After El Alamein, there was also no further defensive position. At El Alamein, it was stand or die.
Fortunately, things finally started to turn around for the Allies. In early July, Rommel hit them yet again in a series of attacks. But with the Qattara Depression blocking his favourite “hook around the south” strategy, came to bloody grief. Rommel had come to the end of his leash. Generals Auchinleck and Ritchie hit back, heavily mauling Panzerarmee Afrika but failing to push them back. This “First Battle of El Alamein” is largely considered a draw.

Meanwhile, Winston Churchill came to Egypt to have a look around for himself. Despite the recent checking of Rommel at the First Battle of El Alamein, Churchill yet again switched out his commanders. Auchinleck was rather unfairly replaced as C-in-C Middle East by Harold Alexander, while Ritchie was replaced as Eight Army commander by General Gott.
Gott, however, was shot down by two Messerschmitt Bf-109 fighters, then strafed and killed as he tried to help others out the wreckage. Next in line, almost by mischance, just happened to be a bloke named Bernard Law Montgomery. History would never be the same.
While Montgomery undoubtedly inherited a great defensive position and reinforced Eighth Army from Auchinleck, “Monty” also went about restoring his army’s cohesion and esprit de corps. After all, this army had been under six commanders in two years, constantly reorganized, and pummelled repeatedly by an army one-third its size. This army needed to find its confidence, and through hard training and discipline, Monty gave them exactly that.
Meanwhile, the exhausted, ill-supplied, and terribly exposed Panzerarmee Afrika tried one last time to break Eighth Army’s line at the Battle of Alam Halfa. Again the Germans were defeated, further strengthening Eight Army’s resolve. Furthermore, a massive new convoy had just arrived from England, and the British took delivery of hundreds of their new “wonder weapons,” the American Sherman tank.
The Sherman gets kind of a “bad rap,” and through much of its operational history, deservedly so. But right at this moment and this place, the Sherman was an “alpha predator” killer. This isn’t Russia, remember, and there are no Tigers in Africa yet. Even up-gunned PzKpfwIVs are rare. On this one battlefield, the Sherman is actually a beast.

Another of Montgomery’s better traits was that he would not be pushed around by Churchill. Constantly Churchill ordered British generals into premature attacks that came to predictable disaster (then Churchill would fire the hapless commander). Monty would have none of it. Despite the incessant pressure, he meticulously trained, reequipped, and reorganized his Eighth Army. He would attack only when he and his men were ready.
Thus, when Eighth Army finally hit Panzerarmee Afrika on October 23, 1942, it did so with the force of a thunderbolt. The artillery barrage was horrific, some sources claim it was the biggest single barrage outside of Russia since 1918. But the Germans and Italians held out. After all, just as the Alamein battlefield had been a great defensive position for the Allies, so it was for Panzerarmee Afrika now that the positions were reversed.
Behind this massive artillery barrage, Allied infantry delicately cleared lanes in the sprawling minefields (the operation was ironically code-named “Lightfoot”), through which British armour was intended to strike. It didn’t work at first. Axis minefields were too deep, Italian infantry were too stubborn, and German 88s were just too accurate. After four days, however, the Allies steadily bent and eventually cracked the Axis line in the north.
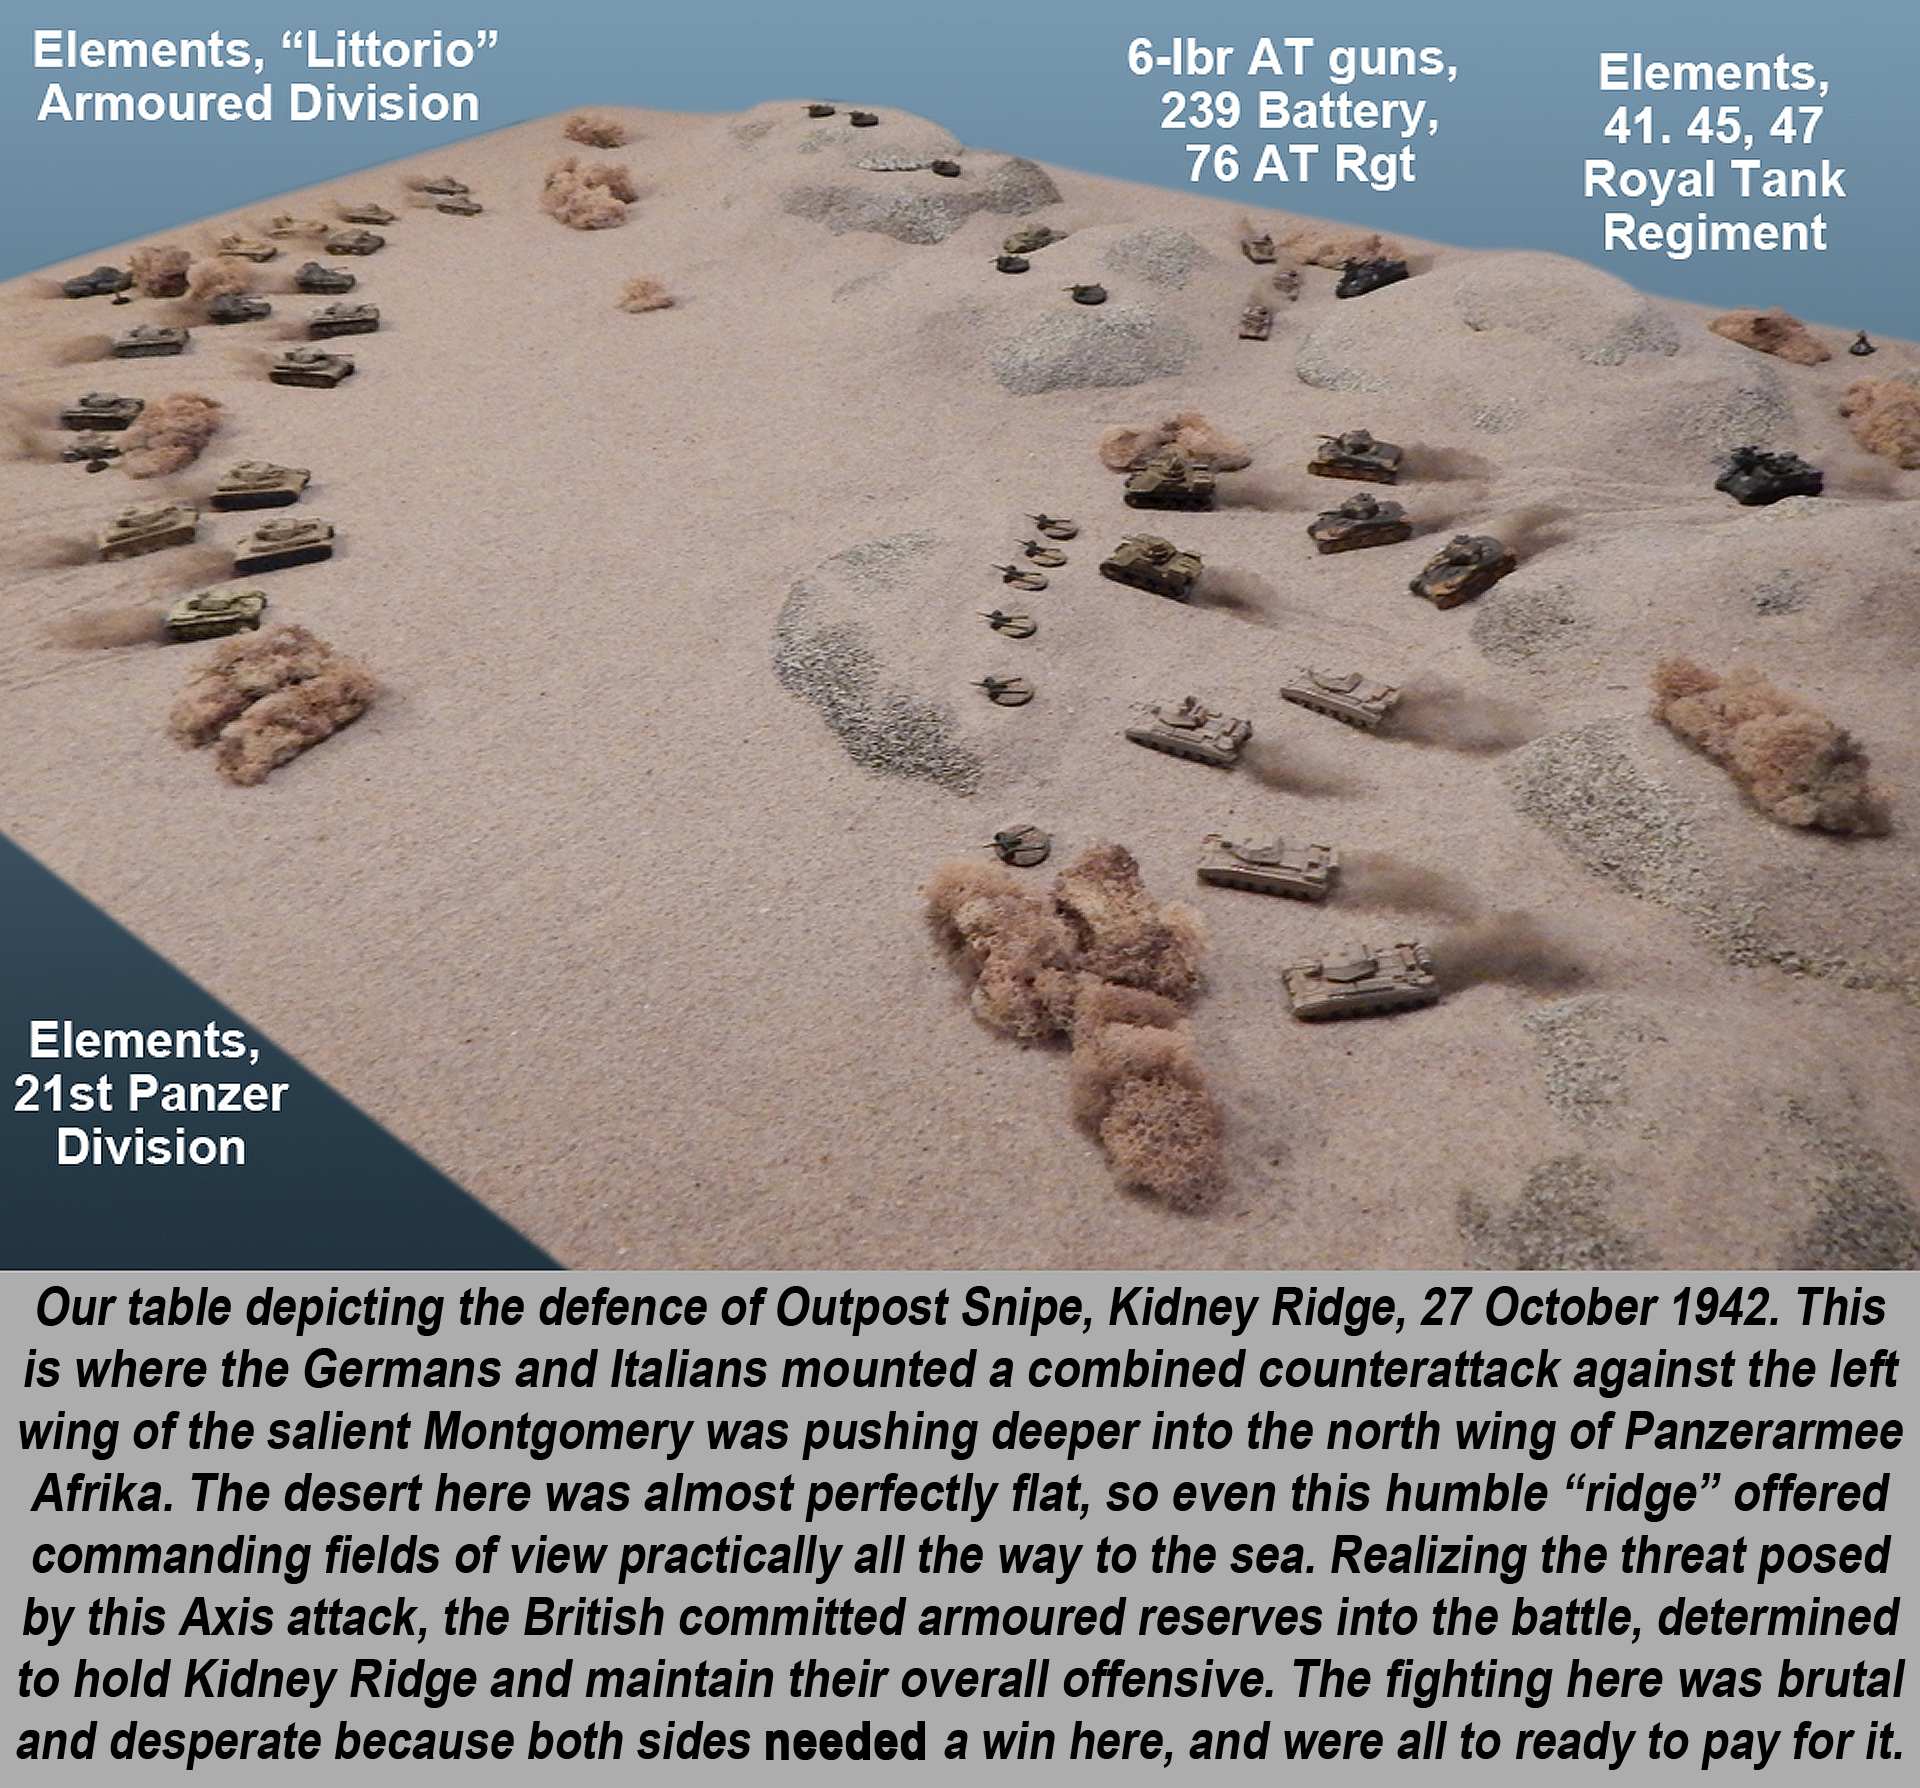
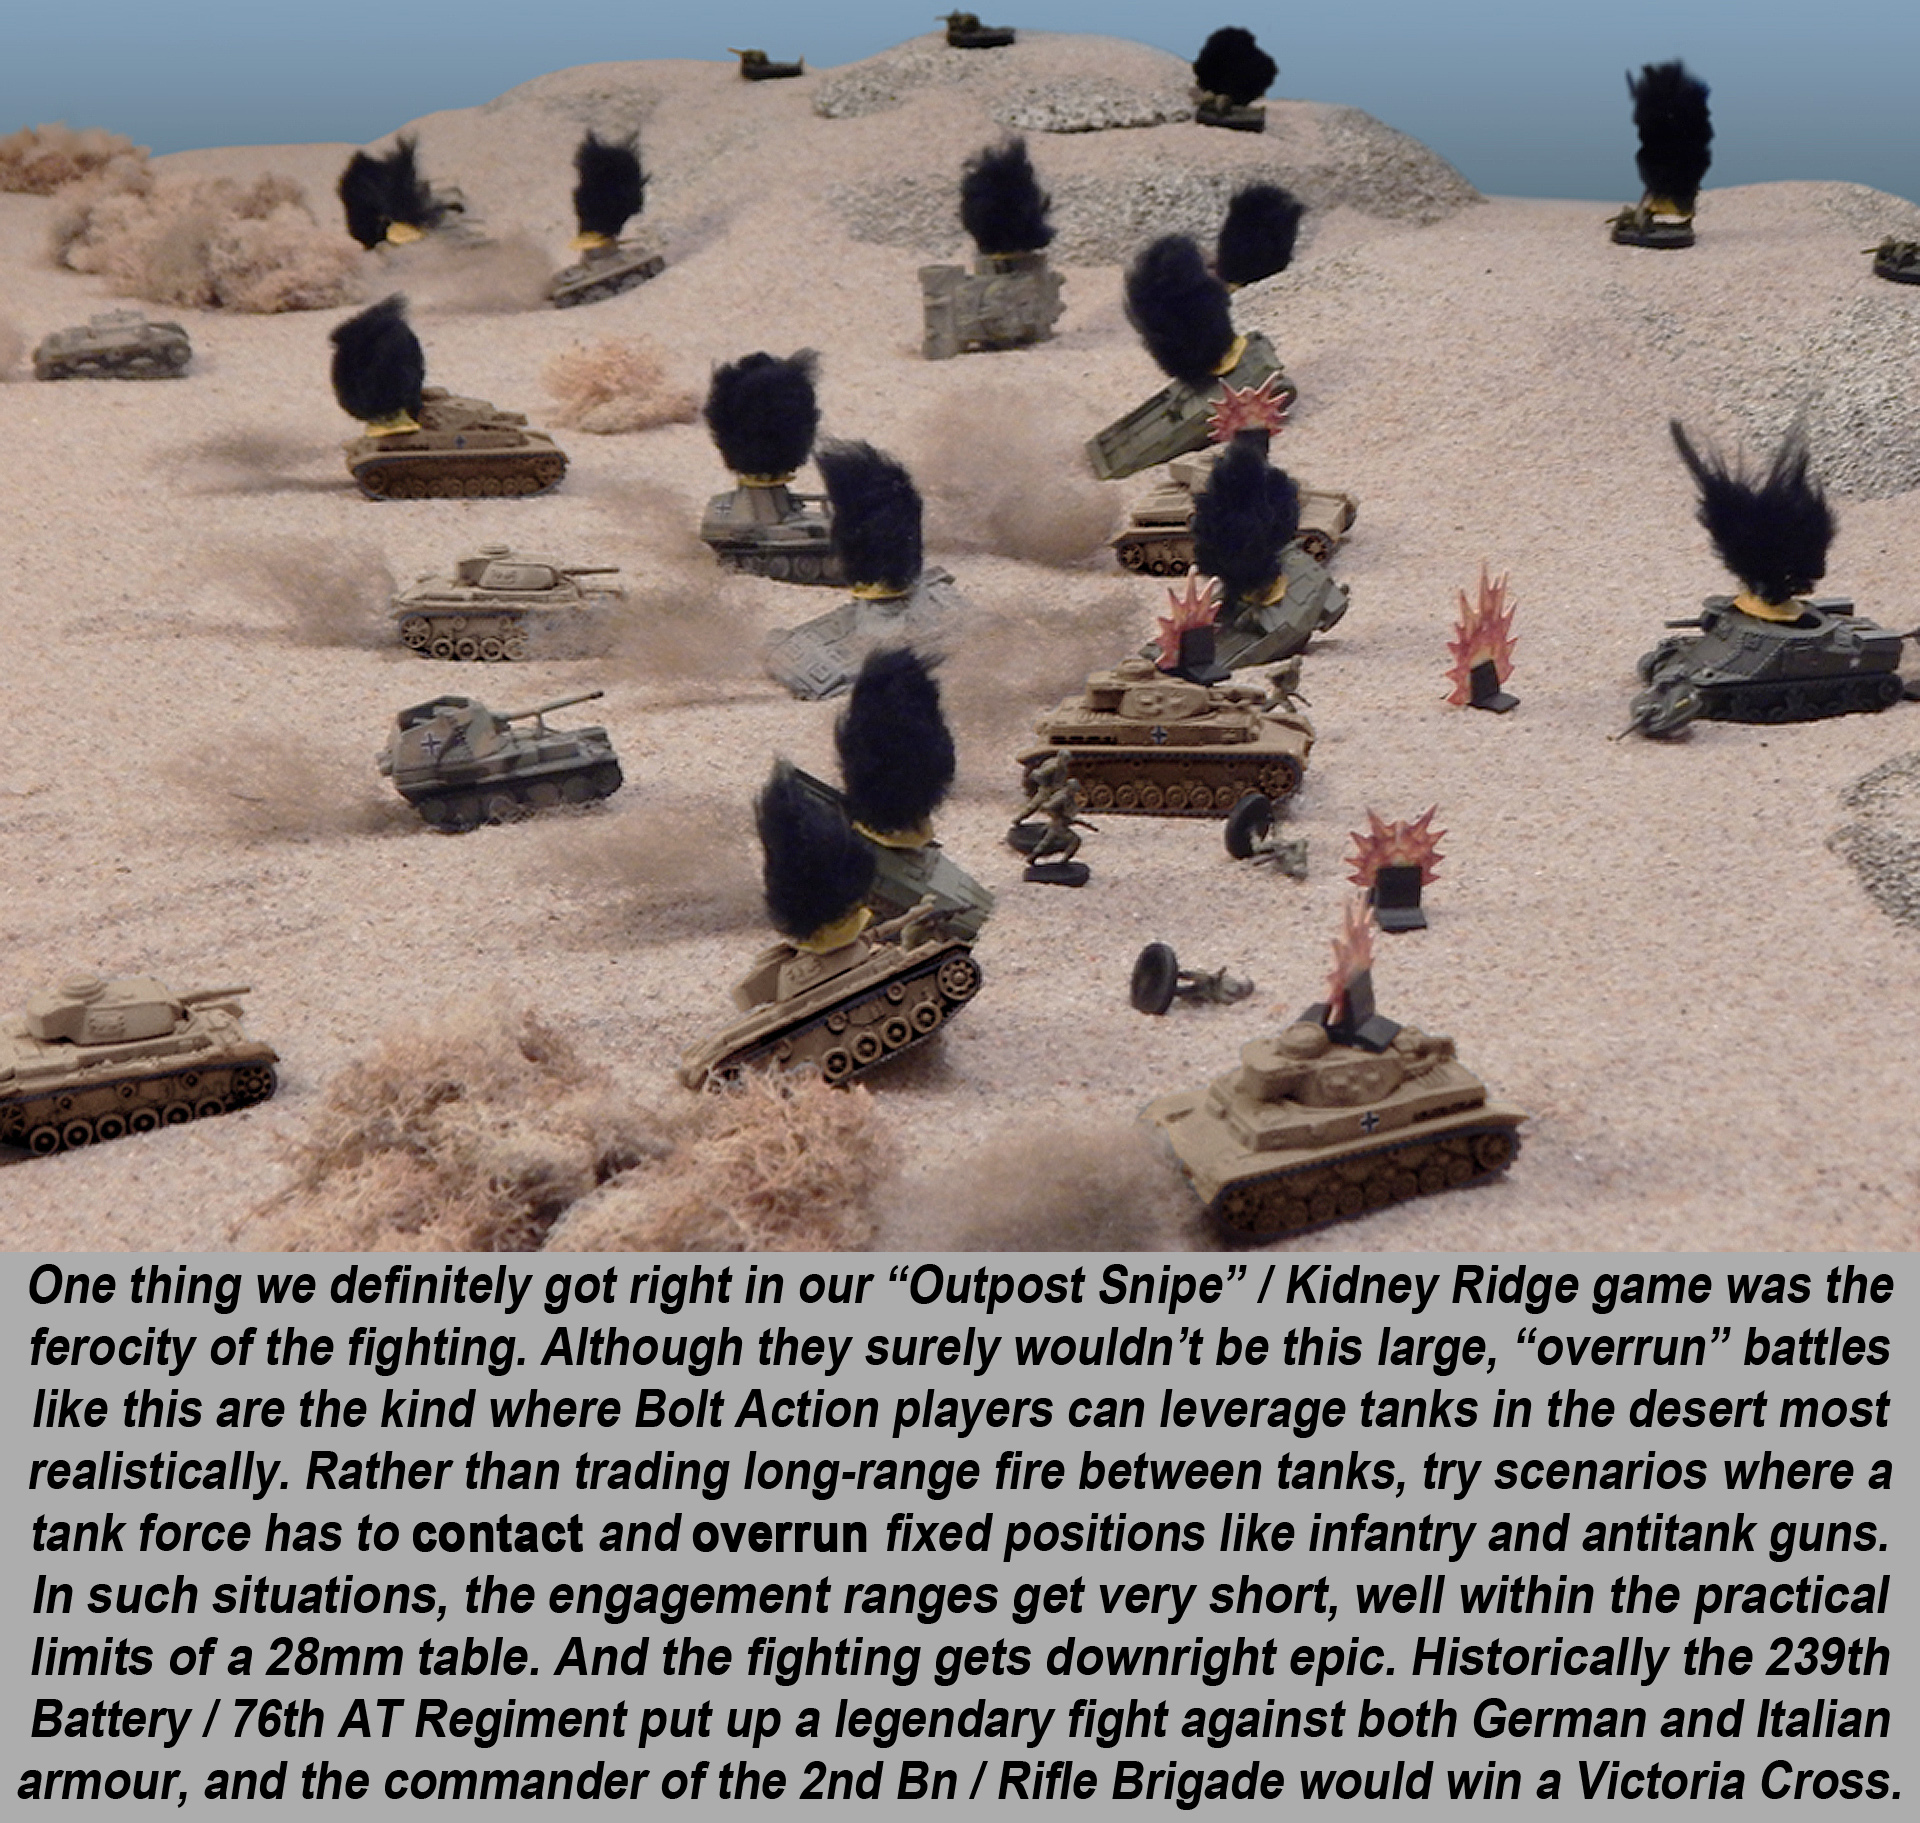
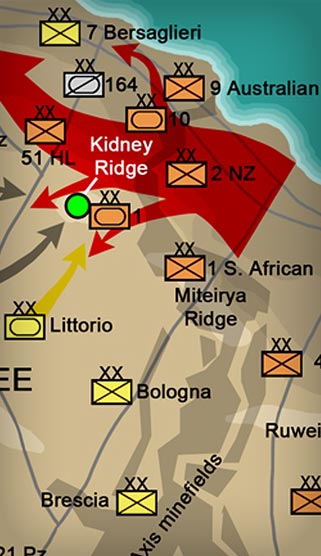
Frantic to contain this threat, Rommel hurled his three heaviest divisions (15th Panzer, 21st Panzer, and Italian “Littorio” Armoured) into a pincer assault on the flank of the Allied salient, which was anchored on a very modest “hill” called Kidney Ridge. Both sides knew what defeat would mean here, and accordingly, the battle at Kidney Ridge was savage, desperate, heroic, and extremely bloody.

In the end, the British at Kidney Ridge held. The Allied drive into Rommel’s northern wing was secure, and Panzerarmee Afrika had expended the very last of its strength. Montgomery reorganized and hit the Axis again with “Operation Supercharge,” which finally shattered Rommel’s defences.
Utterly broken, the Germans began a retreat all the way out of Egypt, all the way across Libya, and eventually all the way to the Tunisian border. So starved was the Axis for fuel that Rommel could only evacuate his German units, tens of thousands of Italians were simply abandoned to be captured by the Allies. The tide had turned, this time for good. The mythical aura of the “Afrika Korps” and the “Desert Fox” were forever shattered.
As Winston Churchill remarked: “No, this is not the end. This is not even the beginning of the end. But it is, perhaps...the end of the beginning.”
Even worse for Rommel, entirely new Allied forces had landed behind his forces in Tunisia. These, of course, were the “Operation Torch” landings in the French colonies of Morocco and Algeria. Now the remnants of Panzerarmee Afrika would face not only British and Commonwealth forces, but for the first time, American forces as well.
Of course, the Germans would also be getting help. New units, new generals, and new tanks would all be pouring in, turning “Panzerarmee Afrika” into “Army Group Afrika.” Come back next week as this restored and recovered Axis force meets its new enemies for the final, climactic showdown in the Desert War.
Put your comments, questions, and feedback below, and tell us if you’re ready to get your boots in the sand with the rest of us!
Getting fired up for the Bolt Action Boot Camp yet?
"...reading their exploits sounds like the script to countless 60s and 70s action movies except that for these men, the adventure was all too real!"
"“No, this is not the end. This is not even the beginning of the end. But it is, perhaps...the end of the beginning.”"


Operation Lightfoot, it would have been better to call it operation certain death! I am in total admiration for the soldiers that walked into those minefields to clear a way, whilst all hell was breaking around and over them. There is a famous painting by Terence Cuneo that is of a section of engineers doing just this selfless task. It is very humbling to think of the sacrifices that they made.
Thanks for kicking us off, @brucelea! Indeed this was a crazy task carried out by the infantry and engineers of the 8th Army’s infantry divisions. I’ve said in interviews and articles that these lanes cut through minefields were 28 feet wide, through minefields in paces five miles deep. Slight generalization on my part . I think you asked at the last boot camp that his seemed like an awful lot, given the six-eight hours these men had to work with. Turns out that while yes … the minefields were in places five miles deep, and yes the lanes were 28… Read more »
Oops – removing duplicate post
Nice one @oriskany nice one of you to give the Sherman its due, It s bad rep is not deserved, it was only really on the Western front that it had problems. Tankers that used it it Italy on the whole loved it because it worked! and of course it was king in the Far East.
Still like the classic Comment from a German infantry vet, on what he thought was the best tank, and hs said Sherman , when the interviewer queried it replied ‘It the only tank I ever saw’.
Thanks, @bobcockayne – indeed, when the Sherman first arrived at the front in North Africa in mid-late 1942 … it was a pretty serious threat. A lot of this comes down to timing and German military priorities. 1) Of course the Tiger and Panther hand’t come out yet (Panther would never see action in North Africa, naturally). 2) Most of the best German armor was still being sent to the East. I’m talking specifically about the vast majority of PzKpfw IV F/2s and Gs, even most of the PzKpfw IIIJ and Ls. The PzKpfw IV “Special” and Grant took center… Read more »
Great article @Oriskany. I remember reading that the second battle of El Alamein, was basically a WW1 western front battle in the dessert. Massive artillery barrage, infantry going forward to clear the way, tanks for exploiting a gap – would this be correct from your POV?
Absolutely, @tobymagill . At least the opening hours of Second Alamein could be thus characterized, with a massive nighttime artillery barrage, infantry pressing toward Italian and German trenches, trying to open lanes in minefields and take first enemy entrenchments. The idea was to open routes through which follow-on armor of 1st and 10th Armoured Divisions could attack when the sun rose. Didn’t quite work, which is what leads to Operation Lightfoot’s overall failure, and thus Monty’s second try with Operation Supercharge. Many of these smaller engagements of which Second Alamein was comprised would remain infantry based and largely positional in… Read more »
A very good one. The first thing that caught my eye was the first map. I read through the divisions included in the Allied defence line and I read … Greek! I didn´t know the “Free Greek” also fought against the Germans just like the Free French. Was it just infantry or did they also use American, British or even Soviet heavier weapons? I´m quite sure they didn´t bring their heavy gear with them from Greece. I know they had some. There are pictures about the Balkan campaign where a Greek artillery piece is set up to defeat the Italians… Read more »
Indeed, @jemmy, a brigade of Free Greeks was attached to 50th Northumbrian Division (part of XIII Corps), along with a brigade of Free French. Equipment seems to be British issue (76mm Stokes mortars, Bren carriers, 2-lbr ATGs, 25 lbr howitzers, etc.). The following is from gregpanzerblitz.com, detailing the platoon/battery-based OOB for this brigade. Yeah, the “skip first turn” surprise mechanic is an old scenario-designers trick. It’s great for equalizing imbalanced forces for asymmetrical wargames. What makes it tough for the situation you describe is that the “surprised” Germans aren’t on defense, they’re on attack. They HAVE to have a first… Read more »
A great read @oriskany the best thing about the Barce raid is that this type of raid could be played for any troop from stone age to 40k making a great game.
Indeed @zorg – a classic “smash-’em-up” raid – the stuff Hollywood action movies are made of.
Outpost Snipe is an interesting scenario. The original plan was to establish two outposts North and South of Kidney Ridge on the night of the 26th of October, one called Snipe, the other Woodcock. The assault on both positions started with navigation errors by the British forces; at Woodcock, the 2nd Battalion of the King’s Royal Rifle Corps (also known as 60th Rifles) instead of dismounting to assault on foot from 500 yards away, as was the plan, blundered onto the German position while still aboard their transports. Realising it would be suicidal to try and dismount and organise his… Read more »
Okay, @damon – I can finally get to a proper reply on this deserving post. 😀 Indeed, Snipe / Kidney Ridge / Hill 29 (taken all together) is an amazing episode in Second Alamein, one which I tried not only in Battlegroup (as seen above) but in much more detail via Panzer Leader / Brian Train’s Desert Leader series. The scenario I designed for this: DESERT LEADER SITUATION 37 KIDNEY RIDGE COUNTER ATTACK THIRD ALAMEIN, 23 October 1942 Needless to say, as soon as Rommel got word that the British had finally launched their long-dreaded attack on the Alamein line,… Read more »
@oriskany, that looks like an interesting scenario, hex and counter definitely has an appeal.
For Bolt Action I think the night attack by C company against the Littorio leaguer might make an interesting and different ‘zoom in’ to the Snipe action.
I would agree with that, @damon – night actions are almost all infantry-based (Bolt Action friendly) and shorter ranged for small arms (again, Bolt Action friendly).
Daylight action at Snipe … i.e., 6-pounders against German and Italian armor … not so much. 😀
We built and refought Snipe twice at games shows around 20 years ago using Skytrex 1/200th models and the Panzer rule system, both times got pretty simulilar results.
A friend still has the tiles and about an inch of limestone dust from a quarry in his loft.
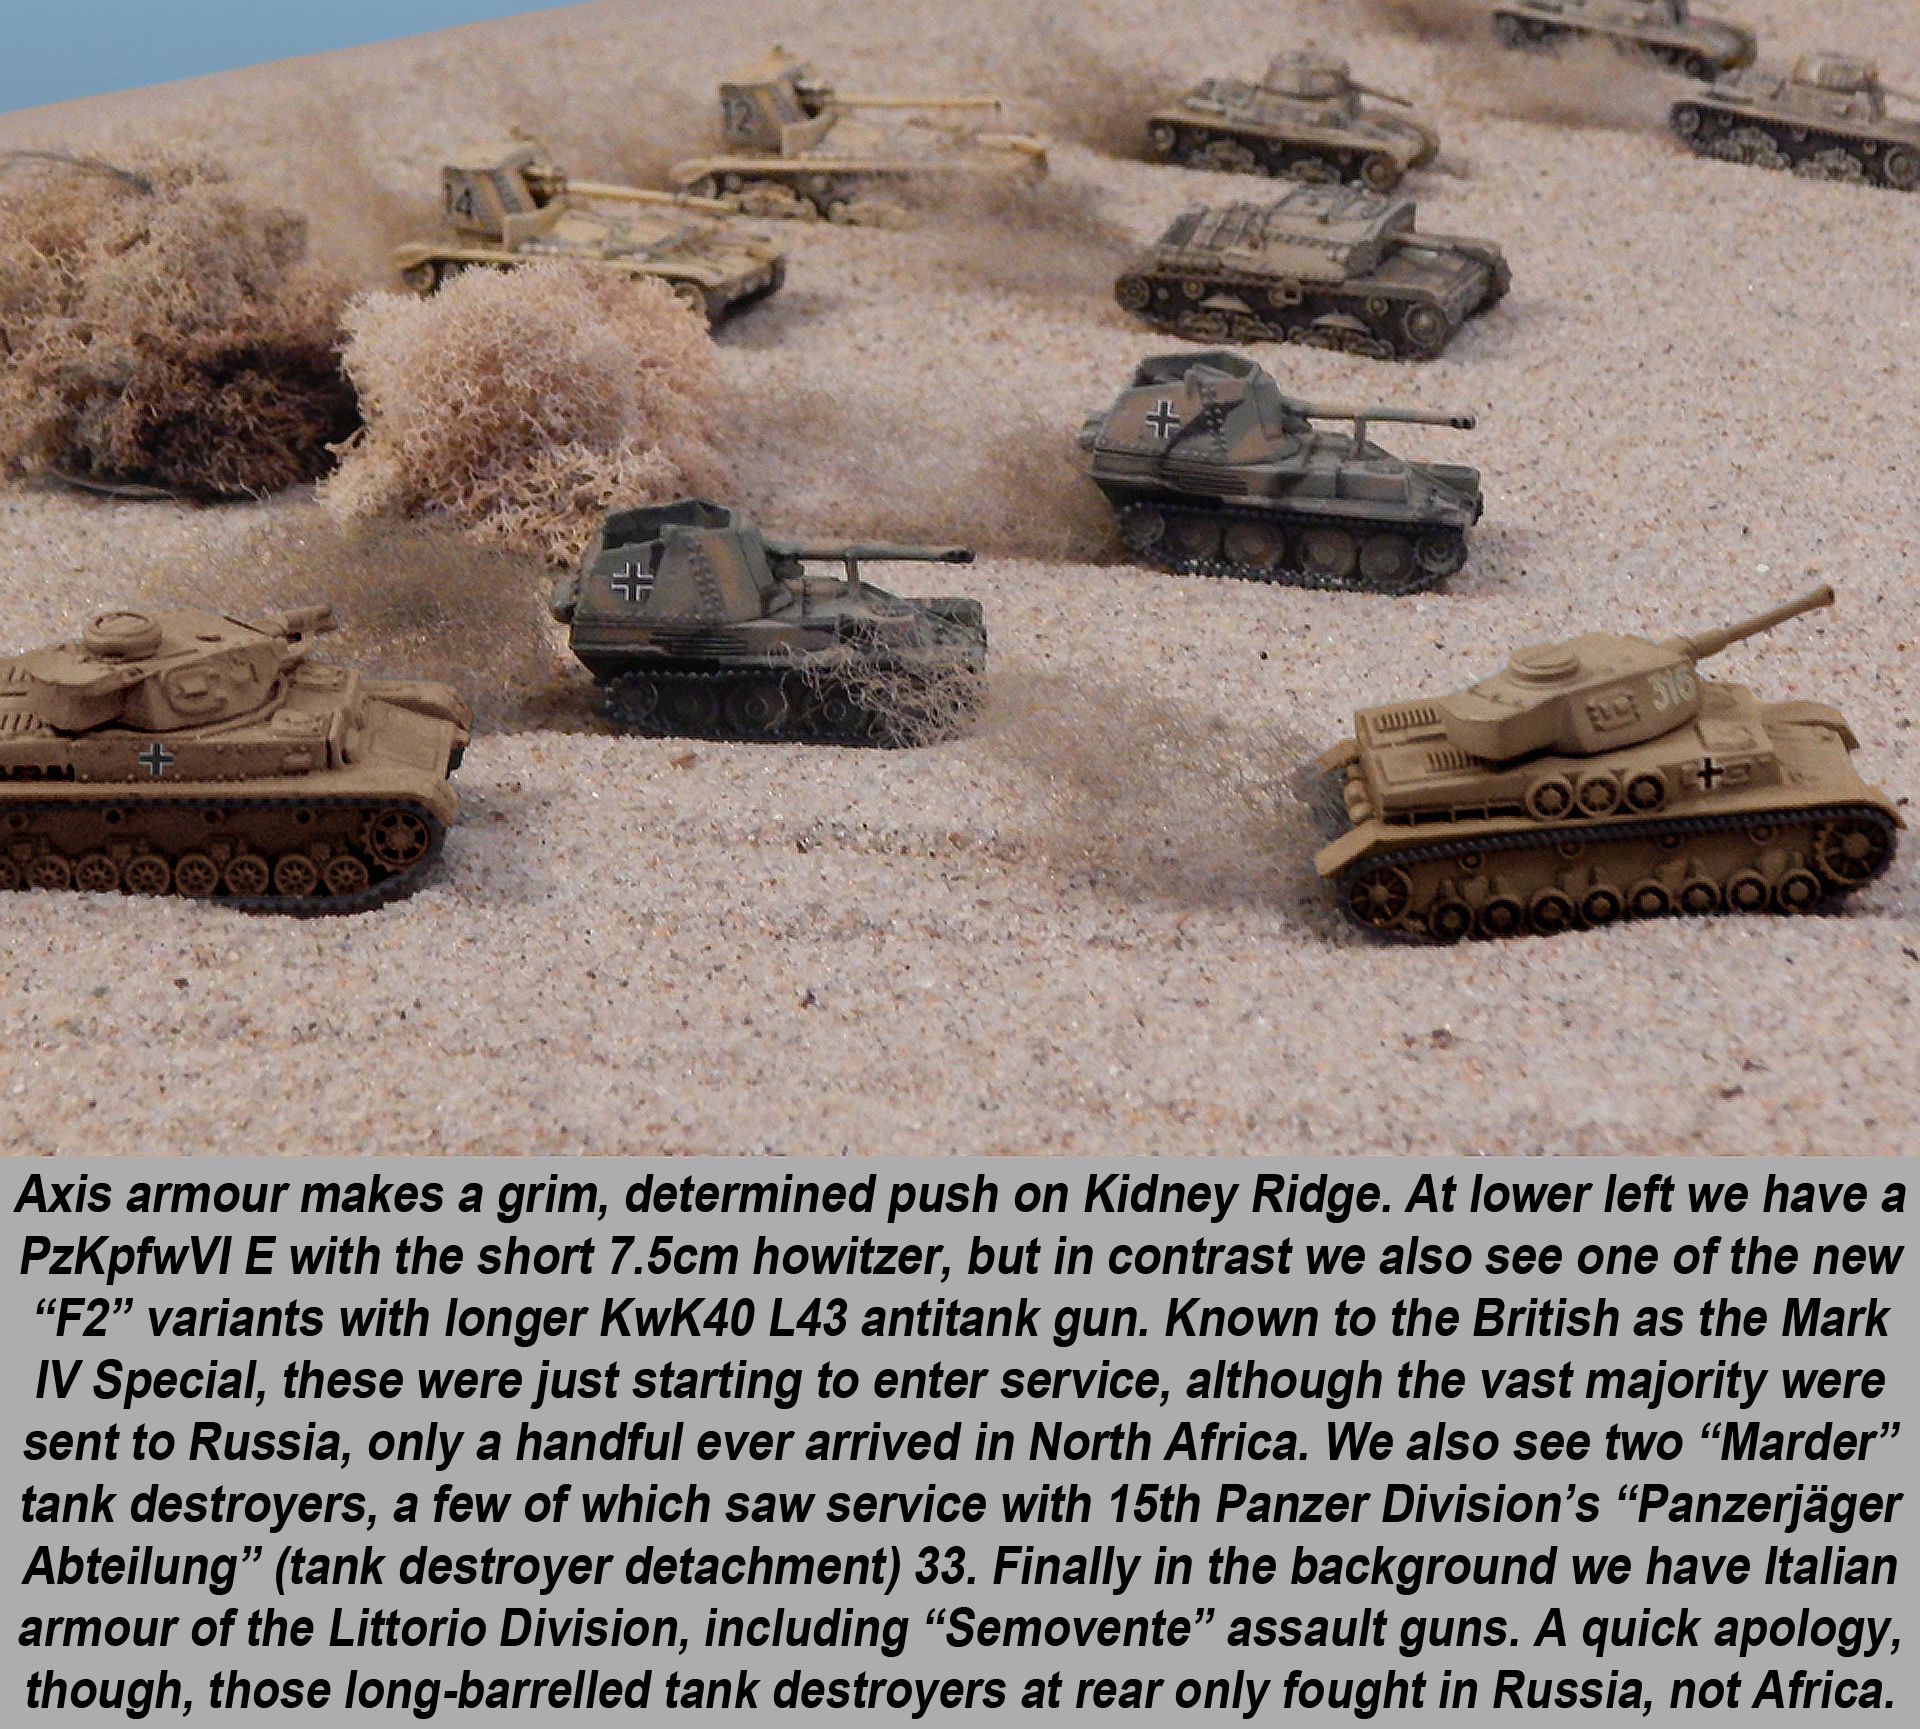
1:200 sounds like a good scale for this battle @bobcockayne , given the engagement ranges of 6lbr, 5.0 cm, and 7.5cm direct fire howitzer weapons in use (plus whatever the Italians had as well). I just like it because it was a “kitchen sink” kind of a battle, the kind that historically happens very infrequently. Infantry, armour, direct fire artillery, support indirect (off board) artillery, and three nations on top of that (assuming you zoom out just a little on the Panzer Leader scale). Oh, one thing, though … ERRATA: One of the pictures in the article above depicts 90mm… Read more »
@oriskany dont think you have to apologise had a look at the token on your picture under the magnifier, thought the silhouette looked wrong for a 90mm and bit at bottom says L40.
1/200th was a simple hexes to inchs conversion for Panzer’s 88, sham they never updated lists of 88 when they re-did at minatures game, though they are a very tank orientated set of rules and infantry rules are basic, though trying to spot the little buggers form tanks is fun…….not!
Thanks, @bobcockayne – I was actually looking at the photo in the article – that has some of the Semovente assault guns in the background with the Mod 39/90 Canone AA guns on the back (big yellow suckers with “12” and “14” on them.
Yes, my Panzer Leader games are usually more accurate than my miniature games. 😀
@oriskany realise you might be on about above after posted, thought you had already apologised for that. If nothing else you have them pointing the right way (on going joke about club member who had a WW2 battlewagon the wrong way round even though there was a wake at back).
@bobcockayne – “thought you had already apologised for that.” – I may have. There are a lot of threads flying around and some of these photos are three years old. 🙂 But yes … at least we have them pointing the right way. Not too hard when you see the size of that gun! 😀
In my defense, these Semovente 39/90s were also included in the original Desert Leader Panzer Leader set … so at least I’m not alone in this.
@oriskany did they get them mixed up with the truck mounted version that may have appeared at end of Desert war?
Errp … nope, I was wrong again. Semovente 39/90s were NOT in the original Brian Train Desert Leader set. He knew better, I did not.
Man, I cannot win with these Semoventes. They are my historical kryptonite! 🙁
Another interesting read
Thanks very much, @rasmus! 😀
Awesome article can’t wait to see all the cool bootcamp content still to come. A great book for anyone wanting to know more about/make wargaming scenarios for the Desert Special Ops is SAS Ghost Patrol. It’s about Operation Caravan and the monumental work that went into it. The British created SIG (Special Interrogation Group) which were German’s in the British army who posed as German Soldiers, which I had never heard of before reading the book, then used them to drive 80 SAS/Commandos into Tobruk in three trucks in broad daylight. They knew they had been spotted and Tobruk HQ… Read more »
Thanks very much, @elessar2590 – Operation Caravan is indeed amazing. There will be lots of this and other stories / episodes covered during the boot camp interviews / live blog, in our “Tales of the Desert” series. Repairing alternator mounts with sand and chewing gum, burying fuel and water and somehow finding it again six months later, meeting tiny little biplanes for resupply out in some remote stretch of desert even Google Earth can’t find ( 😀 ), the one guy who was thought lost until he showed up 10 days later at a rendezvous point, having walking 210 miles… Read more »
Great article and photos. I love the “pink” jeeps and trucks!
Thanks, @gladesrunner – turns out that was only one of many color schemes used by these units. For some reason, that particular shade of pink vanishes into the desert sand … when viewed from the air. I’ve also read accounts where it was used because dawn and dusk were considered the most dangerous times for detection. In any event, for these guys it was all about hiding in plain sight (not much cover in the Libyan Sand Sea), striking out of nowhere, then vanishing just as quickly.
Great detail in there being ore than one Battle of El Alamein. Strange to think that Montgomery was actually not the first choice to lead this battle. Any predictions on how this might have turned out if Gott had been in command instead?
Thanks, @pslemon – Gott was a very solid officer with years of desert warfare experience. As commander of XIII Corps, he led the “original” corps in Eighth Army what had originally grown from the WDF (Western Desert Force), then the XIII Corps, then XIII and XXX Corps, and finally XIII, XXX, and X Corps. So he certainly had the technical, tactical and moral capabilities to lead well. The issue is, was he TOO experienced – i.e., he’d seen all these Eight Army defeats at the hands of Rommel and was too accustomed to doing things the old way? I honestly… Read more »