![How To Paint Moonstone’s Nanny | Goblin King Games [7 Days Early Access]](https://images.beastsofwar.com/2024/12/3CU-Gobin-King-Games-Moonstone-Shades-Nanny-coverimage-225-127.jpg)


Raiding the Dusty Wastes


Recommendations: 1778
About the Project
A build of a display piece that was started about summer 2019. Now a year later it might be ready to paint as I get other projects done. This was fun for the idea of a desert dungeon crawl. Looks like things have changed as its now a SAGA Age of Magic project
Related Game: SAGA
Related Company: Gripping Beast
Related Genre: Fantasy
Related Contest: Spring Clean Hobby Challenge 2023
This Project is Completed
Arabian Nights like Arabian Days
Not taking 1,001 nights
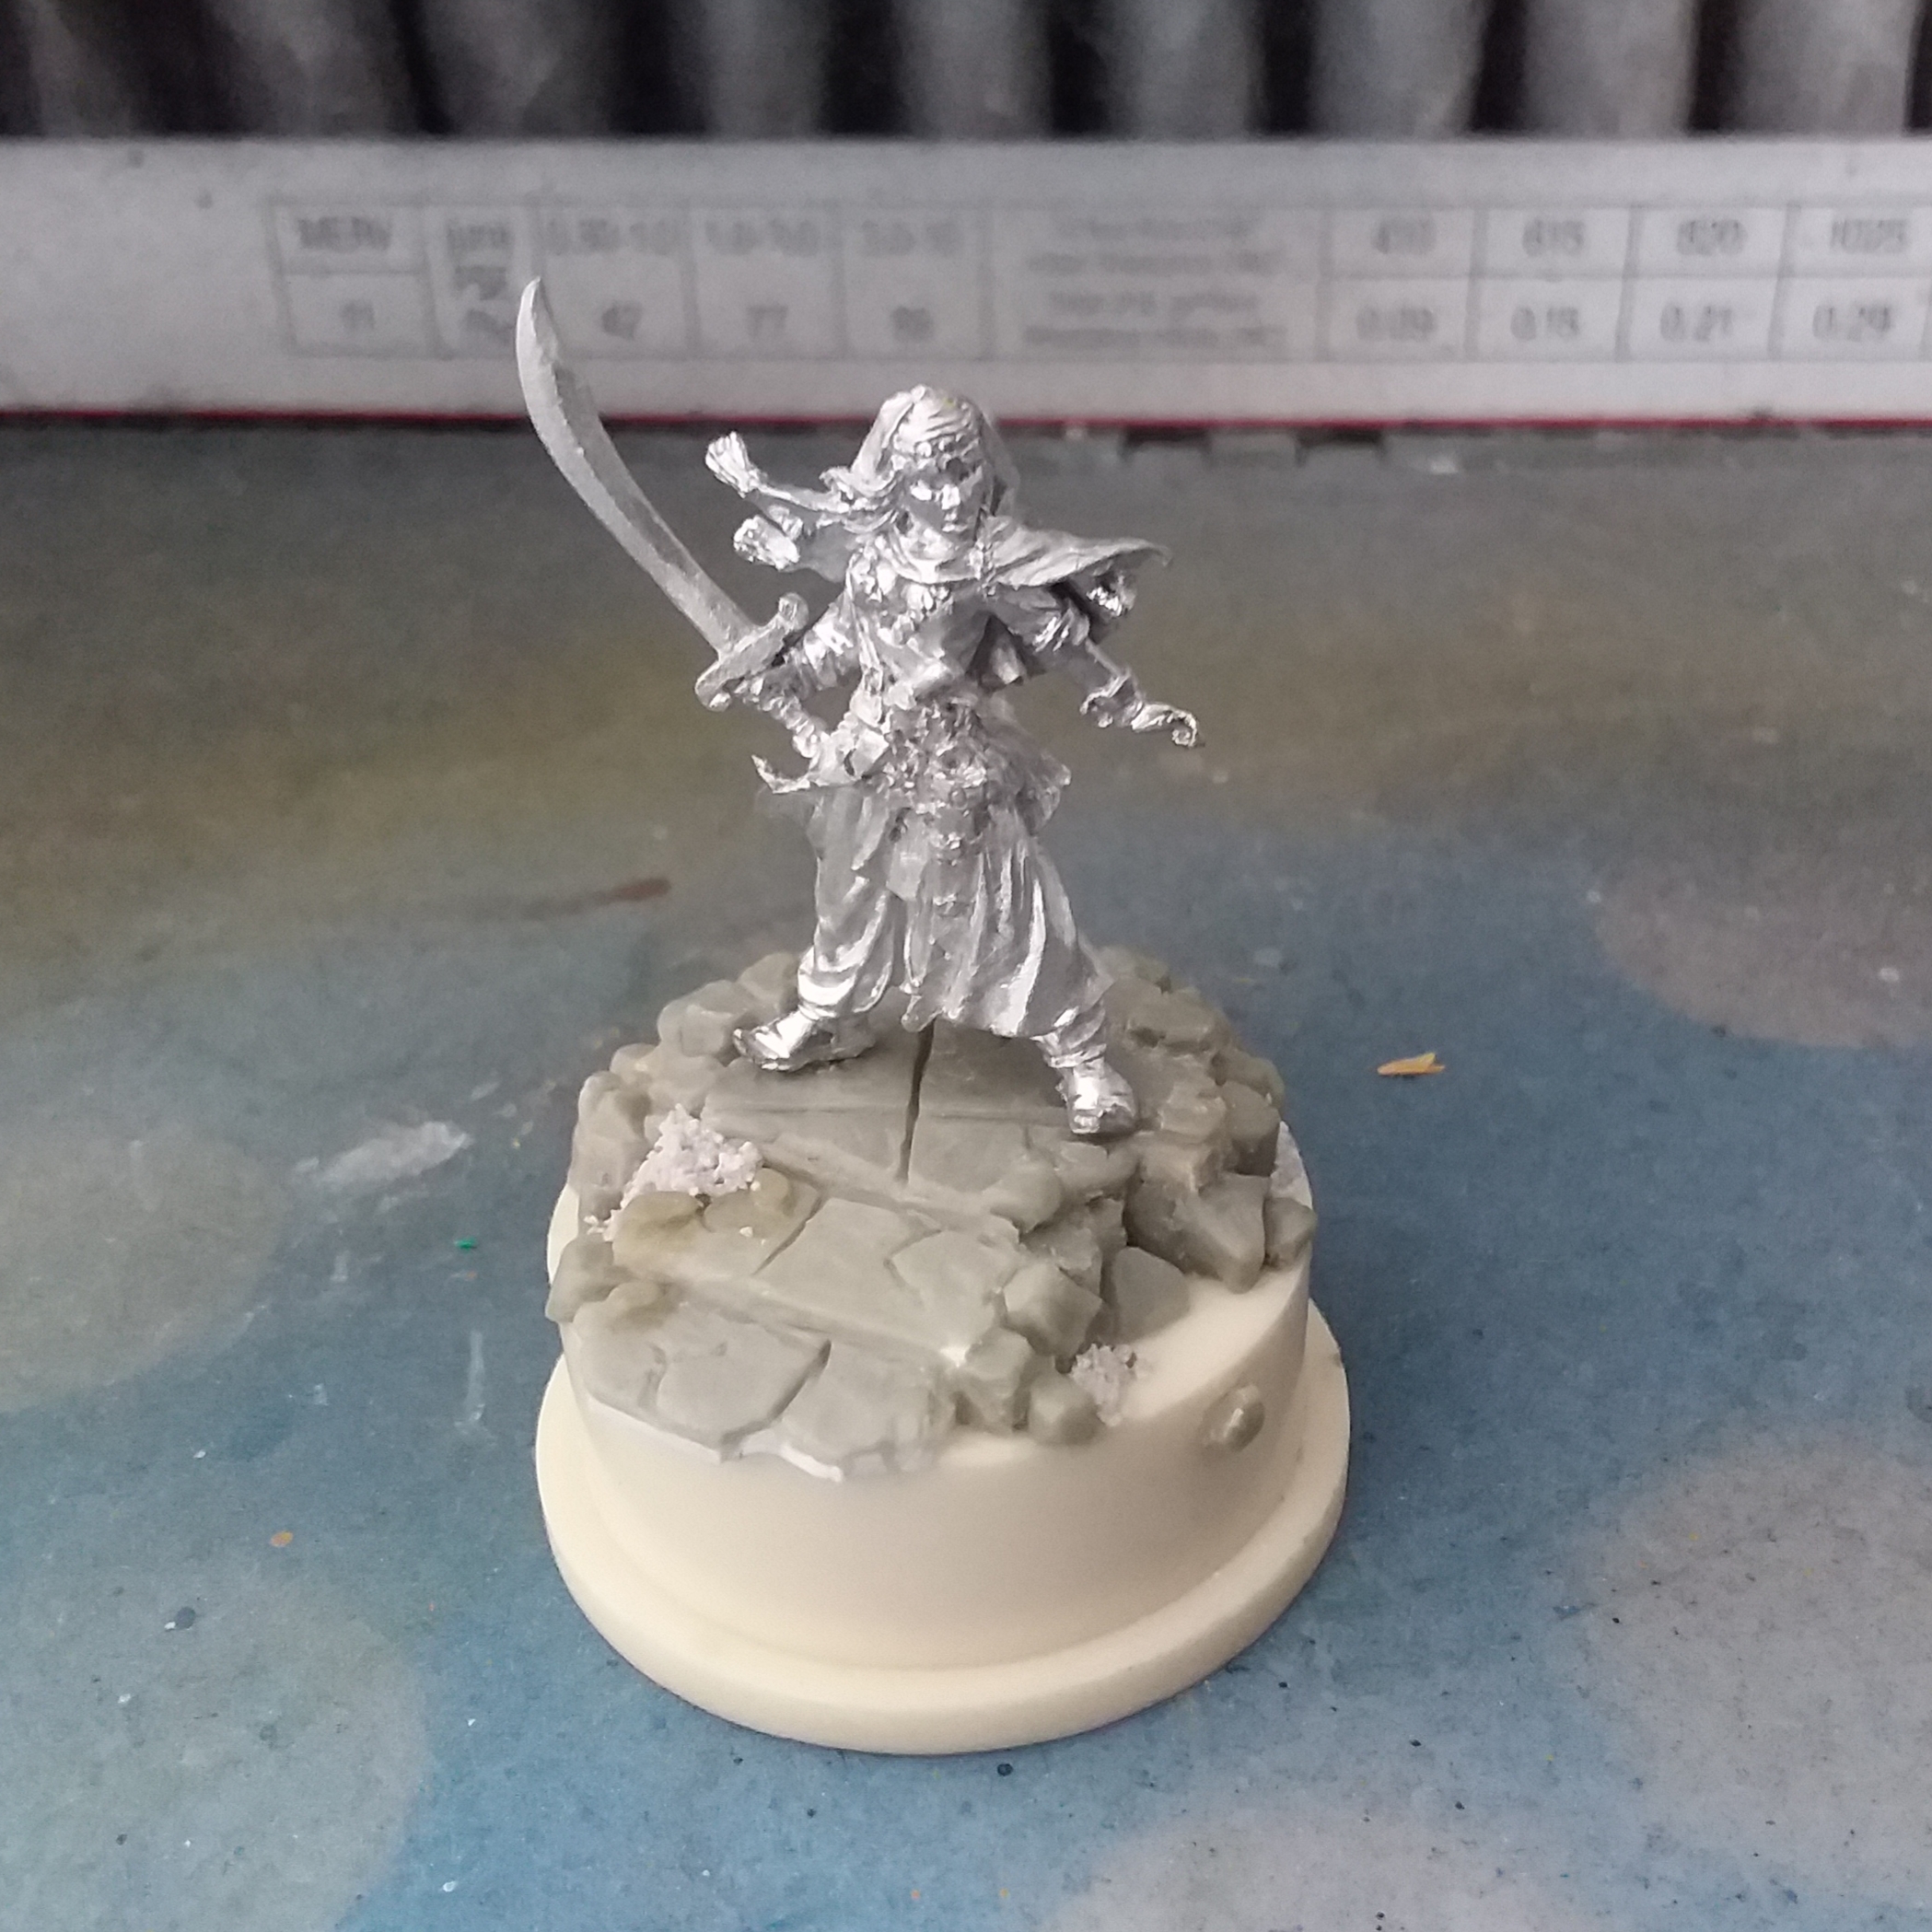
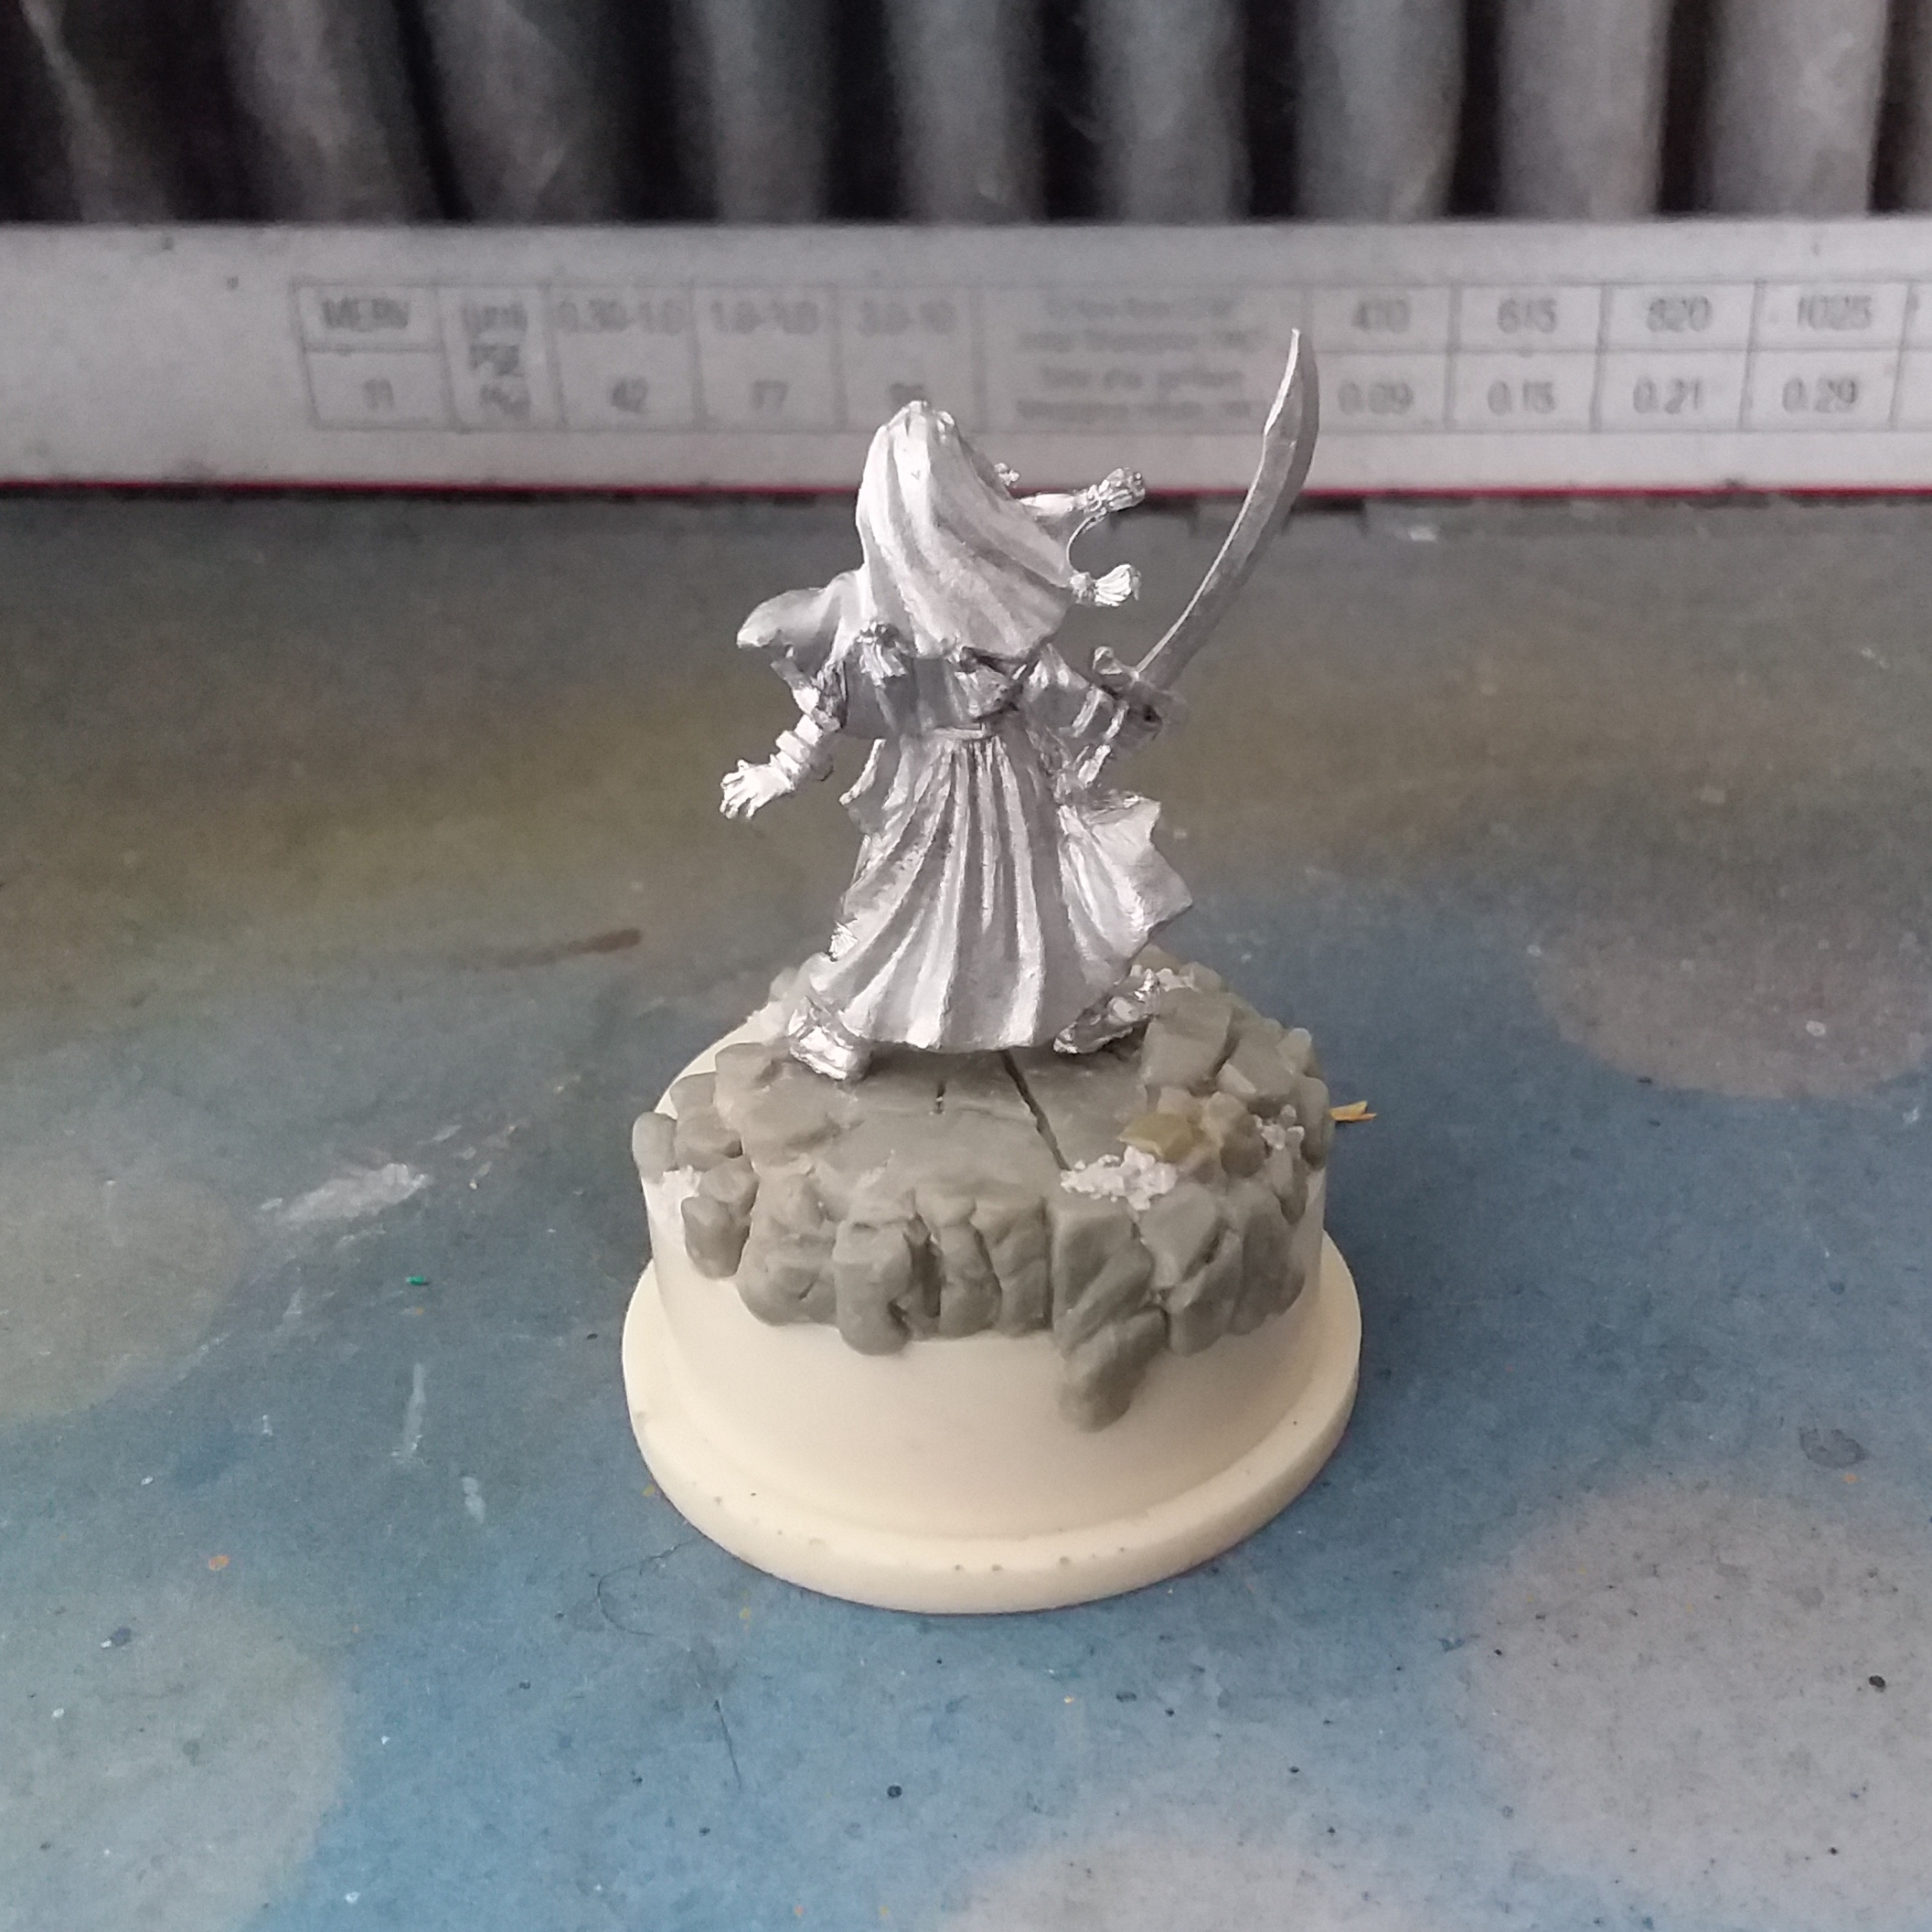
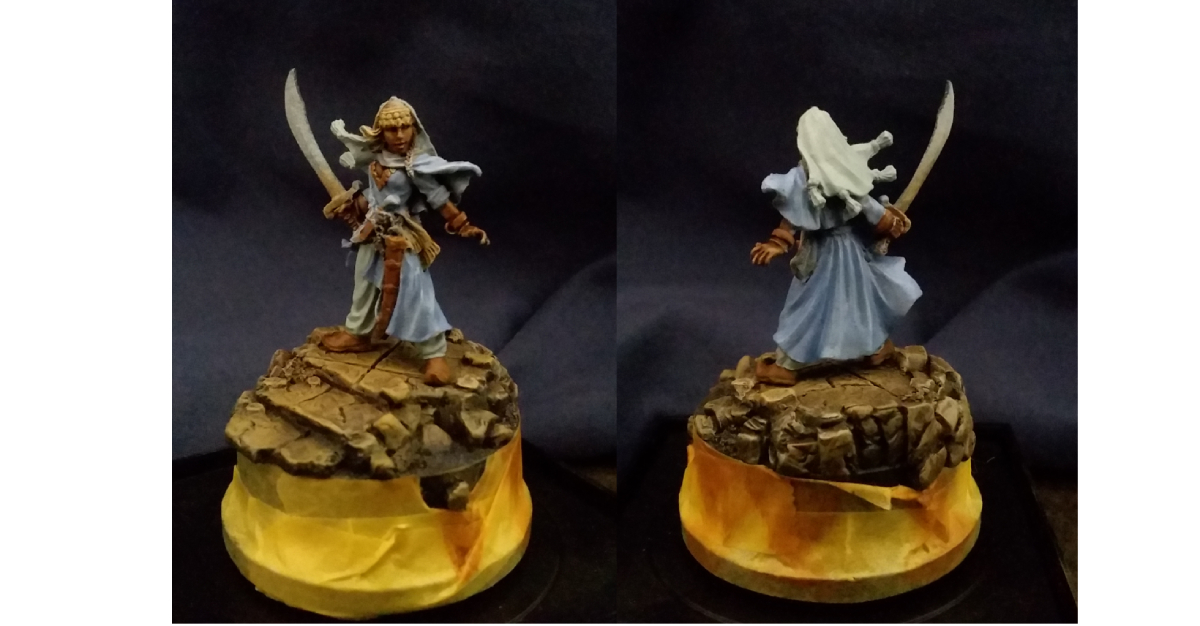
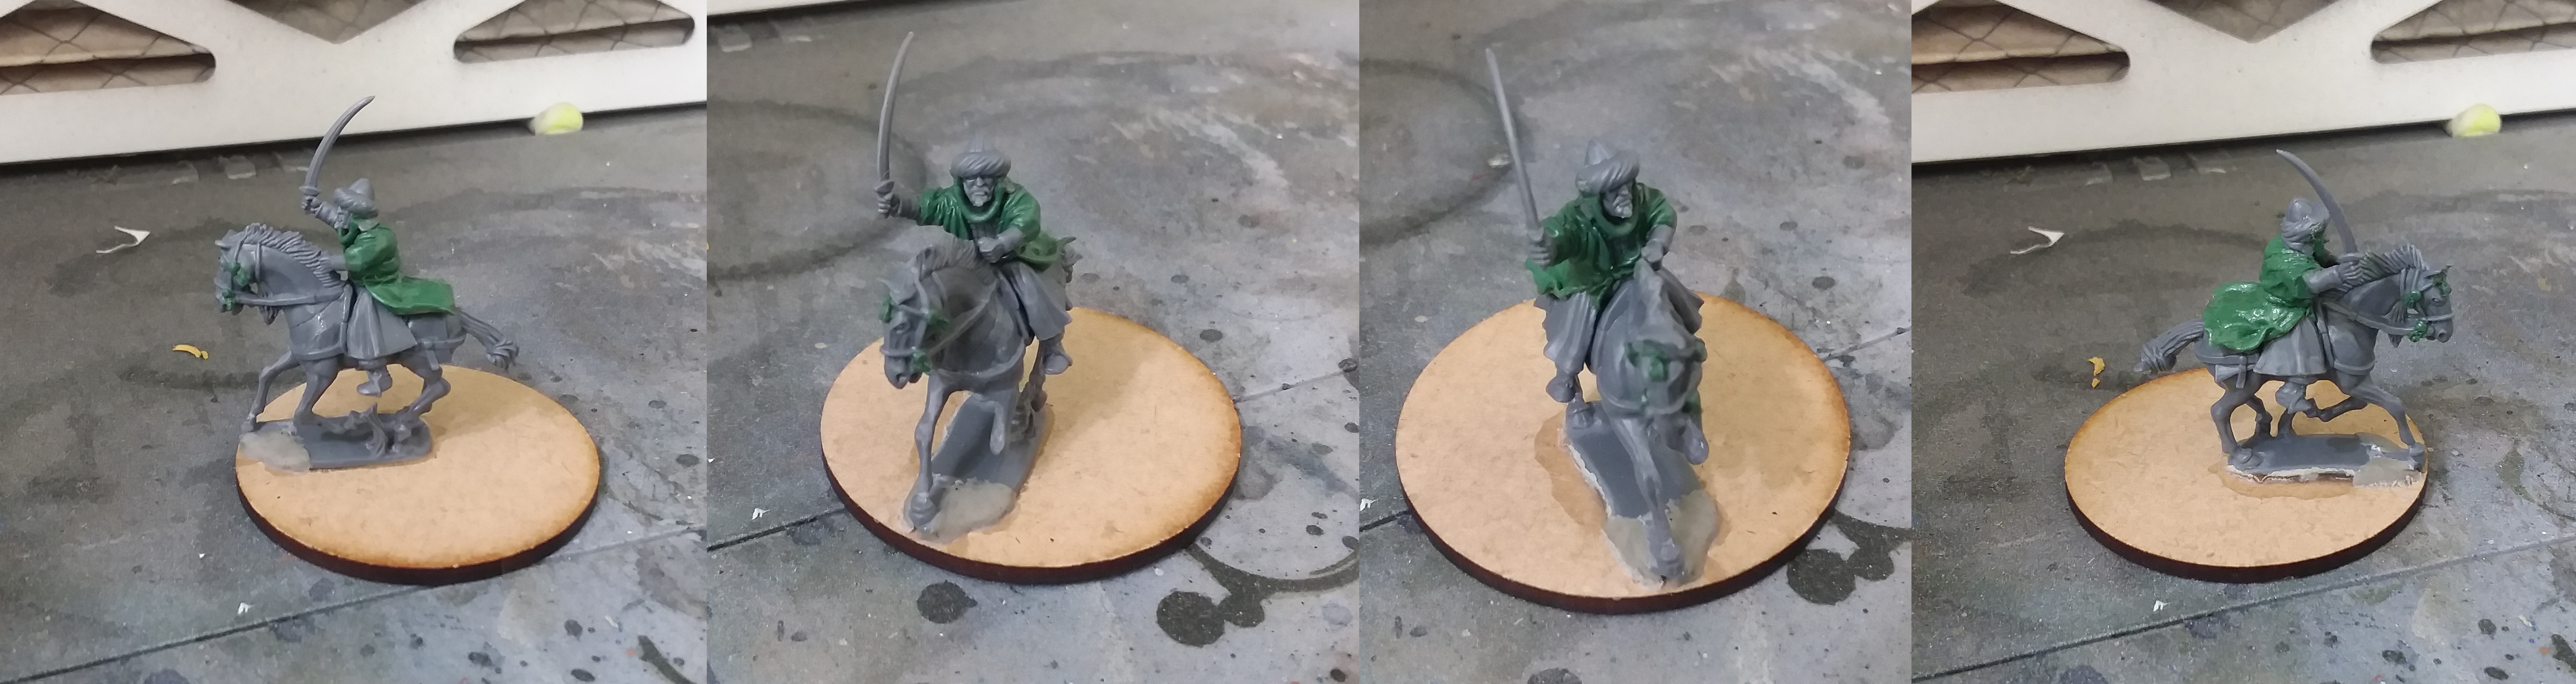
I started with the random “Ooh, Shiny!” purchase and thought it’d be a quick and easy paintjob. Nope, I sat around and then tried painting it once before scraping paint and deciding to strip it entirely. After a short amount of time looking back and forth between the mini and the others that were nicely based/painted I thought this would have a proper plinth to stand on and be just as visually interesting. Away I went to creating the stairwell as close to scale as I could get without actually doing mathematics and driving myself batty with sculpting. I know there will be more to add on in the future before this is “done” with details but here is the bare bones with interesting grit texture courtesy of my mainstay Golden pumice additive.
Here you see the base plinth I bought and work upon. I built a small platform of basswood strip and glued a segment of plasticard for the step. On top of all this I used Apoxiesculpt to make the stone both worked and natural where the mini stands. I thought that the initial scimitar for the figure was a bit off (especially after I had dropped it) so I replaced it with a thicker one from Reaper’s weapon mod packs. So far so good with enough open space to detail later.
Ordering some troops
 Warren was right (don't tell him) the greys are real
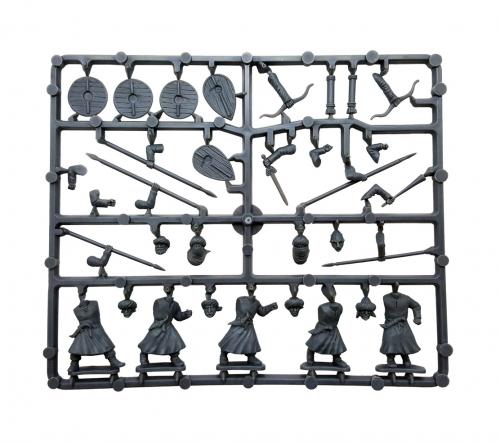
So in a flurry of spending money I went and dropped cash on a single sprue of Gripping Beast historicals on Fleabay. Not a bad thing to buy bits but this was ridiculous as I only found one conehead with turban that I was after. Arab Spearmen and Archers as a boxed set looks cool but I don’t need to buy a whole unit for just one part. This beats buying a Perry box of Assyrians for one head to cut off a face and earflaps, drill out the cavity and add a turban.
Sprue arrival and ideas form
Good news that I got the Gripping Beast sprue. The down side is that I see that the bodies are a slightly large. They’d fit right in with GW stuff for the oversize proportions but not so much with the sculpt from Reaper. So sitting with the bits in hand I think the previous idea of just cutting off a portion of the bottom to the helmeted head, the on the right in the row just above the bottom row, and then just applying greenstuff to make a turban and shemagh is best for scale. I have a plan and I think it might work. I might add a skeletal arm to the base later. I think a third element should be added and it could be the remains of a dead torch (not the British idea of what is known as a flashlight)… eh… nah boring. Changing my mind on the helmet again and keeping a third element. Do the helmet w/ turban but hollow it out and put a skull on the lowest step. Yes, I will do just that and put the skeletal arm behind the figure. A grisly fate for a long dead someone that the current figure is standing over. This will work.
Delicately sculpted features
 Hightlights even hitting the lips
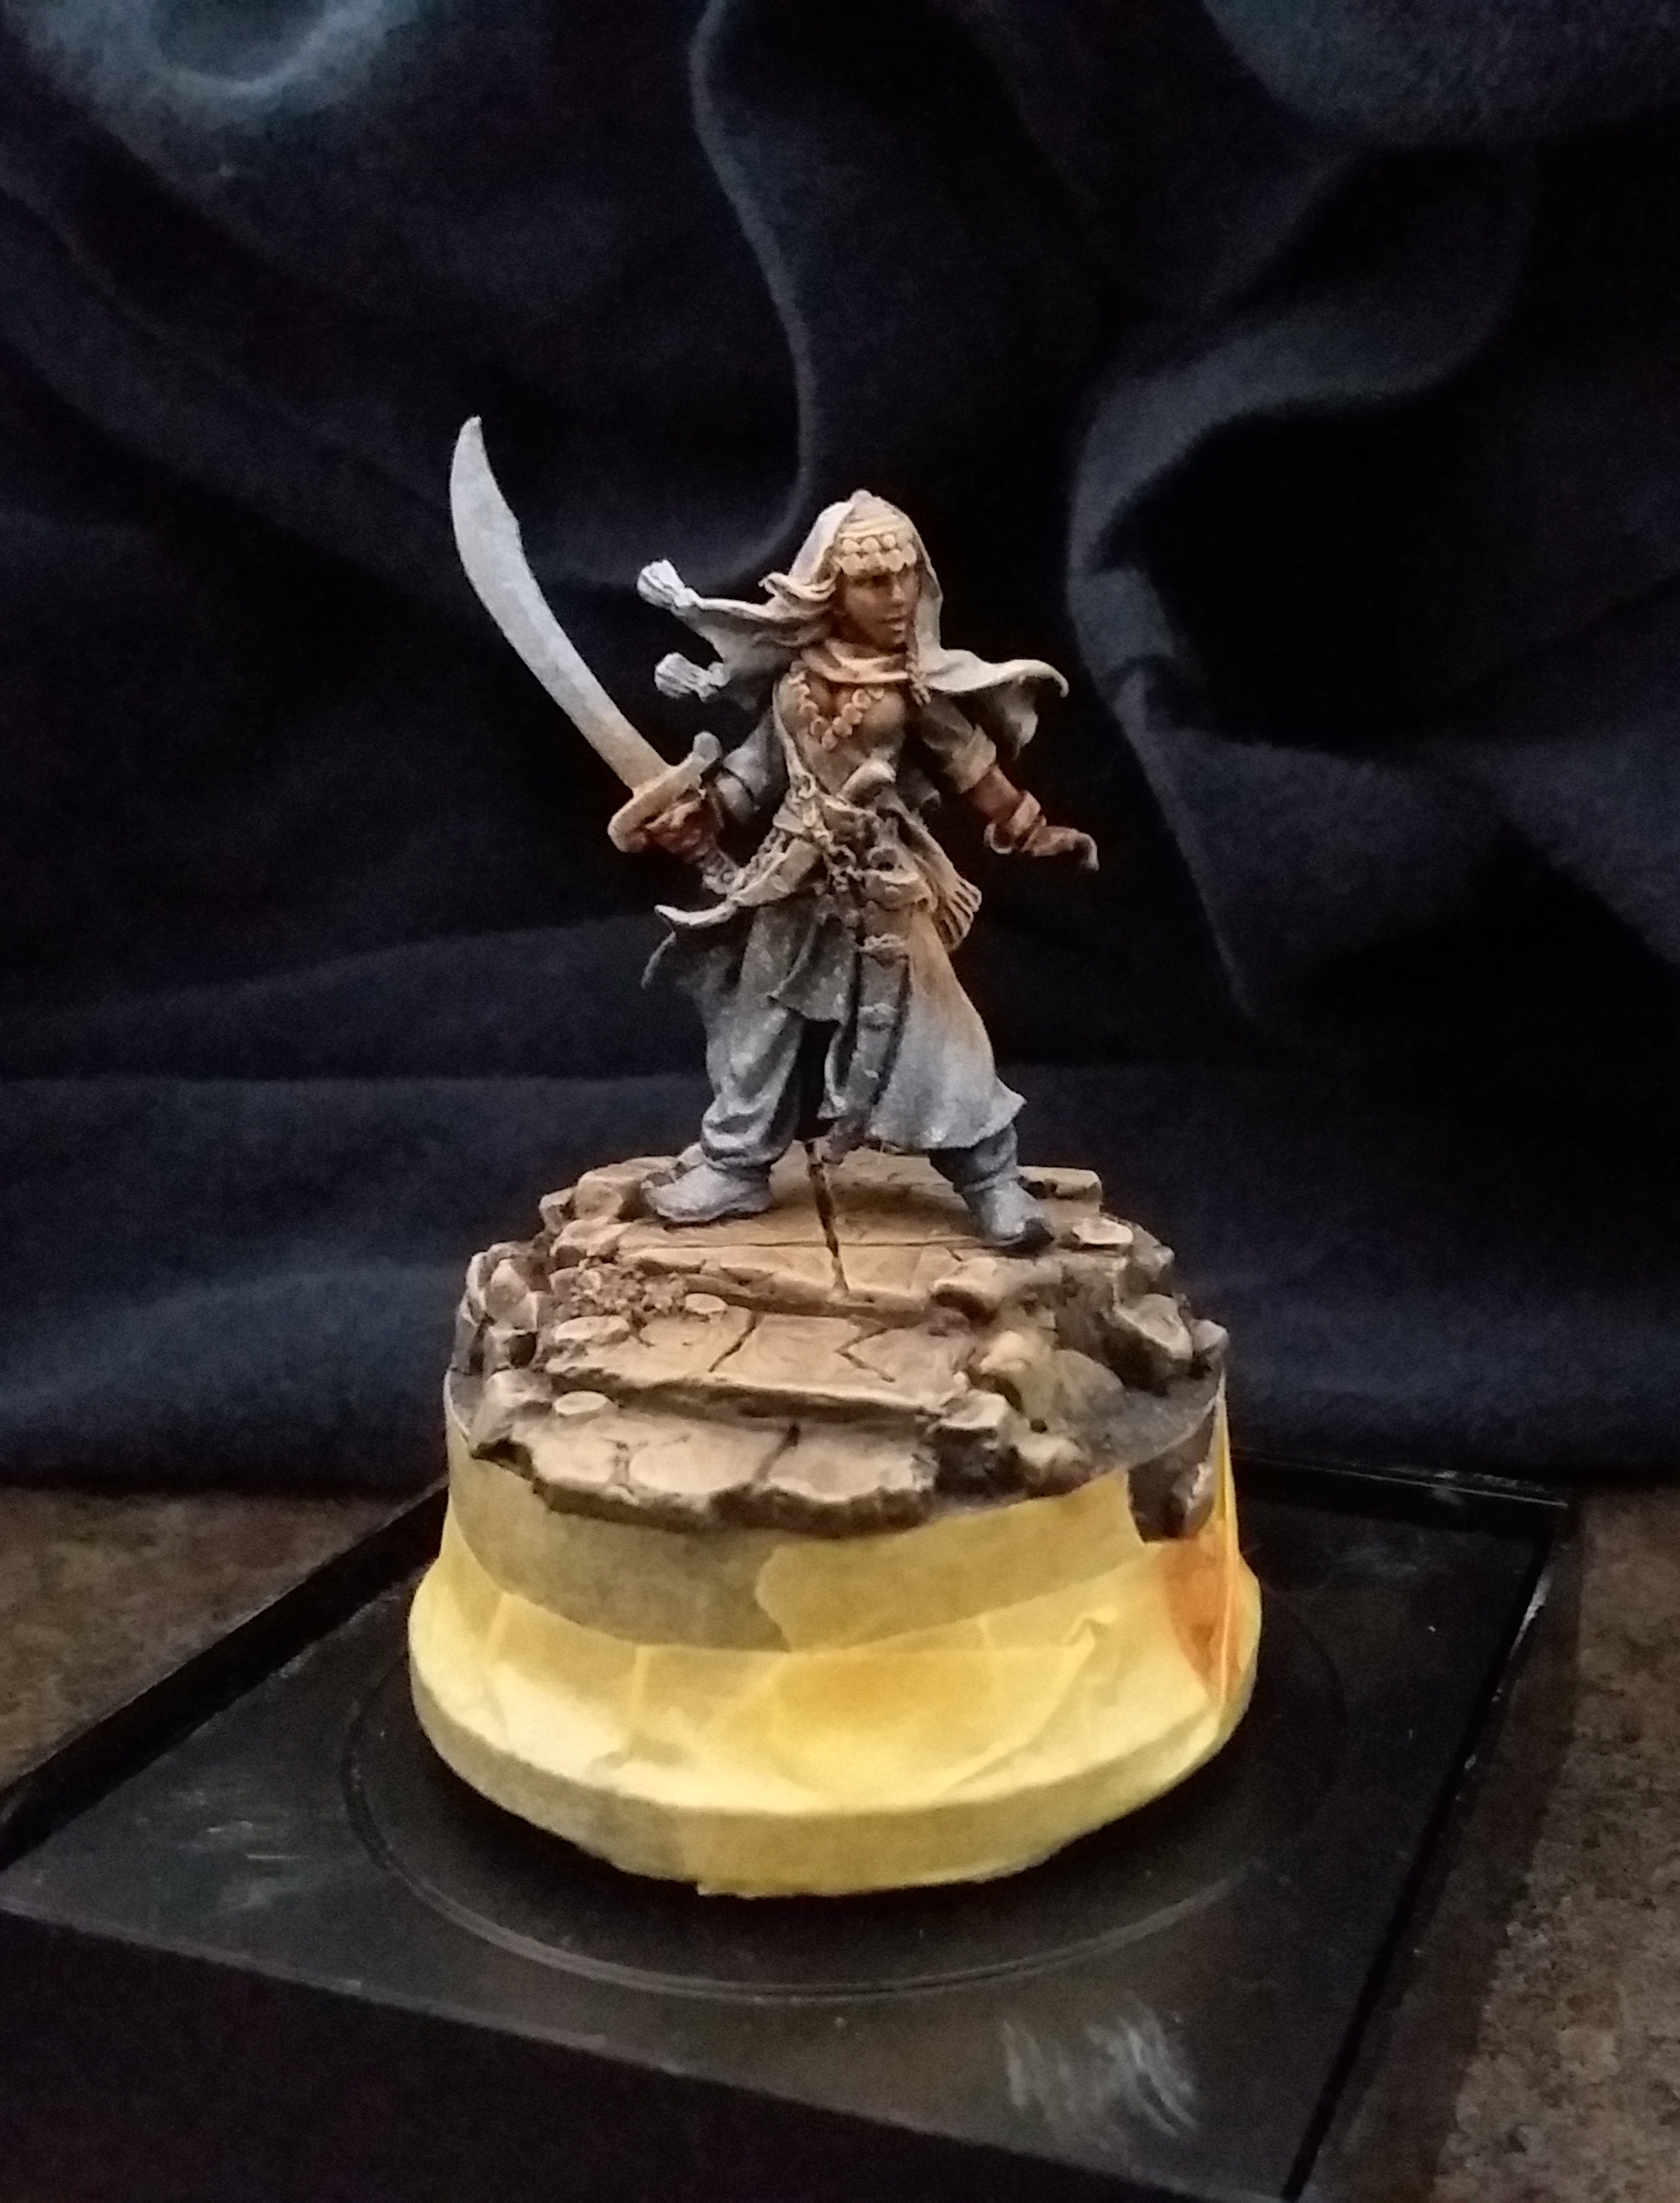
With completing two other projects not terribly long ago I figured that this needed some love again; well, that and I already got the urge to build the Gripping Beast figures from the sprue and toss on some sand/gravel mix I had. I pushed the Arab spearmen aside for a moment and went back to the lovely lady on the plinth (its a visual thing Lloyd).
So what I went about first was a zenithal priming over black. Seeing the success of the Darkoath Brown contrast from GW I figured I might want to try the same on the base. I had misgivings on doing the fleshtone but I relented thinking that there wasn’t much skin exposed and it could be redone with minimal effort. So, on with the drybrush layers.
- VGA Barbarian Flesh (72.771)
- VMA Medium Flesh (78.860)
- VMA Pale Sand (70.837)
After getting all that down I washed it with GW Reikland Fleshshade to ease it all back to something reasonable with highlights. Thinking that this really worked I did the same thing with the base but left out the final wash. It’ll work later as well in tying the palette together.
If I were a lazier painter I could leave the drybrushed Medium Flesh/Pale Sand as a NMM gold but I think the color could be developed more.
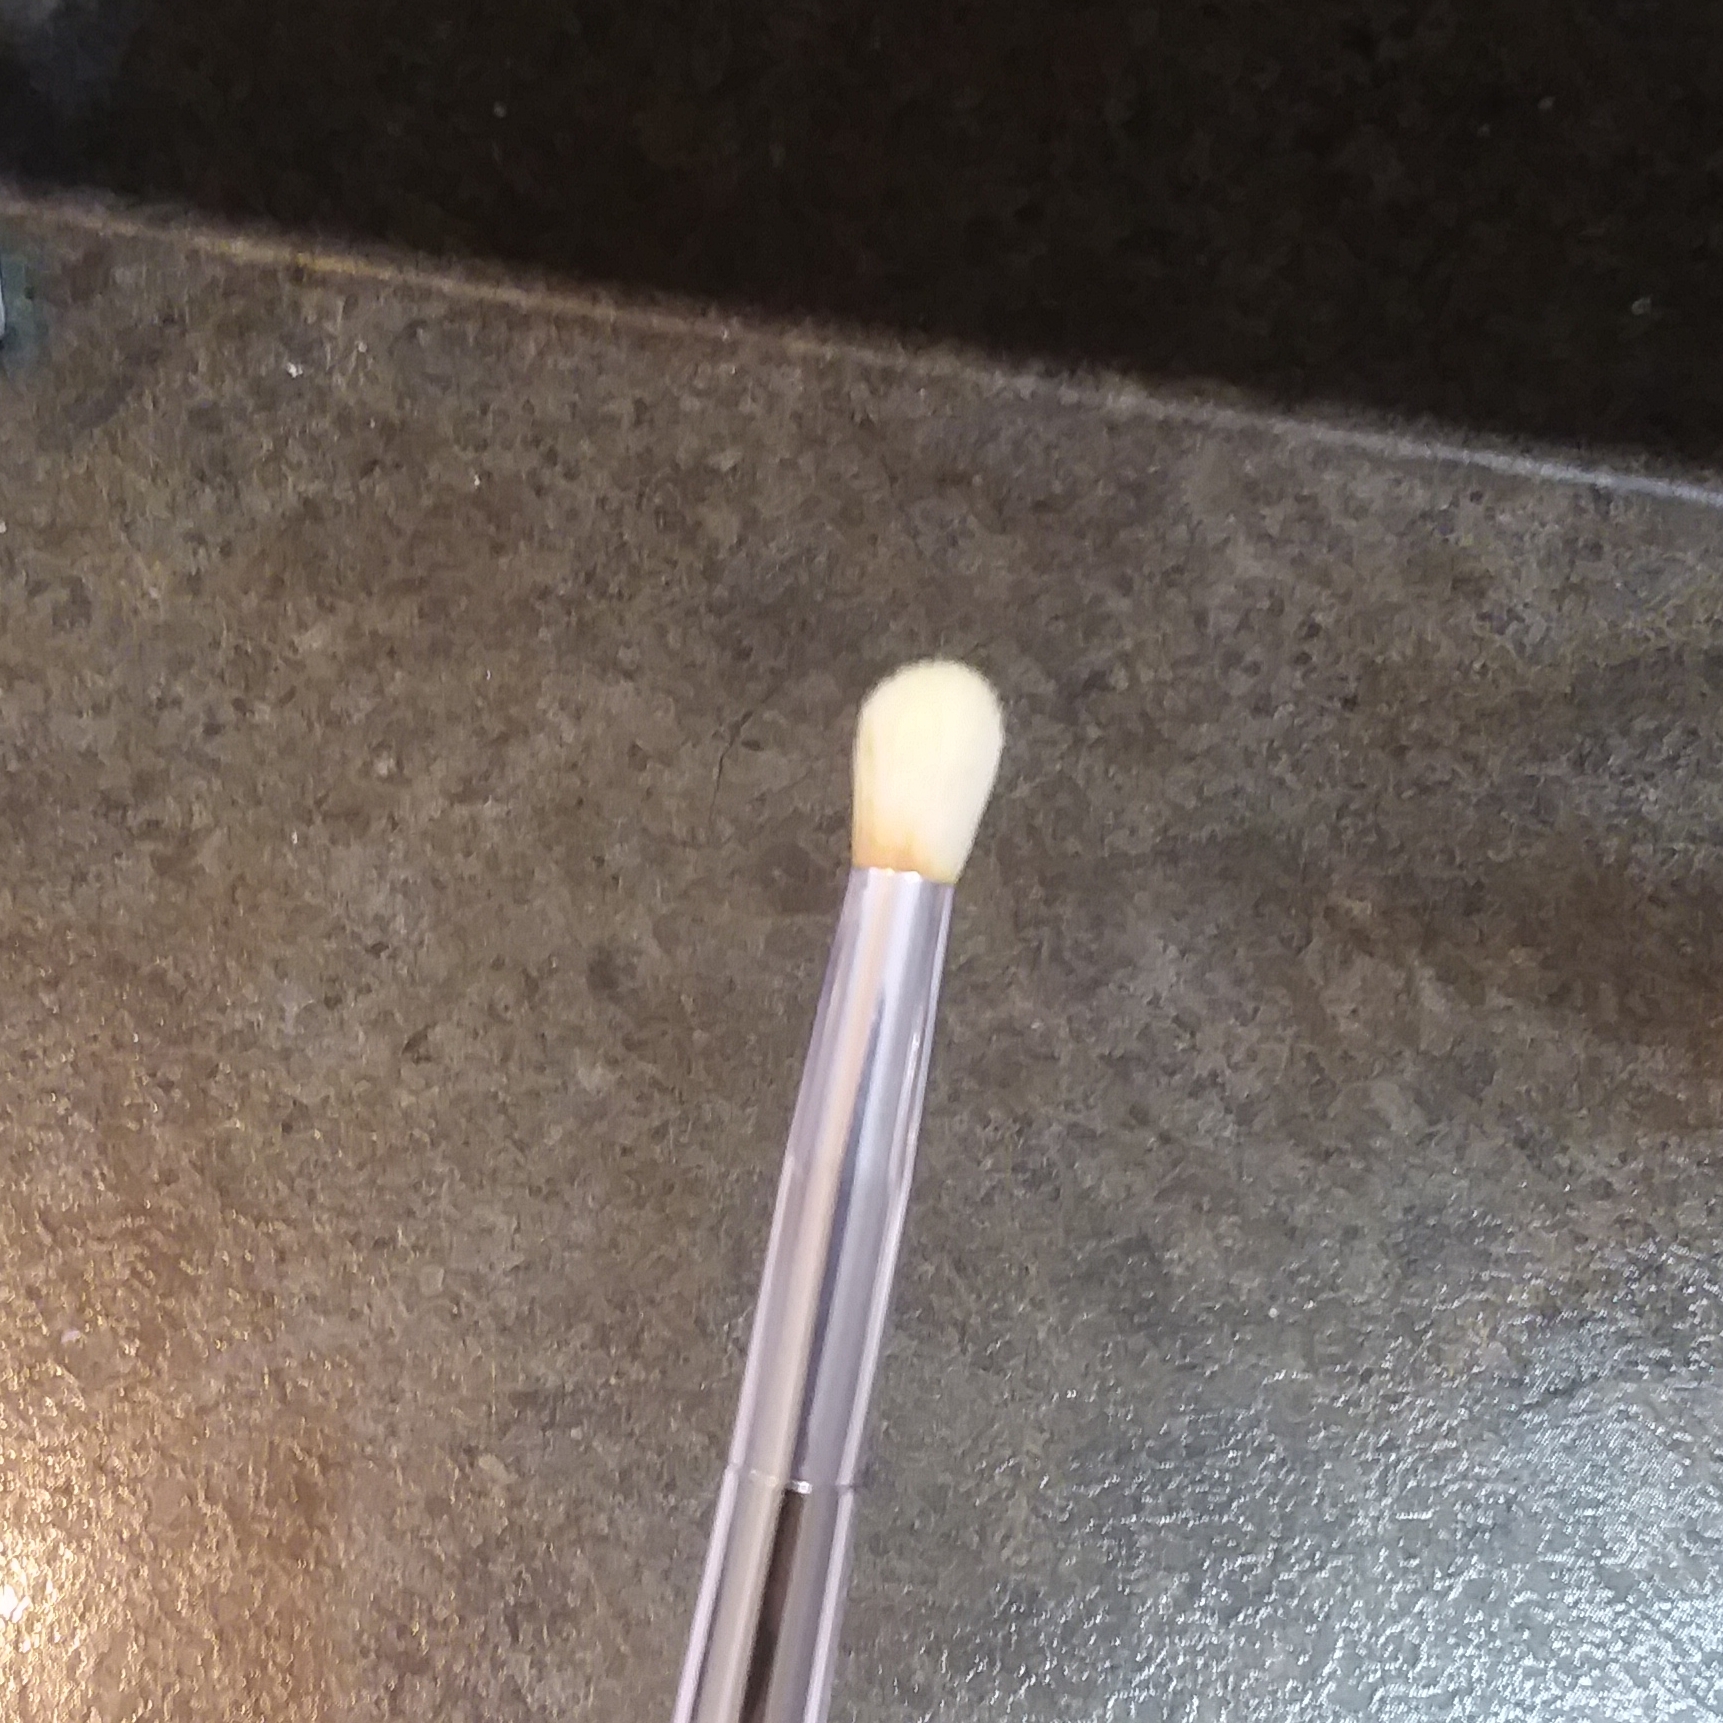
It didn’t look half bad and I decided that this approach to drybrushing will be my fleshtone approach when not refining my airbrush skills. This soft transition was brought forth by a venture into a FLBSS (Friendly Local Beauty Supply Store) for a small soft nylon makeup brush. There were a few sizes but I picked up one about 8mm wide for about what GW’s M scenery brushes go for; its the same material as far as I see.
 Quite a useful little buy
As you can probably tell I finally figured out the damn issue with the lighting. It took a little trial and error but throwing a bedsheet over myself and the mini in the bathroom looks like it will work. I hope to be able to get more good shots like this before I move again as this has finally made me happy with the results possible from my limited knowledge of how to play around with the camera on my phone and being without my own personal setup.
Photopea and me making fantastic history
 Pale colors but better with designs... first shot with Photopea
Considering more detail in the pattern work I opted for putting in pastels for the clothing. I threw down a VMC Pale Blue and then VMC Azure to counter as a dark tone. Realistically they are both quite light as I’ve reserved Azure as a color for creating NMM steel in my first project ever to OTT ( https://www.beastsofwar.com/project-entry/1266395/ ). I did a gentle drybrush with the makeup brush to bring out the edges in RMS Ghost White and glazed back over with the respective colors.
Beyond that I started blocking the light browns with VGA Beastly Brown into the shoes, scabbards and what will end up being gold.
Aside from that I fell back to batch painting with the spearmen. Again things to get better with pattern designs.
 Second shot at Photopea sizing
A Task of Masks
 Visual interest increased
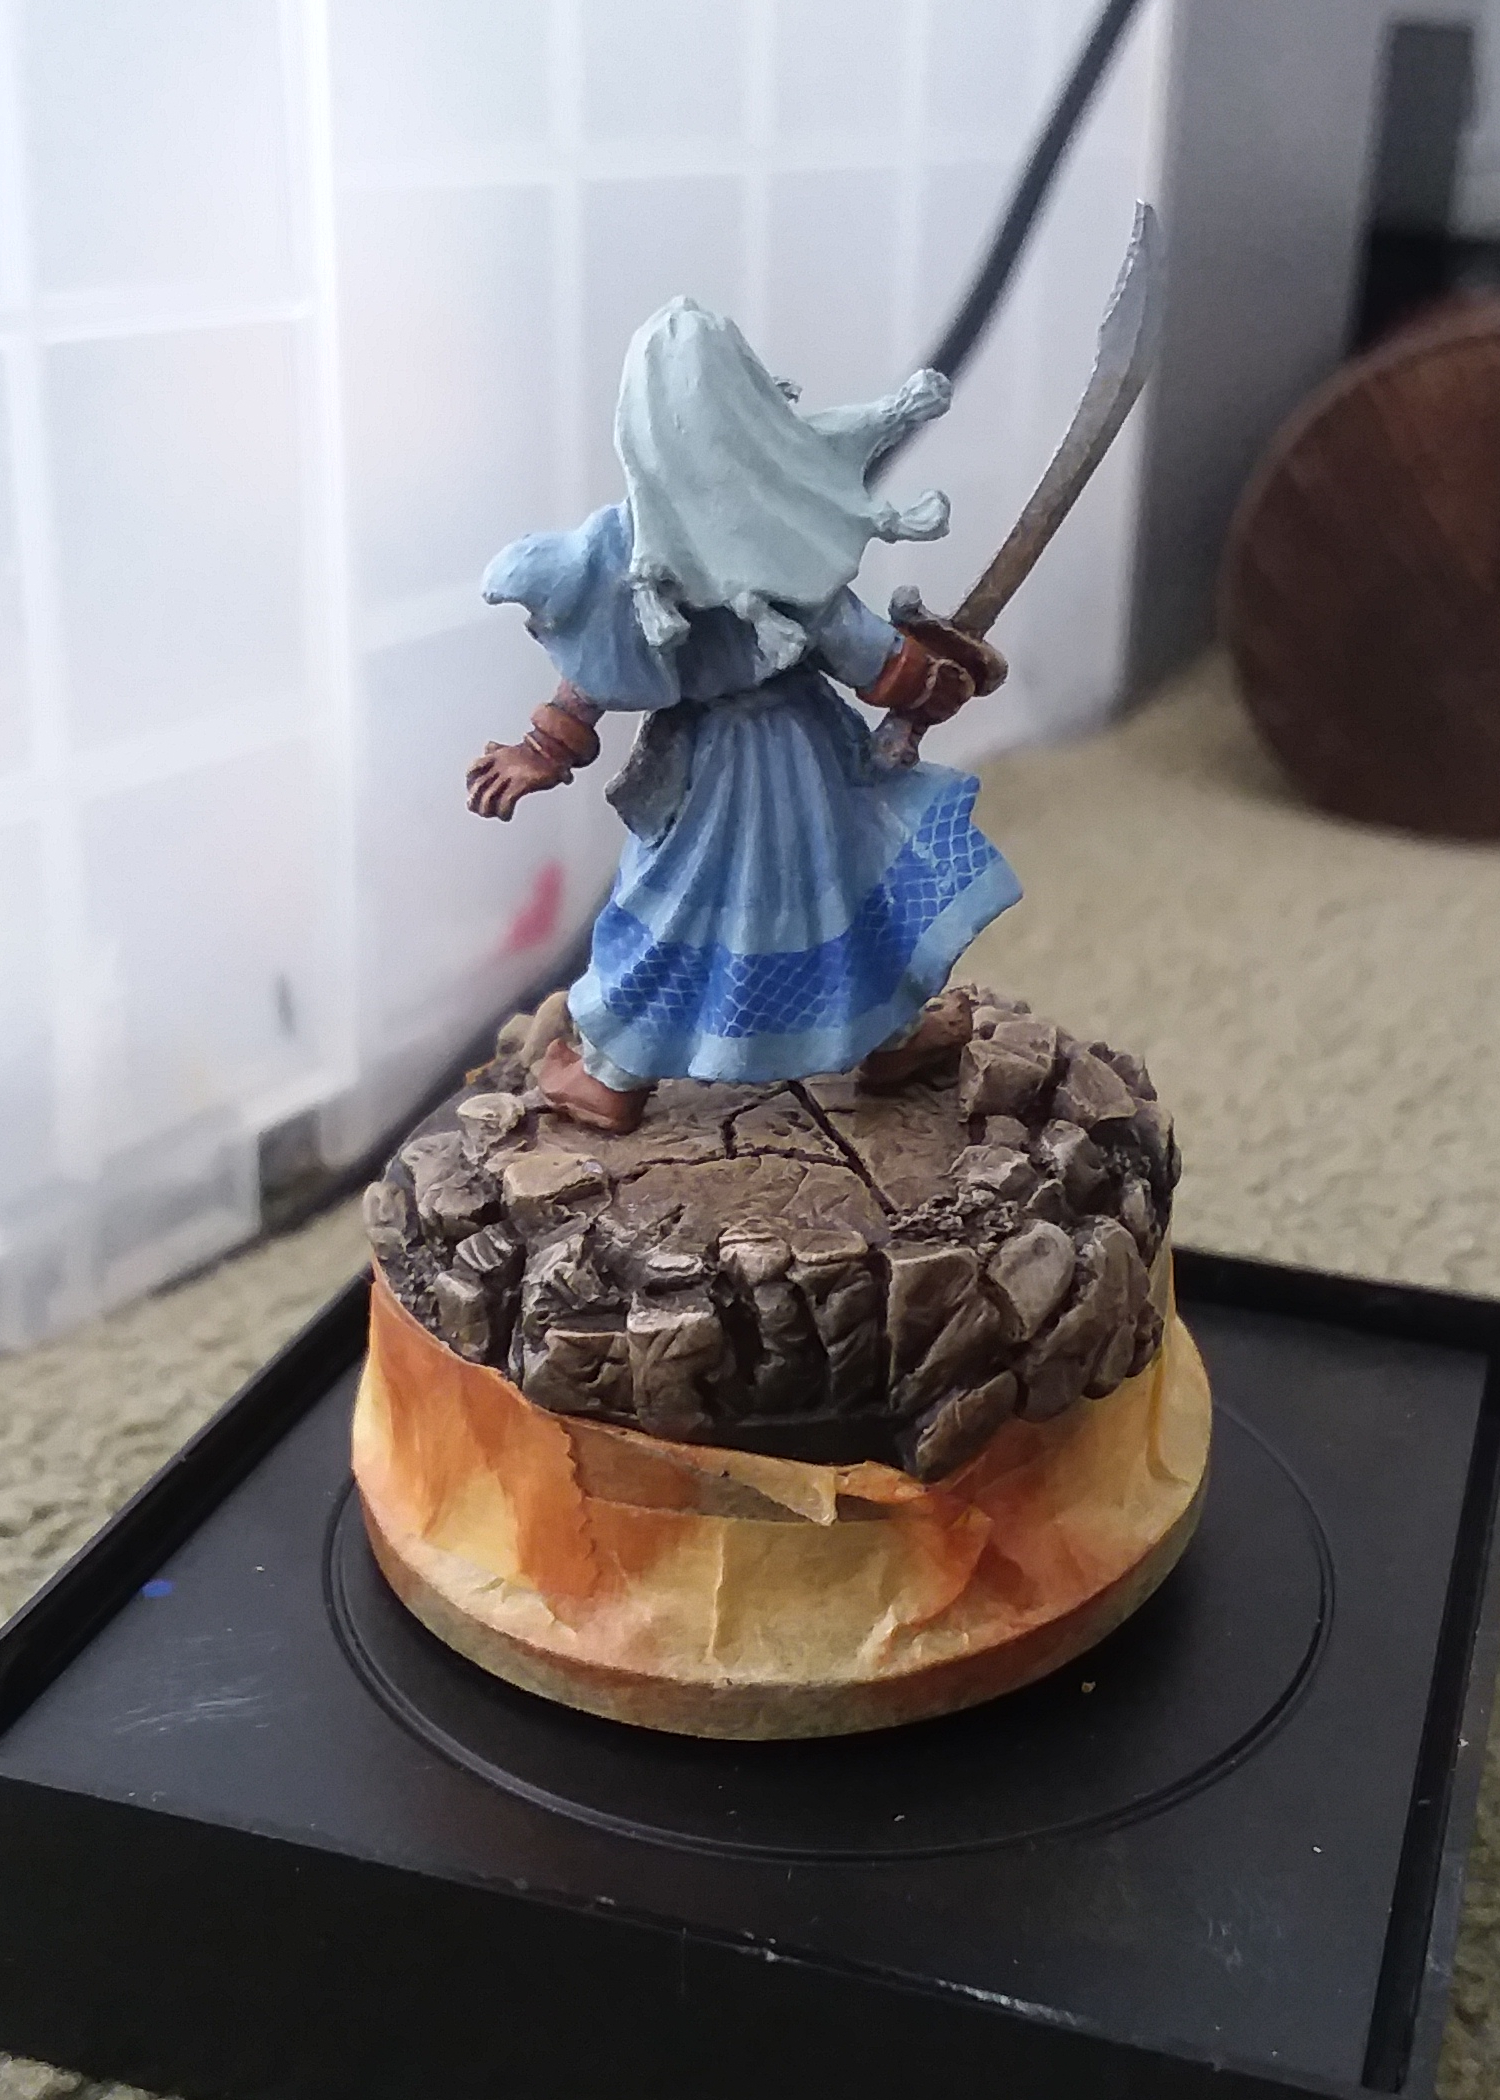
I’ve put aside the work on this for a little as I’ve been pushing commission pieces for a buddy of mine. I threw some Vallejo Air Ultramarine Blue (72.722) through my airbrush and found that using scale mesh has definitely brought up the appeal to the clothing despite my efforts. The happy accident of the fade was pure overspray that I kinda like after sitting and pondering the visual design. I’m not one for going crazy over print/pattern/design in clothing but it does have appeal in breaking the space. I believe that this technique might be the means of making more realistic fishnets in future. Three figures (probably more) on the shelf will benefit from this knowledge.
The downside is that I found that my masking was lacking for the front and I completely missed some areas. I’ll try to cover them as best I can and match the pattern. That is the biggest downside of using masking materials with airbrush. If you screw up the work at first its twice to three times as difficult, if not impossible, to recover. I’m not sure how well the paint/seal method for layering helps much to avoid this from here on out but I’ll keep at it. I think maybe double sealing before intricate painting to allow for foul-ups might be best.
Shield your eyes
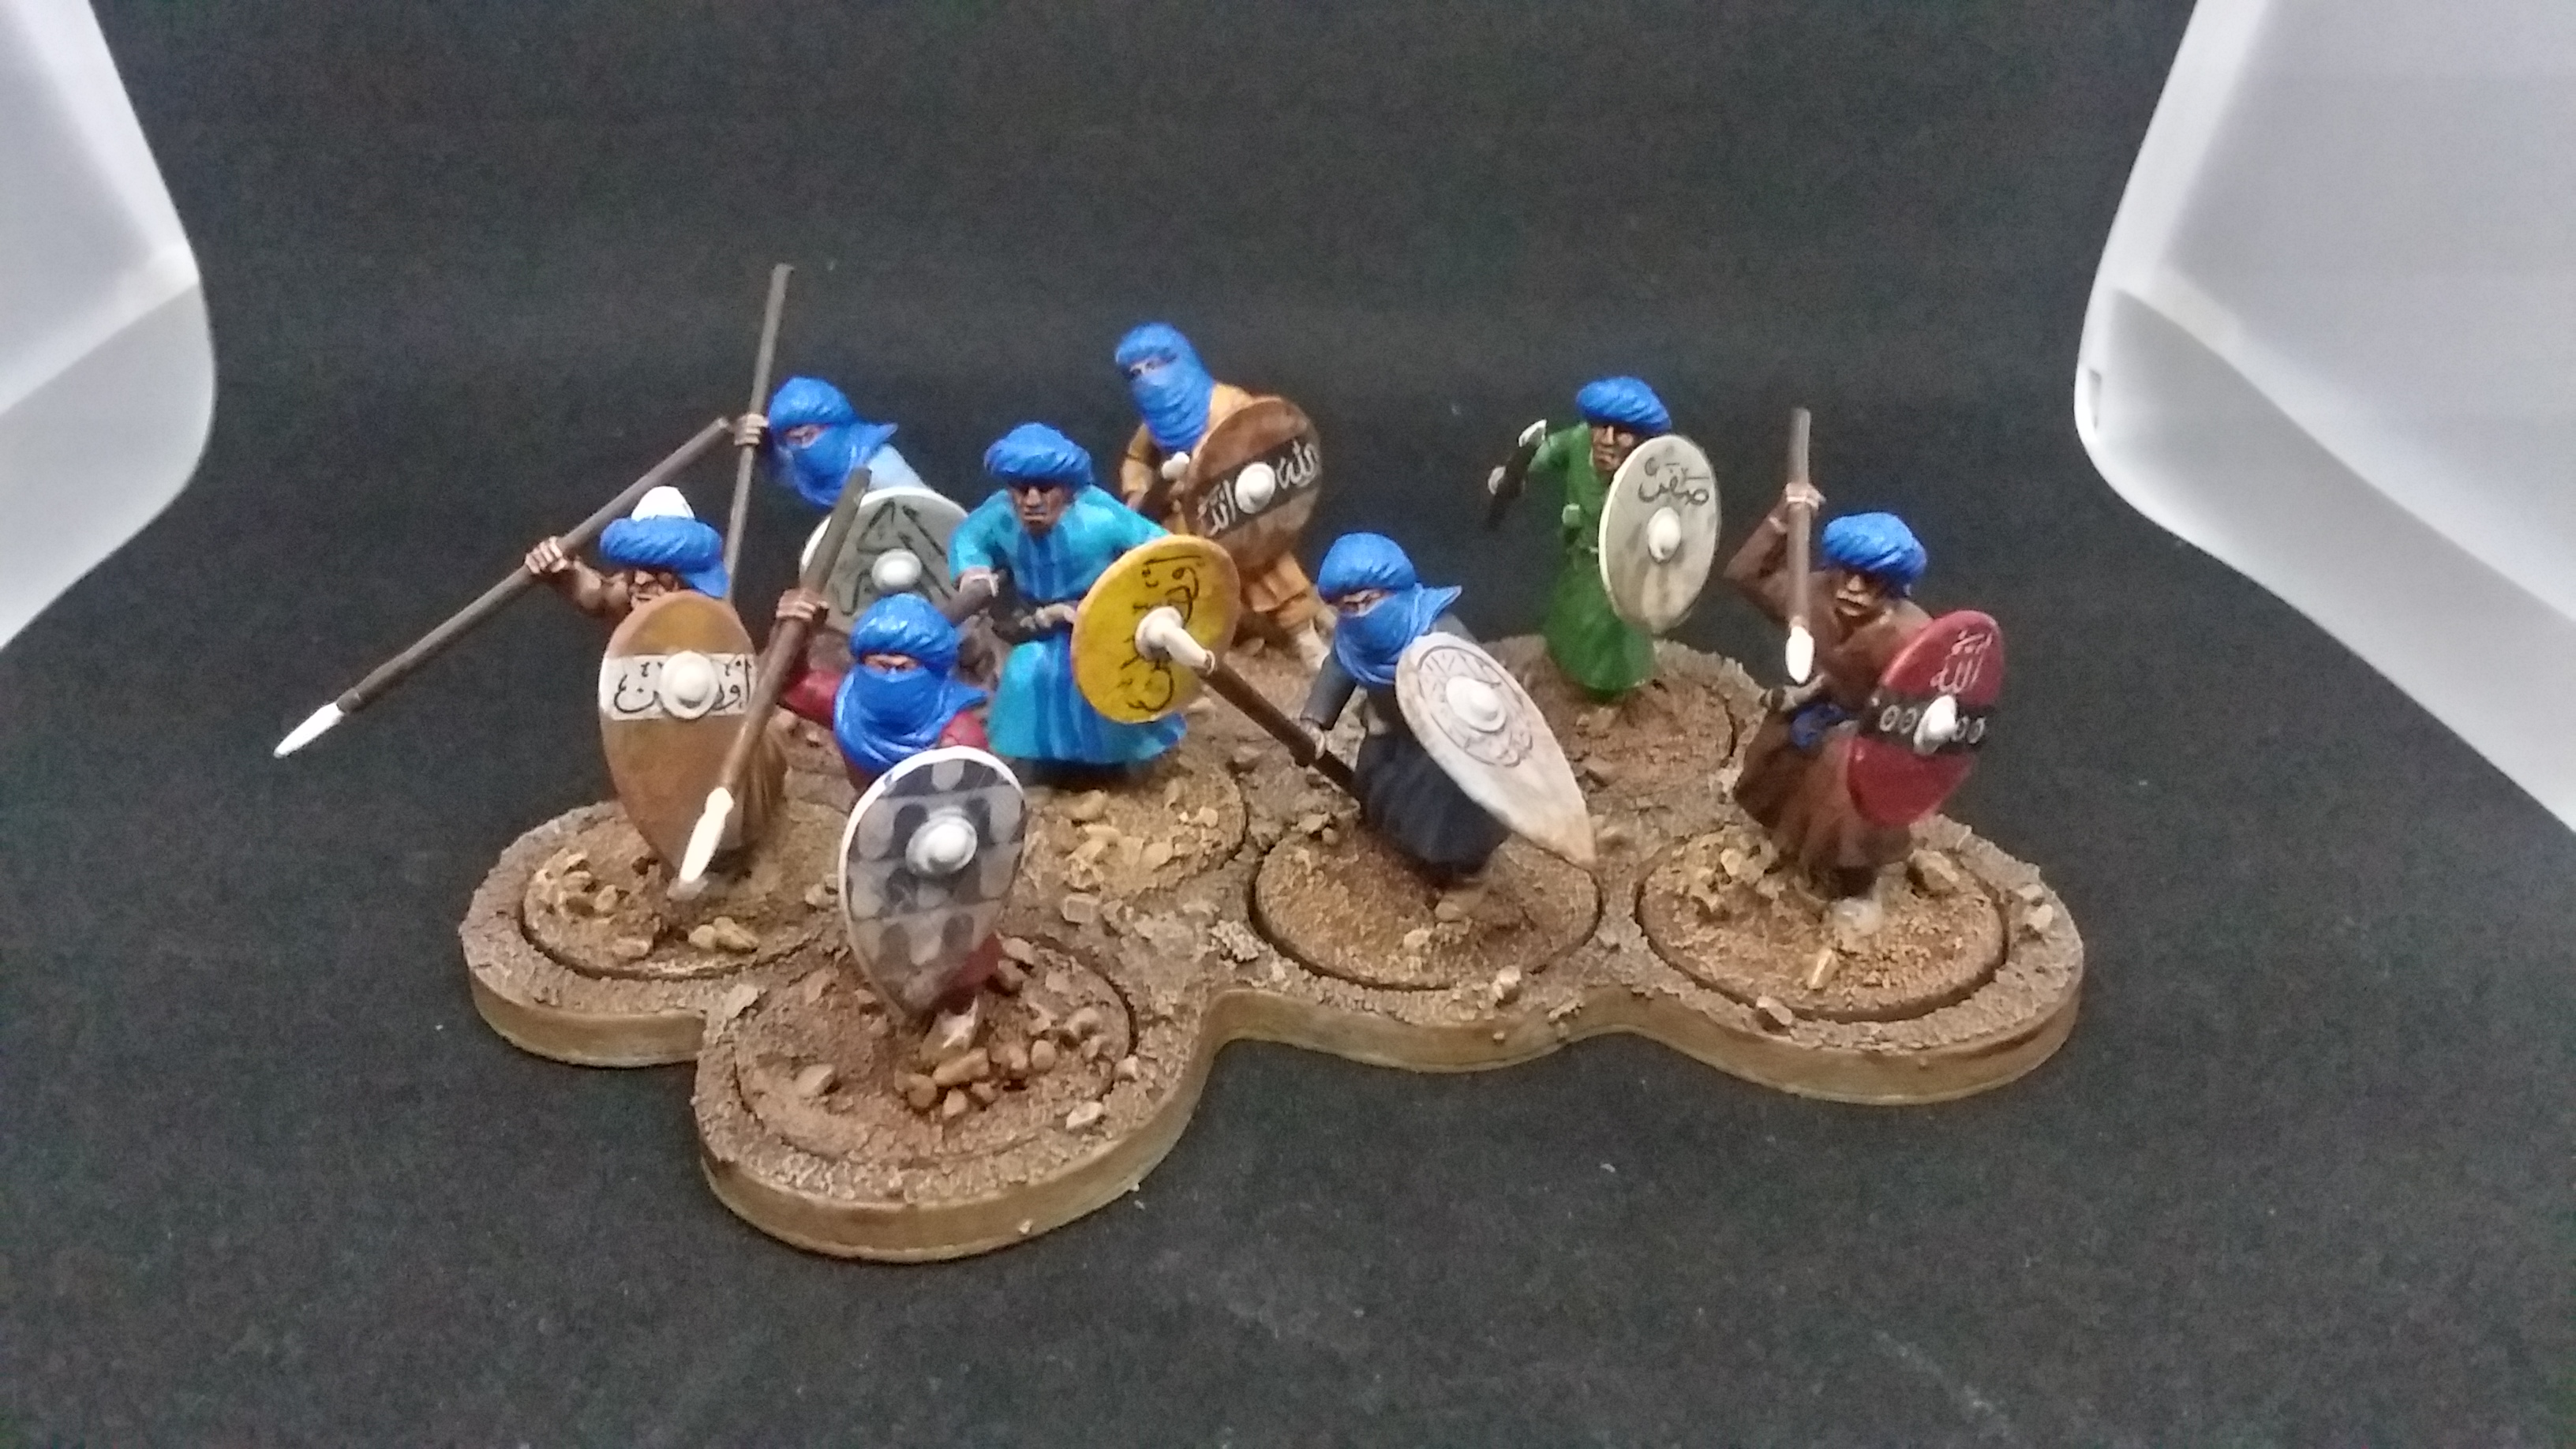
So there’s been some background work done since last putting this on hold for Giftmas presents that have gone out. Yes, more paint and more minis. The transfers from LittleBigMen Studios for the shields really make the fronts pop and add some class. I have a plan for the headwear and dishdashas (the roe/tunics) to really draw the eye which will really pull the force together.
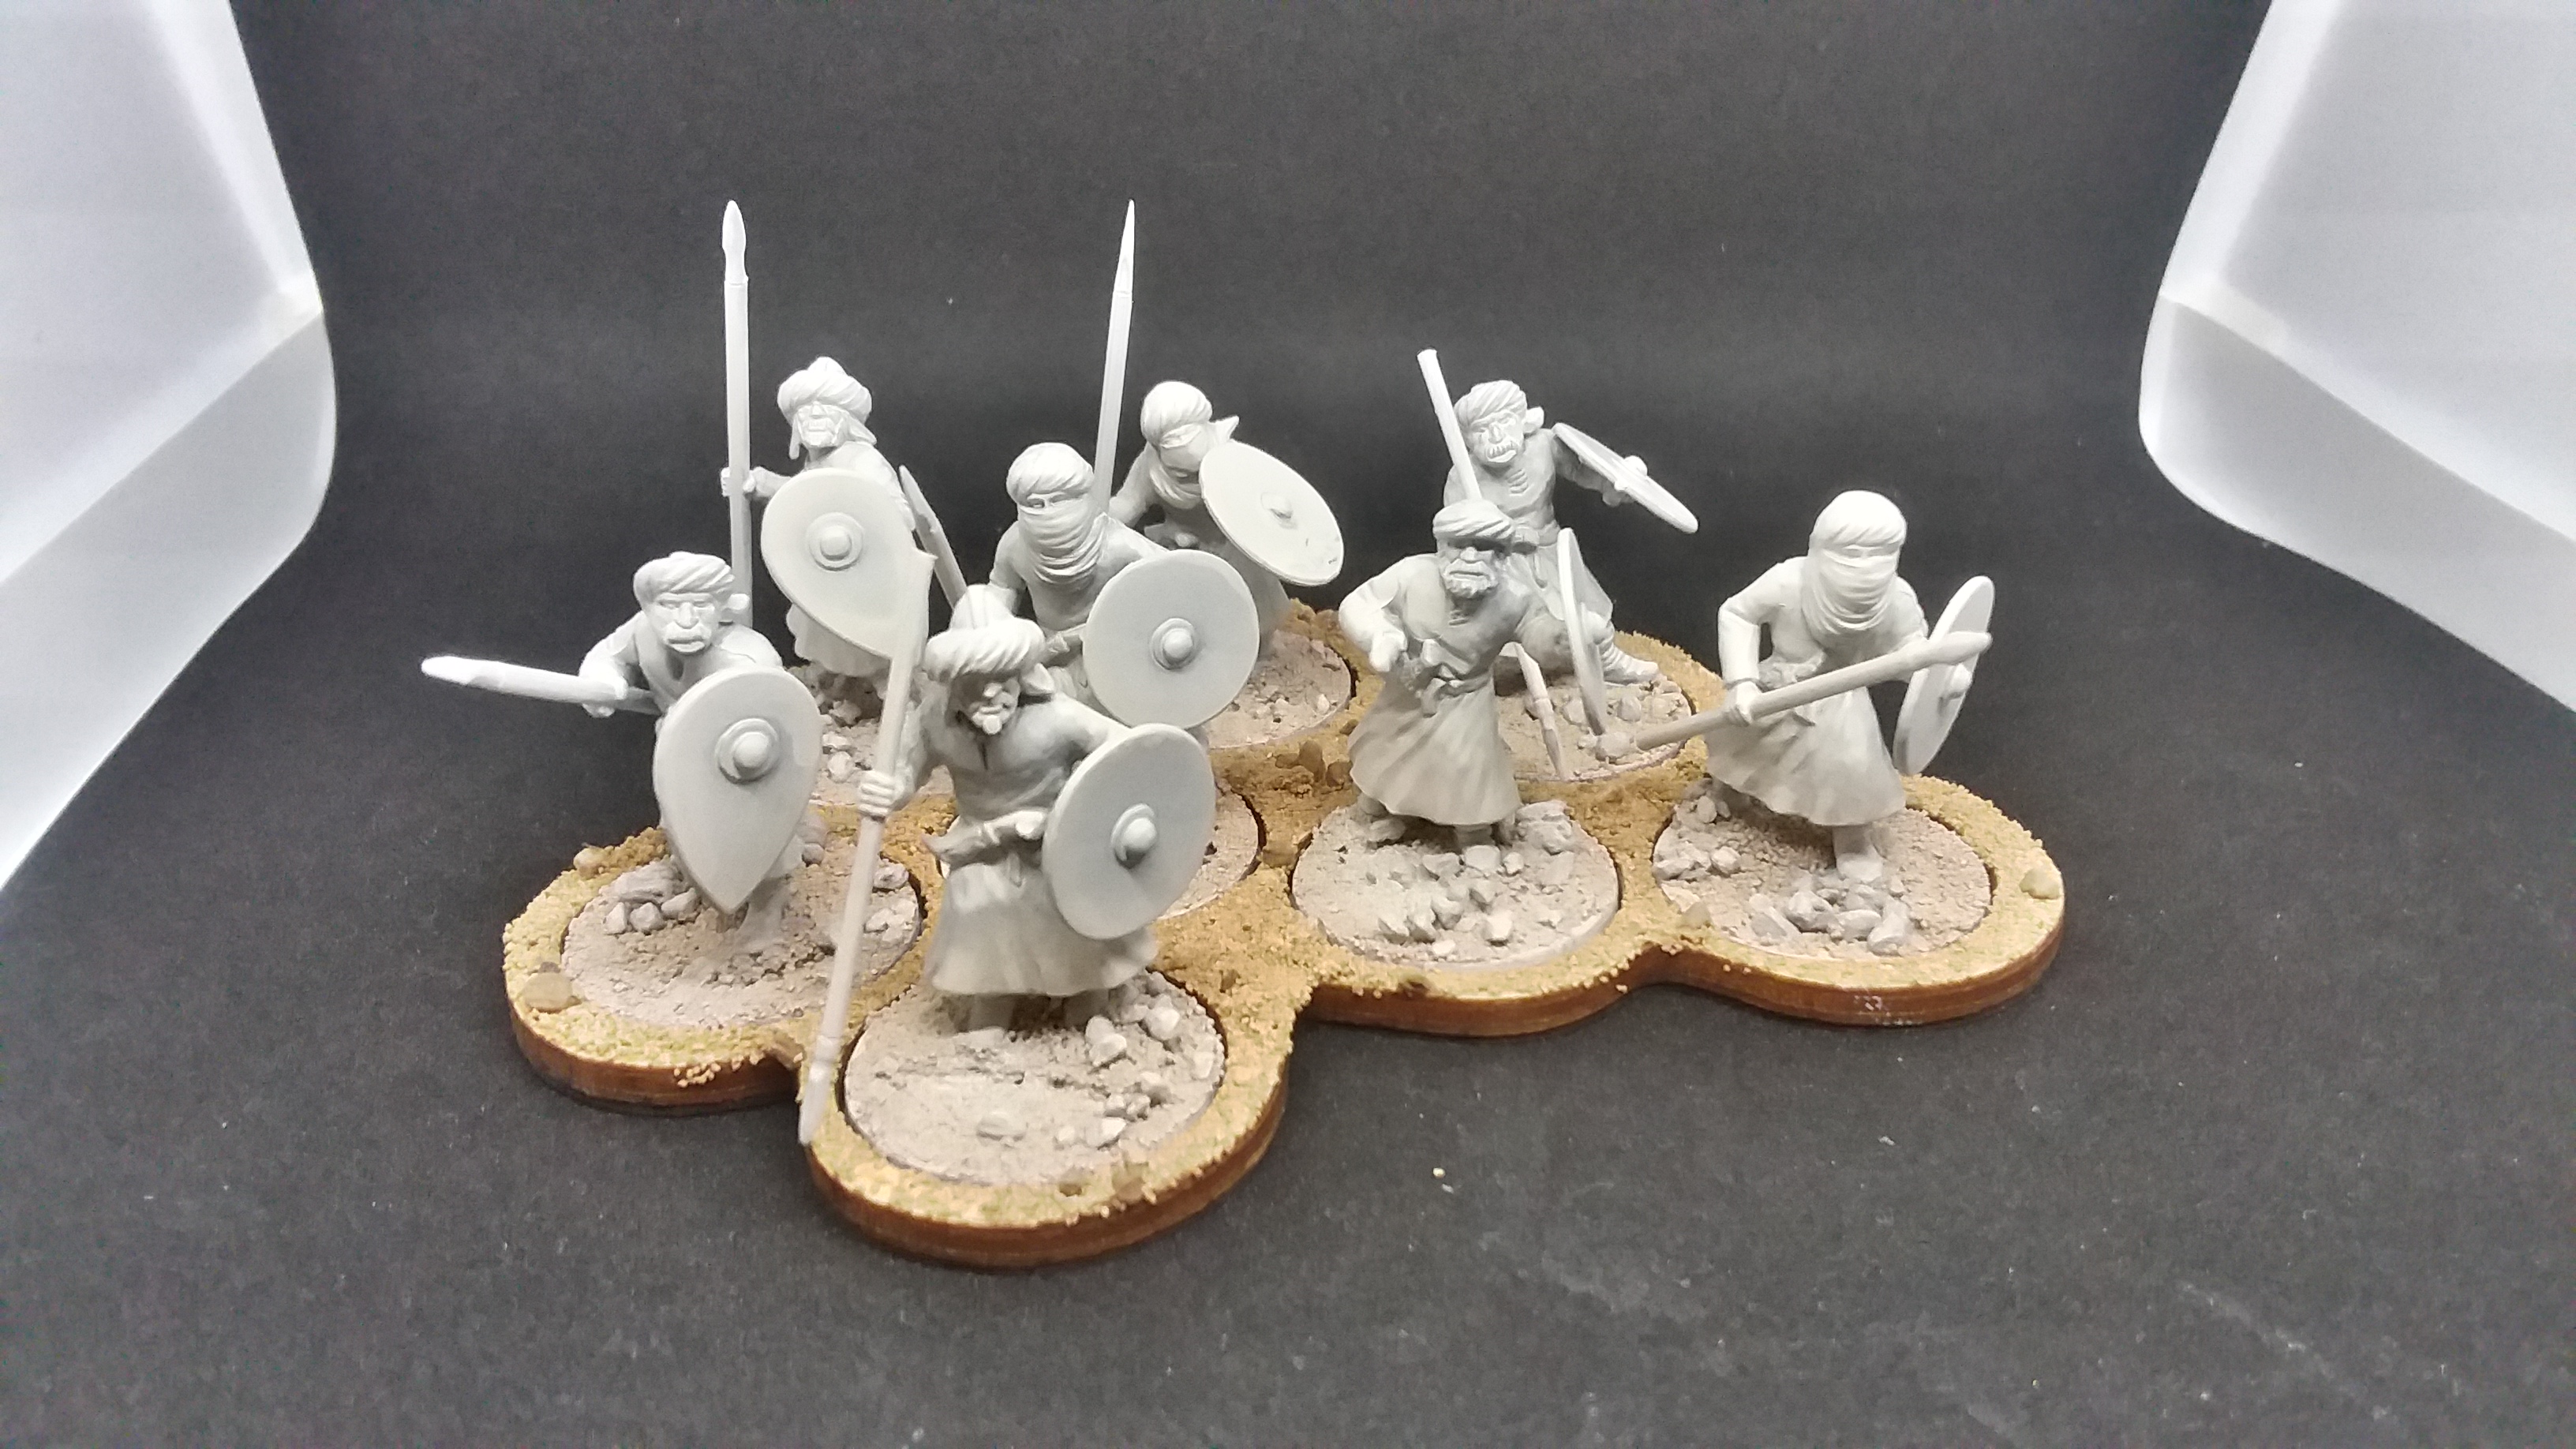
In other news, I got a second batch of plastic Gripping Beast Arab spearmen as I saw that a starter box of SAGA only needed eight men. I’ve purchased the starter box set as a thought to get more options for an Arabian Nights mix-up for the future. Right now I’ll hold off on the flying carpet light cavalry (perhaps horse archer equivalent?) as I need to get access to a 3D printer. I have enough clear acrylic rod to put beneath the airborne rug raiders (can’t help but laugh at that term as I thought of what to call them) so the elevated status of the models be believable. Perhaps with the Age of Magic rules I could add djinni, efreeti and perhaps a roc.
Giftmas Delivery!!!
I got my SAGA order of starter Arabs, the core rules/Age of Magic and I am pleased as punch. The Arabian Nights (Knights?) will be worked on piecemeal as I get some flying carpets printed and I get a better handle on a uniform element for a paint scheme. The shield transfers from Little Big Men studios work very well and require little retouching. Plain water worked well enough as I don’t have immediate access to my hobby stuff in storage. Color matching th shield designs has been solved with weathering the edges.
At the moment I’m inspired to hop over to some historicals and get medieval Koreans to run as a fantasy force under the leadership of the wise lord Gyeon Chul-moo atop his giant eagle. This idea might work better with a dragon or maybe a tiger. I could swap this leader option out and have the lady Song Eun-Kyung on the back of a pheonix. I need to read more folktales for that yet but the idea seems to feel right. I have a lot more ideas that might work but I will figure out model builds as time progresses.
Dusting off minis for a new year
I’ve been sucked into SAGA. So much for being disinterested in historicals. The fantasy element is really what works for me as generally its all some sort of swords and scale mail between the two. Take out the mythic beasts and monsters from Age of Magic and you have the regular rules set that can be easily played out with archaeological proof to back up potential battles (mostly).
 A lot to go but a start
Thus far I still haven’t quite finished blocking in the basic colors for my first unit of foot soldiers but its close enough for a photo. The details of interest for the fabric will come. The second unit has been built and primed to await attention and affection via paint. I’m rather pleased to see them on trays. My next goal, after these warriors/levy are done, is a unit of cavalry that is built/primed with base texture material on the movement trays.
 Humble beginnings
Seeing the trays from bare MDF and how they develop to looking good is very helpful to my sense of accomplishment. The cavalry has been different from the soldiers because of the number and shape of bases. They both hold together the units visually and since the same basing material is in play it all ties together. Considering that, I think the display piece of the swordwoman will be a separate entity relevant to the idea but not so much a part of the playing army.
Going back to the fantastic there are gears turning in the background for additions to be announced in future. For now the bog standard human element of my army is being taken care of.
How to make my opponent cry
Trying to figure out the best way of adding big nasties capable of doling out much in the way of pain and misery I’ve found some inspiration to what I can get made. Not giving any spoilers to what’s definite here’s just a bit of what my tabletop fighting force might feature.


Boots on the ground
I’ve completed the block colors for the unmounted troops I have and applied shield designs. Ill need to touch up shield edges, the fancy detailing for the fabrics, the belt weapons and facial details before metallics for helmets/spears/shield bosses.
 Too many to show on movement trays
On the recommendation of @avernos I’ll be distinguishing each unit type from one another. Unlike him I’ll have the turbans be the unifying element for my army.
My warriors will be these first two units. They, after all, are the ones with money to spend on being fashion forward on the battlefield. My mounted units I’m working on now will also be as colorful as the footsoldiers since it takes some cash to actually buy a horse/maintain the prestige of keeping one.
My future levy will be in a drab single color as the literal poor bastards they are aren’t so well to do as spend their earnings on looking exceptional. No chance to gain anything more than a good meal or something to smoke as far as comfort goes for that lot.
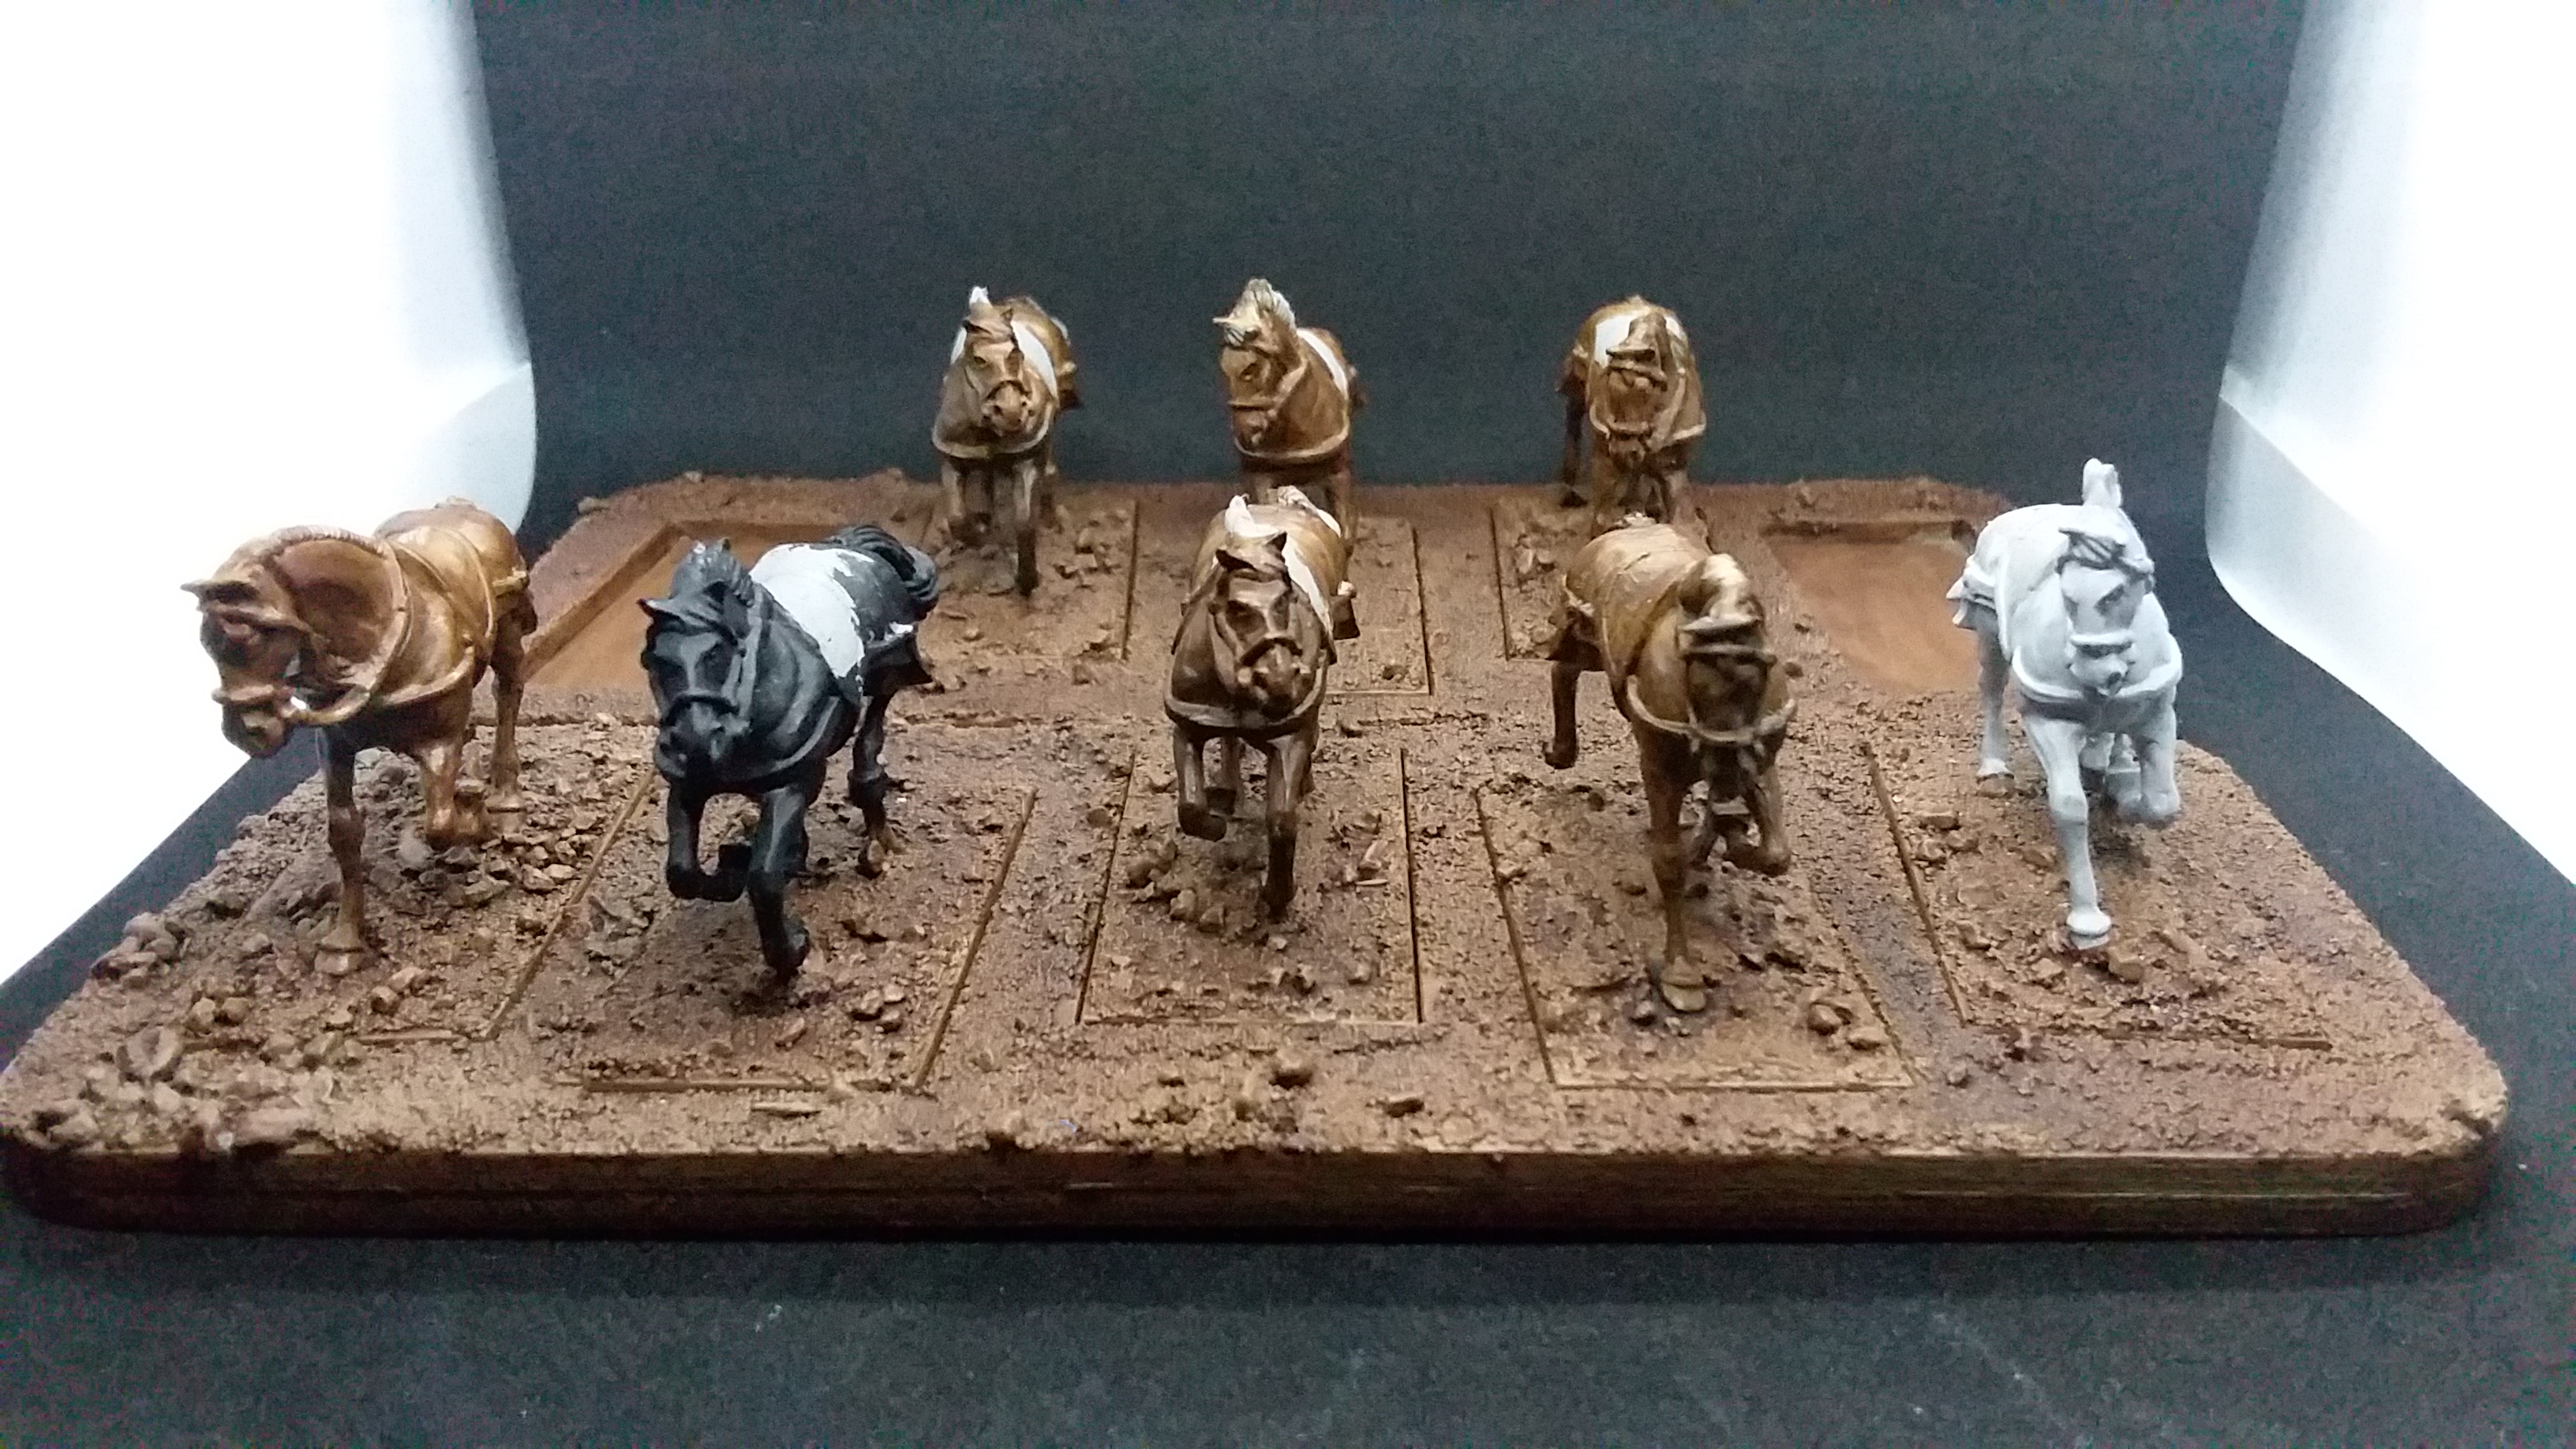 The beginning of cavalry
See his name and know your better
I’ve been holding off this entry away from the project until it was ready. I’ve wanted to make this a bespoke fighting force. That may seem crazy as I’m literally using mass produced plastic figures and numerous other elements that could be slapped together and reproduced. Well, what can’t be redone as an original idea, is creating banners and demarcation for my warlord with his name done in calligraphy.
I have thought about the best way to multipurpose this force, should I decide to play plain old Saga, and translated the name of my guy into Arabic from English to place it on command banners akin to what medieval Arab forces might’ve used.
Using Google Translate I threw in Hasn Heart of the Scorpion, Master of the Desert and got a quick result. I am an amateur linguist, having done translation/transcription professionally in the past but no longer, and I know these things can be tricky but I trust it from my limited knowledge. From there I went to Fiverr in search of a calligrapher to write out what I wanted. This wasn’t too hard as I wasn’t looking for awesome results as I knew there would be some forgiveness found in how damn small the details would be. On the contrary, knowing that there is a lot of detail that can be put into work, I had all the diacritics put into the writing. The fancy whoop-dee-doos all over the place in fancy written Arabic denote vowels and other inflections beyind the consonants of every character. Making this a formal banner I decided that would be the route to take.
I was inspired to take such measures by the owner of Little Big Men Studio from all the written pieces on flags. Its an effort he’s done to bring us all great products that we might take for granted which I can say is a pain considering graphic design. These days he’s been overworked and, after reaching out and not hearing back from his workload, I decided to plan out my standards.
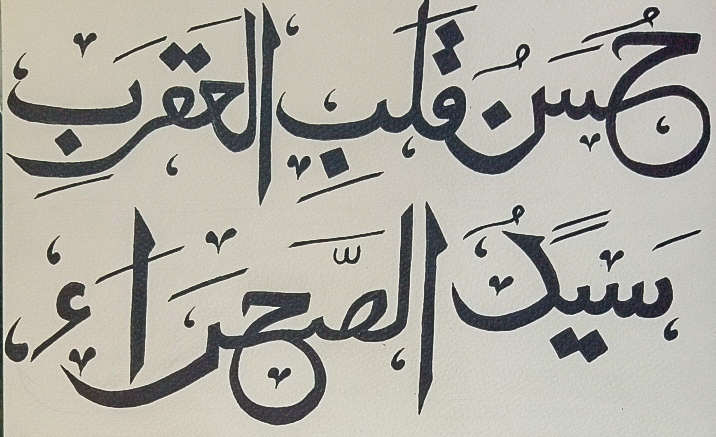
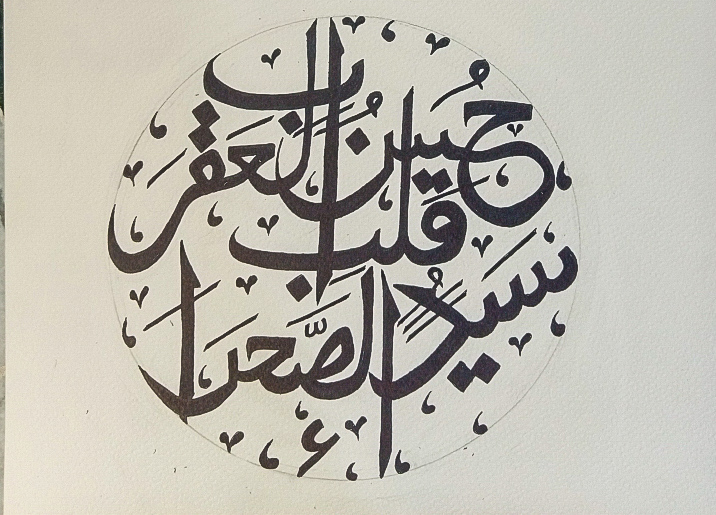
The two lines of “Hasn Heart of the Scorpion” ( حسن قلب العقرب )and “Master of the Desert” (سيد الصحراء) I had written separately and then combined in a circular manner. With each section I figured I could work with bits and pieces like lance pennants and other large flags that go flapping in the wind. Overall the presentation of the name with some wiggle room as to how it gets shown off is less stressful by avoiding the absolute need for the one piece to be perfect.
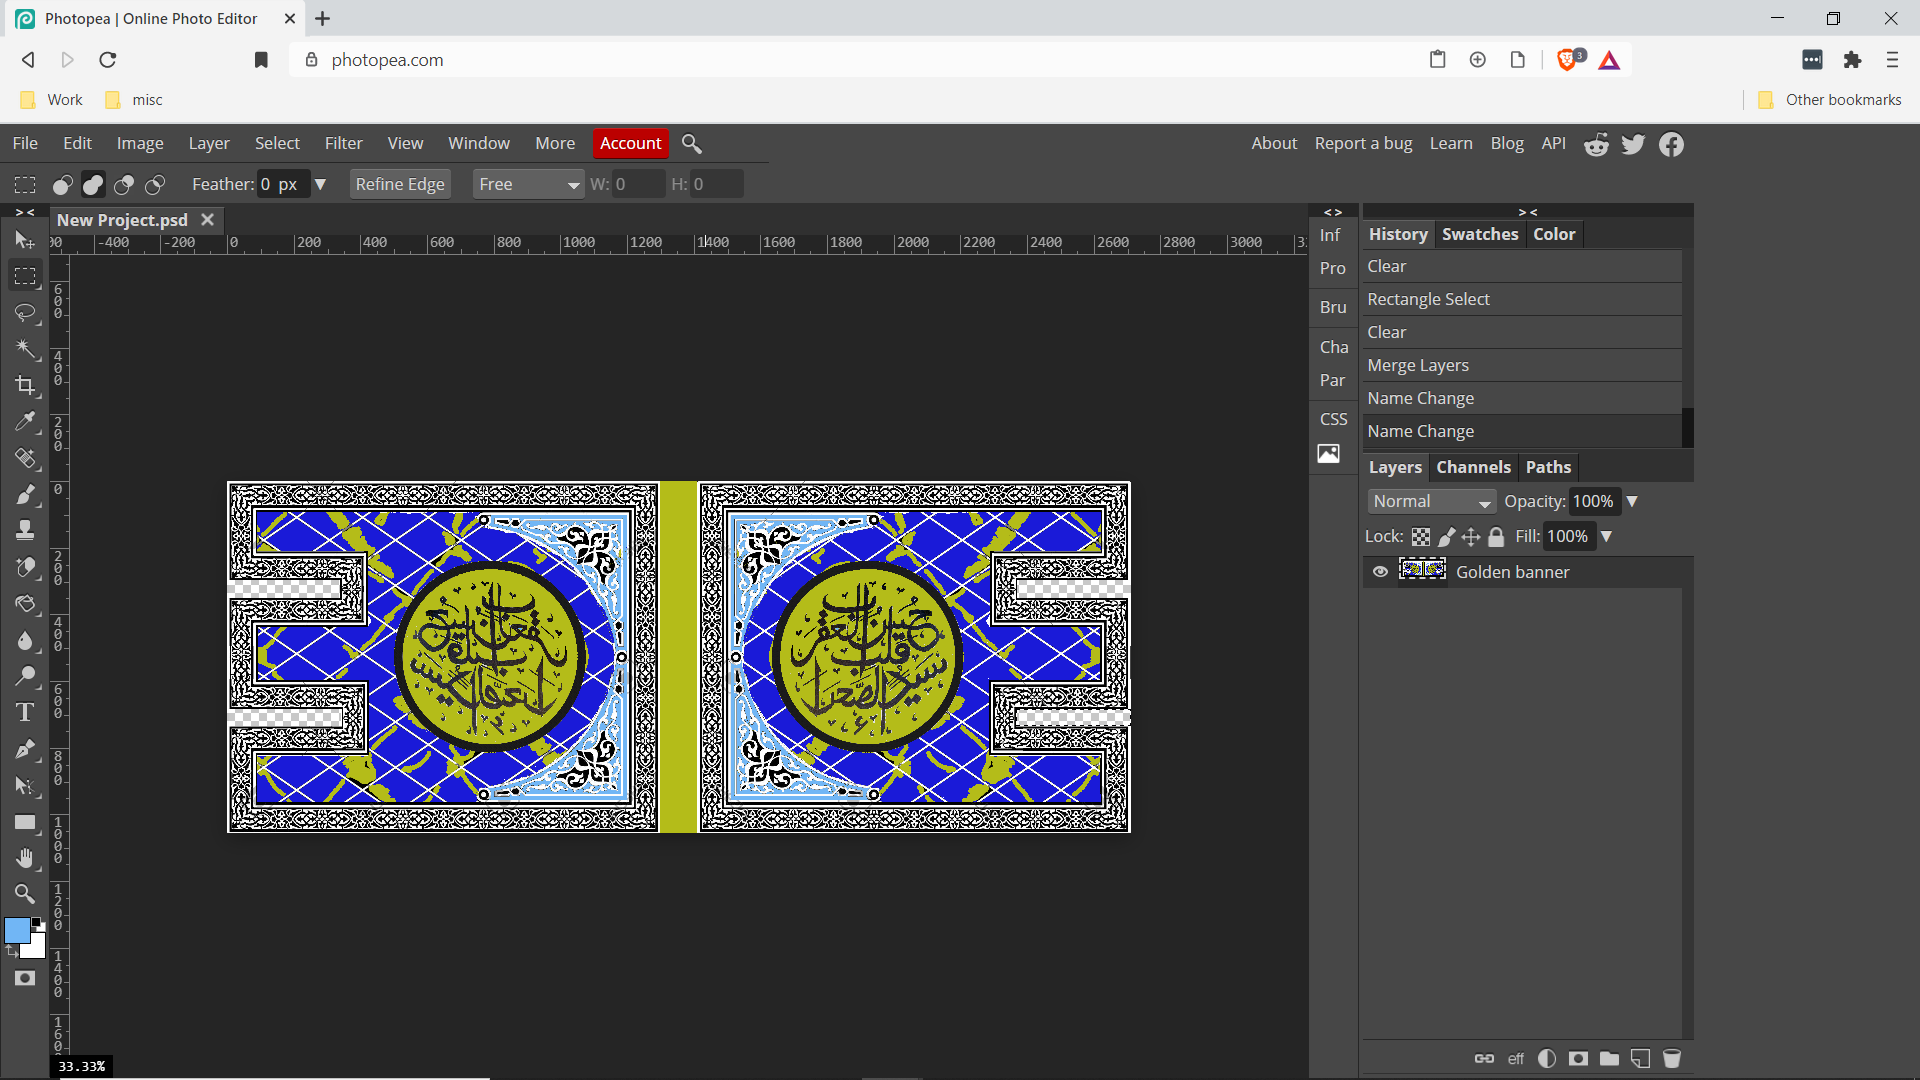
I’ve also taken inspiration from Lloyd in his presentation to Gerry on banners using Photopea but I have neither the confidence nor patience to play with the tool at present. I need to figure a means of getting the transfers printed once I get the rest of the design work settled. That really should have been something planned out ahead of time but like the rest of this project its a haphazard and blissfully organic development.
My brain on banners is toast
 "Bez muke nema nauke" - Without pain there is no learning
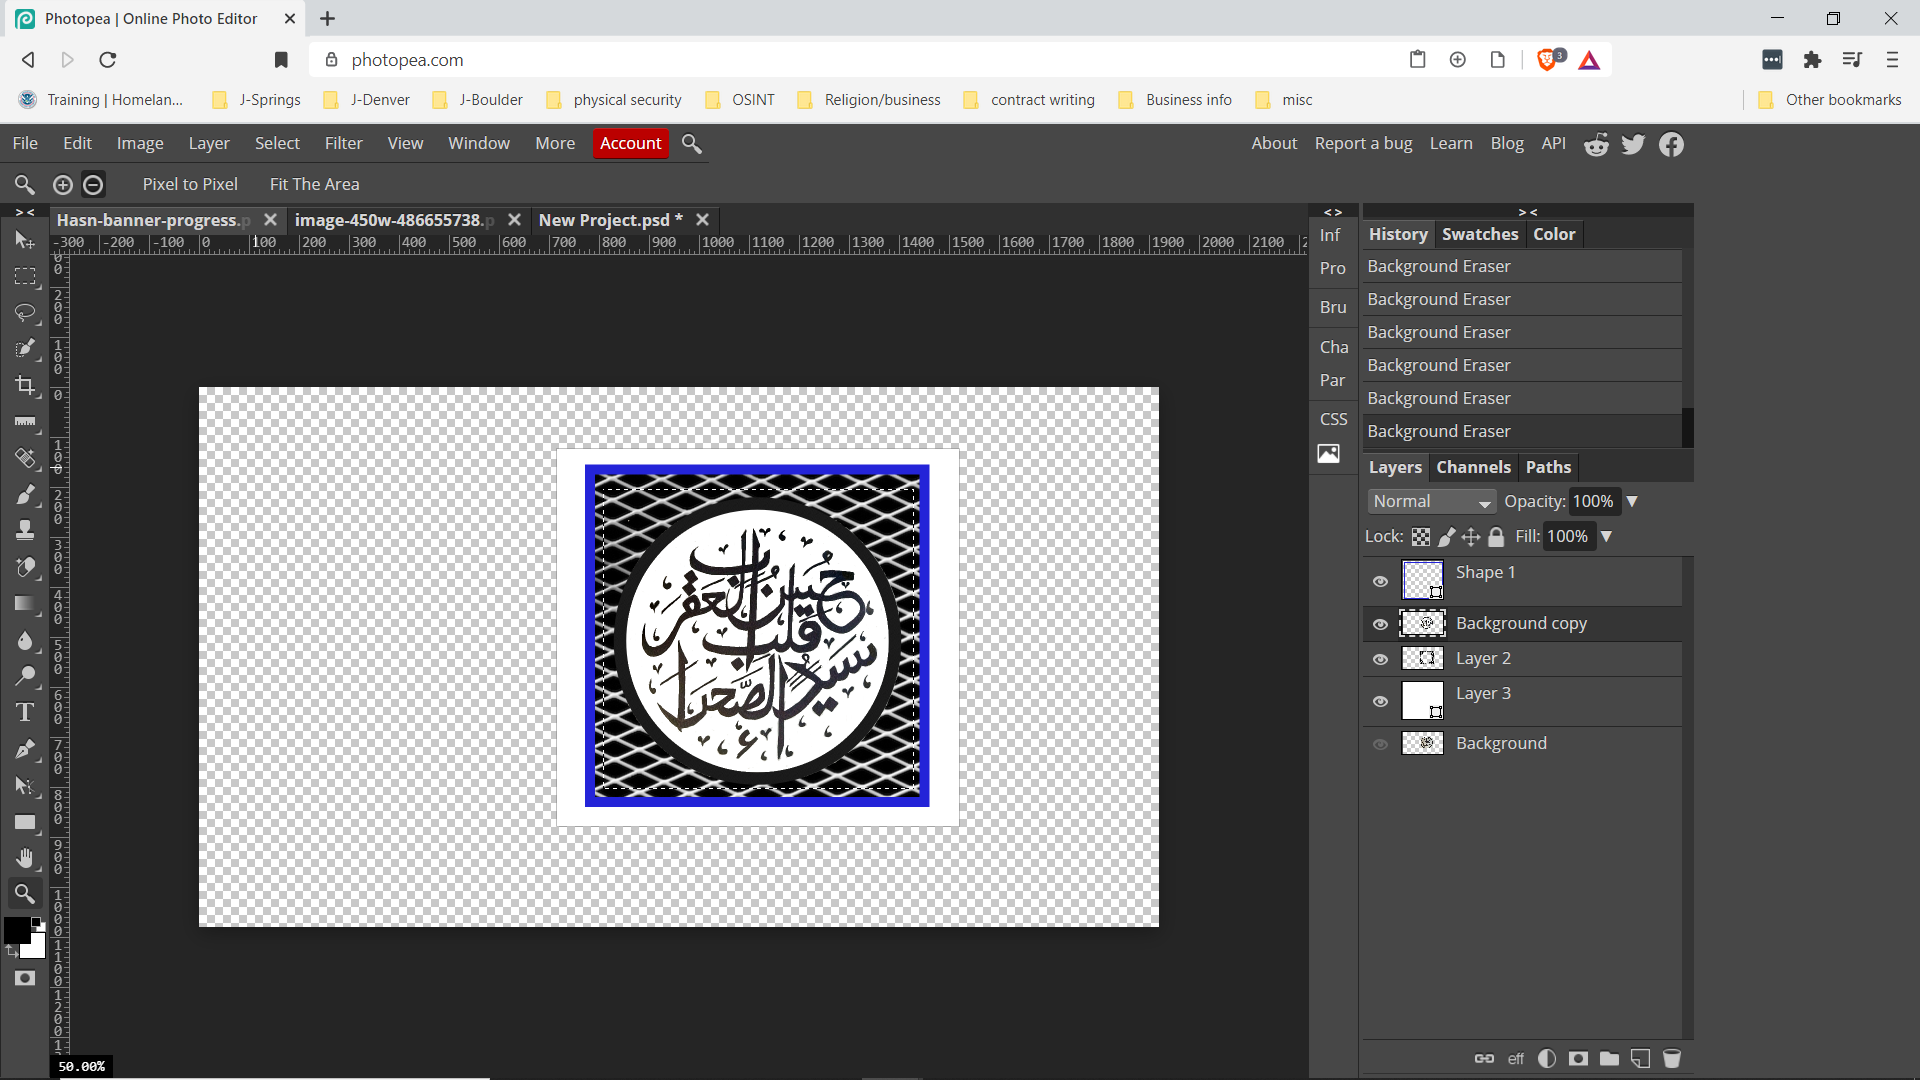
So there is quite a bit of mental struggle to go around but thankfully Photopea is halfway intuitive. I’ve managed to get a general handle on layering and managed to find the Background Eraser. Not a tool that I had been aware of before but monkeying about with keys and mouse-clicks I managed to get it. After some time in clearing out sections of crap that would interfere with layering and general tidying up this banner is starting to look good.
Now on with more headaches to figure how to invert the netting design and color it.
Nope, not toasted quite enough yet
Getting about to the pain of working Photopea was not as bad as initially conceived. I started into the process of inverting the black and white for the netting layer with Ctrl+I. I then went on to changing the color of the lettering with the Magic Wand tool (W a couple of times and you’ll see the icon change under the lasso tool) to select a general area of the script. The program already lacks a background to worry about as I have already erased it from the layer.
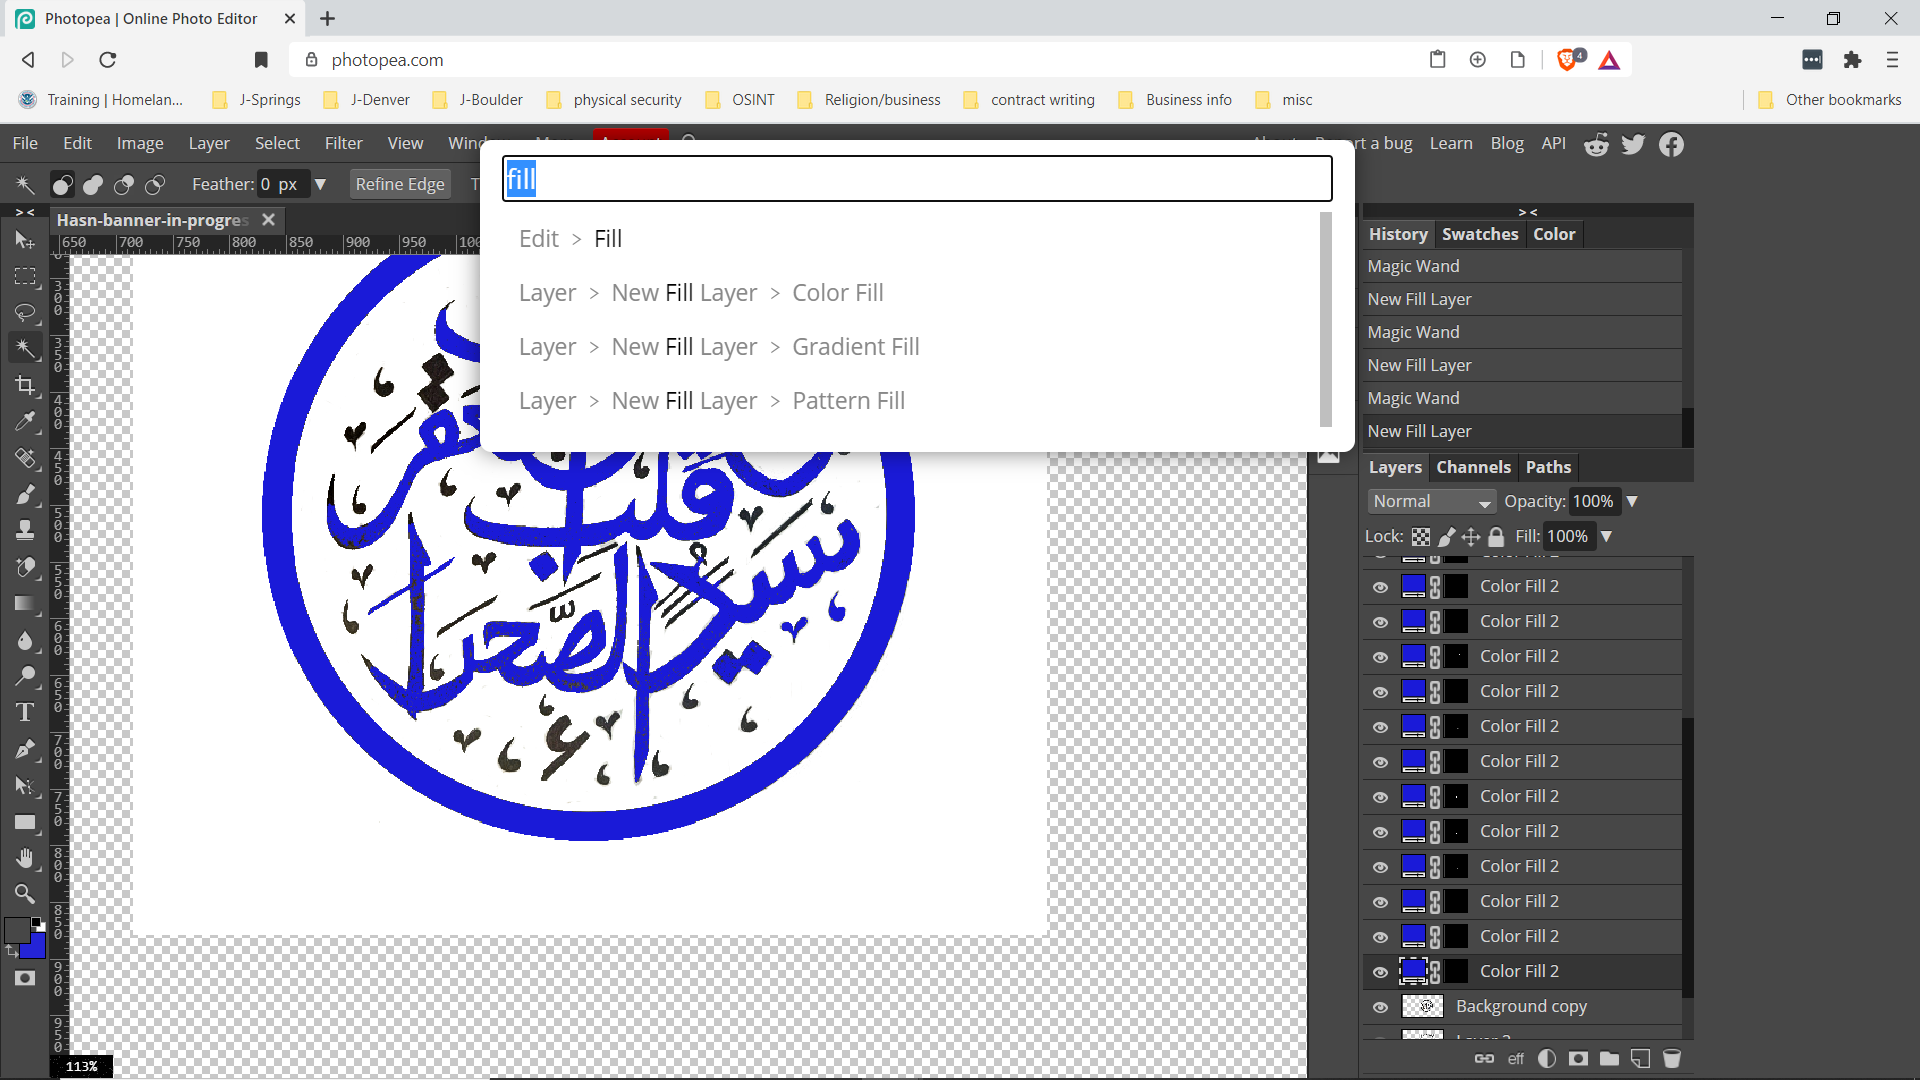
A portion of the image gets selected and I jump into the search area for Fill. I don’t need to retype the command I want as Photopea has saved it.
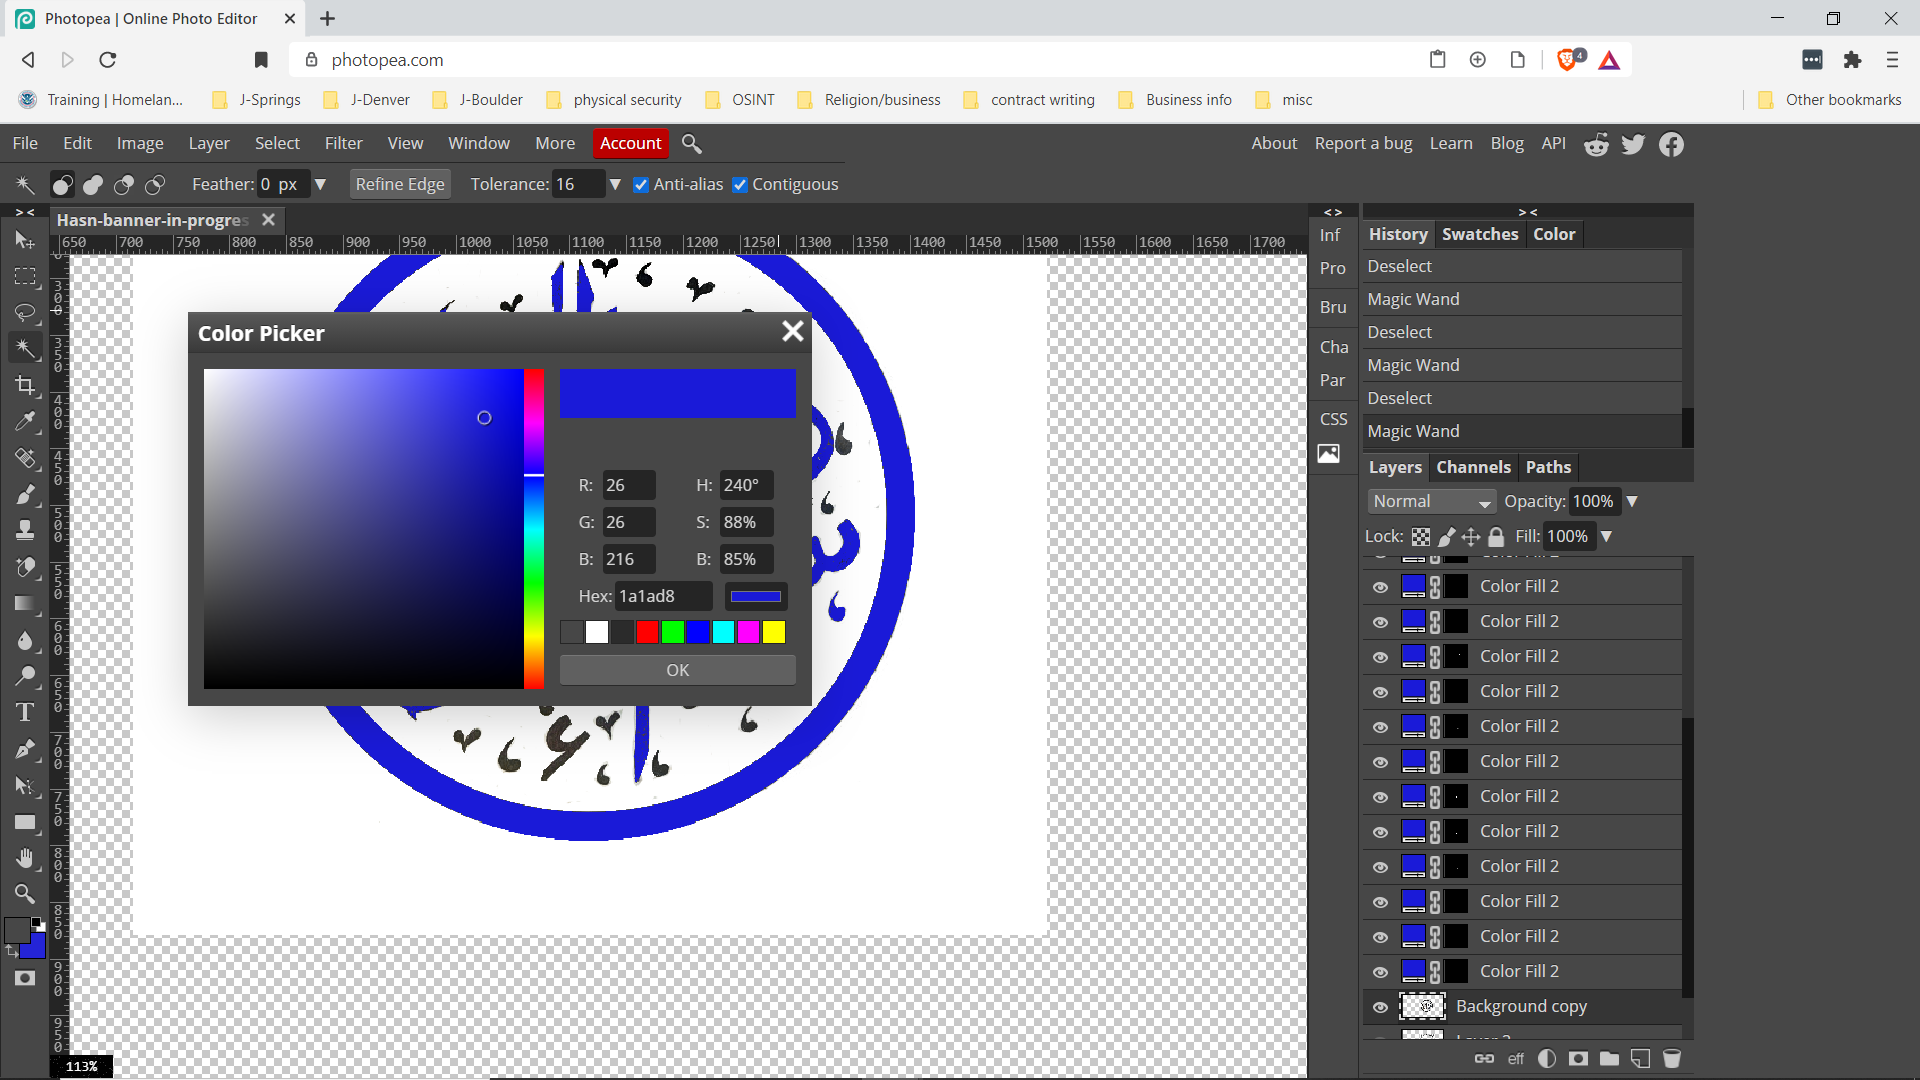
I saved the Hex code for the specific color(1a1ad8) as I got tired of entering the rest of the value information. This is definitely something that copy/paste comes in handy for. With that all done the area is filled with the appropriate color and a new layer is created in a growing list of entries. I’ll merge these all down later to create a cohesive image.
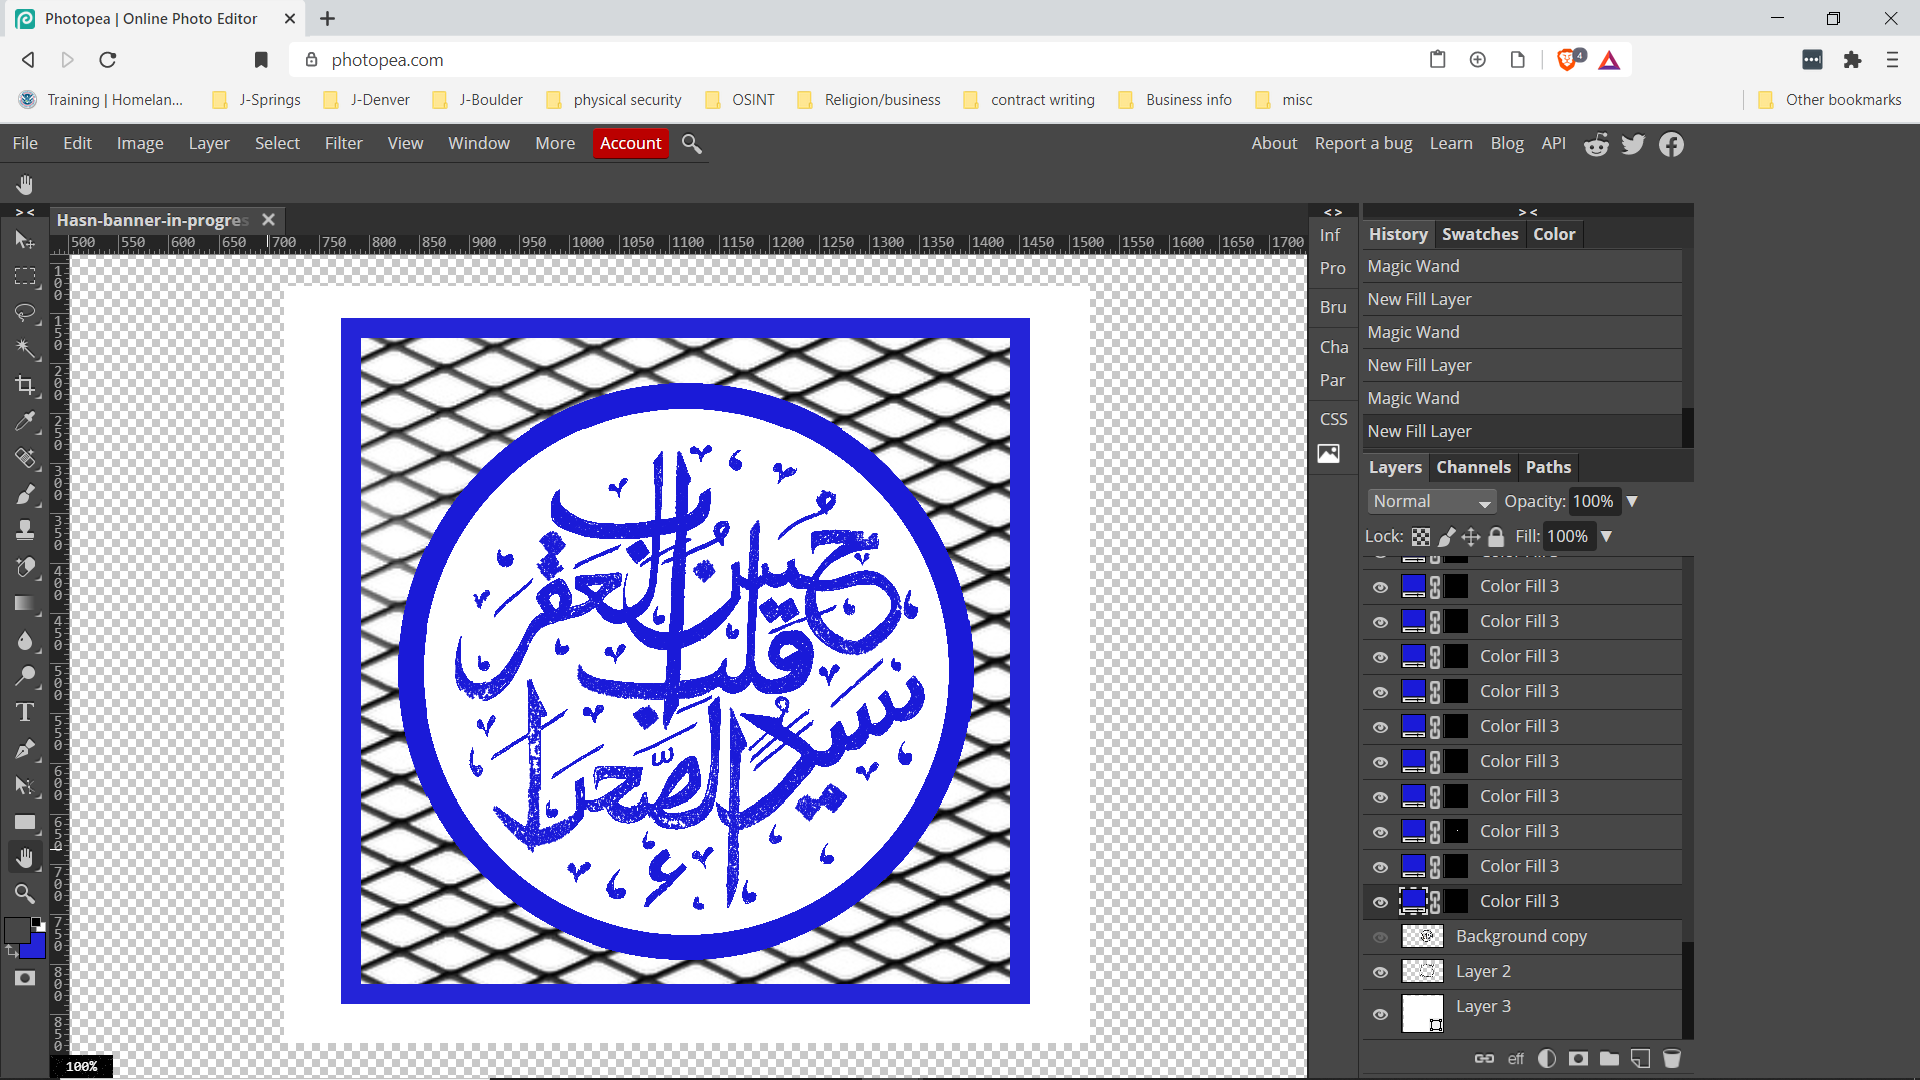
A happy accident from all this is that the script does have defects from the program not completely filling in the shapes. When I remove the underlying layer of initial black it shows some fading that I might just keep running with. The circle was done with another tool that lacked variance as the pigment image did so I’ll manually add the effects there if I do.
This seems to have come out well and I have a few more ideas to run with in order to create the banner with serrations to flap wildly in the breeze.
Lloyd shots...in SAGA!?!
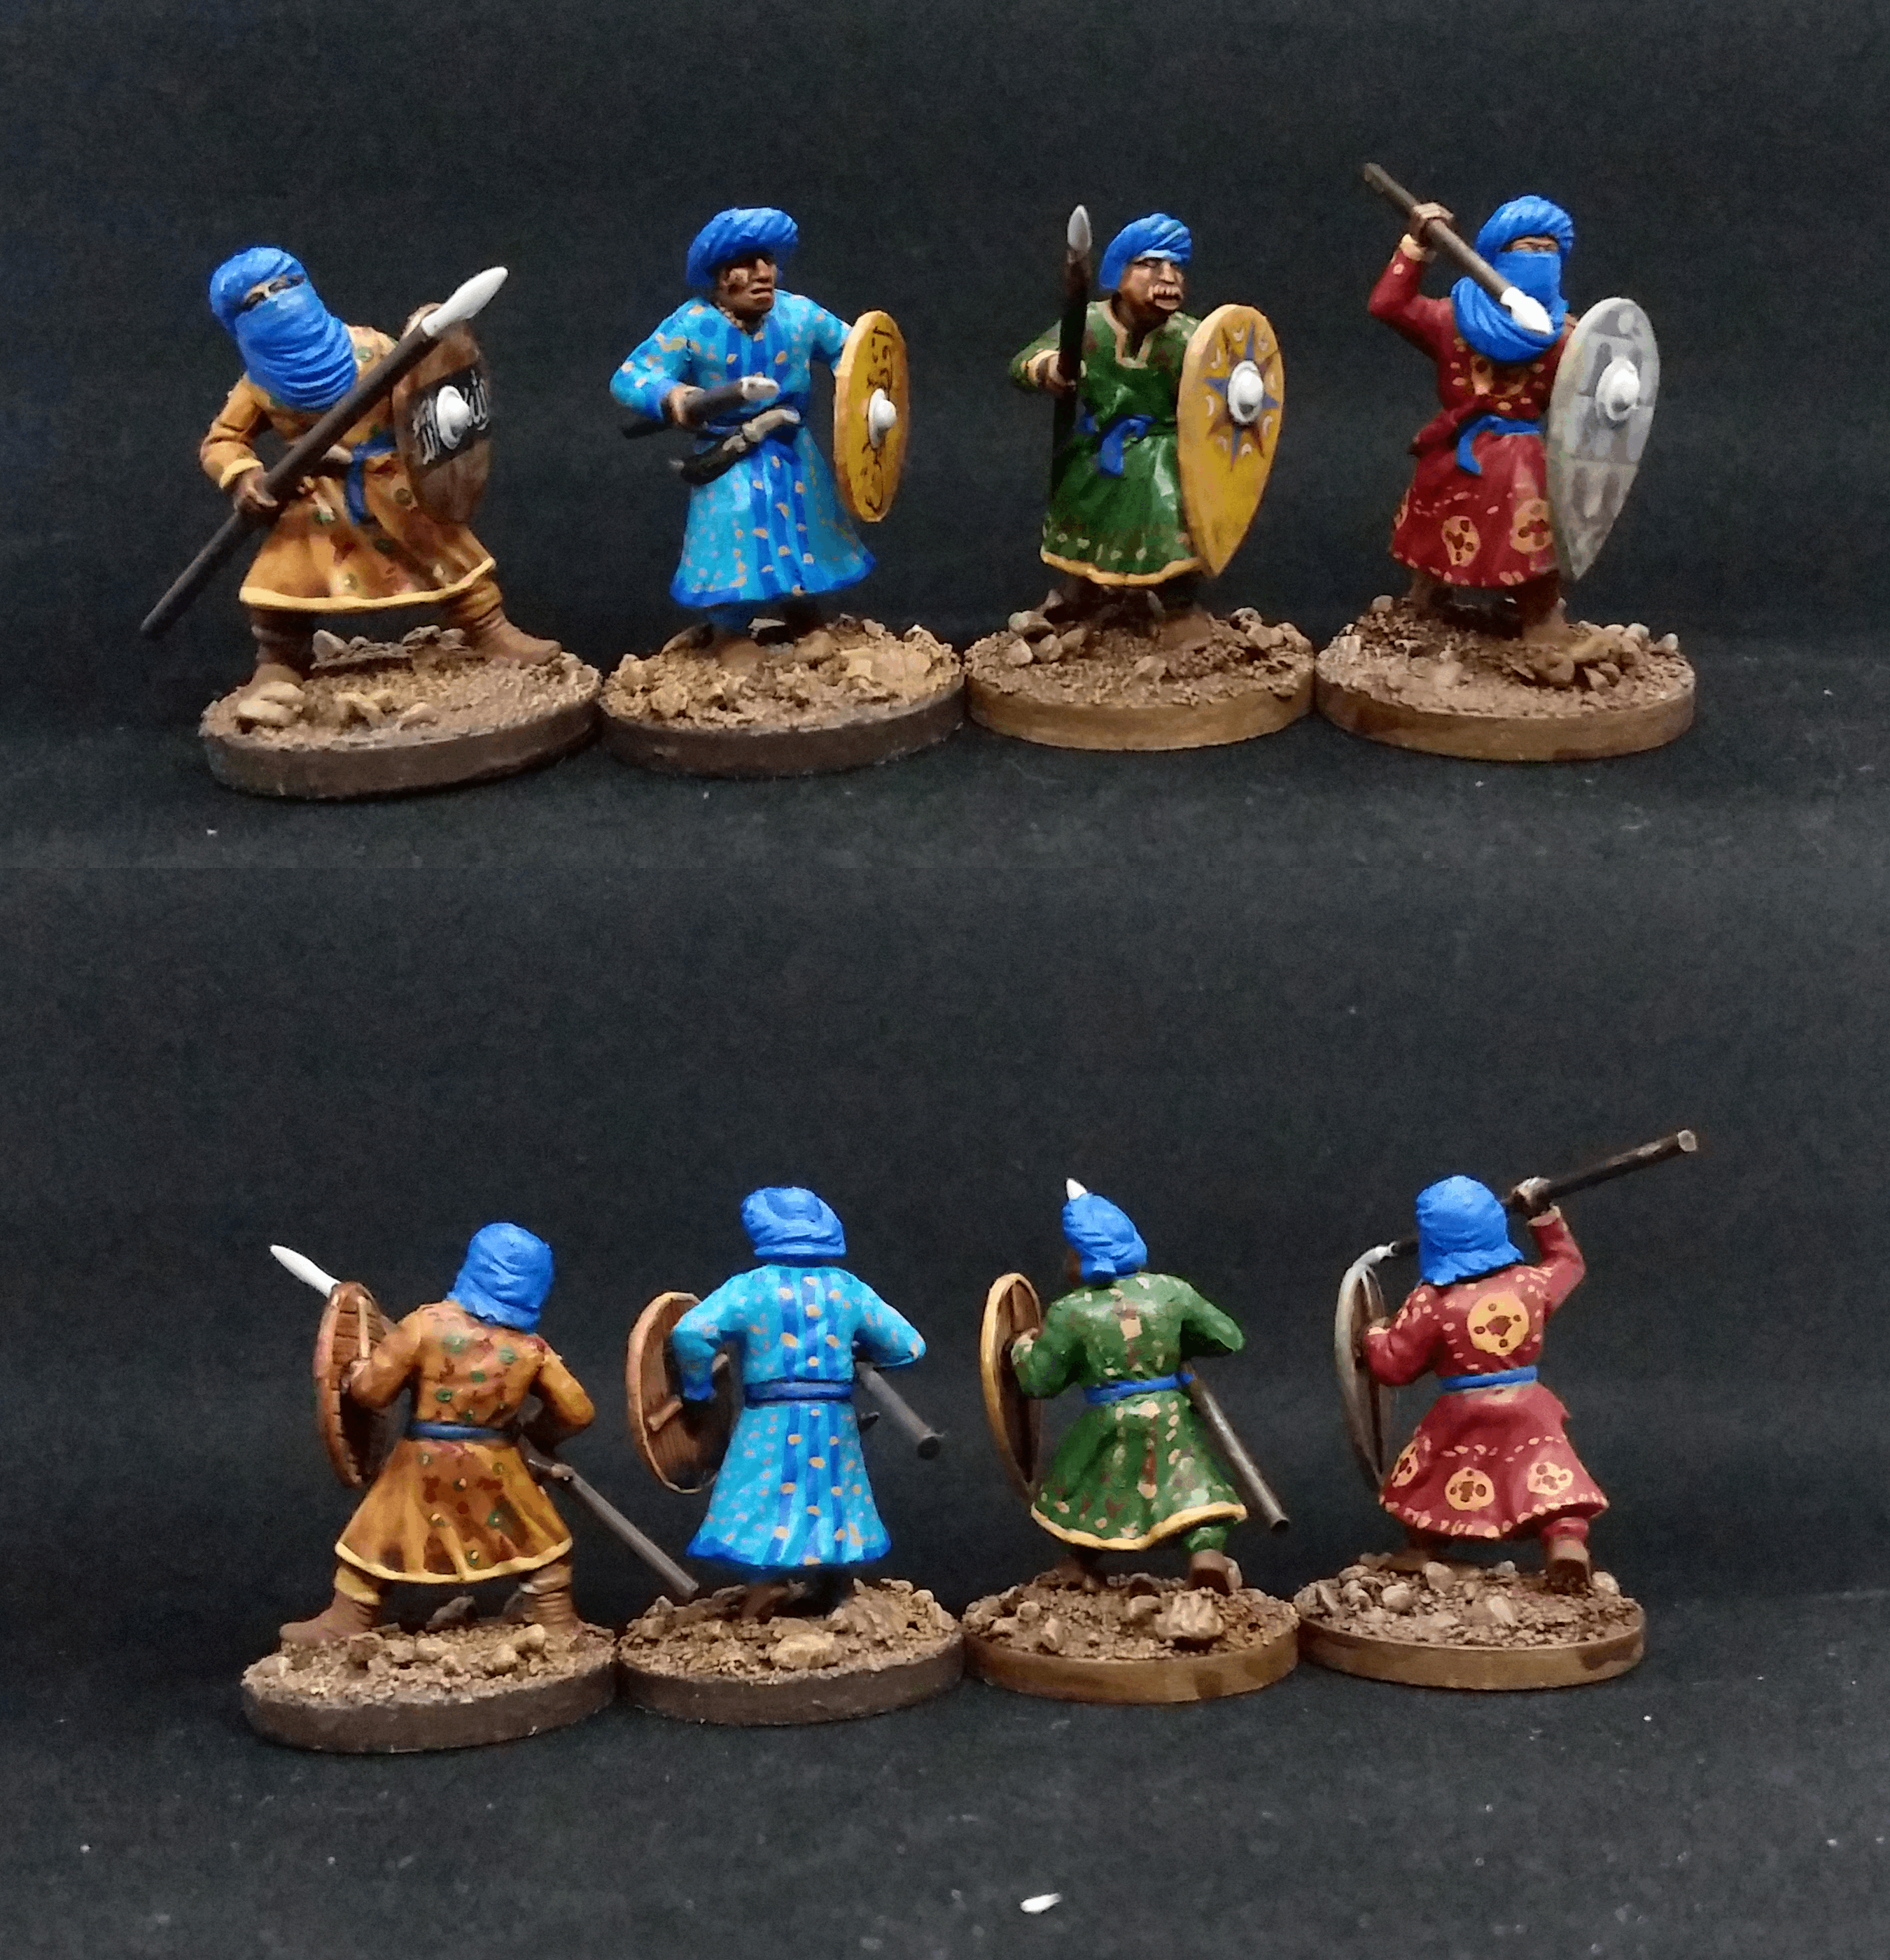
1st squad of eight
Not quite as terrifying as tigers in Africa but not any less important to take note of. These tiny fighting men donned only the best in haute couture for the fray as it would be dishonorable to show up in anything less.
The problem of painting all this is that you need to get to the torsos of the models to align fabric patterns. Initially I thought this couldn’t be done with the shields doing what they are intended to do, blocking ready access to the body, but I was wrong. I’m not so involved in these being painted perfectly from a 2′-2″ rule or box art but they’ll do the job I want and catch eyes.
Fortunately I have learned this lesson as I build the horsemen and will be adding shields after painting the clothing/armor.
Project Runway... Medieval Middle East Edition
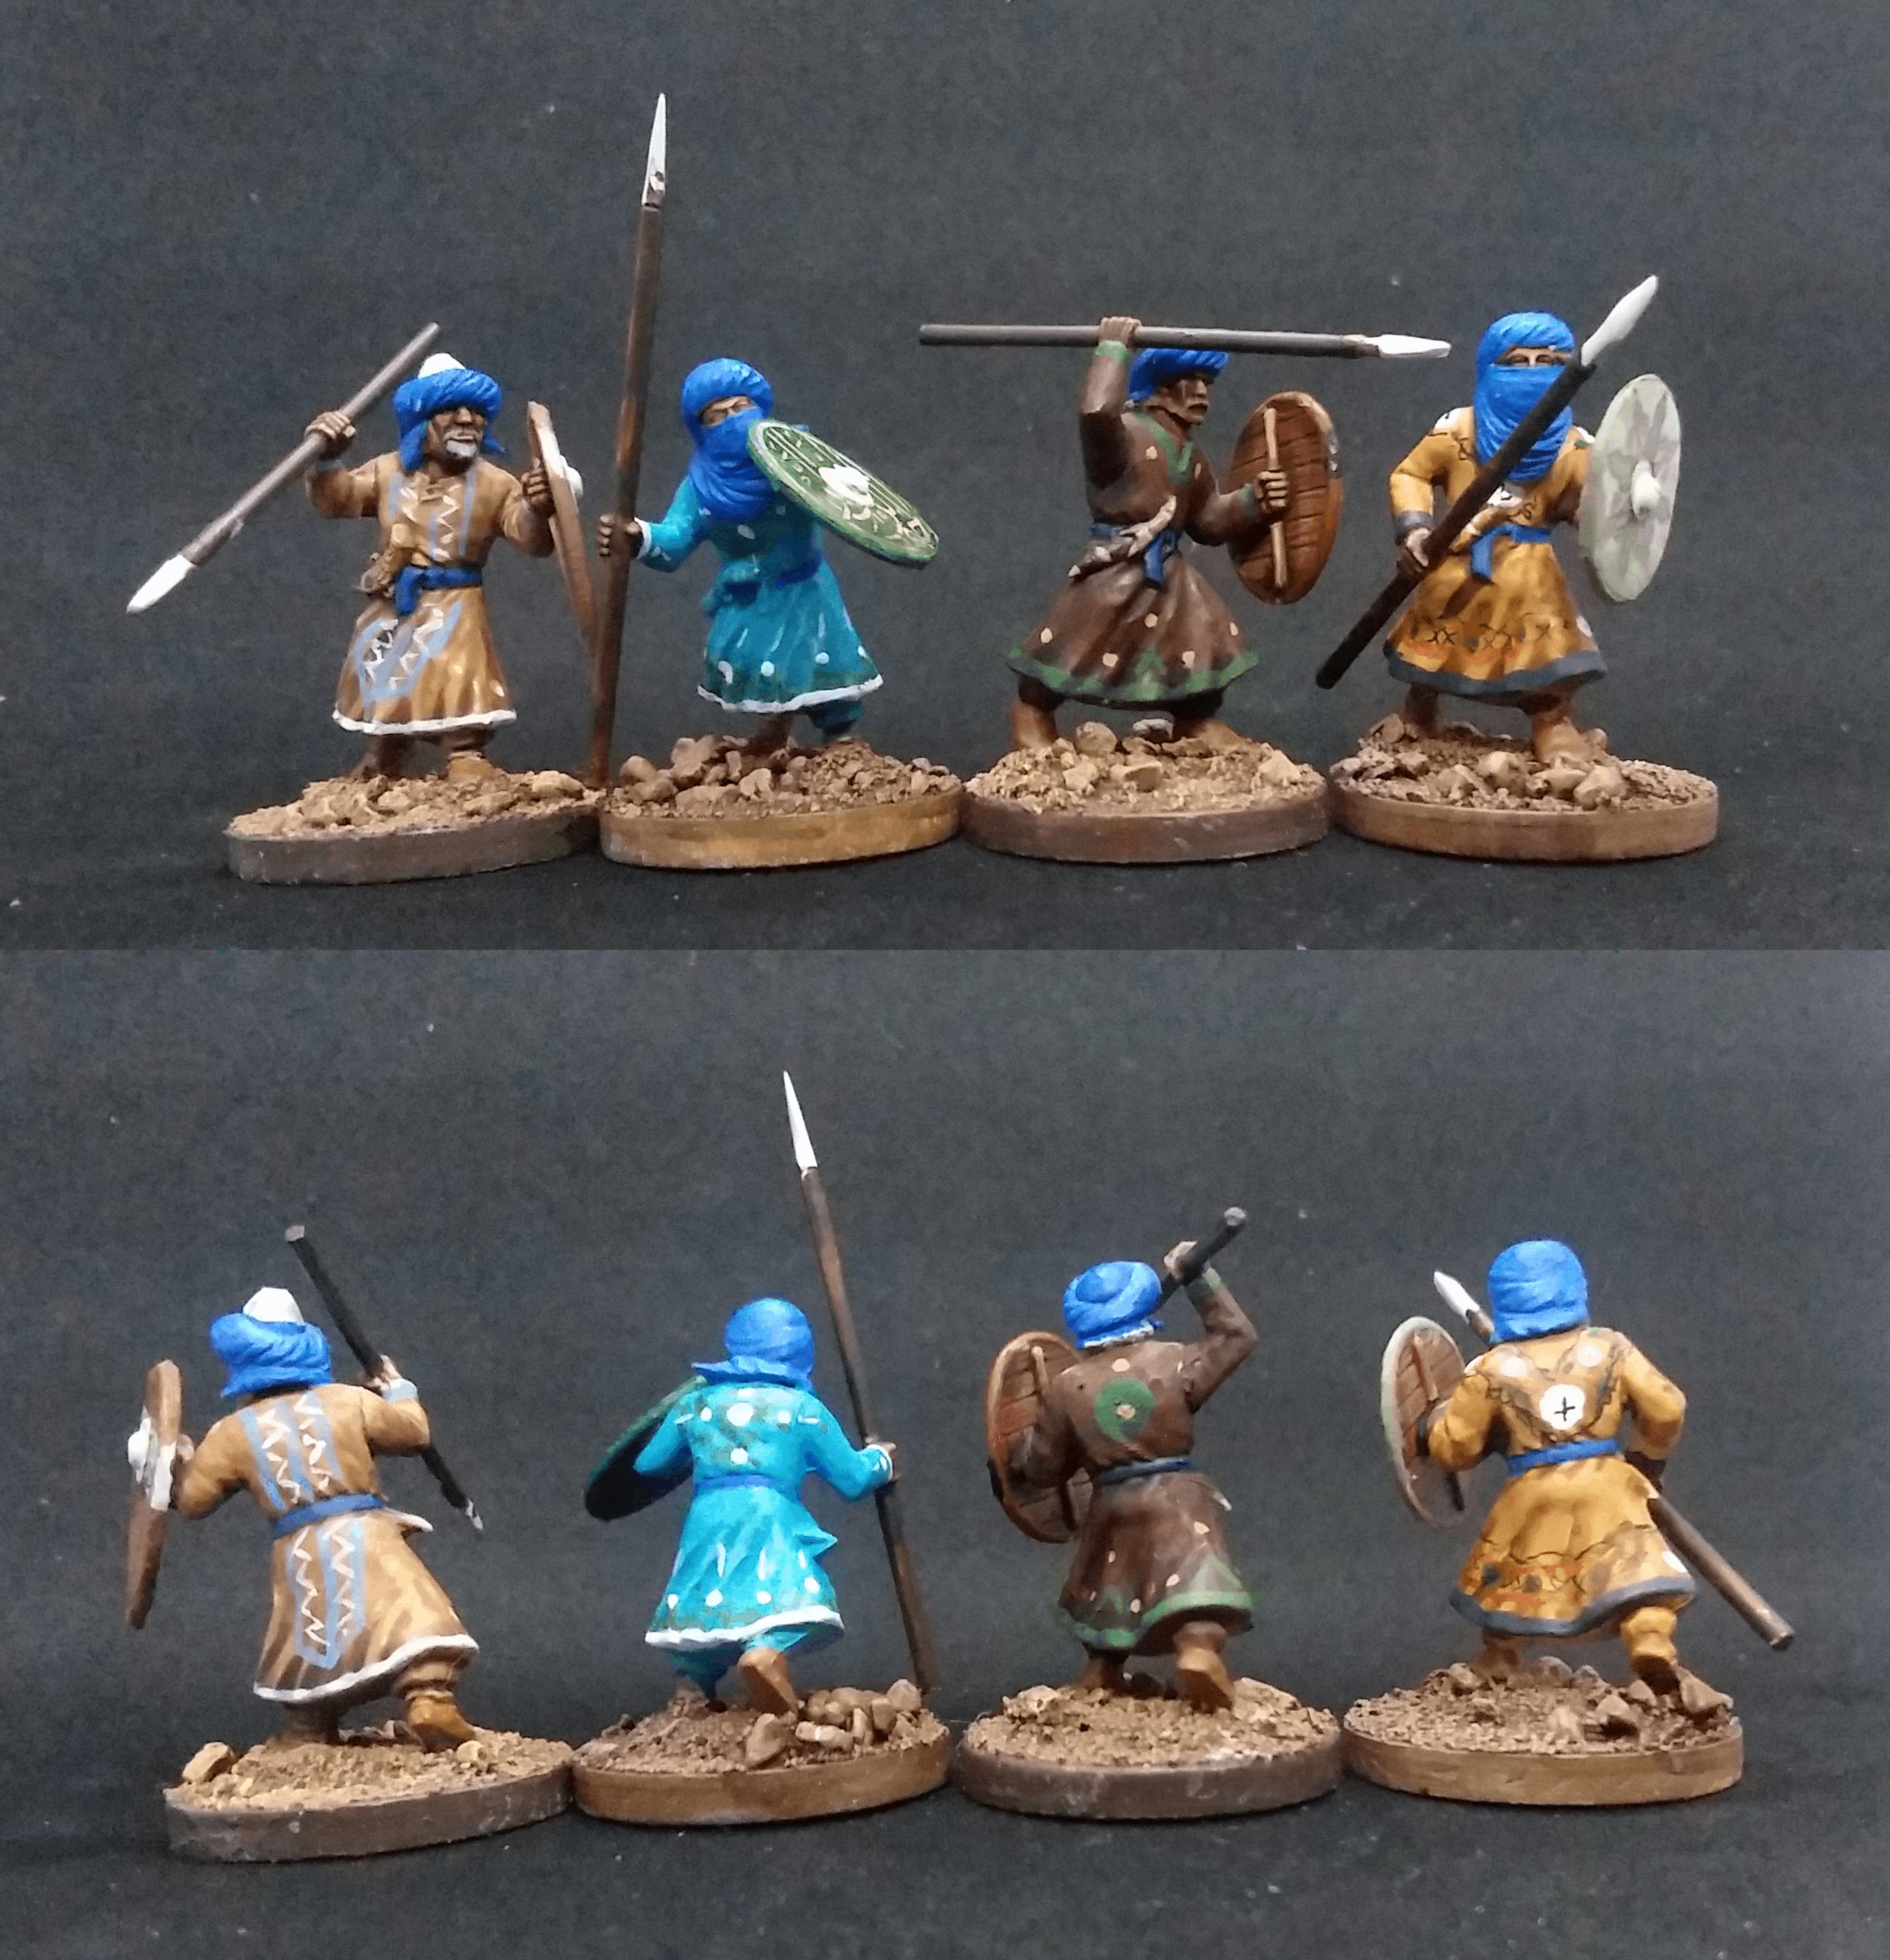
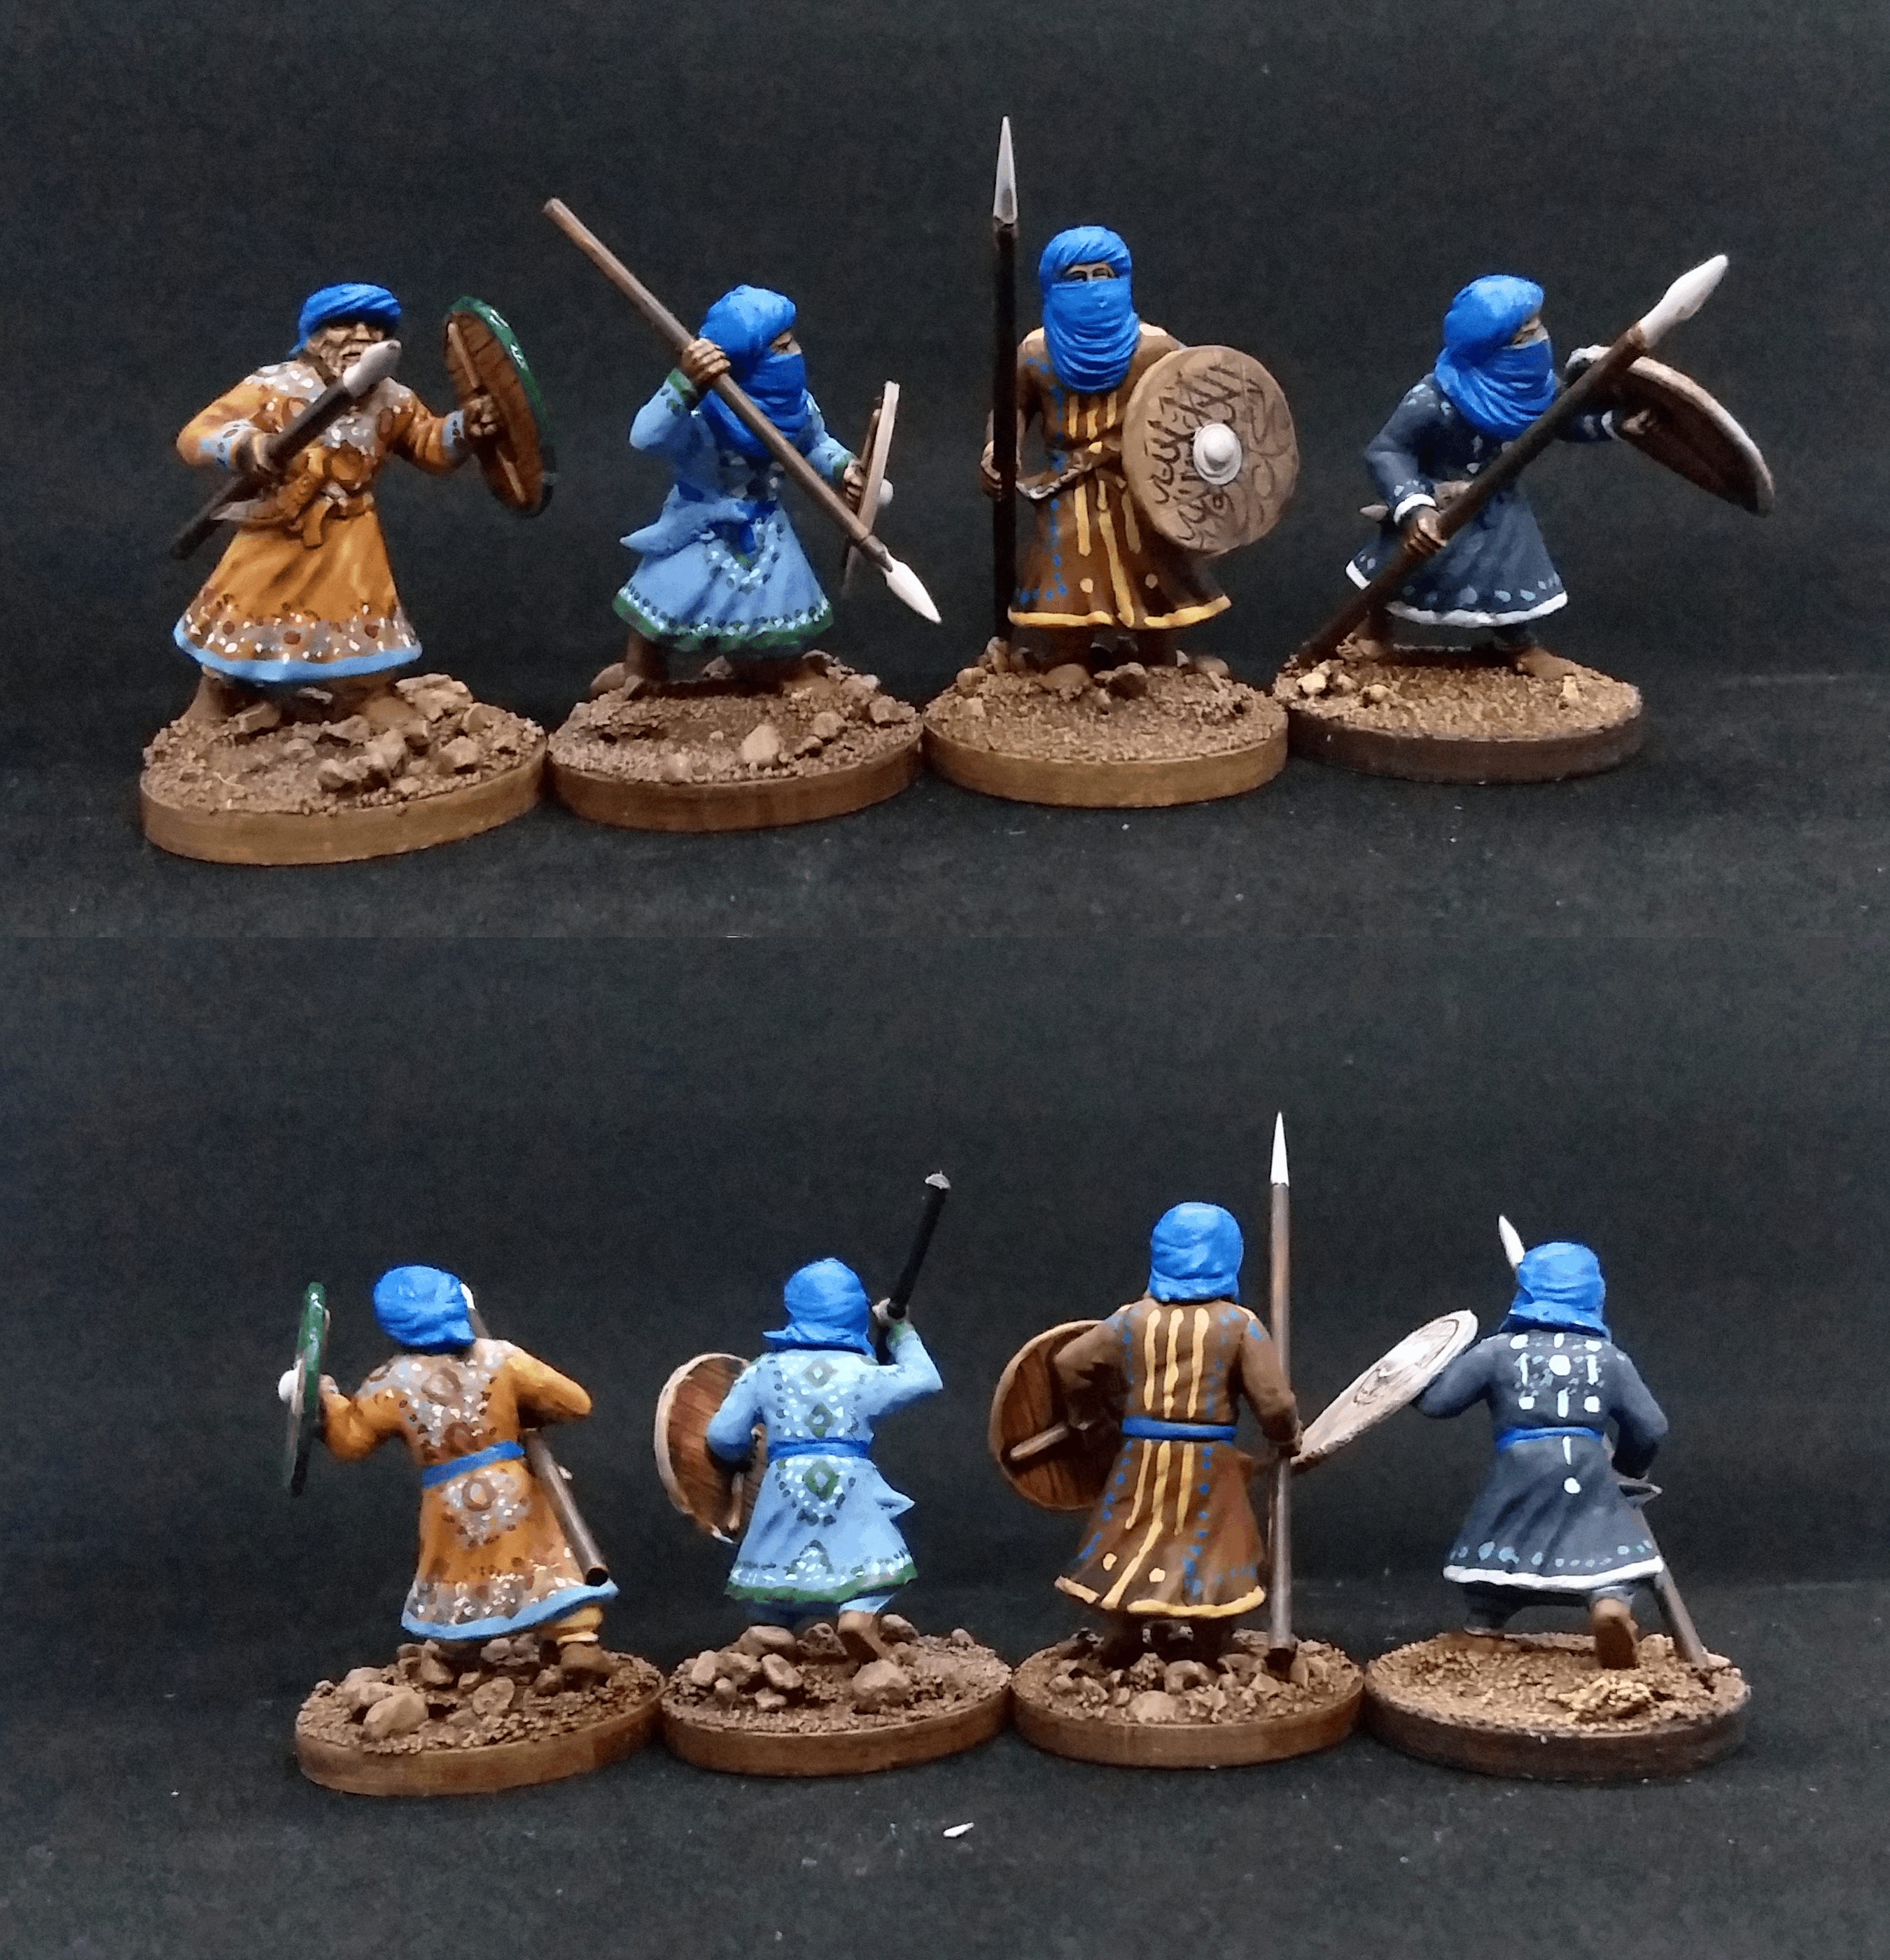
2nd squad of eight
I plugged away at trying to make every one of these guys an individual (cue Life of Brian) and I think I did a good job in not explicitly repeating patterns. No I do not plan on creating such a broad array of insane brocade in future… though I won’t rule that out as this project is a building love/hate relationship from the level of intricacy its beginning to have.
Now on to painting up the cavalry. This will be a bit for the riders as I’m about to move but the horses are nearly there. After that I have my leader planned for regular play. I’m very excited to start on the fantasy elements and share them here.
Swish you said? I say not swish enough!!!
 I'll flap mine proudly in the breeze, thank you
I heard the term “swish” relating to my work thus far and got all chuffed thinking that my effort was not in vain so more effort was going to be put into making this project fancy. As posted before, I had a much different shape than the standard square in mind, since I saw what Little Big Men Studio put out with crenellated banners that caught my attention. This digital work helps as I’m preparing boxes and making ready to relocate to where I can set up a proper hobby desk once more.
In building the banner to what I saw in my head I thought finding a border was most useful. I managed to hunt down a Victorian era styled border that would serve me. There was quite a bit of rebuilding for what would be the leeward edge as it began as a full rectangle. After I got that all done I copied the main layer of the circular name and placed it. The colors will need to be reworked as I could only salvage the initial black image from the many layers. This isn’t a loss as I’ve cleaned up everything and I can begin to edit again. I’m a little miffed that I’ll need to relocate a diamond mesh texture that looked good at 28mm scale but the Internet is vast and I have time before any printing.
There’s more work to be done as far as fabric texturing and any warping due to curvature in the banner is concerned but this is a good place to put out progress beyond figures.
Not painting at the moment, I’ve managed to do a quick build of levy archers and plan what I’ll have for my standard Saga warlord. I’ve thought to use the same parts on him to keep consistency between fantasy and regular play. Since I can only track down a Saracen banner bearer from Gripping Beast on horseback I think I’ll just kitbash one on foot. Oh joy, more customization!
 Now in color
This man has money
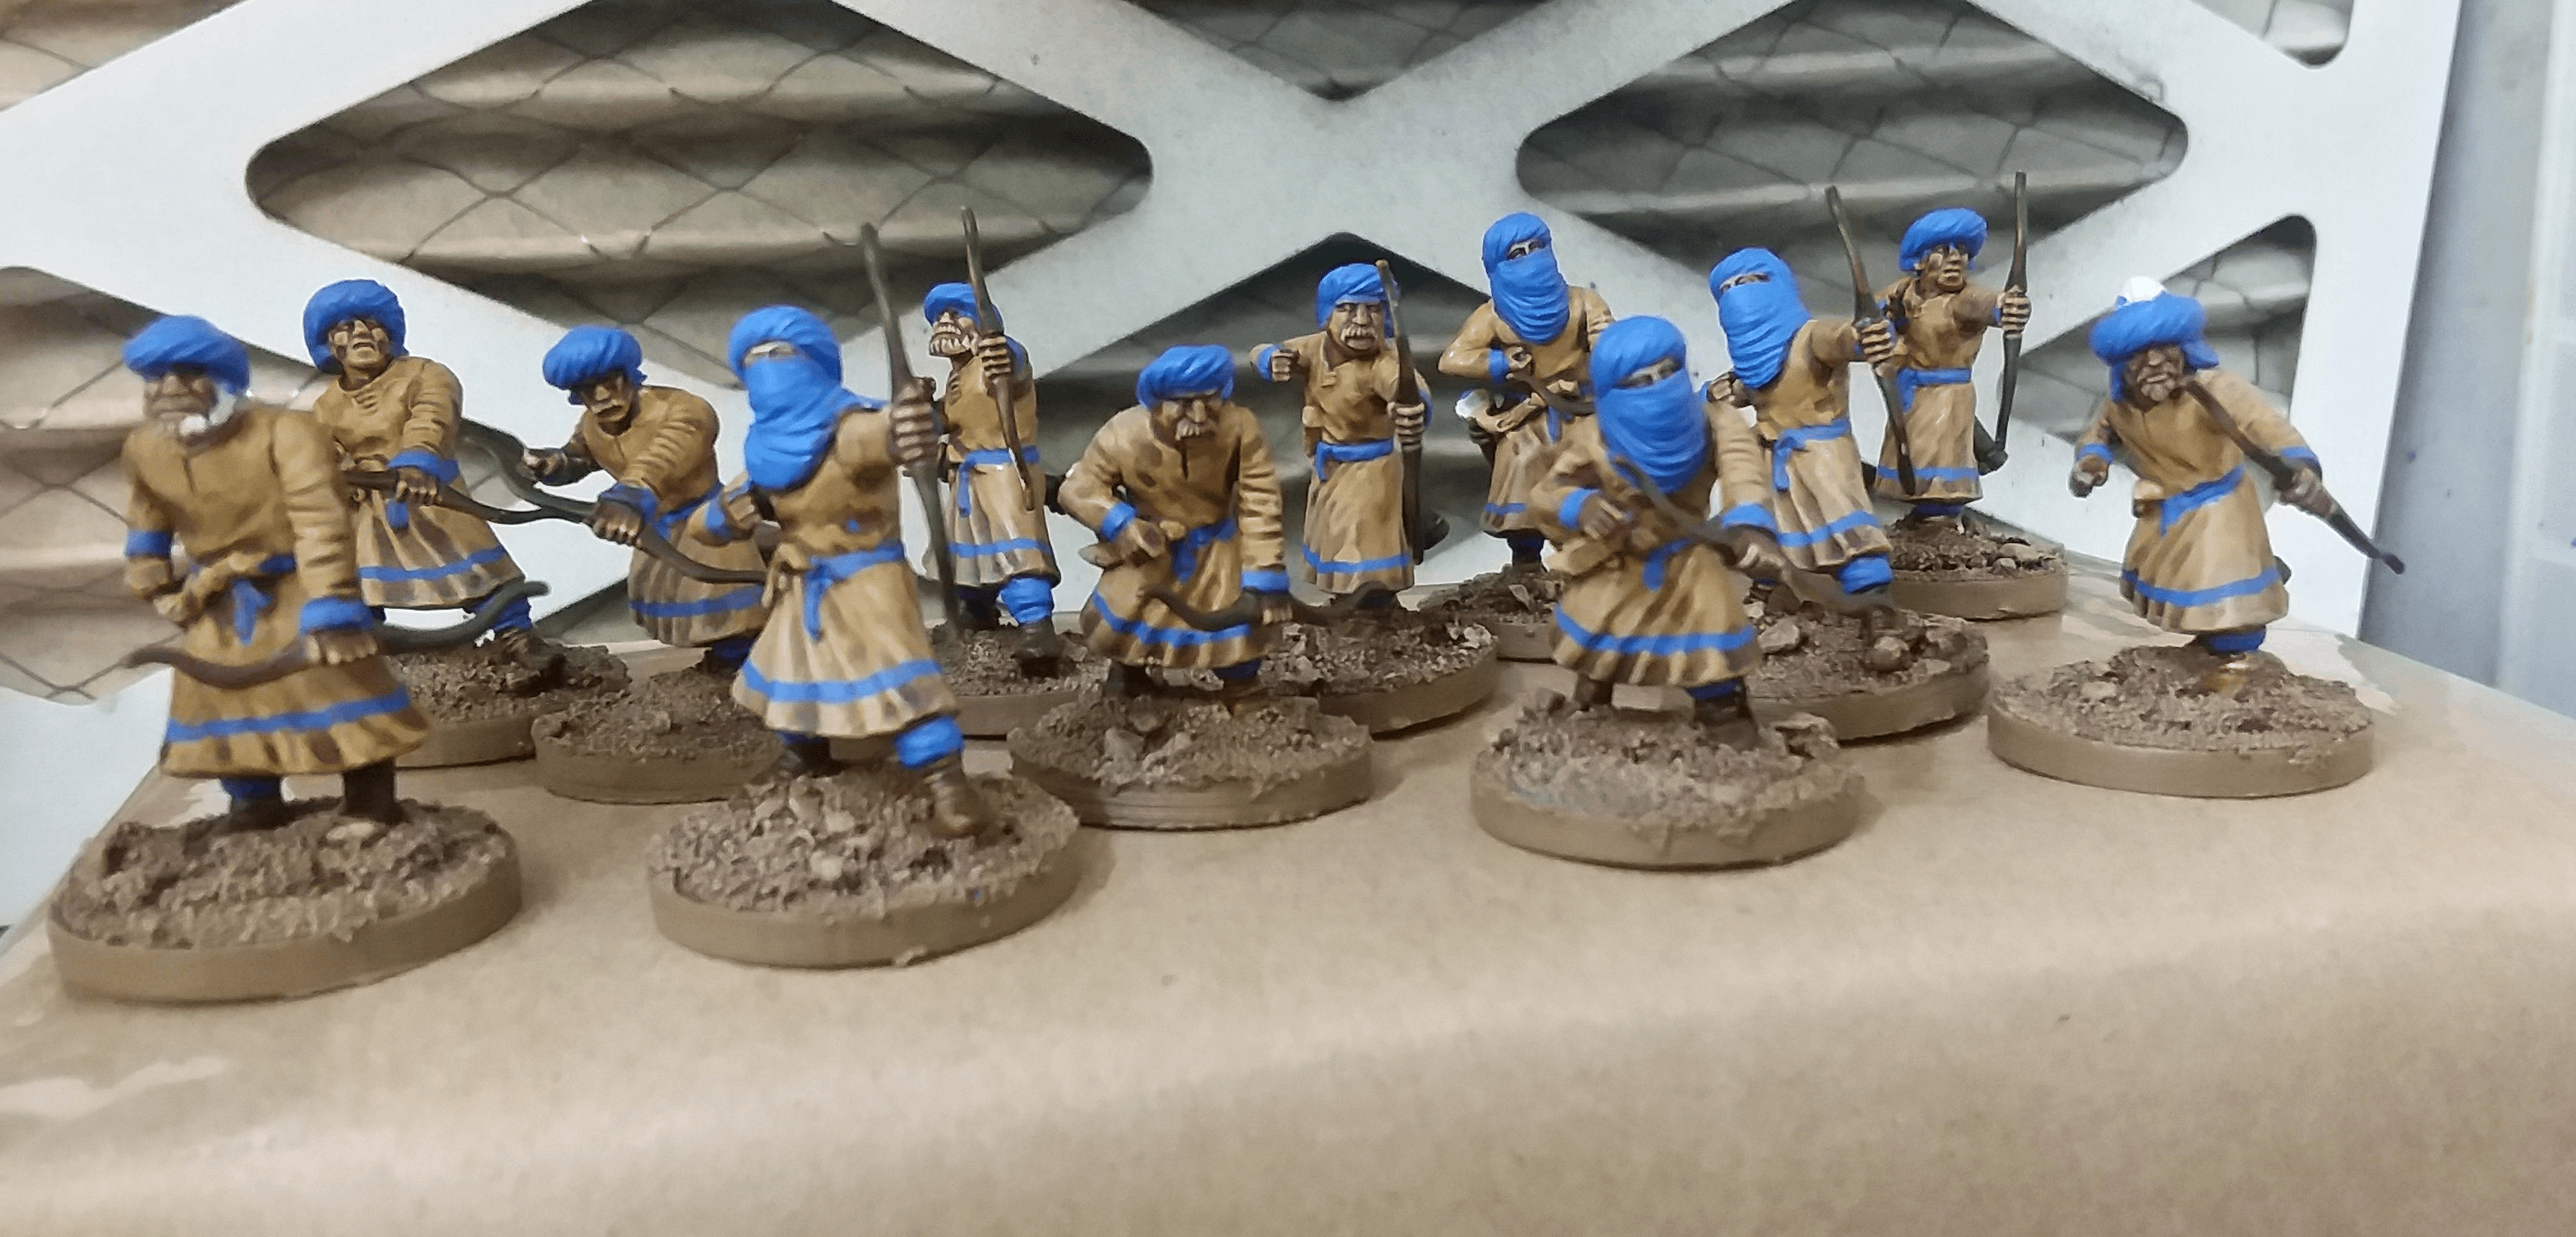 Look! Even his peasants have shoes!!!
I decided that it might not be in the best interest of presenting a fine and noble man such as Hasn without presentable peasants. It is the lowliest of men that are the example of exactly how wealthy and mighty a ruler may be.
I painted the dishdasha with what I think is VMC Khaki Shade. I can’t say for certain as I’ve had it for so long and used it so many times that I’ve rubbed the label blank from handling. and the washed with GW Reikland Fleshshade and highlighted before the mandatory inclusion of the blue people seem to think is the bees knees. I’m fond of it myself since it keeps as a compliment to a general yellowed tone to my army. What else can you expect from the desert… maybe some red, a touch of pinks, the occasional green? No, this is not that kind of desert. Maybe another army will get that but for now you get yellowed brown, nearly baby turd brown. No color joy for you with the desert!
Anywhat, the simple freehand to break visual space was something to give these guys some flair to their generally drab attire. Its nothing fancy as these guys lack money for better threads but the lord of the land can’t have underdressed murder hobos in the lowest ranks of his
Dramatic Robe? Check! Horn? Check! Big Banner? Uhh.. Check!
Slight disclaimer: There were noises made by some semi-Internet-famous entities that this project wasn’t updated enough. Well, just like good bowel movements, this will get some more regularity
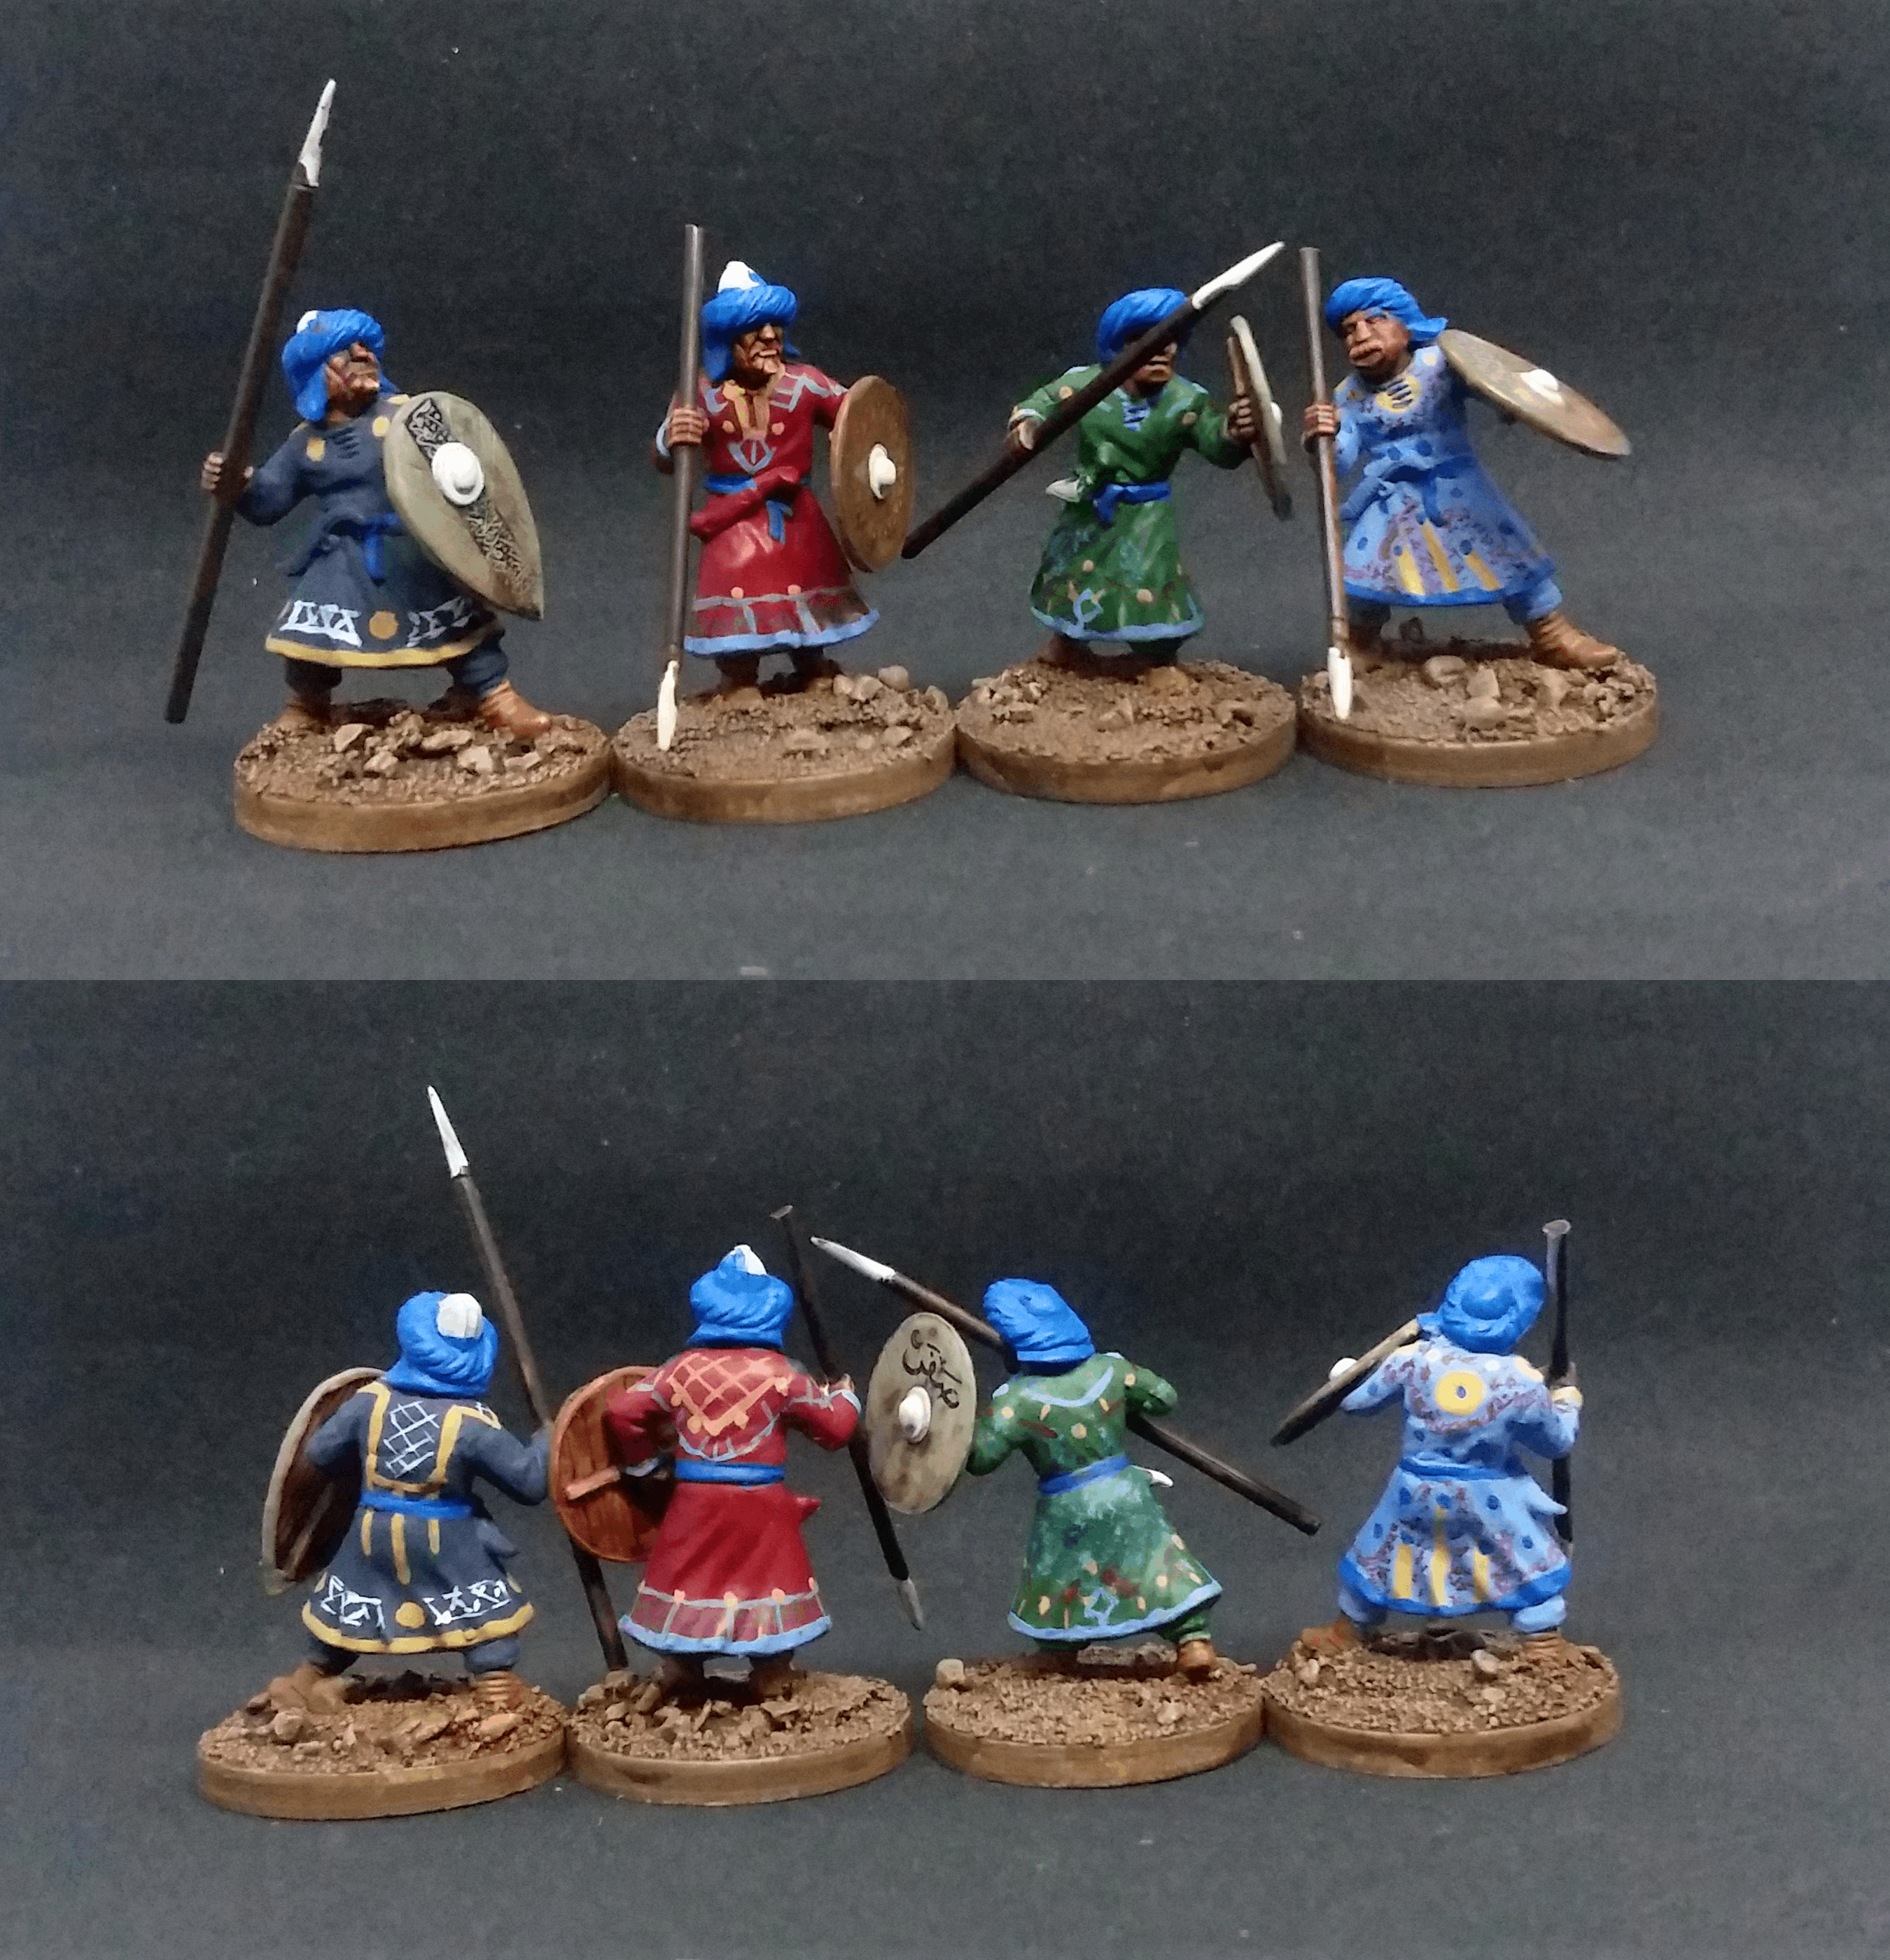
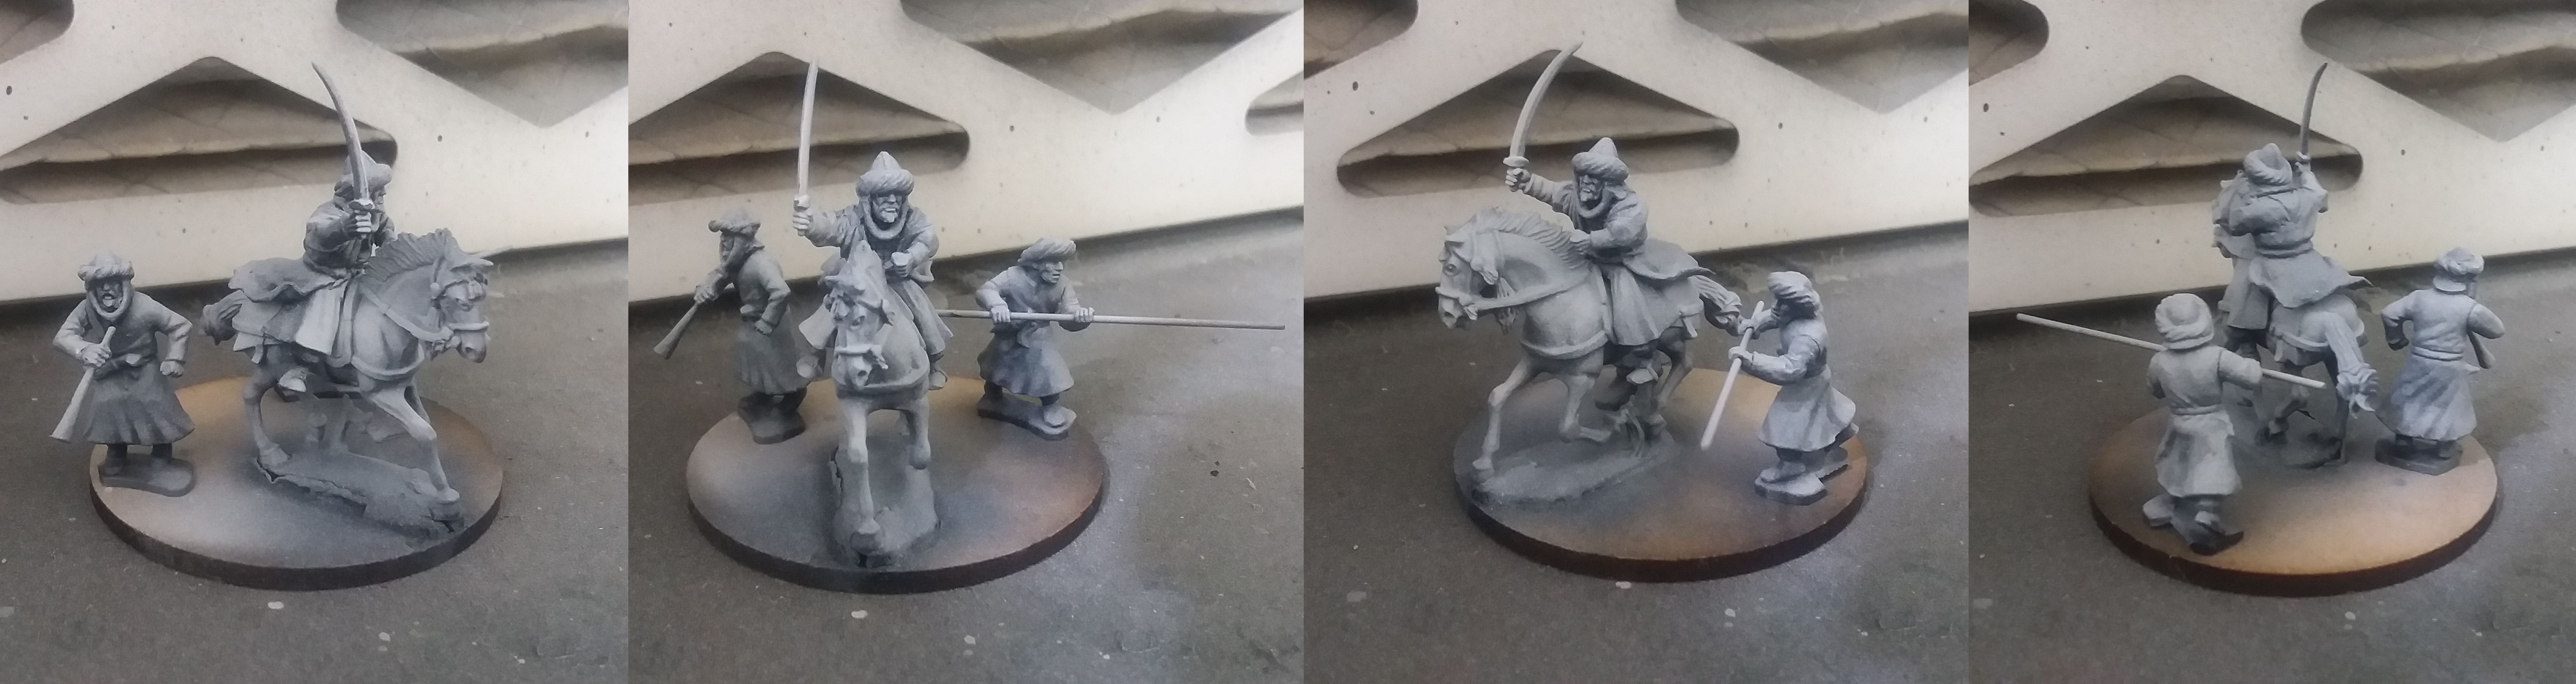 Collected command element
My little dudes are now the epitome of making battle beautiful, atleast outside of the fabulous fashion sense and antics of things related to Slaanesh. I’m quite pleased with the results of all my figures, to include the noble steeds, as these take the cake for the regular game. I’m also happy with the difference made by the lighting in my room.
Right now the pinnacle of the regular game must be attended to.
The initial cohesive pattern for the command unit was a thought that ended up becoming a critical element. All the warriors on foot and horseback stand as unique entities for clothing from cash. The levy are dirt poor and by virtue of conscription have cheap clothes but, as we have seen, this leader of men cannot have his roused rabble running about in rags so they got uniforms. In the end the command would stand on its own too but must first be built. Having looked at the max base size for warlords in Saga I thought that the 60mm footprint was good to put multiple figures on.
I modified the heads a little with greenstuff as the shemaugh have been unwrapped and show the faces. This really was a case where I wasn’t happy with the one armored head option that came on the sprues and found a way to hide the chain coif while tying in the helmet/turban that was done with others.
Unlike Lloyd’s experience sometime back with pinning hands I managed to not blow out the fingers in the hand held forward. The only issue I had was that the rear hand still had the remnants of the spear I clipped from the spearmen arm I had plenty of. There was no way to clean that off so I drilled through it and just fed the piano wire between the hands. Pretty damn good I say to just eyeball the angles for and get as close as I did.
The trumpeter was again more wire work that needed to be done. The plastic sculpt is beautiful, the drawback is that the horn is flimsy and broke at the hand. Again, just a bit of alignment was required to make this a non-issue. A little bit of glue liberally hit with accelerant that was sanded down to shape would see the detail problem resolved.
The final build portion for my army’s leader was now at hand. More scratchbuild modeling with greenstuff was the way to go. In order to make the figure significant I added a robe that billowed from riding in order to break up the monotony of the plastic sprue bodies. Its nice to have uniform parts that I can build as I need pieces but this was going to be my centerstage piece for regular Saga. To have that detail meant I could show off some paint skills later that would signify he didn’t buckle swashes but had cash to sling on silks and scimitars as I was inspired by the metal Mutatawwi’a leader from Gripping Beast. I got this all done before I found out about the Saladin figure that would have lead me down the path of putting the horse in a 12th century flapper dress.
 Prior to all the primer
The whole thing is a multi-element base so I’ll finish it all and then base appropriately to tie all the figures together. What I need to do now is finalize my banner and have it printed. I see good things in the future.
Here comes the cavalry!!!
Barely scripted, nearly unedited and almost uncut

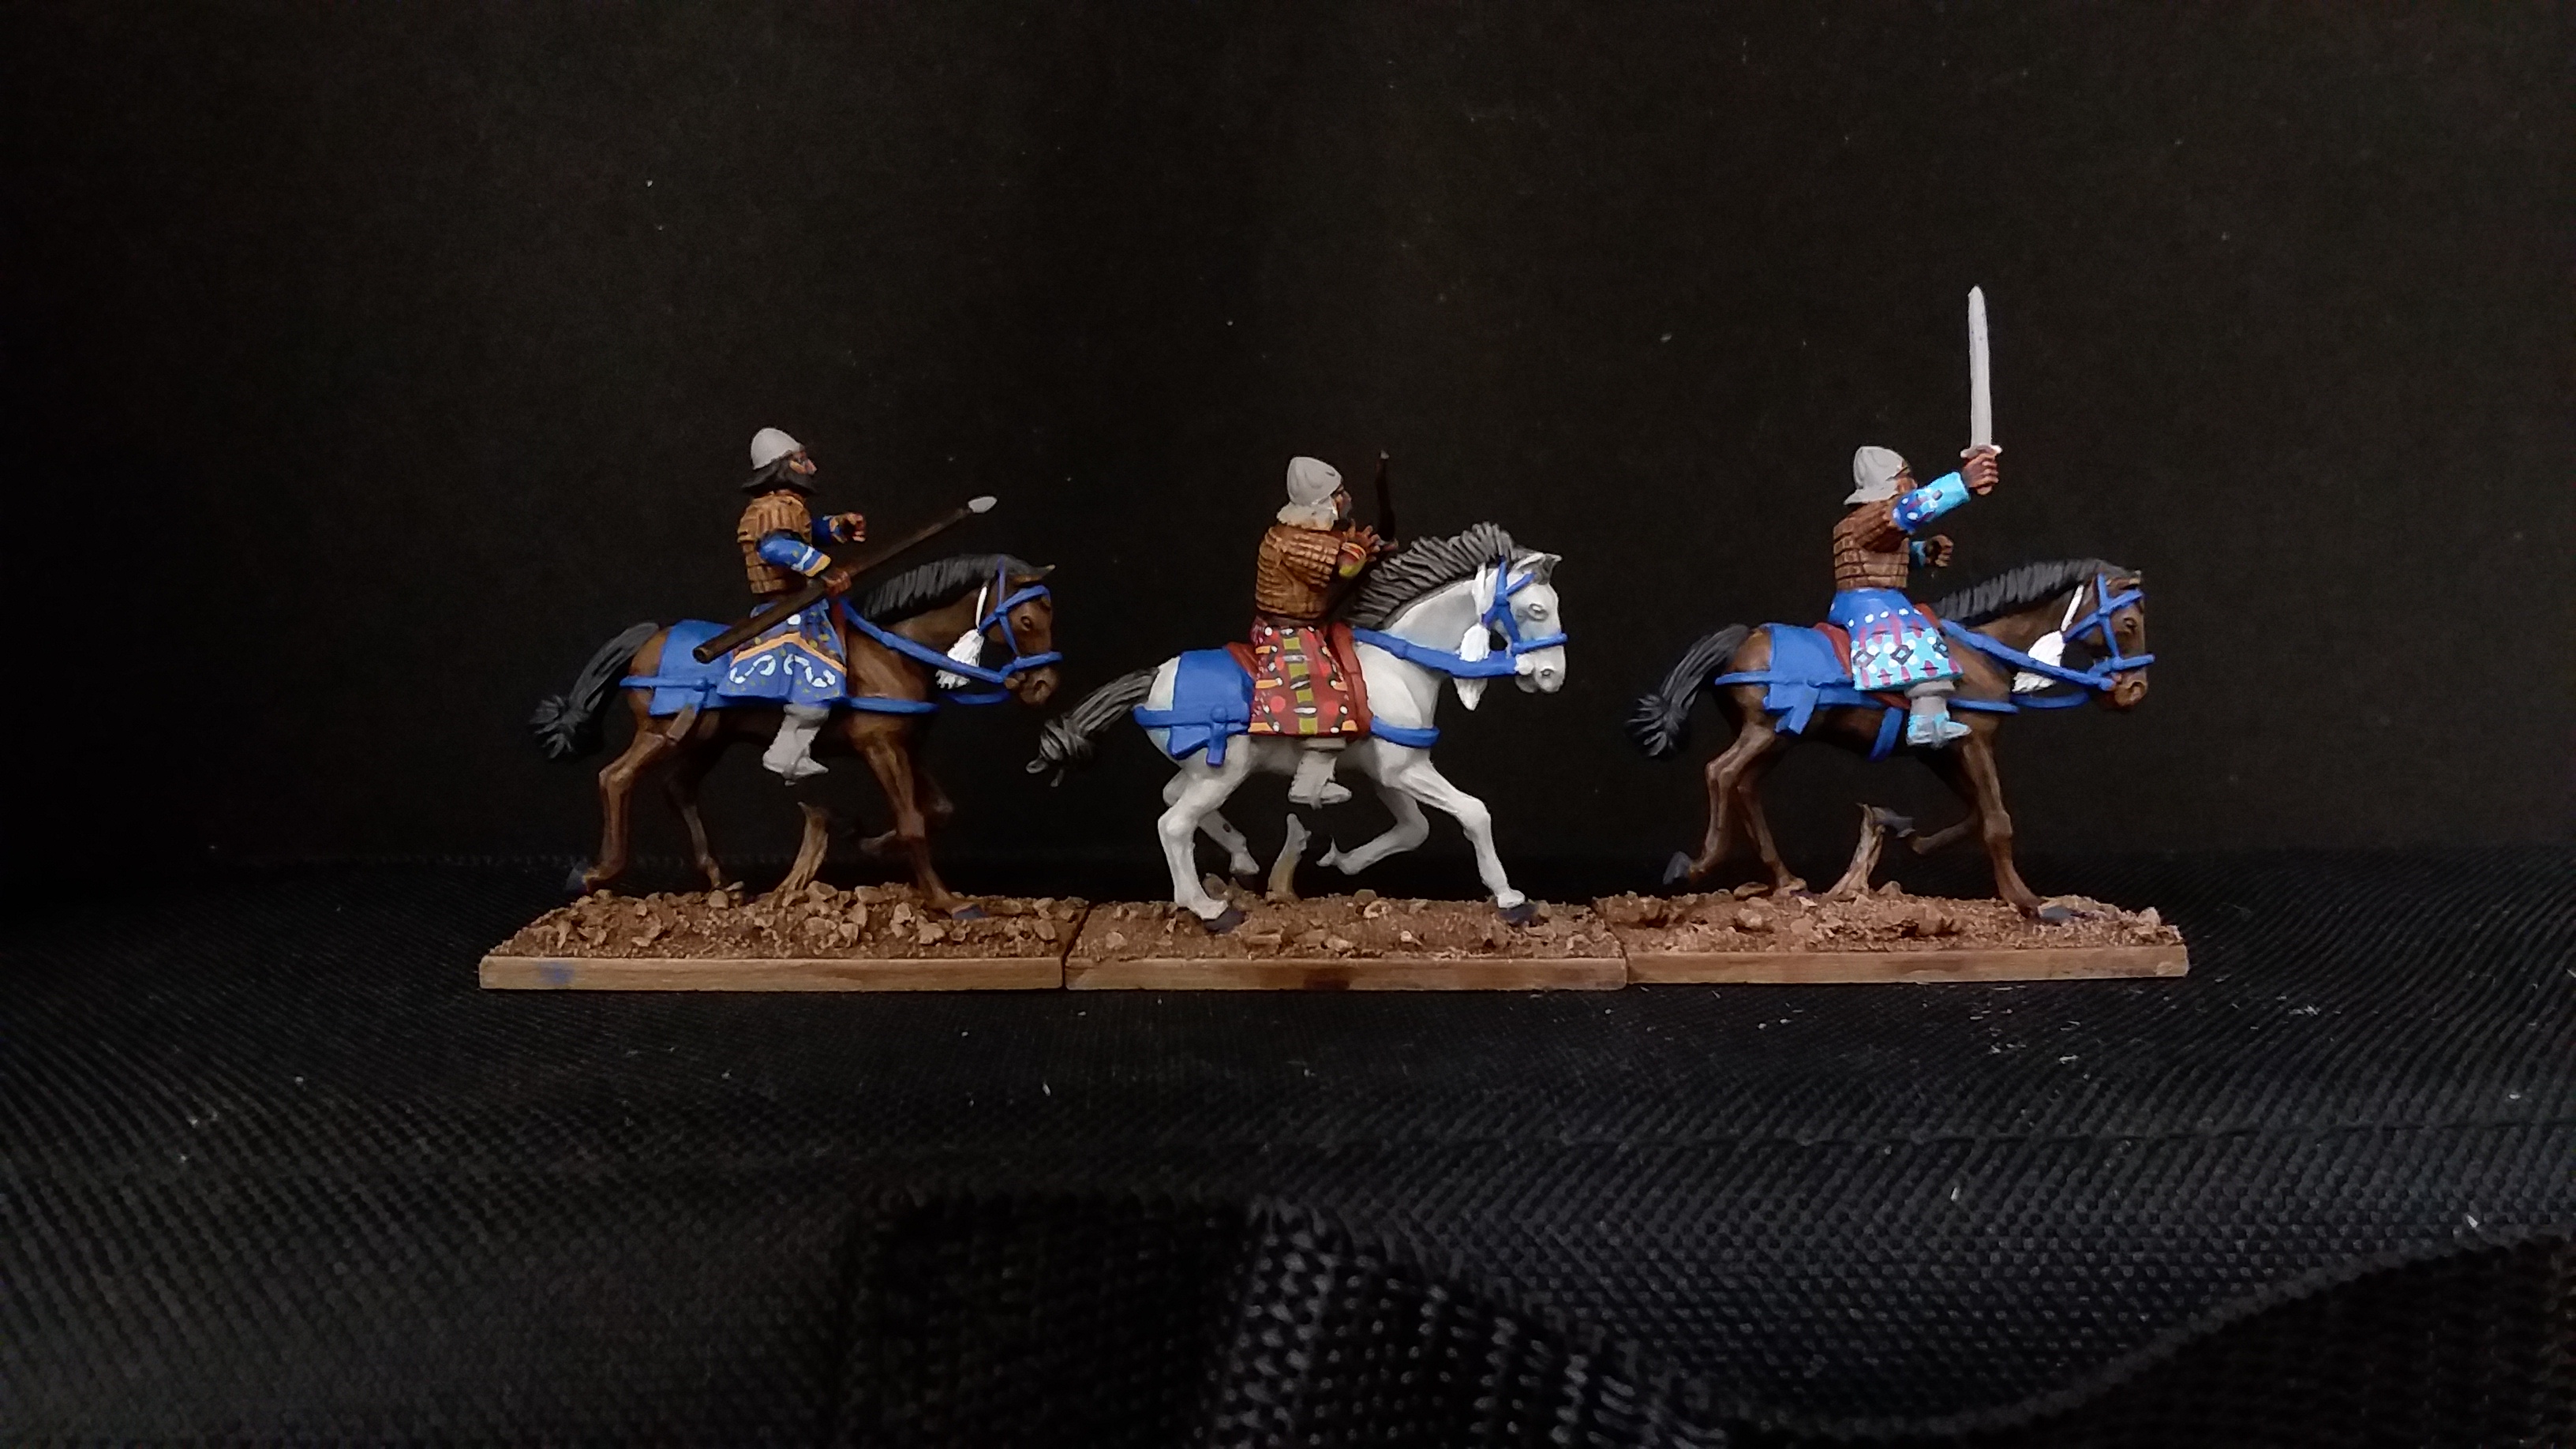

Legal disclaimer: Stallions unrelated to Elke or Megan Thee
Throwing a monkey wrench into the mix in order to get more content out I thought finishing off these guys and letting my ideas collect for the leader and his retinue was in order. Switching my direction of travel like throwing the E-brake and drifting into these minis seemed like a good idea. We’ll see how well it worked out from your opinions.
Horse painting commenced and breaks down as follows….
Brown:
Airbrush VMA Burnt Umber 71.040
Drybrush RMS Intense Brown 09138
Drybrush RMS Chestnut Gold 09073
Wash GW Reikland Fleshshade
Black:
Airbrush VMA Black
Drybrush 1:1 VMA black/RMS Midnight Blue
Wash Nuln Oil
White:
Airbrush Gray
Drybrush 1:1 gray/RMS white (slight contamination of previous brown that wasn’t cleaned off well)
I initially had no set idea for what could be done for the patterns of fabric but I believed that I might want to see about getting some help in reducing the detail level somehow. That didn’t happen as I kept rolling around the thought of “If you do something, do it well; leave a sign to let the world know that you were there”.
Here I’ve looked at the footsoldiers and considered what was done with the dishdasha on the 4pt box art for soldiers and hearthguard. I think I went a step beyond what I intended but I stepped back and considered the color palette. These needed to be brighter as it would be more expensive and attention grabbing; my problem had been solved by pigment prices.
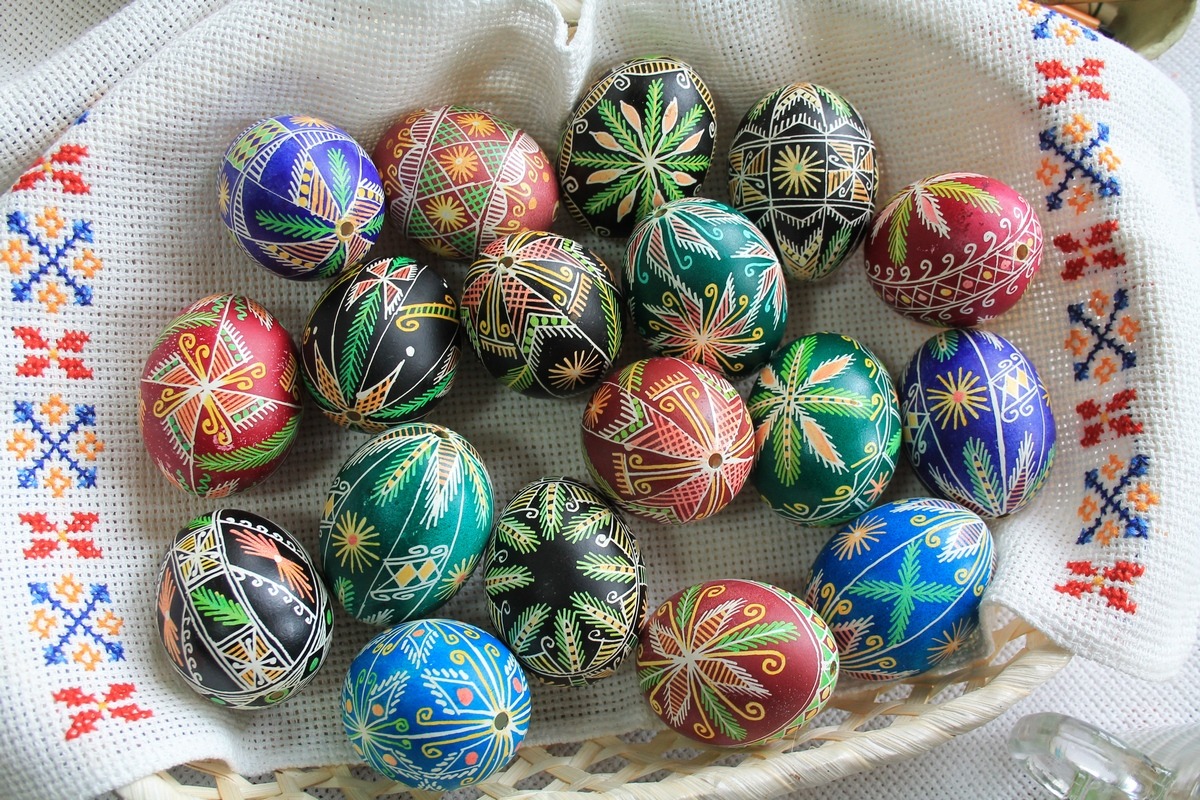
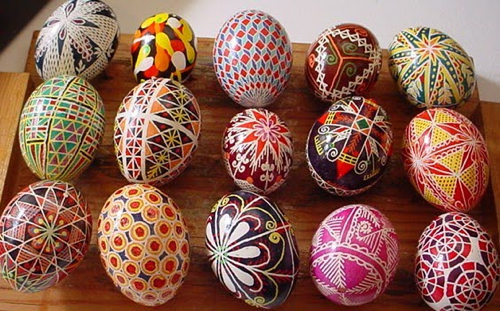
Further on with the cavalry I had an idea about the riders. Yet again I find myself both loving and hating the fact that I push the envelope for detail at times. I was inspired by the decorated Easter eggs that are typically seen all made up for the celebrations of Orthodox Christians and then my recollection of the intricate tile work of the Islamic world.