Make The Game Your Own! Star Wars Ground Minis Part 2
September 29, 2014 by crew
Last week, we rolled out Part One of “Make the Game Your Own: Star Wars Ground Minis” (I would call it “Episode I” but I don’t want to risk being compared to The Phantom Menace). In Part One, I shared some work our group has done with old game packs of Star Wars PocketModels, converting the original trading card game into a battlefield miniatures game.
Now it’s time to review how well the game actually worked. Never shying from a challenge, we leapt in with both feet and tried what has to be the best ground battle in the Star Wars saga: The Battle of Hoth. If our game could handle that, we knew it could handle almost anything.
The Battle for Hoth Begins!
In testing our Battle of Hoth, we used a methodology familiar to die-hard, rivet-counting, grouchy old historical grognards like me. Simply put, we test our scenario designs extensively with strictly historical moves, “re-enacting” the battle a few times to see if the game system recreates something close to the historical result. After all, Hoth can be a “historical” game just like Gettysburg or Waterloo, it just draws on a different history we all share. We set up the movie battle as closely as we could, using only units, tactics, and objectives that appeared in the actual scene. We let the game run its course, and if it came out close to the way the movie did, we knew we had a winner.
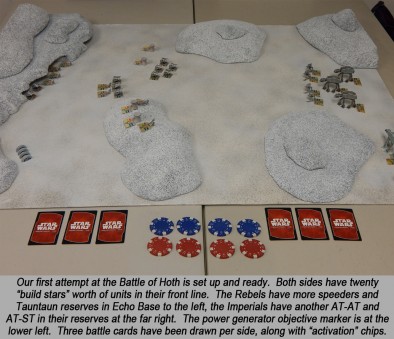
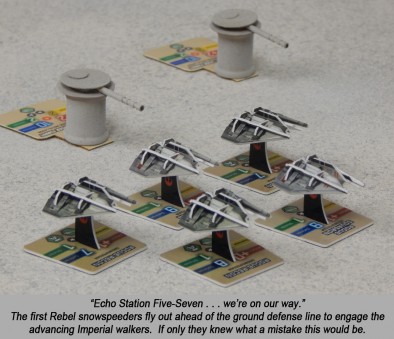
The game was built with twenty “build stars” on a side. For the Rebellion, this worked out to four Echo Base laser turrets (two stars each), eight snowspeeders (one star each), and four units of Tauntaun Scouts (one star each). Of course there were no Tauntauns in the actual Battle of Hoth, but this game includes no pure “infantry” units so we used these to approximate all those Norwegian Army extras that appeared as Rebel ground troops in Episode V.
The Imperial army had three AT-AT walkers (four stars each) and four AT-ST scout walkers (two stars each). Both sides also had six “build stars” in reserve units. Reserves had to be deployed back in each side’s respective reserve zone, and could not be activated until either an equivalent value of first-line units had been destroyed, or by the playing of certain combat cards that allowed early reserve activation. For reserves, the Rebels took two more snowspeeders and four Tauntaun scouts, and the Imperials took one more AT-AT and one more AT-ST.
The objectives were simple. As the Imperial commander, General Veers (played by myself) had eight turns to advance to within gunnery range of the Echo Base power generator and destroy it. My opponent (playing General Rieekan) had to prevent Imperial victory. If that shield generator had even one hit left on it at the end of Turn 8, the Rebel evacuation from Hoth is considered a success and the battle is a rebel victory.
To kick off each turn, a random poker chip was pulled from a bag, as Warren discussed in a recent episode of the Weekender. Each activation allowed the player to move and fire up to five “build stars” of units. Right away this produced a great little tactical nuance, since Imperial AT-ATs are four stars and AT-STs are two stars. Thus, the Imperials could never activate the full five stars’ worth of units, perhaps a symptom of their rigid command structure. With their smaller, faster units and more independent and motivated commanders, the Rebels would always have the option of activating the full five stars’ worth of units.
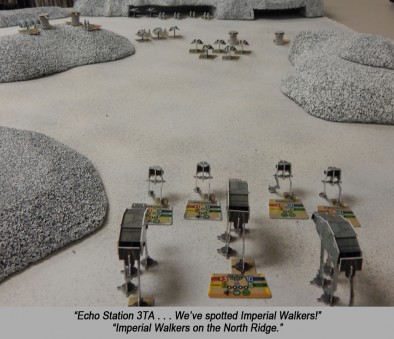
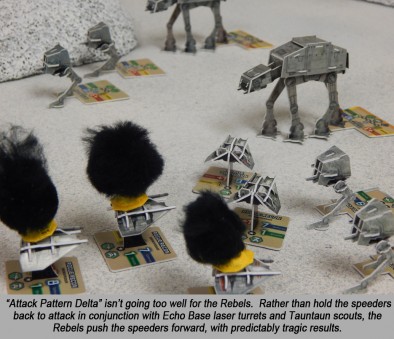
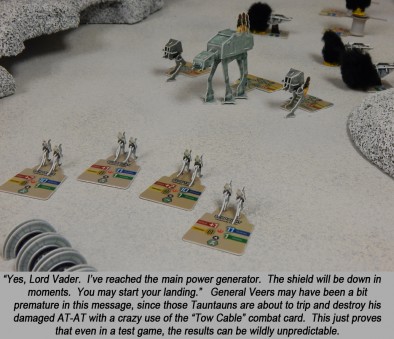
The Imperials lined up their walkers and began their advance, shaking the snow with the weight of their steel march. Weapons range was only twelve inches, so it would be at least one full turn before they could apply effective fire on rebel positions. The Rebels, however, made the mistake of flying their snowspeeders out to meet the walkers (just like they did in the movie), even while the rest of the Rebel ground units were still out of range. Thus, the speeders were left alone against the full weight of Imperial firepower. Predictably, the speeders were largely slaughtered by the walkers while doing little damage in return.
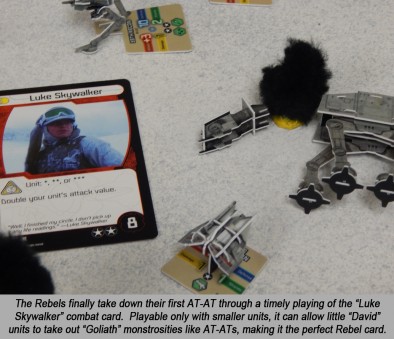
All was not lost, however. Because of the disadvantages mentioned above, the Imperials weren’t moving nearly as we quickly as they would like. Rebel losses were quickly replaced from their reserves, with new snowspeeders flying out from Echo Base. One AT-ST is destroyed, and then the Rebels played the “Luke Skywalker” card in a snowspeeder attack on a slightly damaged AT-AT. This card doubles the damage rolled on the attack, which then proved to be a pretty sweet roll in its own right. Just like that, Luke had wrecked an Imperial AT-AT, perhaps just as he did in the movie.
Only when the Imperial walkers came within range of the Echo Base laser turrets, however, did they start to suffer appreciable damage. Quickly the walkers made the eradication of these turrets a priority. But surviving snowspeeders and arriving reserves started wearing down the smaller AT-STs as well. Even the Tauntaun scouts got into the mix. Although they can do no damage themselves (without the use of a combat card), they can combine with other units as part of a five-star “fire group” and add their accuracy bonus to other units with greater damage factors. Thus, it’s like the Rebel infantry is “spotting” or “marking targets” for bigger guns. Quickly we began to see tactical synergies in the combination of units and battle cards, how to divide and combine firepower values, all combined with the unpredictability of dice and the opposing player playing his own battle cards in defence.
The sheer weight of Imperial firepower and armour, however, made their advance as inexorable as it was slow. The Rebels kept falling back, trying to keep themselves between the Imperials and the power generator. Finally the Imperials played the “General Veers” card, and the last AT-AT unleashed a barrage of cannon fire at the power generator. Although heavily damaged, the generator survived! The Rebels struck back with a card they’d just drawn, the infamous “Tow Cable” card, where players can emulate the famous scene of tripping up an AT-AT’s legs. By now, the Rebels had no snowspeeders left, but then one of their Tauntaun scouts met all the legal prerequisites and conditions listed on the card. So did the scouts have a tripwire strung out ahead of the walker, or did they dig a hole, or did they just have a crazed Tauntaun on an overdose of energy drinks . . . running in circles around the AT-AT’s legs trailing a spool of cable? We leave it to your imagination.
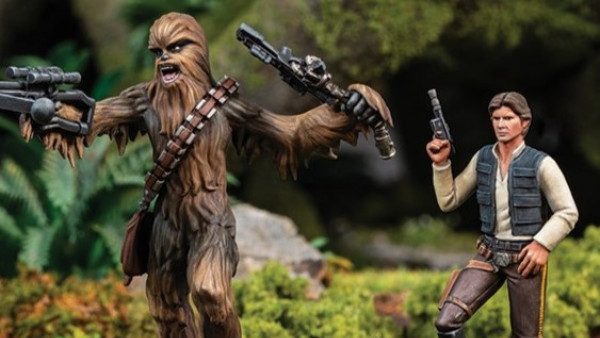
The Rebels then drew another activation chip and launched another attack, playing the “Chewbacca” card (any “5” or “6” result on a dice roll does extra damage). The Imperials counter-played with a “Wampa Ice Creature” card, which basically equates to a free attack on any enemy unit under a certain size. So we basically had Chewbacca and a Wampa slugging it out in the snow (now there’s a pay-per-view I would buy in a heartbeat), but the two titans basically cancelled each other out.
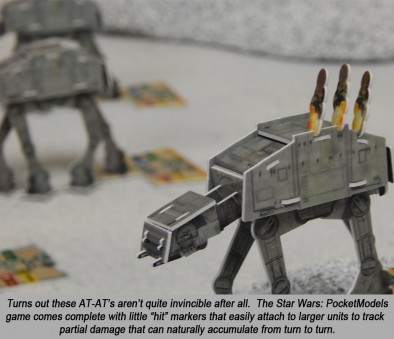
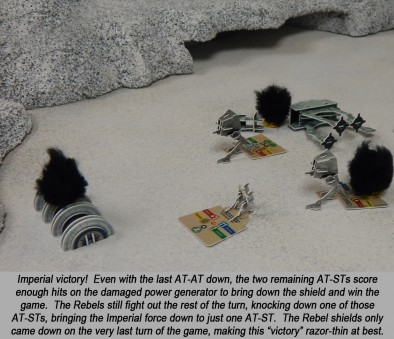
Finally, the Imperials dropped another round of fire on the Rebel shield generator, scoring just enough damage to finally destroy it on the second-to-last activation on the last turn. Ironically, it was the little AT-STs that won the day, not the lumbering AT-ATs. The shield generator blew up and Hoth was laid bare to the fleet of star destroyers orbiting overhead. The game was chalked up as the narrowest of possible Imperial victories, much like the original Battle of Hoth in Episode V: The Empire Strikes Back.
A Success?
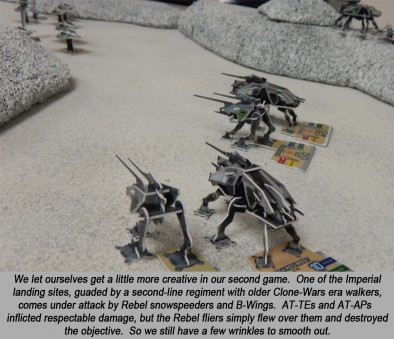
Of course, not all of our playtests have gone quite so well. In another Hoth game, we speculated about possible peripheral engagements fought in parallel with the main battle. In one, one of the actual Imperial landing sites (guarded by a reserve regiment equipped with older Clone Wars-era equipment) came under counterattack by Rebel snowspeeders and B-wing assault starfighters. This game showed us the danger of putting an all-ground force up against an all-flying force, even when the points are balanced. The Rebels simply flew over the Imperial AT-AP and AT-TE walkers and biker scout troops, taking respectable casualties but promptly blowing up the two Imperial landing ships (the objective) and winning the game by the end of Turn Four. So clearly we still have some work to do.
So what do you think, Star Wars fans? Post any questions, comments, or suggestions below. As we’ve said, this is a work in progress and any recommendations would be welcome.
Check out oriskany's rules and print outs for infantry in your games of Star Wars Pocket Models!
If you would like to write an article for Beasts of War then please contact me at [email protected] for more information!
"...did they just have a crazed Tauntaun on an overdose of energy drinks?"
Supported by (Turn Off)
Supported by (Turn Off)
"So we basically had Chewbacca and a Wampa slugging it out in the snow..."
Supported by (Turn Off)












Sounds like it worked out really well. It’ll be interesting to see how you handle land-based vs. fliers, though I think it would be hard to land a shuttle craft full of troops without air support.
Also at some point you need infantry! Did anybody ever produce 6mm tall Star Wars action figures?
Thanks, @frankelee . We totally agree re: infantry and have tried to address the issue of infantry on this related forum thread here:
http://www.beastsofwar.com/groups/sci-fi-gamer-town-square/forum/topic/star-wars-experimental-infantry-for-pocketmodels/
We actually tested them just yesterday in a Geonosis battle (battle droids vs. clones) and they seem to work pretty well. More testing is on the way, however.
When I was a youngun I used to have a great collection of Kenner Star Wars Micro Machines… they had quite a variety of little figures. Image search “micro machines star wars characters”
also check out:
http://www.starwars.com/news/making-the-galaxy-smaller-inside-kenners-star-wars-micro-collection-part-1
(@BoW can’t include images in posts?)
Aaohhh… wait a second… in my nostalgic haste I seem to have misplaced some memories. Micro machines weren’t made by kenner, they were made by Galoob. The article I erroneously linked was for the older Kenner line, which is not what I was talking about. The Micro Machines figures were far smaller than the Kenner line. Anyway, sorry about the double post. (@BoW no editing comments??)
Thanks, @neigh . I actually have a bunch of those old Star Wars Micro Machines in a coffee can at home, kept safely in stasis from that Dark Age commonly known to historians as “the Nineties.” 🙂 They’ve held up pretty well with one exception. The clear plastic stands that the ships would come on so they would like they were “flying” have turned a rather nasty shade of transluscent yellow, like a cheap beer bottle. 🙁 Of course scale was a problem (my Executor-class Super Star Destroyer is about the same size as my AT-AT) – but that’s a… Read more »
That was really good mate, enjoyed reading that would you be able to release the rules to us a download.
Thanks, @hawker2000 . I can sent a link to a youtube video that for the ORIGINAL rules, but we haven’t actually written anything down yet for our new table top version of the game. Shouldn’t be too hard, though. They really are the definition of simplicity. 🙂
Okay, @hawker2000 . . . I’ve been in touch with the BoW team and made sure I wouldn’t cause any legal issues if I published some house rules. I’ll start work on some semi-formalized rules booklet for Star Wars PocketModels. Stay tuned! 🙂
It looks like the Hoth game went really well. It certainly reflected the grinding, inexorable advance of the Imperial Walkers and the desperate Rebel defence. My favourite bit has to be Luke taking down an AT-AT just like in the movie, probably having just crawled out of the wreckage of one of those unfortunately over confident snow speeders. Though that is closely followed by the exploits of the hyperactive (perhaps force sensitive?) Tauntaun… All in all, it sounds like the game was a real blast, and even followed the events of the movie surprisingly closely. As for the problems of… Read more »
@vetruviangeek – Ran another game at the club today (Endor), where both sides had some air power, and the destruction of an inert target wasn’t the objective. In such a case, Imperial 501st Legion Stormtroopers had little trouble defending themselves from Rebel B-wings and even shot two of them down. 🙂
Just did some reading on wookiepedia and it appears that shoulder fire AA missiles were common for infantry. There were also dedicated AA vehicles and gun emplacements. I think making these units would alleviate the problem with fighting an all air enemy.
Thanks, @smithsco and @vetruviangeek . These air defense ideas are great, especially for the Galactic Civil War (GCW) era in Episodes IV through VI. After all, the Rebels have no good ground vehicles, and I’m finding that building GCW-era games is actually pretty tough without giving the Rebellion tons of flying units. The Rebels always had better fighters, after all, even if they were outnumbered 100 to 1. But no walkers, no tanks, no nothing, really. The problem is that if we give the Rebellion all flying units, the Imperials are now getting hammered all the time. Great for movies,… Read more »
the blizzard card could be E.C.M.s jamming the targeting computers good for any planetary system? @oriskany
@Zorg – that’s actually a really good idea, maybe not as a card as a general “special rule” for a given scenario, perhaps attached to a building or an objective or certain command vehicle. Scenario: Four X-Wings are swinging down to attack a small Imperial surveillance post on the Planet Zorg-1. 🙂 The ground installation is the target, but there’s a Nebulon-B class frigate in orbit broadcasting ECM/ECCM noise that gives all X-Wings a -2 to hit. So the Rebel player has the choice, do I go for the frigate to clear the way (the trade off being wasted time),… Read more »
No problem you could use a bit of Xmass tinsel to mark the craft or area being affected. LOL
“We can’t really make more cards because unlike new units (which have to look SORT OF like the existing units), the new cards have to look EXACTLY like the original cards, or your opponent will instantly see that you’ve drawn one of the new “house” cards. So long story short, we can’t rely on the cards. ”
Yes we can! What you need is a set of card sleeves with opaque backs. Then they will all look the same whatever is inside,
That’s a cool idea, @maledrakh . I have four decks of cards (one for each faction, Rebels, Imperials, Separatists, and Republic), each with about 40 cards. So roughly how much would 160 of these opaque-back card sleeves cost? 🙂
That was a brilliant report & close if you have time are you going to rerun the battle but attack on mass with turrets and speeders to see if the rebel triumph? @oriskany
Actually, yes, @zorg , thinking about re-running Hoth in the near future. This is because we’re experimenting with infantry units, which we didn’t have for this game. If we build a bunch of “Echo Base Hoth troopers” pieces for the Rebels, we might be able to run a more faithful recreation of the actual movie battle.
@oriskany – thank you for a simply brilliant article. The articles and support you have provided to us is inspirational. Now large Star Wars and Clone Wars actions can be played.
No worries, @ants . That’s what being part of a gaming community is all about. 😀
Is there a card for when Dack’s corpse gets squished into pâté? No seriously. The original cards could be replicated in a graphics program, then CTRL C and start inventing new ones and they’ll all have the same look…? Not trying to make work for you Oriskany 🙂 I’m glad the Imperials won, and in the manner in which they did. The best games are close to “history” but with a certain spin that makes each game (match not system) unique. This time around Veers got his bell rung and the lighter vangaurd units had to seal the deal. Awesome… Read more »
“Right now I feel I could take on the whole Empire myself . . . right up until I become AT-AT toe-jam . . .” I agree about the Photoshop, @amphibiousmonster , that’s how I’m making the bases for my new units . . . but to physically print cards that look exactly like the originals just isn’t possible. You draw cards from a stack and then hide your hand like in poker, playing them only when you want to. The opposing player can’t know what cards you have (although certain cards, like “Biker Scouts”, force your opponent to reveal… Read more »
Oh and there’s that gun emplacement that looked like a satellite reciever. again…not trying to invent work for Oriskany. :O
Are we talking about the Hoth ion canon? That wouldn’t be too hard, actually. Someone at the gaming club asked about it, too. If we ever-go back and try to run a “multi-level” Hoth battle (with star destroyers in orbit on a separate gaming board) we could build this without too much difficulty.
Ion gun is a big sphere. The rebels had a satelite-dish shaped gun emplacement. The guy is shown operating it with a wired remote. he shoots it, hits a walker in the knee, nothing happens and he’s like…”Damn.” I added that last part.
Oh, right. Those things, you’re right. Hell, those things would actually be pretty simple, only because of how small they are. The big white turrets are based off of 5/8″ wooden spools from the craft store, I think I have some 1/2″ or 3/8″ ones that would be perfect for that. A small circle for the “dish,” the clipped end of a toothpick for the laser projector, and a little dark gray paint. Probably a +1 to hit, but 0 damage (have to use with other units or combat cards to actually score any damage). This way it reflects what… Read more »
you can try to make one from a ping pong ball with a rawl plug / dowel for the gun barrel.
Might be a cool idea for sensor dishes, etc. Getting that “bowl” shape can be pretty tough.
I personally love the humor you put in your write ups. Battle/gaming write ups can be dry with necessary details, but things like “thousands of ewocks throwing pine cones” for an Endor blizzard and Taun Taun on energy drinks make it fun to read. Keep it up.
Say what? Reading about other people’s games can be dry? **gasp** No! Almost as dry as slide shows of other people’s vacations, you mean. 🙂 Seriously, though, thanks for the positive feedback.
Okay, @vetruviangeek (and others), your ARC troops have been made to order. 🙂
http://www.beastsofwar.com/wp-content/uploads/forumfiles/sw-infantry-post-01.jpg
Also, some CORRECTIONS, REVISIONS, and ADDITIONS have been made to the Clone Troopers, Stormtroopers, 501st Battalion clones and 501st Legion Stormtroopers.
Feel free to download and use. Warning, these haven’t been playtested very much yet.
More content on the way. 🙂
Great stuff. Now my battlefield can be graced by colour coordinated clone commando hard cases. 🙂
Awesome. If you use them, let me know how they “did.” I’ll be using my Galactic Civil War era infantry pretty shortly, but it’s gonna be a while before I can playtest these new Clone trooper guys. 🙂
Once I have the necessary bits and peices, and if I can find the time and an amenable opponent, I will be sure to give them a spin.
Cool deal. Here are some Jedi and Sith to use in your experimental battles. 🙂
http://www.beastsofwar.com/wp-content/uploads/forumfiles/sw-infantry-post-02.jpg
ARC Troopers and Force Users? Could a Starwars fan ask for anything more? 🙂
Anything else we could ask? How about a Star Destroyer to scale and a new garage to store it in? 🙂
Well, now that you mention it…. 😉
…two hundred and fifty turbo laser…BATTERIES.
two hundred and fifty tractor beam…BATTERIES…..
Whoa, whoa. I said Star Destroyer . . . not Super Star Destroyer. 🙂 The link below has a screen capture from the old West End Games “Imperial Sourcebook”, showing the stats for an Executor-class super star destroyer. Back in early 1991, we were playing some heavy Star Wars RPG and got to the end of a campaign and I needed a huge “boss” battle to dominate the campaign climax. So I rolled out a super star destroyer, and started reading the stats out to my cringing Rebel friends. “Th-th-that doesn’t sound too bad,” they quaked. “250 turbolasers? 250 heavy… Read more »