


Make The Game Your Own! Star Wars Ground Minis Part 3
October 6, 2014 by crew


In our continuing series on “Make the Game Your Own: Star Wars Ground Minis,” we’ve been looking at a conversion of the old Star Wars PocketModels TCG into a miniatures wargame. So far we’ve talked about the basic conversion and reviewed some play testing results for the Battle of Hoth. In this article, we’ll expand the discussion into the “Prequel Era” and also look at multi-level games, where combat on a planet’s surface is coupled with a simultaneous engagement in orbit.
A Prequel Battle!

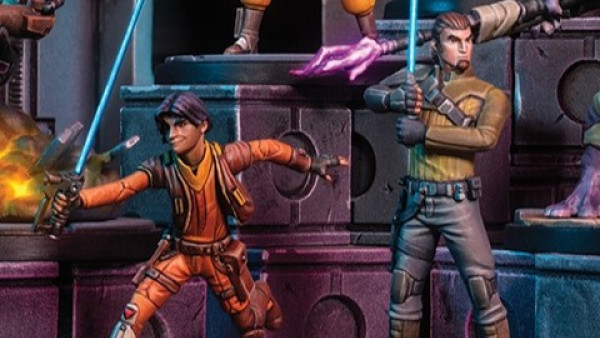
It’s no secret that many Star Wars fans hold Episodes I-III in dim comparison against the original Episodes IV-VI. So why recreate them in a wargame? Firstly, the PocketModels packs are “blind buys,” so anyone who collects them will get loads of prequel-era units anyway. Second, a lot of the prequel vehicles look pretty cool (despite the movies they’re in), so why not use them? Third, it’s much easier to set up a “balanced” large-scale wargame between Separatist and Republic forces in the Clone Wars than it is between the Empire and the Rebellion twenty years later. This is especially true in light of all the great “expanded universe” material that’s been produced for the Clone Wars era. For these (and many other reasons), we decided to set up our next series of play tests at the end of Episode II: Attack of the Clones, recreating the Battle of Geonosis.

In this game, the Grand Army of the Republic had just landed powerful forces on the surface of Geonosis, a remote but key Separatist world vital to the production of their droid-based army. The Republic’s objective was a massive droid foundry complex, where a pair of C-9979 class landing craft were trying to take off with key Separatist leaders, plans, and materials. A pair of huge Trade Federation battleships loomed in orbit, ready to cover the Separatist escape from the approach of several Acclamator-class planetary assault ships. In game terms, the victory conditions were simple. The Republic had until the end of Turn 8 to destroy the two landing ships, which could not move or fire. If they didn’t do so, the Separatists won.

While the battle would ultimately be decided on the ground (where the landing craft were), the orbital battle had to play a key part in the overall outcome. All the same, we didn’t want the orbital battle to be the sole decisive factor, with the winning side’s capital ships and fighters free to rain destruction on opposing ground forces. In particular, we didn’t want the Republic’s assault ships to be able to simply pound the Separatist landing ships and end the game before it began. The overall aim was to keep the importance of the two games balanced.
Accordingly, we agreed on some rules whereby fighters launched from capital ships could spend an activation to switch boards, either from the orbital board to the surface board or vice-versa. They could do so from any spot on their current board, but always appeared in their respective side’s “reserve zone” on the new board. This transfer constituted their entire movement phase.

Capital ships, meanwhile, could never enter the atmosphere (yes, Acclamator-class assault ships can actually land, but we were trying to keep this game balanced). Capital ships could hit targets on the surface board, however, regardless of range or line of sight. To compensate for this “finger of God” approach, and because the capital ship weapons were extremely powerful, we applied a -3 to hit penalty for capital ships shooting from space. This also accounted for things like atmospheric refraction, ranges of 200+ kilometres, and the difficulty of hitting walker-sized units with weapons designed to engage star destroyers. This resulted in a game where capital ships could rarely hit a ground unit, but vaporized anything they did hit. Ground units, meanwhile, could never engage anything on the space board, but could easily shoot down fighters that entered the surface board.
Both sides started the game with about twenty stars in both their ground forces and orbital fleet. This basically resulted in a “double game,” so we added extra poker chips to the bag for our alternate initiative mechanic. The Republic fielded four AT-AP walkers, three AT-TE walkers, and one massive HAVw A6 Juggernaut “turbo tank.” The Separatists squared off with five huge OG-9 homing “spider droids” and three NR-N99 droid tanks. In space, the Republic vectored in with three Acclamator-class assault ships and four flights of Eta-2 Actis “Jedi” Interceptors, one of them flown by Mace Windu. The Separatists were ready with two of their mammoth Trade Federation battleships and a swarm of Vulture droid fighters.

As we’d done for our Hoth battle, we moved and fired five “build stars” worth of units with each activation. Ground units and capital ships could move six inches and fire, while speeder, air, and fighter units could move twelve inches. Weapons range was always twelve inches, with the attacker getting a +1 to hit if the range was three inches or less.
The action started off violently on the space board, with the ground board remaining quiet for the first few turns. This may have been because I was having difficulty getting my Republic forces through a narrow valley, while my Separatist opponent was content to await my approach. On the space board, however, my Republic ships came off very badly. While my Jedi Fighters did well against the first wave of Vulture droids, a second group of Vultures swung around my left and hit Yoda’s flagship in the flank, destroying it instantly with a well-placed torpedo strike. I hope Yoda had an escape pod, or we just caused some serious plot issues for subsequent movies.

Another problem I had was the sheer firepower of the Trade Federation battleships. True, I had them outnumbered. But bad dice, good play by my opponent, and the handy playing of some droid-themed battle cards (the General Grievous card had a “grievous” effect on my last assault ship) quickly had my fleet reduced to a planetary ring of debris. My last-ditch effort to shut down the droid fighter force (and thus protect my ground troops) was a playing of the Anakin Skywalker card. In true “falling to the Dark Side” style, this card gives +3 to hit, but inflicts +1 damage to both your target and yourself. To make matters worse, I played this on a Jedi Fighter that was already damaged, so Anakin’s fighter destroyed itself to take out the last of the droid fighters. So Yoda’s down, Anakin’s down (which means no Luke or Leia in later movies); at this rate the last throne room scene in Return of the Jedi will be between Ewoks and a Jawa Sith Lord. “Give yourself to the Dark Side...or buy some droids, whichever you like.”
On the ground, the battle was going much better for the Republic. I found that selectively shooting apart droid formations (and leaving surviving units widely scattered) to be a handy tactic. Remember, in order to keep an approximation of the original TCG’s “zone” mechanic, we’re stipulating that when you spend an activation to move and fire your five “build stars” of units, they have to be within six inches of each other. Thus, by knocking out part of each five-star battle group, I was leaving the remainder “stranded” until they fell back and regrouped.

Still, my opponent kept forces between my walkers and the landing ships, even after I pulled my last two Jedi fighters to the ground board and started strafing surviving droid tanks. Things really got bad when the Separatists scored not one but TWO lucky hits with their orbital bombardment rolls (the two Trade Federation battleships were still looming overhead, remember), incinerating my Juggernaut tank and one of my AT-TE walkers. I played the “Reinforcements” card which helped bring a new AT-PT up from my reserves, and finally brought the landing ships under fire. But these ships have a high defence rating and can take plenty of hits, and although they were both heavily damaged, both were still in play at the end of Turn 8.
Using The Force!

On my very last activation, I had just my two Jedi fighters left (other surviving units had already moved this turn). Both Separatist landing ships had just one hit left, so I had to score one more hit on BOTH ships to win the game. I swear I could almost hear the “Obi-Wan Force” theme in my head as these fighters split their attack, each Jedi fighter going for one landing ship. The rolls were extremely difficult, and the odds of making them both were all but non-existent. But if I believed in the Force, trusted my instincts, and “stayed on target . . . stayed on target...”

Nope. I destroyed one landing ship, but missed the other. Thus, on the very last roll of the game, the Separatists had one hit left on their last landing ship, and walked away with a razor-thin, laser-scorched, blood-soaked victory...the very best kind if you ask me.

As always, we’re still experimenting. I now have some Republic drop ships scratch-built for my AT-TEs, and the link below leads to a forum post where we’re experimenting with true infantry units to add to our PocketModels games. So let us know what you think. Comments and suggestions are more than welcome.
Check out oriskany’s rules and print outs for infantry in your games of Star Wars Pocket Models!
If you would like to write an article for Beasts of War then please contact me at [email protected] for more information!
"I hope Yoda had an escape pod, or we just caused some serious plot issues for subsequent movies..."
Supported by (Turn Off)
Supported by (Turn Off)
"...if I believed in the Force, trusted my instincts, and “stayed on target...stayed on target...”"
Supported by (Turn Off)


Heh, the results of the space battle sound about right to me – those Acclamators were pretty much good for one thing only – delivering a gazzilion clones to the battlefield along with the necessary ground and speeder support they needed in order to wage war. They weren’t exactly carriers and they weren’t designed to go toe-to-toe with anything the CIS had that was bigger than a frigate. It wasn’t until they started bringing in the 170s and the Venators that the Emp..er.. Republic finally had some decent hitting power.
..and yet, I really LOVE those flying wedges 😀
I have to say, though, that I’m kicking myself for not thinking about using the Pocketmodels line back in the early days of my Star Wars RPG campaign. Throwing the players into a mass combat scenario would have looked a lot more exciting!
http://www.freewillstation.net/StarWars/101and118.jpg (Legion-level)
http://www.freewillstation.net/StarWars/118th.jpg (3rd Regiment in action)
Dude, don’t knock those maps of yours, they are awesome. Is it weird that I would probably get MORE into a sci-fi wargame that looked more like yours than these PocketModels? I especially like the actual NATO military symbols on your “Legion-Level” theater map, and then the hex grid on your tactical map. Like they say on “Armymals” . . . “hexy is sexy!” 🙂 And is that Star Wars “Basic” language script at the top a font you can download somewhere? Yeah, I don’t have any Venator ships yet, I might have to build some on my own if… Read more »
Yup, it was the Aurebesh font which you can download from a number of places (although I don’t recall which of the many sites purporting to offer it were genuine.. there are lots of dodgy font sites around it seems so I won’t risk posting up any links!) As for the NATO symbols it was a bit of a fudge but I knew that a few of my players were into those high-level wargames so I figured they would dig it while we tried out the mass combat rules. Said rules were pretty clunky, it has to be said, but… Read more »
Thanks, @siygess . — “Yup, it was the Aurebesh font . . .” Awesome. I will check it out. — “As for the NATO symbols it was a bit of a fudge but I knew that a few of my players were into those high-level wargames so I figured they would dig it . . .” I probably would have been one of them! 🙂 — “Of course, it wasn’t until the cordon of droids started to fail and the Lucrehulks started to bug out that the course of the campaign veered off from the straight-up military campaign the players… Read more »
Any chance you’ll give us a .pdf of the final rules when you guys are done with them? I’m itching to play this so bad.
Okay, @darthp00p00 . . . I’ve been in touch with the BoW team and made sure I wouldn’t cause any legal issues if I published some house rules. I’ll start work on some semi-formalized rules booklet for Star Wars PocketModels. Stay tuned!
We’ve had a couple requests for that. Hopefully I’ll be able to get started on a consolidated rules set, once we complete one or two more small series of games . . . because these new series are actually adding and testing new facets to the rules. The Hoth games were a test for the basic miniatures mechanic. The Geonosis games were test for the dual-board multilevel battles, as well as the new clone war era units. Future games will test new infantry units, dropship units, new terrain, and even jedi. Eventually we’ll reach a nice stopping point, and talk… Read more »
I am looking forward to future installements of this series of articles that let us see how infantry, dropships and ‘hero’ jedi/sith units pan out on the tabletop.
In particular, I am interersted in the performance of the ARC Troopers and a certain bald lady force user notable for twin red lightsabers and husky tones…
You know who I mean, right @oriskany…? 😉
Why no, @vetruviangeek , whoever could you mean? 🙂
We haven’t tried ARC troopers or Jedi yet, but the 501st and dropships have been tested and have performed well . . . almost too well. We’re always making small adjustments as we go. The results are coming up in a future article(s). 🙂
@oriskany – another brilliant article. Thanks. Would be interesting seeing it re-played but including infantry and Clone gunships.
Thanks, @ants . We’ve actually run a Geonosis side-battle specifically to test the clone infantry, B1 battle droid “infantry,” and the Republic drop ships. I had hoped to put it in this article, but it was already way too long (thanks as always to @brennon for giving me a little elbow room on the length limits on these articles 🙂 ). If there isn’t room for it in a future article, I can always post it in a forum thread. The battle worked well, though. Like I was telling vetruviangeek, those infantry might have done a little TOO well .… Read more »
Well that was some battle definitely a game of two half’s (are you contacting George) to say he is going to have to re film the later films? LOL
“George” is no longer on my mailing list, @zorg. 🙂 Although I do have a small shrine to J. J. Abrams in my house, where we sacrifice small animals to him in the hopes that he somehow saves our beloved franchise with Episode VII.
no no no, don’t sacrifice small animals, sacrifice prequel action figures and lens flairs!!
I would accept all the lens flares in the world in exchange for no characters like Jar Jar Binks. 🙁
What’s wrong with jar jar just a happy go lucky chap down on his luck??? LOL
You can’t hate an animated character, true. But the number of loathsome things he represents (both “inside” and “outside” the movie) would have to be listed on another whole forum thread. 🙁
A great article @oriskany – another close fought battle, and this one came down to pretty much the last dice roll. That is the stuff of which wargaming legends are made.
The space and terrestrial combat mechanics seem to be working together exceptionally well, and I feel that you have really nailed the representation of starship weapons on the ground battelfield; innaccurate as all get out, but the last word in burny-laser-death if they do hit anything.
Thanks, @vetruviangeek . In regards to the orbital bombardment rules, we are guided by one ironclad principle . . . keep it friggin’ simple. Our group plays very complex, realistic, data-intensive, and historically accurate wargames . . . So when we play sci-fi, it’s because we want a nice, light, quick, easy break. Yeah, I just couldn’t believe the Separatists’ with not one hit with those Federation battleships . . . but TWO. I was actually kind of counting one one (three turns left in the game, two ships so six rolls, they basically needed a 11 or 12 on… Read more »
Great article, love the play by play. Its hard to admit that the prequels have anything cool, but damn those ships are powerful. Thanks for all the great ideas, the Beast of War crew is happy to steal all your hard work 😉
No one’s “stealing” anything, I assure you. It’s a fun opportunity. 🙂
No force required but it may help? LOL
https://uk.yahoo.com/movies/the-epic-anti-spoiler-poster-on-the-star-wars-episode-99349678877.html
Very funny, @zorg . On a related note, I just saw the premiere of the new animated “Star Wars: Rebels” and it was actually pretty good. Better than 90% of the Clone Wars episodes, actually. None of the insulting prequel material (Jar Jar, etc.). A jedi explains the Force to a new character and never mentions the hated word: meticlureans,” as well.
Of course, it was still a Disney animated cartoon, but still . . .
I loved the clone war series the ones I have seen.
Some of them were really great, @zorg . I think my favorite is still S2/E5 = Landing at Point Rain. Kind of like Star Wars meets Saving Private Ryan. 😀 Probably the “bloodiest” piece of Star Wars I’ve ever seen (well, except for the destruction of Alderaan, technically).
I will have try and catch that one, I thing the scrip’s were better on clone wars than the first three films to immature for a supposedly serious film.
Yeah, @zorg , you’re right about the Clone Wars cartoon being written better than the movies. As we watched the animated series, my girlfriend and I must have yelled at the screen a dozen times (no exaggeration) . . . “Augh! Why weren’t the MOVIES like this?” 🙁
and on that note over to George??? LOL
Good write up on a kickass battle, Oriskany. I want to remind everyone this guy has a more-than-full time job and he still finds time and energy for all this. DAMN!. I don’t know how you do it, Oriskany. The write up is cool and I always love it when “history” gets messed up in a game. You haven’t done anything a video game hasn’t done billions of times. Hell, remember, I did good as the Soviets in the ’39 war… so ANYTHING’S possible. siygess, I love your maps too. Sometimes your RPG gets so big, or your characters are… Read more »
Thanks, @amphibiousmonster . That’s why mankind invented weekends. 🙂 And the six hours when you’re not sleeping or working . . . you gotta squeeze that time for every drop of blood its worth. As far as “messing up” the history of Star Wars goes, fans will note that we weren’t quite as careful with the design of our Geonosis game as we were with Hoth. “Historically,” Yoda was on the surface commanding battalions of stormtroopers . . . (“Oh, great warrior! Wars not make one great!” — Oh, Yoda. What happened to you? Reason #964 to hate the prequels)… Read more »
After reading about how the republic got torn apart in space I read about the actual battle of Genosis (can’t believe I just wrote that) and the republic literally flew tanks in the space battle. Also they jammed cis comms. Is there any card that would allow you to do that?
“Republic literally flew tanks in the space battle.” You’re kidding me, @smithsco . No seriously, are you pulling my leg or taking a good-natured jab at my photos? 🙂 I say that because we didn’t have any Jedi fighters for our space battle . . . but I have about 10 of what they call “Jedi Fighter-Tanks” (wtf?). So we used these instead of fighters, and that’s actually visible in some of the article photos of our space battle. You’re telling me that we were actually CORRECT, the Republic actually flew “tanks” in the space battle? That’s gotta be one… Read more »
Not kidding. My jaw dropped when I read that on wookiepedia. http://starwars.wikia.com/wiki/TX-130_Saber-class_fighter_tank Apparently after taking casualties from planetary defense artillery, the Jedi flew a few of these past the defenses and landed them on the planet and destroyed most of the artillery. So yes you were actually correct in using tanks. On a side note, how did the CIS command structure not become aware of the Jedi when their fighters and artillery started blowing up. I get jammed comms but wouldn’t you get suspicious if none of your comms were working and there were explosions and stuff. It really makes… Read more »
Well… yeah. Not everything in the EU is golden and some of it is out right ludicrous.. to be enjoyed but not taken seriously (in as much as you can / should take anything in Star Wars seriously! :D) Mind you, when you consider the three main problems the CIS had, it becomes easier to explain away some of the weirdness: 1) In the early part of the war, the bulk of their fighting force were droids and most of *them* were were dependent on a central C&C system and couldn’t operate without it. It’s the whole ‘hit it in… Read more »
I just struggle with the fact that no underling went to Dooku or Nute and mentioned that planetary defenses were engaging 200+ Jedi spacecraft. I don’t think there is any excuse or justification for that. I can live with and enjoy a lot of the holes in the films and EU but this is the one that gets me mad out of all of them.
That is true, @smithsco and @siygess . In the movie, the arrival of the whole Republic invasion fleet and ground force is a complete surprise. All the Jedi are surrounded in the arena and about to be executed . . . and then BAM! Here comes Yoda and the 1st Air Cavalry Division (all they were missing was “Ride of the Valkyries” from “Apocalypse Now.” But remember: “Wars not make one great!” 🙁 I don’t even remember there being an orbital battle, but I assume there was one in the EU or the novelization of the movie. Even villains as… Read more »
Good information on the Separatists and the CIS being two different entities, @siygess . I actually never knew that. (Wait a second, isn’t the CIS what they were calling Russia and the federated former-Soviet republics for a while? Oh, George . . .) Anyway, I always have to remind myself that Dooku and the Palpatine, the two “enemy” leaders in this huge war, are actually working hand in hand. Dooku probably never wanted the CIS and Separatists working together too well (or even the megacorps within the CIS) because the ultimate aim of this Sith Lord and Sith Apprentice was… Read more »
Yeah, the Separatists were basically a bunch of Outer Rim systems who were fed of being in the Republic because they were always getting attacked by pirates and the like and the Republic wasn’t helping them because they didn’t have the resources to intervene. Thus, the wealthy factions who had significant holdings in those systems started to arm themselves.. initially to protect themselves.. but as those defence forces began to grow and become private armies, the Republic started getting antsy. Partly it was because they would prefer to maintain the status quo where nobody had a large standing army and… Read more »
Now see, @siygess . . . why are the Clone Wars never covered in this kind of detail in the movies? This is actually interesting, it makes sense, doesn’t include a stupid kid pod-racing, or a nonsensical and clumsy attempt at a . . .*ahem* . . . “love” story. Furthermore, it seems to present plenty of moral ambiguity and “catch-22s” where a certain noble Jedi Knight might get caught up in an impossible situation and find himself seduced by the Dark Side to become . . .
. . . oh, never mind. 🙂
Following this game with interest. Have just bought 15 packs of Ground Assault in readiness for the completed rule set. Debating getting another 15 ‘just in case’ !
Awesome, @ork56 ! I have one or two more articles to write, but I’ll try to start putting these rules on paper at the same time. 🙂
Okay, @ork56 . . . I’ve been in touch with the BoW team and made sure I wouldn’t cause any legal issues if I published some house rules. I’ll start work on some semi-formalized rules booklet for Star Wars PocketModels. Stay tuned! 🙂
Siygess, the plot to your RPG sounds really cool and fun.
Heh, thanks. There was certainly enough material to run a campaign that lasted more than a year, spanning from the opening shots of the Clone Wars to a finale taking place during the chaos of the CIS invasion of Corruscant at the start of RotS.
And one of the packs has an Imperial Star Destroyer in it! It’s huge!
But Tauntaun are tiny…
Do you ever add a spot of glue to your minis, once assembled, to keep them all together?
Absolutely, @ork56 . The worst offenders are:
Tauntauns
Speeder bikes
Droid tanks (the ones from Episode 2 that look like little black snails).
I also find that lightly rubbing the tip of a pencil or a toothpick in the slots and groves is sometimes helpful (opens them up just a tenth of a millimeter) when the pieces just don’t want to squeeze together right.
I found that the damage counters are just the right size to slide into the slots to widen them up just a hair.
Oriskany, Imagine the sales you’d generate for a game still in print. 🙂
They’d have to hire me, @amphibiousmonster , at least temporarily as a design or marketing consultant. Which means I’d have to quit my present job. Which means they’d have to match what I make now. Not to be “that guy,” but I’m not sure most gaming companies could afford me. 🙂 i won’t lie, though, the “new job” would be more fun.