


The Road To The 2015 Warzone International: Part Two
May 11, 2015 by crew


We're on to week two and I'm already having doubts about the two lists I have drawn up, which are largely about completing the missions and not so much about handling my opponent. As you will see when we get on to the missions it is quite possible to get a Partial Victory by simply wiping out your enemy and right now my biggest concern is dealing with lots of Rapid Deployment; particularly big scary things that will drop into your back line and are tough enough to cause havoc for the rest of the game. Hmm...

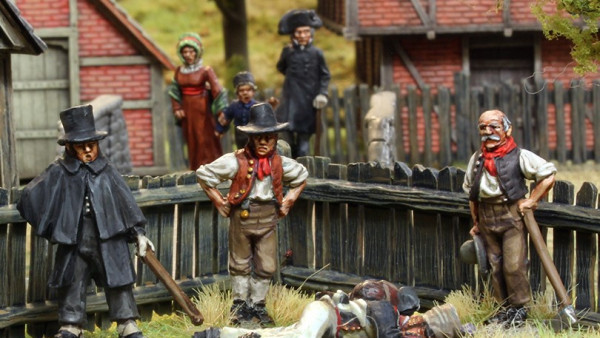
Things aren't set in stone just yet, however, as I've only had time to do the bases. That means I have four large bases, one medium base and twenty eight small bases ready to accommodate the miniatures in my two lists. Are there three Vulcans in one of my lists? Maaaaaybe. The important thing to remember is that your two lists must share the same warlord and troop choices, although their composition, as well as support and light vehicle changes, may be altered freely.
So, pushing aside my concerns about Cybertronic Scorpions falling from the sky on turn one, let's start to take a look at the seven missions in the official tournament pack. Each mission will be played out on a 4x4 board and can only be played once, so it's going to be tough to handle them all with only two lists! A Major Victory will net you ten mission points, while a Partial Victory will net you five. There are also Hidden Agendas, secret missions that you can decide upon before the start of the game and successful completion will net you a further five mission points although we will cover these later:
Mission 1: The Advanced Base
Deployment Type: Battle Line (Each player has the full width of a table edge to deploy along, with a deployment zone that is six inches deep).
The objective of this mission is, from the end of turn four onwards, to have at least one squad wholly within eight inches of the objective marker while there are no enemy models within twelve inches of that marker to contest it. The objective marker will always start the game between one and five inches from the centre point of the table, scattered in a random direction.

There are three things to consider here...
1) Which units cannot 'control' this 8 inch zone around the objective marker? Nothing is specifically mentioned in the tournament pack but according to the standard mission rules, the only global restriction is Heavy Vehicles, which doesn't matter in this tournament since we are using the 'Standard' Offensive Organisation Chart which does not allow them. Referring to the main game rules, we also see that a unit that has failed a Break test is similarly unable to interact with objectives or hold table zones.

Within the Bauhaus force list no squad is explicitly prevented from doing so although in other lists there are units such as the Brotherhood Mortificators who have a passive skill that prevents them from interacting with objectives or holding table zones. This means I can use any squad in my list to try to complete this mission objective.
2) As with all of the tournament missions - the Major Victory can only be triggered from the end of turn four onwards. While a partial victory can be achieved if you have the most units within 8 inches of the objective and you reached the end of turn eight with no clear winner (also known as a 'Disengage') or if the game runs out of time, if you want a Major Victory, you might have to hold on to that zone for several turns.
Sneaking a last minute Rapid Deployment into the area at the end of turn 4 is unlikely because at the start of each turn, you only have a 50% chance of holding your Rapid Deployment squad in reserve for another turn. If you have an army that is entirely comprised of squads with Rapid Deployment, you might get lucky, but for most people, bringing a unit onto the table at the very last moment is going to be tricky.

So, if you are going to hold on to that zone for several rounds, you need a squad that is either big enough to soak up the casualties (a maximum sized squad of troops, for example) or tough enough that it can soak up a lot of incoming fire, yet reliable enough that it won't break and run after only one or two losses. Tiger Dragons, with their Flesh into Stone ability, would make for a tough unit to dislodge but as I'm playing Bauhaus, Vulcan Walkers or Juggernauts are both good choices as they are resilient and can put out plenty of ranged attacks.
If you are going to try and clear the zone out from a safe distance and rush in a unit at the last moment then a fast squad like the Capitol Purple Sharks are ideal for this as these tree-top terrors can move in excess of 20 inches...although a large squad of Sharks might have a problem fulfilling the "wholly within" requirement because if one Shark's base doesn't quite sit entirely within the eight inch zone, it won't count.
For that reason, rushing in smaller one or two person squads (even your Warlord) might be better although you will need to have cleared out the twelve inch 'outer' zone before moving into position. Putting your Warlord within ten inches of a squad of enemy Ronin who haven't activated yet is just asking for trouble!

Personally I think a minimum sized Bauhaus Vorreiter squad is the best unit for the job if I'm going to take this approach because those bikes are nearly as agile as the Purple Sharks and since they aren't quite as good on the offense as their Jet Bike counterparts from Capitol I am less likely to have committed them to a shoot out earlier in the game.
3) How do you keep the enemy out of that twelve inch zone around the objective? Most factions have squads or cards which will offer up some kind of area denial that will help to keep the enemy at bay. All squads have the ability to utilise the Sentry Action, a kind of overwatch that allows a few members from that squad to react to an enemies activation or action point usage.
Placed on a model with a high rate of fire (RoF), this can be very effective. Some squads have an ability - or access to weapons which grant them the ability - to perform a Suppressive Fire action which will punish an enemy squad that wants to move more than 2 inches. Don't forget that flamers can create an eight inch long wall of fire that will last until the end of the turn which most squads will be reluctant to move through. These are just 'conventional' responses to troops closing in via 'conventional' means however.

What if your opponent does manage to keep a squad in reserve for Rapid Deployment until turn four, or what if he has a unit such as the Mishima Shadow Walkers and there is terrain near (or within!) the twelve inch zone? I think the key here is careful placement of your miniatures. To reduce the effectiveness of a squad that must be placed in the open (e.g. not within, or in base to base contact with) light, heavy or impassable terrain such as squads with those with Rapid Deployment, space your guys out.
Don't forget that models count as impassable terrain, and most tokens with structural points - SP - count as light terrain too. Even the wrecks of your vehicles can be used to deny a safe landing spot to your enemy. For units that function in a manner similar to Infiltrate (must be placed within - including base to base contact with) light or heavy terrain, this is trickier.
The Power Of The Sentry
Sentry Mode is your best bet since it is easier to 'cover' a portion of the table that has terrain than an portion of the table that is entirely open but remember that in this case any tokens you have placed (with SP) or vehicle wrecks you have will count against you. If the opponent's squad is specialised in close combat, be prepared to sacrifice a squad to 'screen' the zone but remember that many close combat squads have flame-thrower like attacks.

Finally, don't forget that Sentry Mode only lasts until the following Control Phase, so at the start of turn four, even though your opponent will have to announce that he will place his Valkyries this turn via Rapid Deployment or his Shadow Walkers via the placement of their tokens, if you don't win the initiative roll , your opponent will be able to deploy and utilise that squad before you have a chance to start putting your squads back into Sentry Mode again!
The Warzone Resurrection 2015 International Championship is being held at the UK Games Expo in Birmingham on the 30th and 31st of May.
If you would like to write an article for Beasts of War then please get in contact at [email protected] for more information!
"...let's start to take a look at the seven missions in the official tournament pack."
Supported by (Turn Off)

Supported by (Turn Off)
"Putting your Warlord within ten inches of a squad of enemy Ronin who haven't activated yet is just asking for trouble!"
Supported by (Turn Off)


MOAR
Worry not there are at least another 5 parts to come, plus a follow up once the tournament has been and gone!
disregard below question.
Also will there be a post tournament list analysis?
I’m planning on getting along to the Games Expo at some point over the weekend. There are a few games I like the look of but know nothing about. Warzone is on that list.
Great Stuff Mate!
Another great article and sweet looking bases. I also like how the objective isn’t pre-fixed, but can shift a certain distance in a random direction.
Rapid Deployment with Vorreiters? Are they going to use the tournament rules, that will resctrict RD unit on max 200/1000 points?