


World War 2.5 – Gaming An Alternate History [Part Two]
February 23, 2015 by crew


Backstage Rules Pack Download
We’re back for another look at our “World War 2.5” article series, postulating the grim possibilities of an “Allied vs. Allied” war in the immediate aftermath of World War II. If you’re just joining us, the premise, scope, and objectives of the project were outlined in Part One of our series, along with some of this hypothetical war’s first engagements. Have no illusions, this could have happened. The Western Allies and the Soviet Union were the bitterest of rivals until Hitler attacked the USSR in 1941.
Through 1945, many important figures (including some heads to state) were certain such a conflict was in the cards. Armies on both sides had contingency plans quietly locked away in desk drawers “just in case.” And if you think the world was just “sick of war,” consider Greece, the Middle East, Malaya, Korea, the list goes on and on.

It is 04:00 hours on June 4, 1946. After three days of combat, the situation for the Western Allies does not look good. In the south, elements of the Soviet 1st Guards Tank Army and 5th Shock Army have smashed into the “Fulda Gap” in front of Würzburg, taking hideous losses in some of the largest tank battles since Kursk. But the American 2nd Armoured Division (and part of the 7th) have been effectively smashed, opening a potential breakthrough toward Frankfurt am Main.
This development is especially worrisome since a breach here would doubtlessly imperil the left wing of Patton’s Third Army fighting further south in Bavaria. The Soviet 1st Southwestern Front has also scored successes against General Hasso von Manteuffel’s newly-formed “Bundeswehr,” where a combination of tank, infantry, and even airborne forces threatens to cut off Nuremberg. Could a new “Stalingrad” be unfolding here in West Germany?

To the north, the Soviet 1st Northwestern and 1st Western Fronts have invaded Lower Saxony. Their first operational objective is Hannover, gateway to the Weser River and the industrial cities of the Ruhr. But while the initial Soviet attacks in the south were spearheaded by guards tank corps and followed by infantry, here in the north the Soviets reverse the pattern. Instead they lead off with “expendable” rifle divisions of the 2nd and 3rd Shock Armies, followed closely by elite divisions of the 8th Guards Army (the same men who once defended Stalingrad).
Reinforced by independent guards tank regiments, their mission is to storm the cities of Wolfsburg, Salzgitter, and Göttingen. Once this line of strongpoints has fallen, fleets of swift T-34 medium tanks (organized into tank and mechanized corps) will pour through the gaps and encircle Hannover from the north and south.

The Soviet plan, however, doesn't quite work. First of all, the 50th Northumbrian Division (who landed at Gold Beach) repulses the attack of two guards rifle divisions at Göttingen in a furious two-day battle. Wolfsburg and Salzgitter eventually fall, but these battles cost the Soviets heavily and last almost a week (the Soviets need two full “WW 2.5” turns to take the towns, each turn is three days). The delay allows the British to deploy the 51st Highlander Division into the Harz Mountains, and the 3rd Canadian Division (Juno Beach) into the gap between Wolfsburg and Salzgitter.
Only when Salzgitter finally falls on June 5 can the Soviets commit their breakthrough forces: the 300 tanks, 2,000 vehicles, and 35,000 men of the 9th Tank and 8th Mechanized Corps. Their mission is to race through the breach and pivot northwest, forming one wing of the encirclement the Soviets hope to throw around Hannover. Their late start, however, has allowed the British to mobilize armoured reserves, and the British Guards Armoured Division and 31st Tank Brigade are soon moving to check the Salzgitter breakthrough.

What the British don’t know, however, is that the Soviets have already been watching this crossroads, thanks to a pair of BA-64 armoured scout cars. But these scouts apparently can’t get close enough to fix the exact locations of all the Cromwell tanks, some of them hull-down in hedges awaiting the Soviets in ambush. As the lead Soviet T-34/76s make their rush, these Cromwells open fire and the first Soviet tanks blow up.

As more T-34/76s pile onto the board, followed by a contingent of T-34/85s and SU-85 assault guns, the weight of fire starts to tell and soon the Cromwells are starting to burn. The British Comets respond, racing into position and drilling T-34/85s with longer-ranged fire from their 17-pounders.

But Soviet numbers (not mitigated by the disappointing first round of British ambush fire), soon have these Comets in trouble as well. Normally these swift British cruiser tanks would use “Fire and Manoeuvre” order to fire into the Soviets and then fall back, but the heavy armour reinforcements still haven’t arrived and the T-34s (almost as fast as the Cromwells) could reach the objective bridge in the meantime. Thus, the light cruiser tanks have to stand and fight in a hopelessly outmatched slug-fest. Luckily for the British, however, they have an ace up their sleeve.

The timely arrival of British a “Typhoon” fighter-bomber helps the British turn the tide. But even as a second “Tiffy” is chased off by a Soviet LaGG-3 fighter, the heavier armour of the Coldstream Guards finally arrives. Churchills, Challengers, and even an A43 “Black Prince” cross the vital bridge to bolster the disintegrating screen of lighter Cromwells and Comets.

Once the heavy British infantry tanks are across the bridge, the Soviets are finally broken. They've lost too many units and too much time clearing the cruiser tanks. The Churchills are too heavily armoured for the last T-34/76s, and the 17-pounders of the Black Prince and Challenger quickly seal the solid, if bloody, victory. Assuming the rest of the Guards Armoured Division’s engagements against the 9th Tank Corps took a similar course, the Soviets are going to have to find another route if they want to encircle Hannover.

Down in the south, meanwhile, the situation is looking far better for the Soviets. Having suffered hard reverses in the Fulda Gap and along the Ussel River, the Americans and West Germans are unable to prevent the city of Nuremberg from being sliced off from outside communication and supply. An entire American division and several German brigades are now trapped in a small and shrinking pocket. By June 8, 1946, the Americans actually consider using the A-Bomb to redress this desperate situation, but to do so would doom the Allied garrisons in West Berlin, still surrounded by Soviet forces in East Germany. Fortunately for the Americans, however, that “one division” in Nuremberg happens to be the elite 82nd Airborne.

These initial battles of Nuremberg will prove especially vital in our alternate history, if only because of the close cooperation between American and German troops, soldiers who’d been mortal enemies only 13 months before. The outskirts of Nuremberg have already been heavily shelled by Soviet artillery of the 5th Guards Army, but the American paratroopers and German grenadiers withdraw deeper into the city, where stronger buildings will make for formidable redoubts. Thus, they draw the Soviet guardsmen into a maze of streets and ruins where their numbers will count for far less.

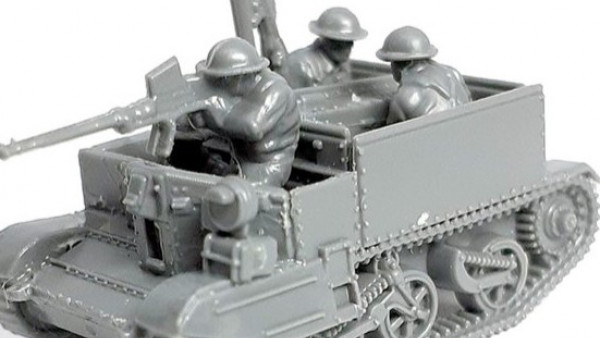
On our gaming table, this was our first game of “Battlegroup” where we really let infantry and artillery take centre stage, and were amazed at the tactical depth and nuance that resulted. The Soviet attack was slow to get started, they took their time getting observer teams into position where they could call on 82mm mortars and 76.2mm divisional guns. The American paratroopers, with typical aggression, used this pause to push out with bazooka-armed squads of infantry, but only after their own 81mm mortars and 75mm “pack howitzers” had pinned down the Soviet infantry supporting the tanks.

Soviet guards units, however, always have plenty of two quantities: numbers and determination. Their own artillery soon had American spotter positions pinned down, which were then overrun with Soviet close assaults. How much easier this is when you pin the enemy down first!
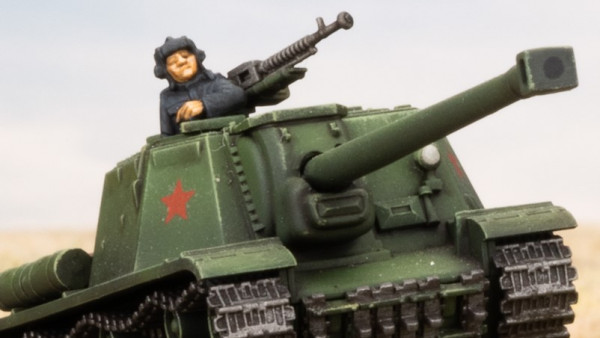
Building by building, the Soviets moved forward, always under the cover of their mortars, artillery, and direct howitzer support of their SU-122 assault gun. At one point, the Soviets played a “Confusion” counter on our paratroopers, forcing them to make an immediate morale check. But the paratroopers passed in true 82nd Airborne style. Yet only when the two German “Hetzer” tank destroyers took out the rest of the Soviet armour (especially that SU-122) did the Americans just barely manage to hold the crucial objective and win the day.

So after the first nine days of our “World War 2.5,” the most threatening of the Soviet breakthroughs seem to be contained. For now. You can bet the Allies aren’t out of the woods yet, however. Check back next week to see how the tides of war turn when the Soviets commit their reserves!
The Series:-
- Part One: The Floodgates Open
- Part Two: The Big Push
- Part Three: Valiant Heroics
- Part Four [Finale]: The End?
If you would like to write an article for Beasts of War then please contact me at [email protected] for more information!
"Armies on both sides had contingency plans quietly locked away in desk drawers “just in case.”"
Supported by (Turn Off)

Supported by (Turn Off)
"The American paratroopers, with typical aggression, used this pause to push out with bazooka-armed squads of infantry"
Supported by (Turn Off)


Come on the plucky Brits!
Yeah, they didn’t do too badly, did they? Amazing what a “bit o’ guts” and a few 17-pounders can do.
Really gripping continuation of WW 2.5. I can’t wait for the next instalment.
Looking good for the allied forces in the north. A really interesting read when it comes to the tank battle. Waiting for the next one @oriskany
Thanks, @teabaron and @yavasa . 🙂 Our next installment takes some decidedly different directions, hopefully enough to explore more kinds of battles such a conflict could include, and all the kinds of battles Battlegroup game system can encompass. But you’re right, yavasa . . . when it comes down to it, there’s nothing quite like a good tank smash-up. 😀
Indeed @oriskany, I did imagine the poor paras getting pounded in the second battle… artillery can really “make” your day worse… or does it? 😉
btw. Am I mistaken or Battlegroup Kursk is not available at the moment?
To be honest I am not sure, @yavasa . I have heard that the original BG Kursk hardcover book is out of print. I have HEARD it may be coming out in .pdf download, but I don’t know. Fortunately, I have the core BG rule book and the “Fall of the Reich” supplement. As long as you have the core rule book and at least one of the supplement books (these are much bigger and nicer than the core rule book, as Warren shows on the recent Weekender), you should be able to play, depending on what period / campaign… Read more »
It’s as good as watching a film, riveting stuff.
Seeing the Fulda Gap mentioned reminded me of a book called Team Yankee, set in a Cold War period when the Soviets attack the west for whatever reason. It was written by a guy who was an Abrams tank unit commander and is very readable and realistic. This reminds me of it but in an older setting.
Thanks, @gremlin ! High praise indeed! I almost wish I could make things like this into movies, if only I had a spare $50 million or so.
100% agree on Team Yankee, @dorthonion . For his “setting,” Harold Coyle used the backdrop originally presented in Sir John Hackett’s “The Third World War – August 1985” – more of an operational and strategic view of the same war. Both books are absolutely epic, and IMHO above some other subsequent books by Clancy, Bond, Coontz, etc.
Good stuff @oriskany! Christ I’d love me some 28mm scale Comets…
Another fantastic entry in your latest series of articles @oriskany. It was particularly gratifying to see my alternate history compatriots make such a strong showing with their 17 pounders.
As noted by @gremlin upthread, it is interesting how very cinematic this campaign is turning out to be. Who knows, maybe an Oriskany helmed war film may yet be in our future… 😉
that was good stuff @oriskany I don’t think you will need your next dental appointment they will be gleaming after that battle?
Thanks, @bigdave . I’m definitely developing a love affair with Comets myself. From what I read, the design might not have gotten as much credit as it deserved, not only because they entered service so near the end of the war, but also they used so many components as the Cromwell (and outwardly resembled an “upgunned Cromwell”) . . . and the Cromwell had a lot of drawbacks people automatically (and perhaps unfairly) associated with the Comet. By the time the Comet really got a chance to prove itself in the postwar world, of course, the Centurion was here to… Read more »
Great stuff – I can’t help but wonder how things are in the far north – Scandinavian comiting themselves?
Thanks, @zorg . Should I admit that it took me about an hour to get your “skin of your teeth” joke? 😀 Yeah, that last battle was a squeaker. Thanks again, @ramsus . I honestly have no idea what’s going on in Scandinavia. I purposely left other theaters of the war open. (a) I don’t have the space to mention in the articles, and (b), I thought this would encourage some more discussion among the community, as they filled in their own ideas about possible WW2.5 scenarios. One community member – jamesevans140 – had the great observation earlier that with… Read more »
While considerable amount of small arms was hidden in case of Soviet occupation following the Moscow Armistice, it is doubtful that Finnish army could have mobilized under the close Soviet supervision. In case of Soviet occupation plenty of guerrilla action would have taken place, but post war Finland wasn’t ready for another full scale war with its neighbor. There was also the bitter memory of the lack of action by Western powers during Winter War, so I have doubts about Finland’s willingness and ability to take part in the conflict even if help was promised (and logistically Soviets would have… Read more »
Can’t help but agree. @jamesevans140 has also chimed in below on the subject, and seems to concur. As far as Scandinavian involvement in WW2.5 (original question), I’m afraid we may be limited to Soviet air mobile operations in northern Norway / Spitsbergen-Svalbard, with a view toward some kind of Soviet naval activity (as limited as that might have been). Definitely a tough case to sell – a long way from the Invasion of Iceland portrayed in Clancy’s “Red Storm Rising.” The US Navy in 1945-46 was simply ridiculous in scale, and with no war underway in Japan . . .
no worry’s I have confused myself with some of the things I have dun/said before.
Sometimes I have a hard time with knock-knock jokes. 🙂
LOL
Well done, loving the narrative. You have to hand it to the 82nd, that is what we trained for in the 80’s.
Hey, I was hoping you’d drop by and see the credit we were giving the 82nd Airborne. 😀 I felt a little bad because in the “Bulge” article series, we focused so heavily on the 101st Airborne. The 82nd was in the thick of the Bulge as well, they just weren’t in Bastogne (and haven’t had an HBO miniseries made about them). So I resolved that if I had a chance to spotlight an American airborne division in WW 2.5, it would be the 82nd!
Truly an elite unit, then and now.
Very much a Larry Bond novel. 🙂 I am enjoying this article run.
“Say Hello to my little 17 pounder friend” FANTASTIC! Only Oriskany could combine Scarface and WWII mini’s gaming and make it work. Also, love seeing the snippets of your division game. Having play tested a couple of times with you I can’t wait to see the final version. If only it came with the spiffy arrows the make tracking your turns easier ;).
Another great one, please keep them coming!
Thanks @ghent99 ! That’s quite a complimentary comparison. 🙂 He’s definitely the king of technical realism. I used to play his “Harpoon” modern naval wargame when I was a kid, before it was on computer. Thankfully my Dad had a tennis court in the back yard. I’m not kidding, you needed that kind of space if you stuck with the 1/2400 scale ships. Our game club has a copy of Larry Bond’s WW2 “Command at Sea,” but every time I pick up the box my arms break from the weight of the rules. Just kidding, it looks like an awesome… Read more »
I don’t envy u all that work. And I like the parking lot joke in the last pic!
Oh, it’s fun. In a self-punishing, masochistic kind of way. 🙂
Sorry @oriskany I have been out of the loop as my granddaughter is getting married next weekend. So straight to the point. Finland 46 would be a curly one but at the end of the day I would have to say she would be a no show and with a giggling laugh my wife says I wish. Starting with the surrender of Germany the Russians forced the Finns to de-mobilise to the point that the Russian garrison (sorry security helpers) would be able to deal with it. The Finns were forced to disband the civic guard as being anti-communist and… Read more »
Ah, Churchill and his underbellies. 🙂 Who knows if he still would have been in office, or perhaps been brought back into office once our imagined crisis loomed in Germany. Historically he was replaced by Attlee during Potsdam, July 45. Assuming he’d be sitting at 10 Downing Street, would the Americans have listened to his “underbelly” strategies in a WW 2.5? In 1943-43, the Americans needed quite a bit of convincing to go in for North Africa, Sicily, and Italy. And that was Roosevelt, who had a great personal relationship with Churchill. Truman may have been a different story. But… Read more »
Thanks @pursuant. I suppose we are feeling an undertow here in WW2.5. When the US entered the European War their army still needed to learn to fight and the UK had the moral right to lead so it got a second row seat. 46 is the dawn of a new day. The US is the world’s first superpower and world even if at this stage it still has training wheels. Their army are now veterans and masters of modern warfare and the US now had the world’s largest economy. The US not only has a front row seat but is… Read more »
Thanks for the comment, @jamesevans140 . 🙂 I agree with just about everything you say in your post. I just hope it’s clear why, within the context on this project, I had to minimize or outright ignore certain historical factors we all know and agree upon . . . for the sake of the project itself (game design, intended audience, etc.) This WW 2.5 project is almost complete (phew). Third article has now been submitted, the rule book for the divisional-level game is now 90% complete. I’ve been pushing this thing on two basic fronts: the tactical front (get to… Read more »
Thanks @oriskany. I suppose we are feeling an undertow here in WW2.5. When the US entered the European War their army still needed to learn to fight and the UK had the moral right to lead so it got a second row seat. 46 is the dawn of a new day. The US is the world’s first superpower and world even if at this stage it still has training wheels. Their army are now veterans and masters of modern warfare and the US now had the world’s largest economy. The US not only has a front row seat but is… Read more »
Likewise, I got a quick read yesterday but did not have time to comment. That being said, I’m running out of ways to say, “Awesome job, Oriskany.” I love the Comets. I love the West German Hetzers. My God, The terrain looks better and better every article series. The operational maps look awesome. They really tell the tale with your arrows and “battle indicators” more than just trying to figure out how the counters got there. I’ll think of more, but amazing work so far. *** “Check back next week to see how the tides of war turn when the… Read more »
Great alternate history story. I am looking forward to the next installment.
I am a FOW player, and I am inclined to stay with tne game system. However, your description of some of the Battlegroup mechanics has caught my attention. I would like to know more.
Any chance of BoW doing a Battlegroup demo game?
Thanks, @amphibiousmonster . I’m steadily building up more and more terrain, although I’ve got a long ways to go before my tables look like one of Warren/Lloyd’s. 😀 And yes, you can count on any one thing during an operational game involving the Russians . . . they’ll have reserves. Thanks, @lorddgort . Although I don’t really play FOW myself, BoW’s old FOW “For the Win” series is what first got me involved with Beasts of War. I can’t say if BoW will ever do a Battlegroup demo game, but community member “piers” (one of the playtesters for BG) has… Read more »
I completely forgot to give praise for the AWESOME factory we can see in the last few pictures! Was that one of the BoW patterns or one of your kick a** creations?
Copy / pasting from the “extra photos” thread re: the factory: The main factory building is just an old iPad case covered with “building skins” I found on line and scaled / printed to fit in 15mm. Then I added the coverings over all the factory windows, put old-style shingle “print-skins” on them, etc. The sloped roof segments (modular, so they can be arranged in other ways) were made the same way. The smaller factory buildings to the left can be combined with / stacked on top of the main building to get different configurations, etc. My only worry with… Read more »
really great campaign so far can’t wait for part 3!
Thanks, @bloodydrake – Like the last lines of the article suggest, in Part 3 we see the Soviets renew their push with the commitment of some reserves. They lost both games in this article, but we can’t expect the Allies to keep up that kind of luck forever. 🙂 Part 3 **should** go up sometime tomorrow (Monday), although of course the BoW team always has the final say, depending on whatever else they have going on.