


![Flames Of War – Villers-Bocage 80th Anniversary Battle [Catch Up Now]](https://images.beastsofwar.com/2024/06/Flames-Of-War-Villers-Bocage-80th-Anniversary-LIVE-BATTLE-225-127.jpg)


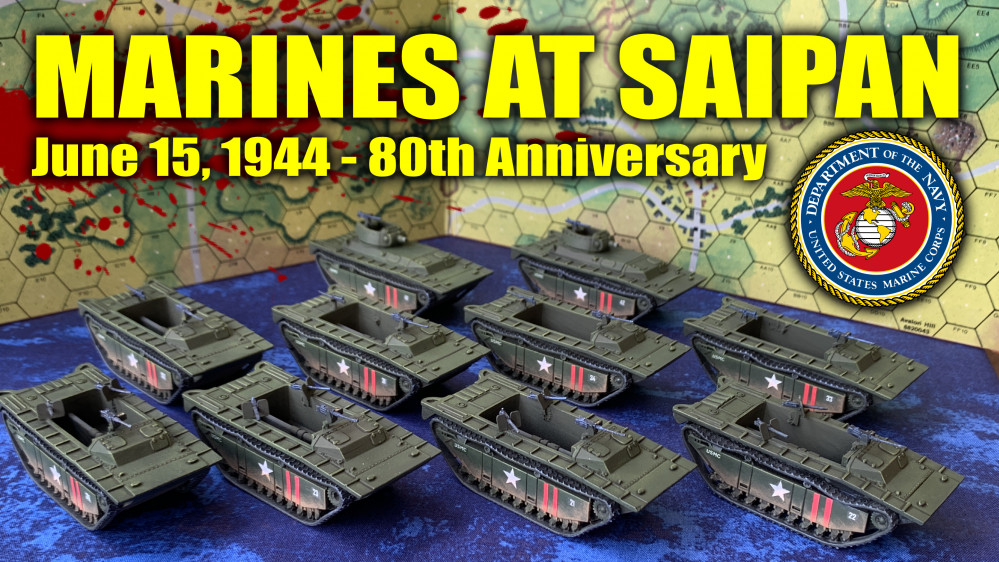
US Marines at Saipan


Recommendations: 12599
About the Project
Lately, I've been running war games every weekend with members of the community via web conference. Players log on and play wargames with each other in real time, regardless of location, and we usually have at least a couple spectators as well. Many times it’s been Darkstar, but we’re also running wargames in Panzer Leader, Arab-Israeli Wars, and now Valor & Victory.
BoW/OTT community members @brucelea, @damon, @davehawes, and @rasmus have taken the plunge, leading battalions across thousands of meters of desert, starfleets in pitched battles across the heavens, or vicious firefights in the jungles of Vietnam, all without leaving the comfort of their home.
Hard-core, old-school command-tactical wargames can now be run (complete with spectators and recordings) in real time, with BOTH PLAYERS moving pieces across THE SAME virtual game board, thus maintaining player agency, speedy and instant results (no play by e-mail), interwoven turn sequences, any questions / feedback instantly received and addressed, and with the game being virtually recorded as it goes, a ready-made battle report can actually be created as we go.
All of this without the players having to install any new software on their computer, on any platform (PC or Mac). All that's needed is to agree on a time, a handful of dice, and a bellyful of courage!
Every weekend can now be a boot camp! All without costing me thousands of dollars in airfare, too!
Related Game: PanzerBlitz
Related Genre: Historical
This Project is Active
Poland 1939: Panzer Leader Games
A while ago, my friend @yavasa and I resolved to undertake a project we felt was pretty special. We wanted to “sound the starter gun” on the 80th Anniversary of World War II, with some commemorative publications and wargames centered on the official opening of the conflict, Germany’s invasion of Poland in 1939.
September 1, 2019 marks the 80th anniversary of that fateful morning.
Over the next few weeks we’ll be putting up a series of write ups, battle reports, wargames, documents, maps, and photos to put a spotlight on this often overlooked and misunderstood opening chapter of the Second World War.
We wanted to do this as a forum thread instead of a project or an article series so we could invite participation from the community as well. Where have you done Poland on the table top, game board, or even computer screen? What documentaries, books, magazine articles, or wargames have you found insightful on the topic? What stories have you heard, what questions do you have?
USMC at the DMZ - 1967 (PART 2)
Now it’s time for the conclusion of the Valor & Victory Vietnam game between myself and @elessar2590 . Do my US Marines have what it takes to seize the all-important high ground from the NVA, limiting their ability to establish artillery fire on key targets for the upcoming Tet Offensive?
No spoilers, but suffice it to say … this one is CLOSE!
Gulf War Panzer Leader Highlights Video - Part 02
Part one of our playtest highlights reel is up on the Sitrep Podcast YouTube Channel.
This one still has a few bugs in it, the overall system is sound but there is some “edition conflict” in a few of game values on the counters.
Stay tuned for Part Two, and again, if you ever be interested in …
- Darkstar (please let me know what faction you’d prefer – Wave two ships are of course now available)
- Valor & Victory (WW1, WW2, Vietnam, Lebanon, or Falklands).
- Arab-Israeli Wars (1956, 67, 73, or 82 Lebanon)
- Tactical Combat Middle East (Panzer Leader in 1991)
- Panzer Leader WW2 as always, virtually any theater or campaign.
- AirWar C21 (any period 1950-present, Vietnam jet combat?)
- Naval Command (any period 1950-present)
… live on our channel, just drop me a PM and we’ll try to get you sorted out!
Gulf War Panzer Leader Highlights Video - Part 01
Part one of our playtest highlights reel is up on the Sitrep Podcast YouTube Channel.
This one still has a few bugs in it, the overall system is sound but there is some “edition conflict” in a few of game values on the counters.
Stay tuned for Part Two, and again, if you ever be interested in …
- Darkstar (please let me know what faction you’d prefer – Wave two ships are of course now available)
- Valor & Victory (WW1, WW2, Vietnam, Lebanon, or Falklands).
- Arab-Israeli Wars (1956, 67, 73, or 82 Lebanon)
- Tactical Combat Middle East (Panzer Leader in 1991)
- Panzer Leader WW2 as always, virtually any theater or campaign.
- AirWar C21 (any period 1950-present, Vietnam jet combat?)
- Naval Command (any period 1950-present)
… live on our channel, just drop me a PM and we’ll try to get you sorted out!
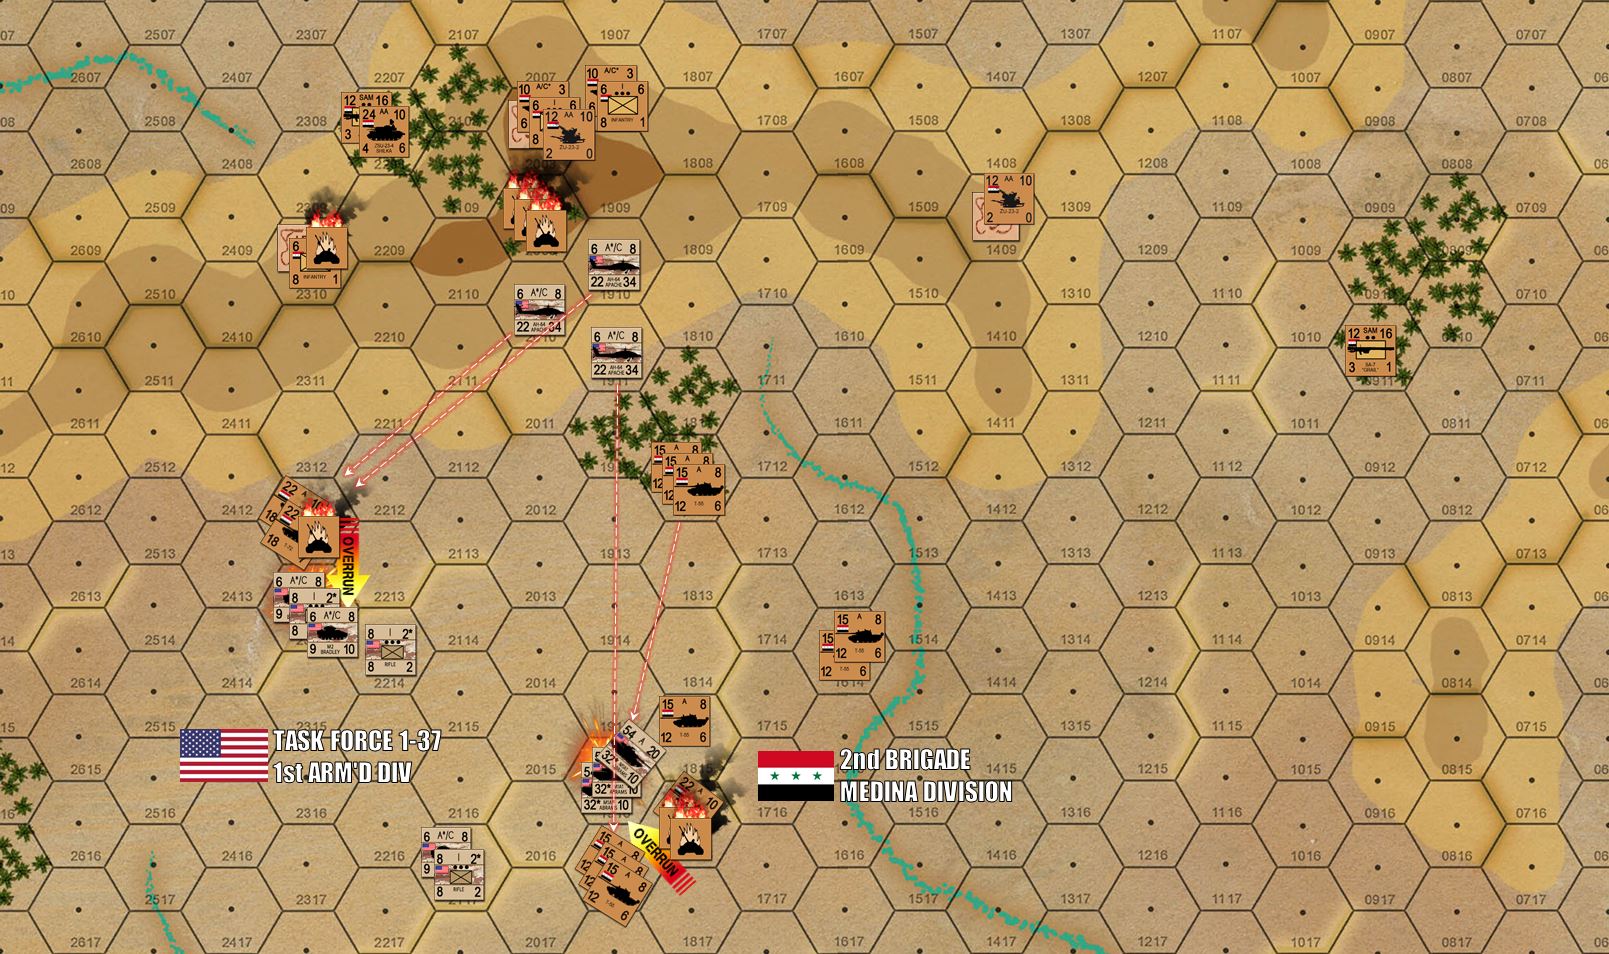
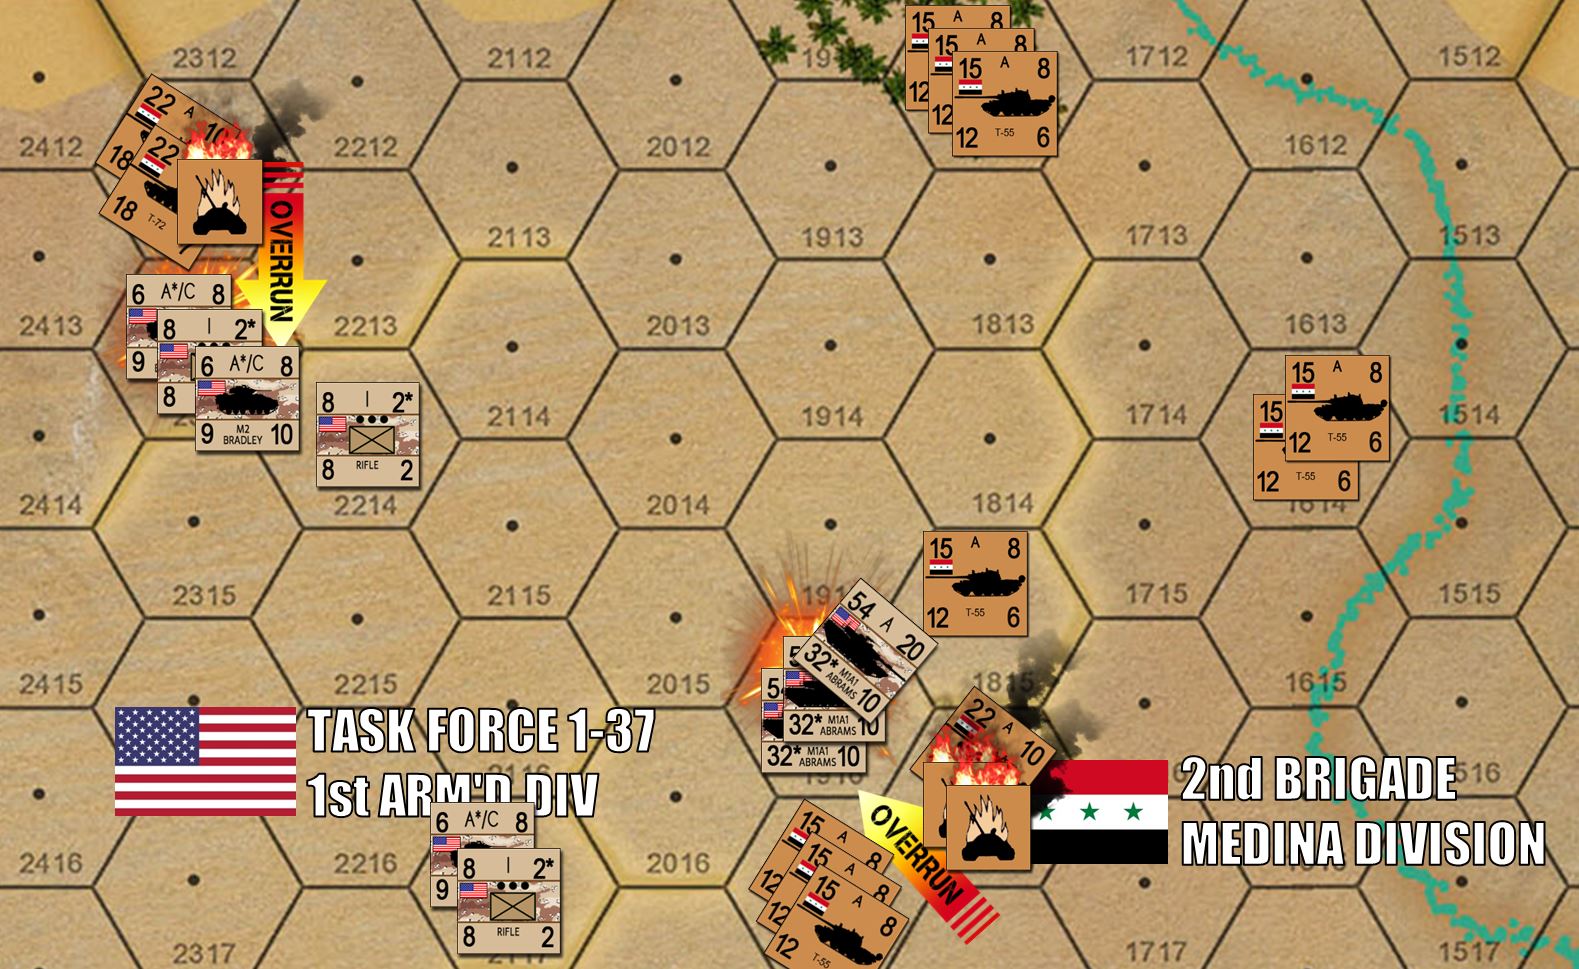
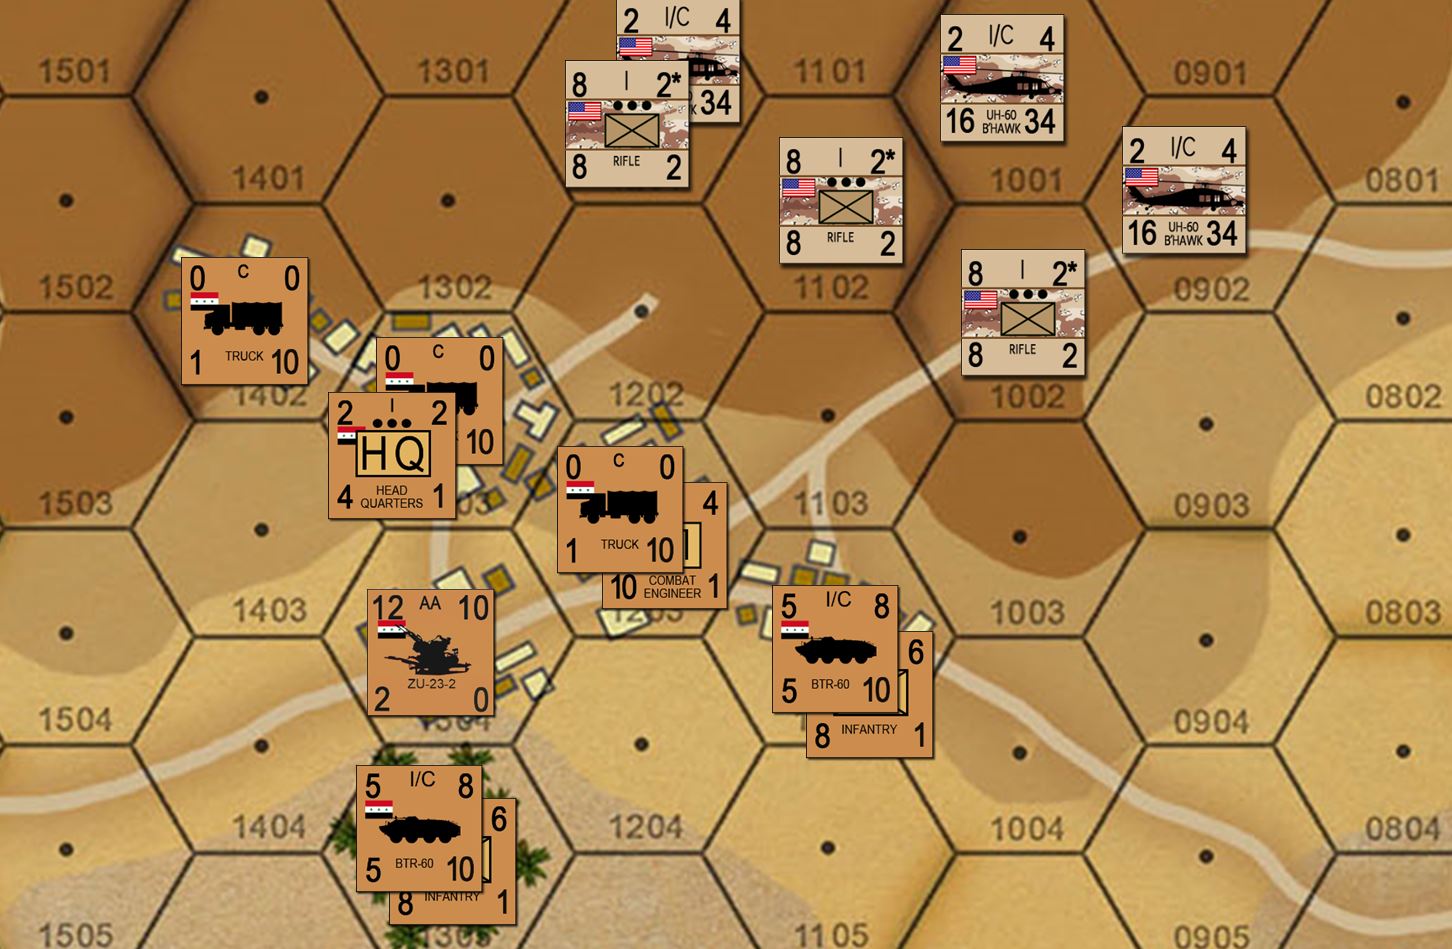
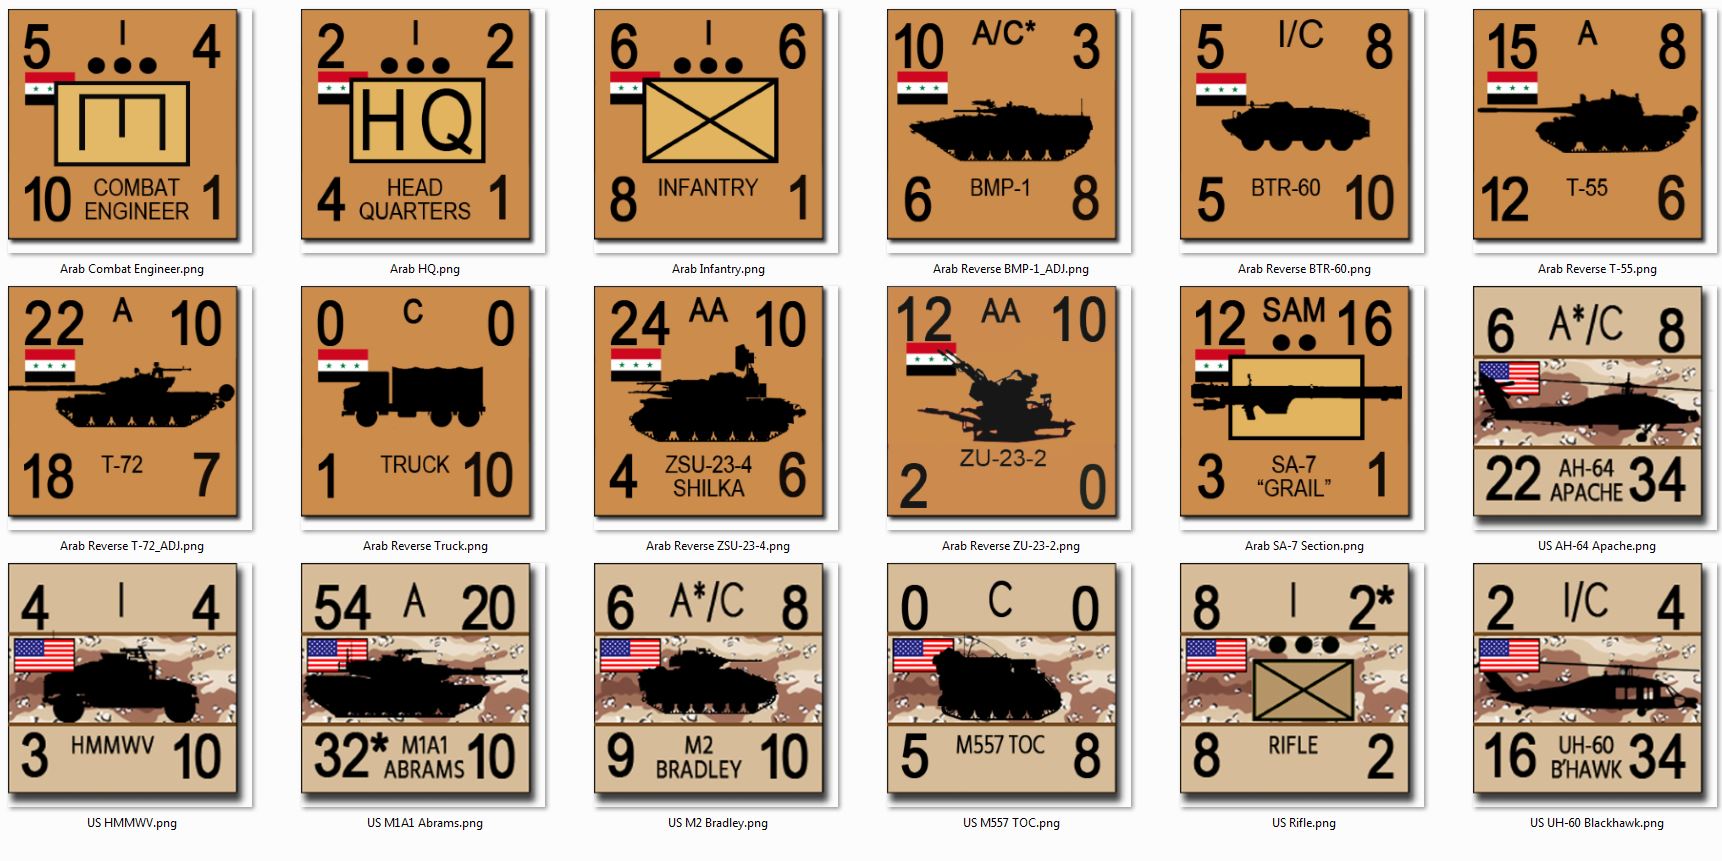
1991 Gulf War in Panzer Leader
Had a great demo game of Panzer Leader, updated to 1991 Gulf War, using Toscach Miniatures’ Tactical Combat Middle East as a beginning guide.
Made some counters for the US, including M1A1 Abrams, M2 Bradley APCs, AH-64 Apache gunships, UH-60 Blackhawks, rifle platoons, and HMMWVs, and sent them up against a rag-tag collection of Medina Division Republican Guards (T-72s / BMPs) and remnants of a shattered Iraqi mechanized army division (T-55s / BTRs).
Just a few turns to try out the new counters, again, most of them make up just this morning.
We stream hobby every Thursday, and live games on the web every Sunday! I you haven’t already, check us out!

Chipping away at some more counters
New Videos: Australian Armor in Vietnam
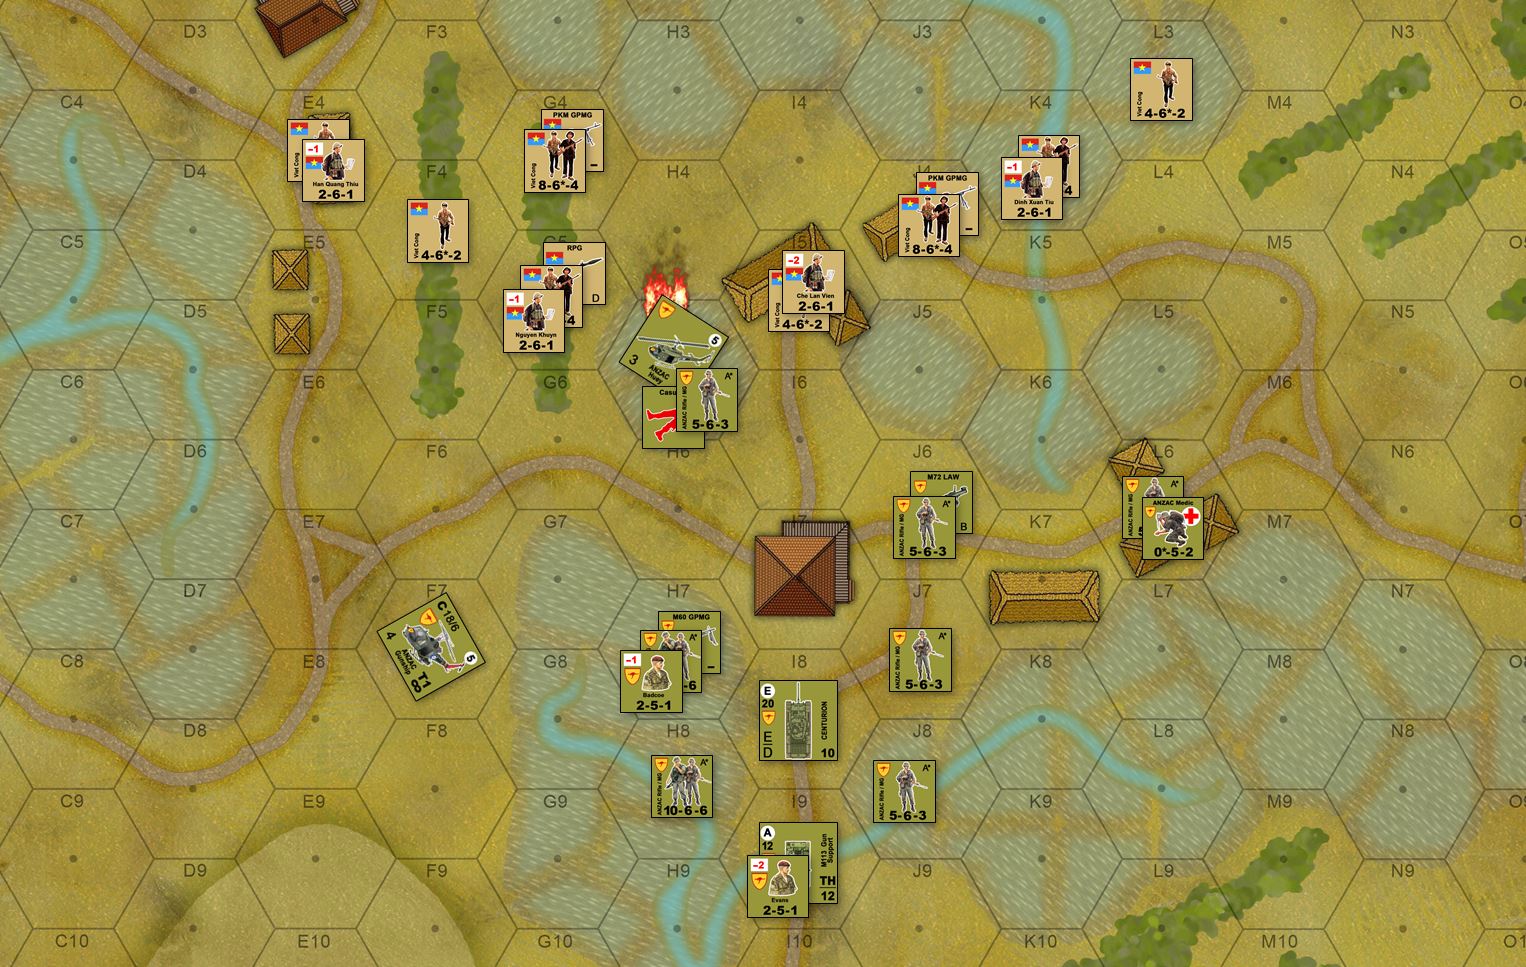
@Elessar2590 and I had a great game of Barry Doyle’s Valor & Victory. Here are the “Battle Report Highlights.”
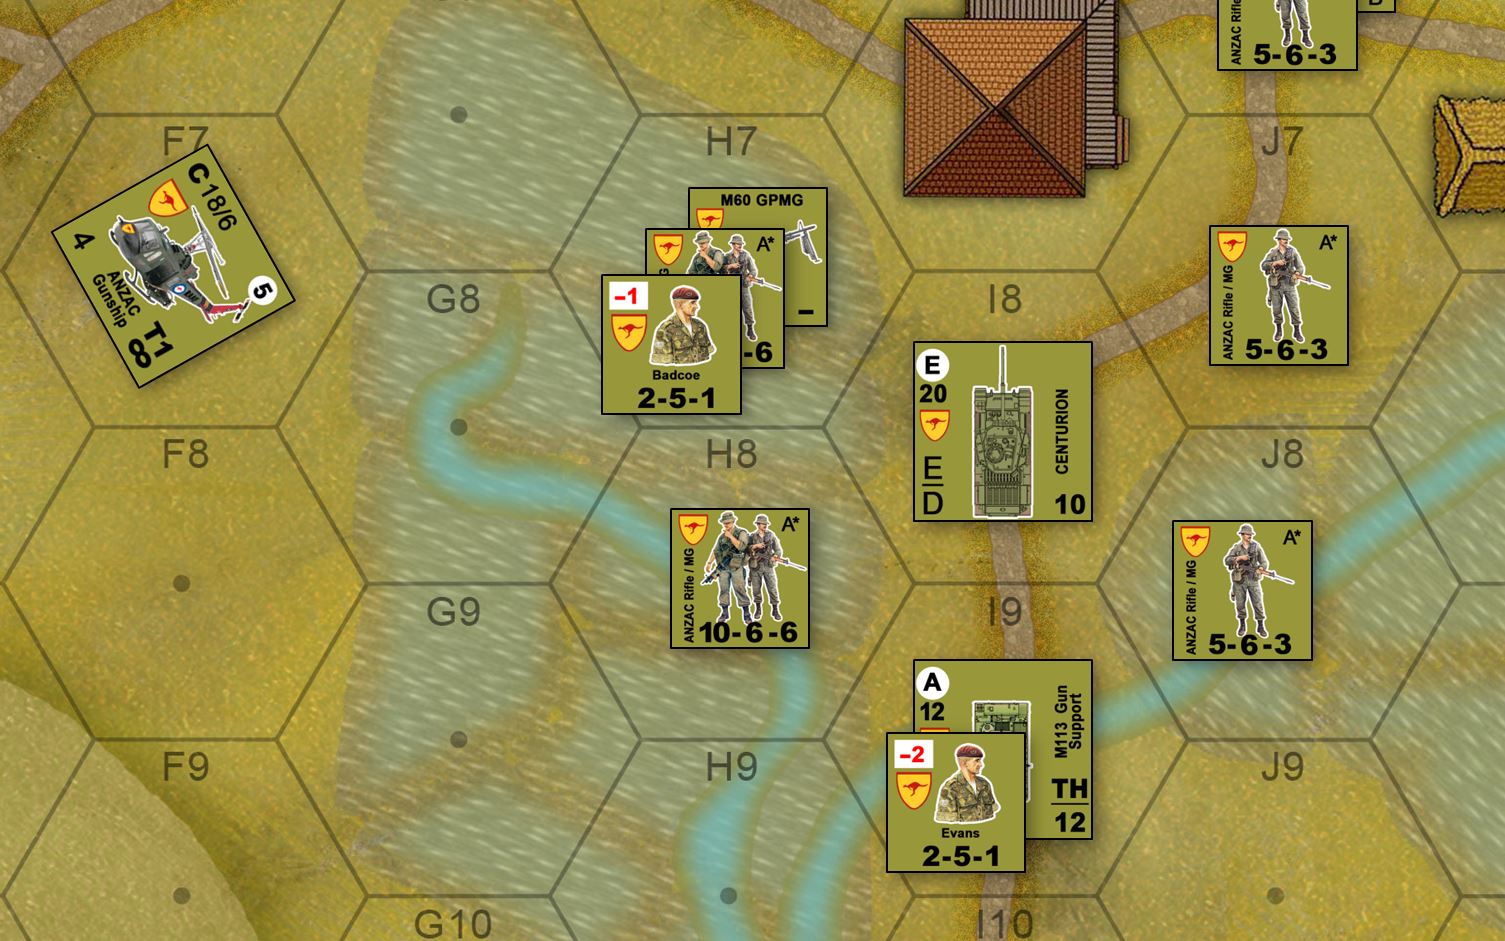
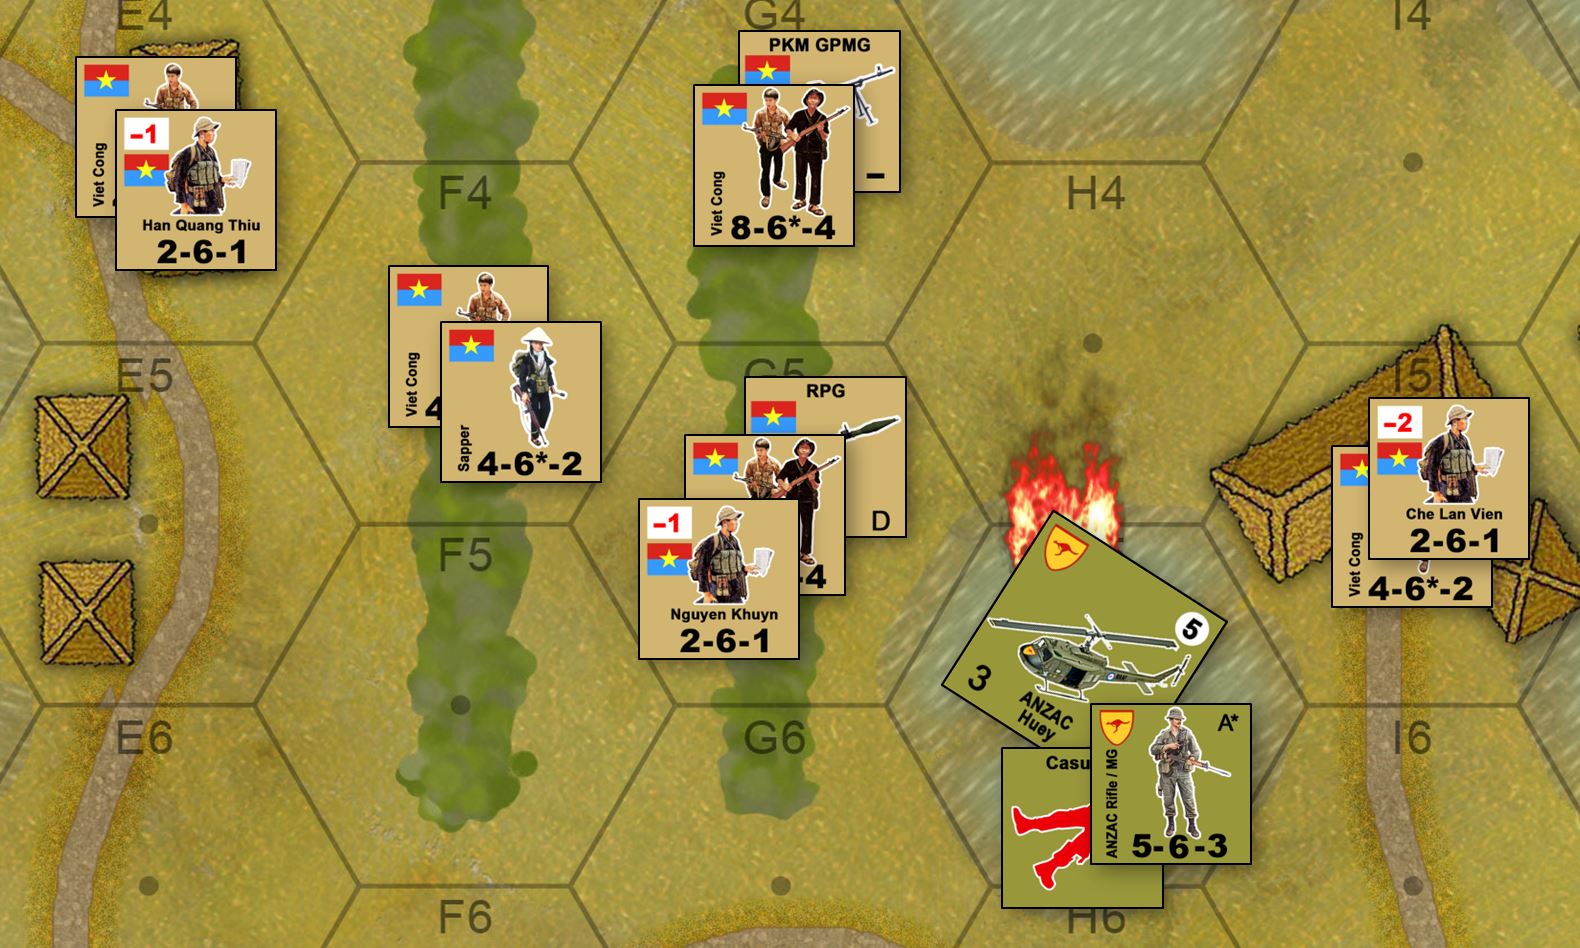
An Australian recon helicopter, returning to the base camp of 9th Bn / RAR (Phuoc Tuy Province, III Corps / II Field Force Sector, South Vietnam), has been shot down by Viet Cong RPG fire.
A rescue force of infantry, supported by M113 APCs, a UH-1H gunship, and even a Centurion main battle tank is sortied out to rescue the downed crew.
But main force battalion Viet Cong are swarming toward the crash site. It’s “Blackhawk Down,” the Australian Prequel!
Can they reach their downed comrades in time?
Poland - 1939 (80th Anniversary Prep)
My friend Piotr ( @yavasa ) and I are taking a look at Germany’s invasion of Poland in 1939, using Panzer Leader, first playtest and demo game.
We’ll be live on Twitch in about 45 minutes!
8PM UK time, 3PM US East Time
Just a few pics from today's game ...
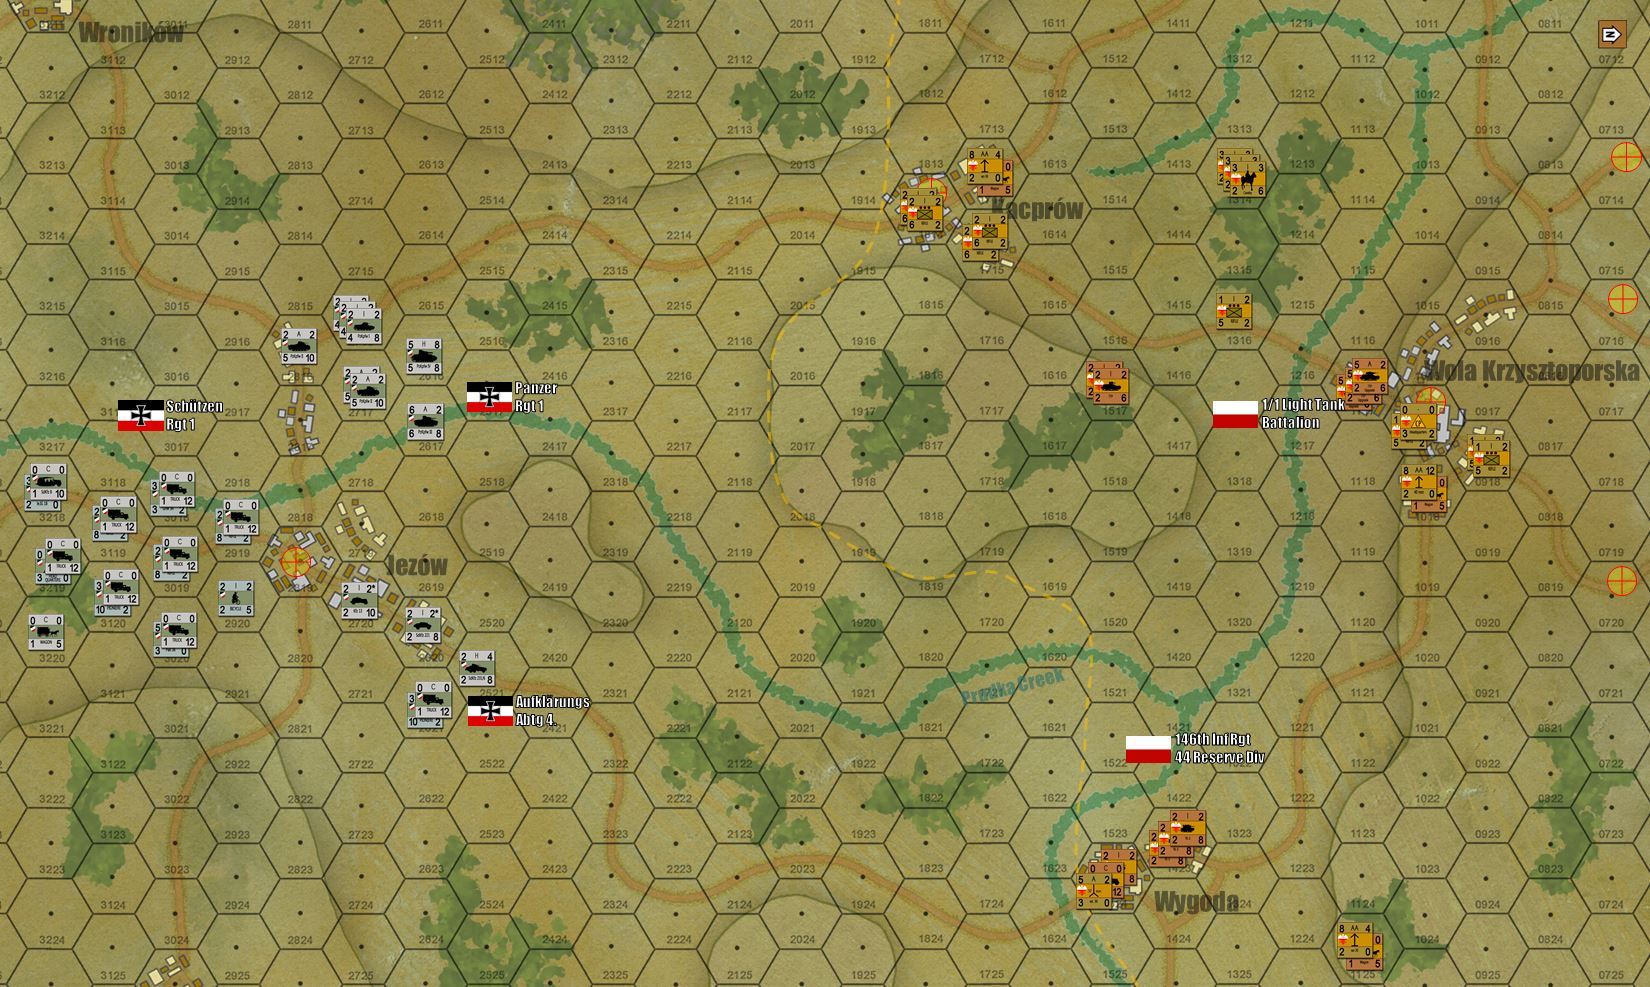
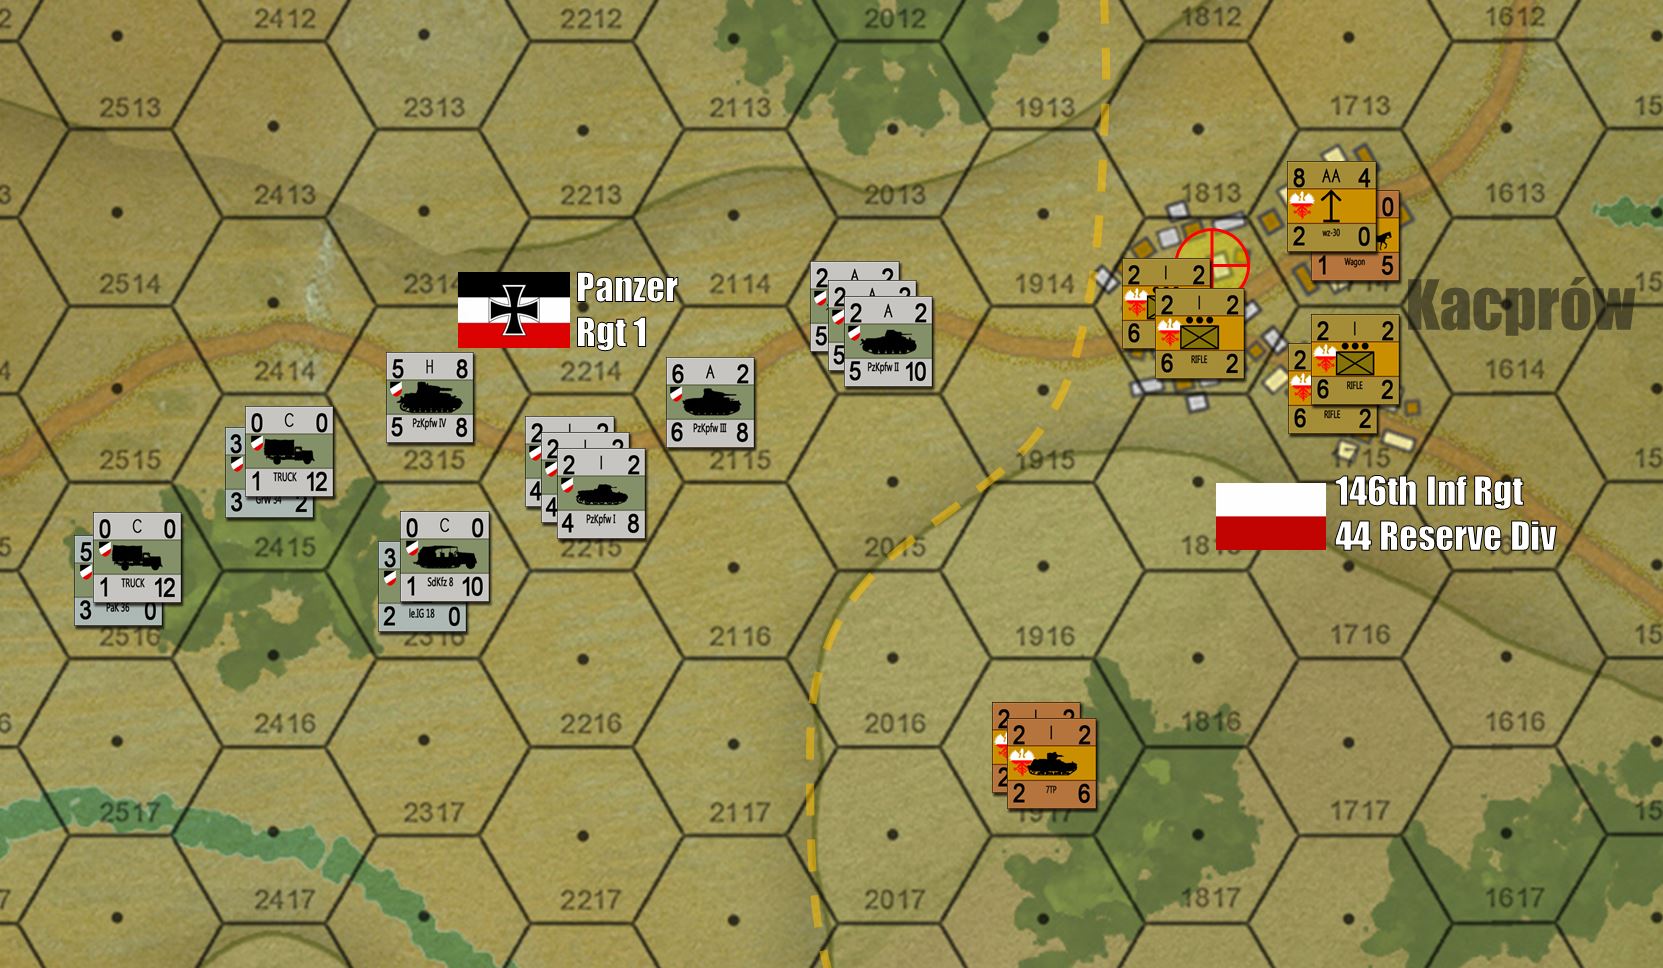 Ah, the "mighty" German Panzerwaffe of 1939. We're looking at about 40 tanks here, roughly one battalion, or about 1/8 of 1st Panzer Division's armored fighting power.
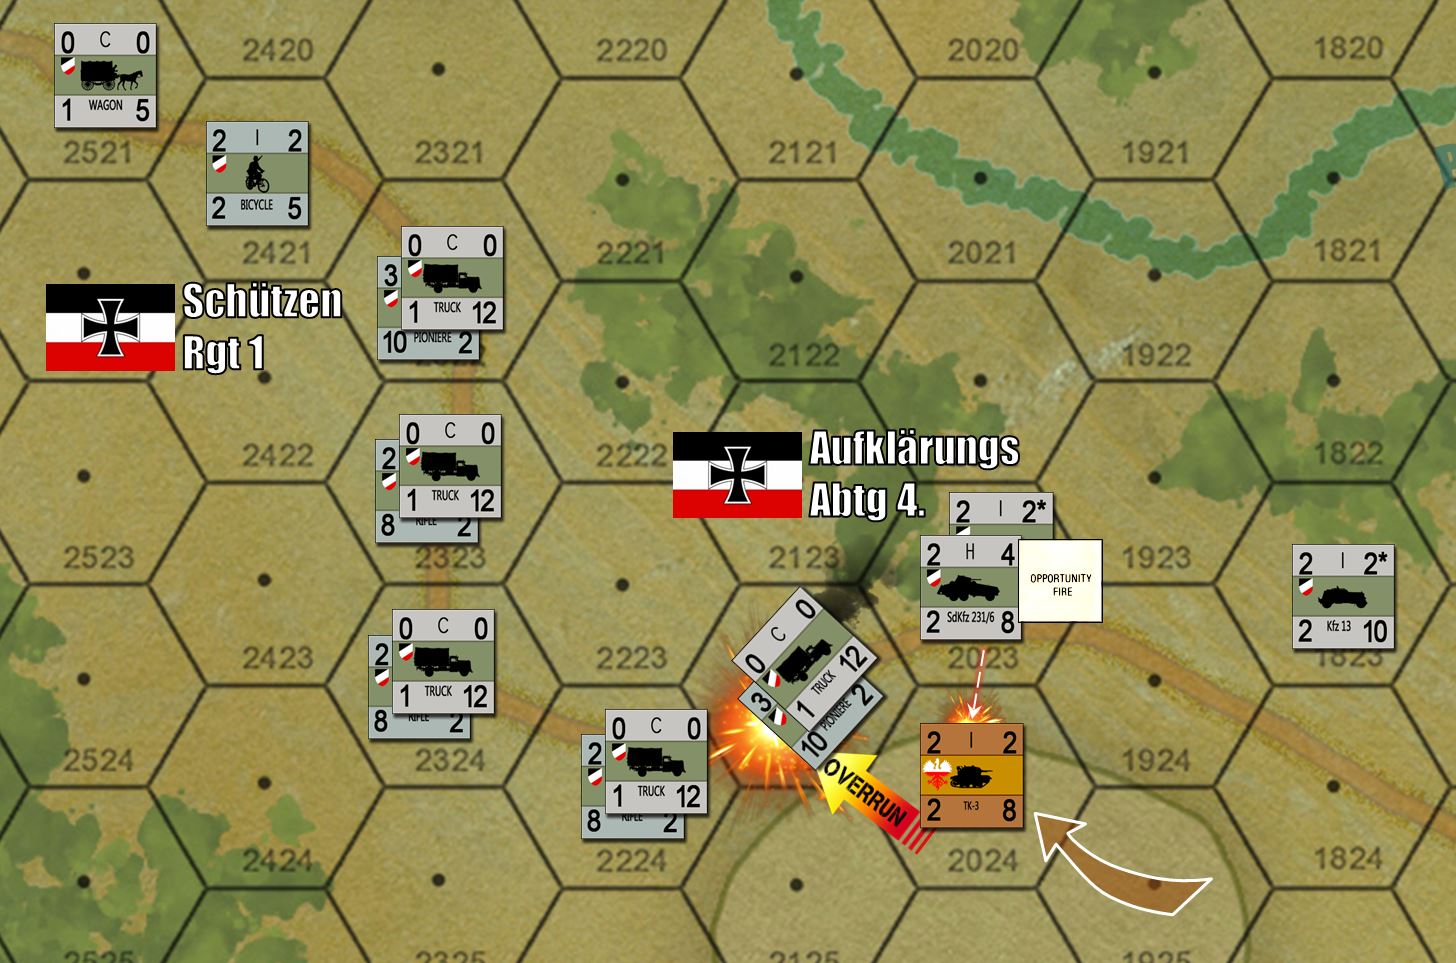 Yavasa gets bold, wiping out a platoon of "Pioniere" assault engineers while they were still in my trucks. The nearby platoon of SdKfz 231/6s tried to break up this tankette attack, but failed.
 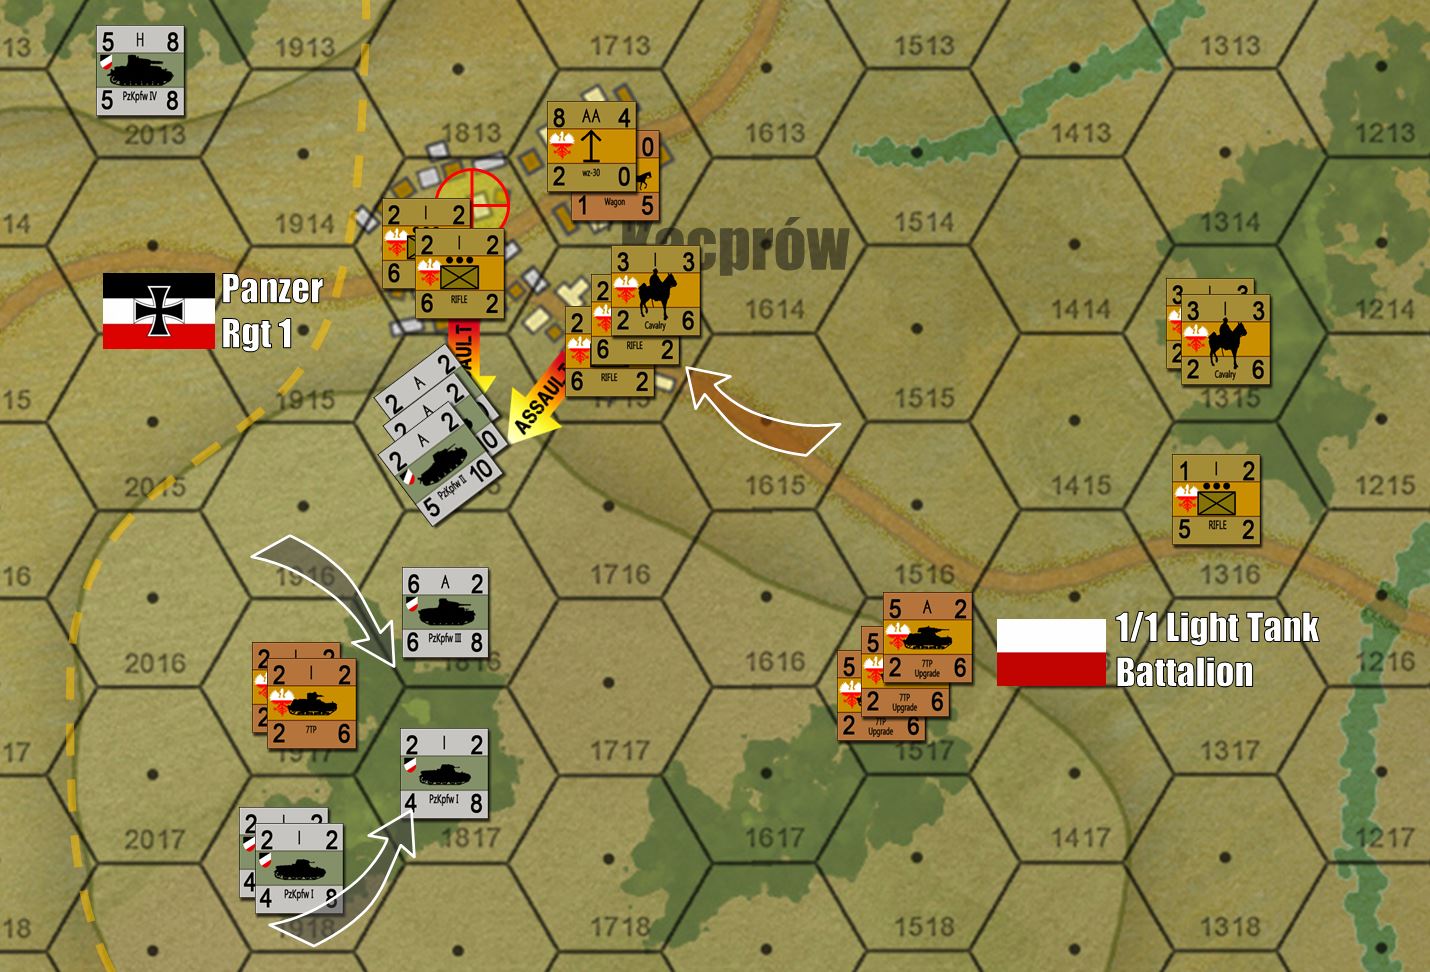 The Germans invest Polish tanks, and set up for their set-piece assault on the second Polish objective hex.
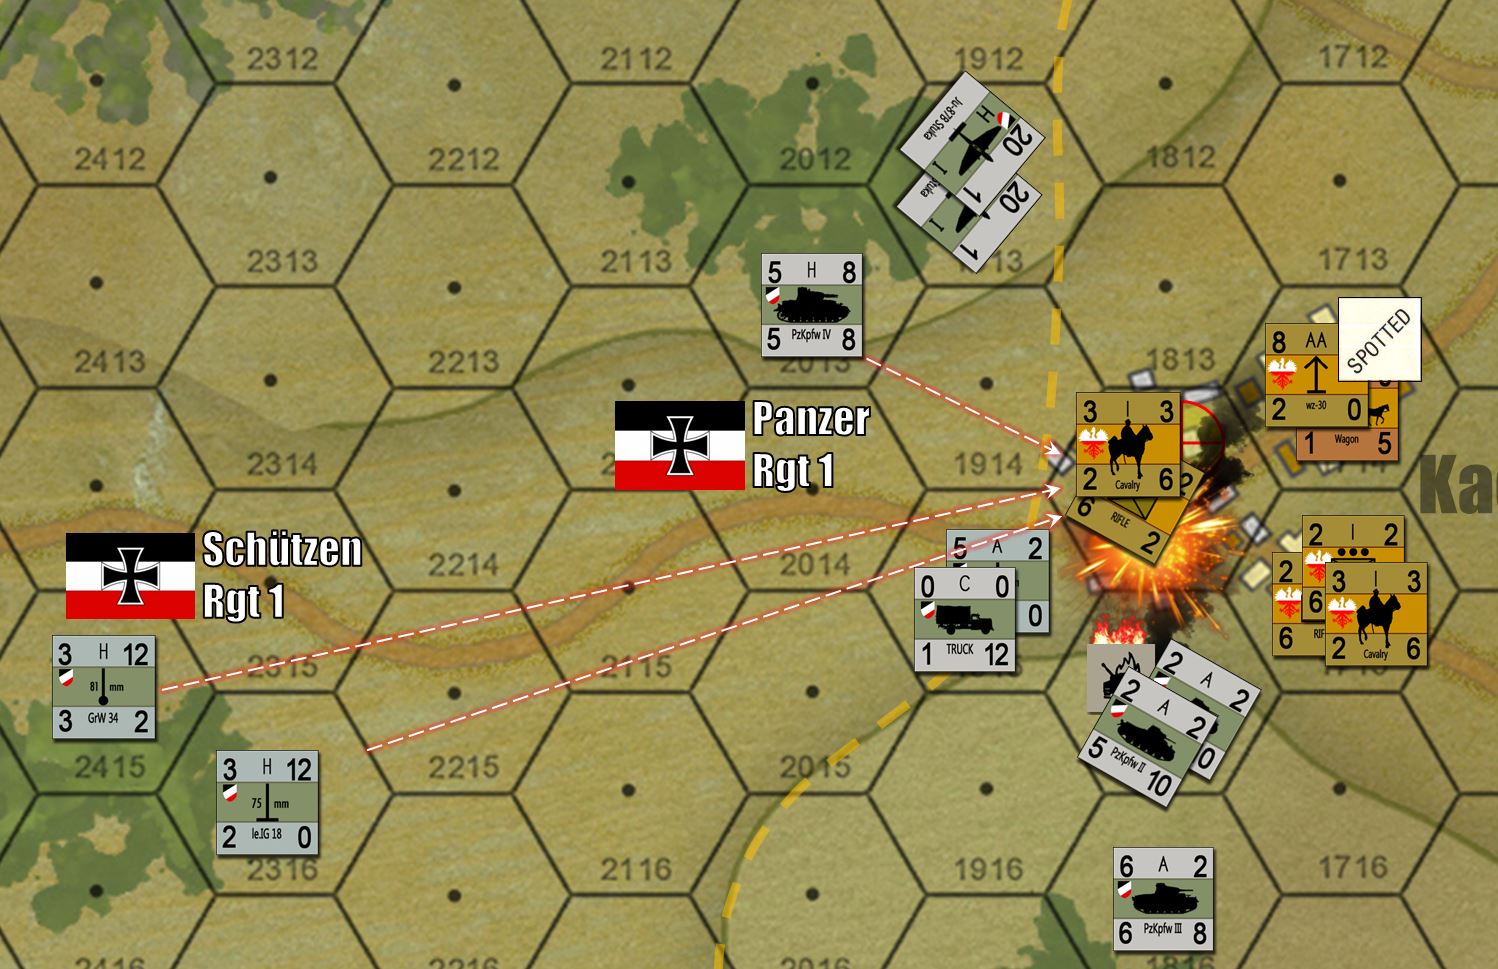 The German assault begins in earnest, with infantry guns, mortars, and 7.5cms on PzKpfw IVs. But Yavasa is feeding in reinforcements into the battle, and close-assaulting German PzKpfw IIs originally used to spot the Polish defenders. Yes, German tanks are burning, and Polish cavalry are involved. This DID happen (German armored recon if memory serves), and CAN be successful if done carefully under the right circumstances.
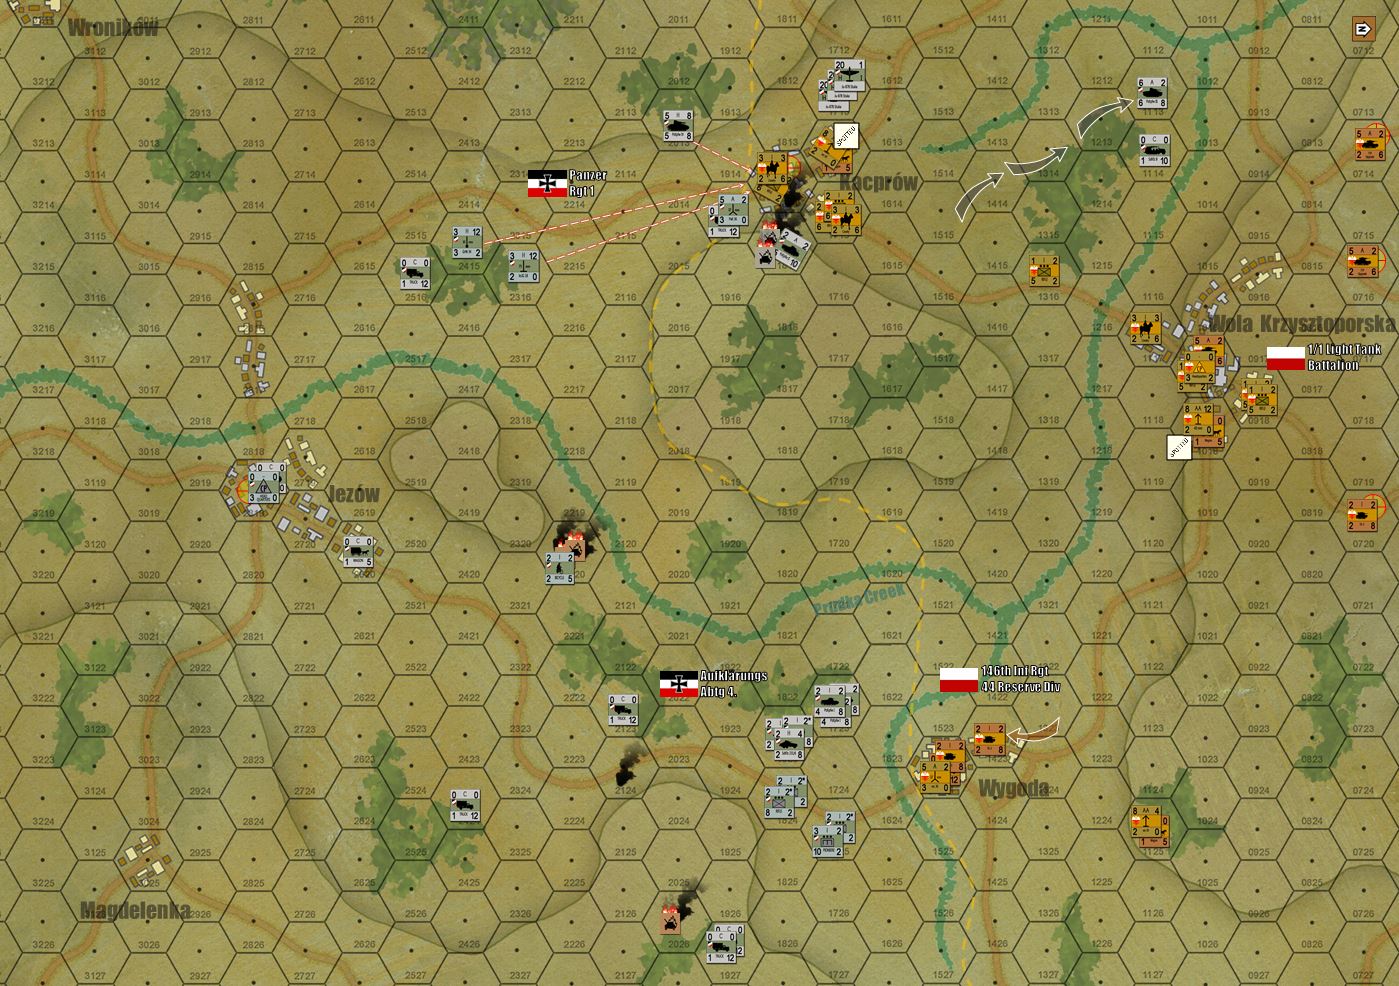 We got as far as Turn 5. Yavasa has definitely picked up this game! And I'm pretty sure if this game had gone to completion we'd wind up with a 4-3 Polish win.
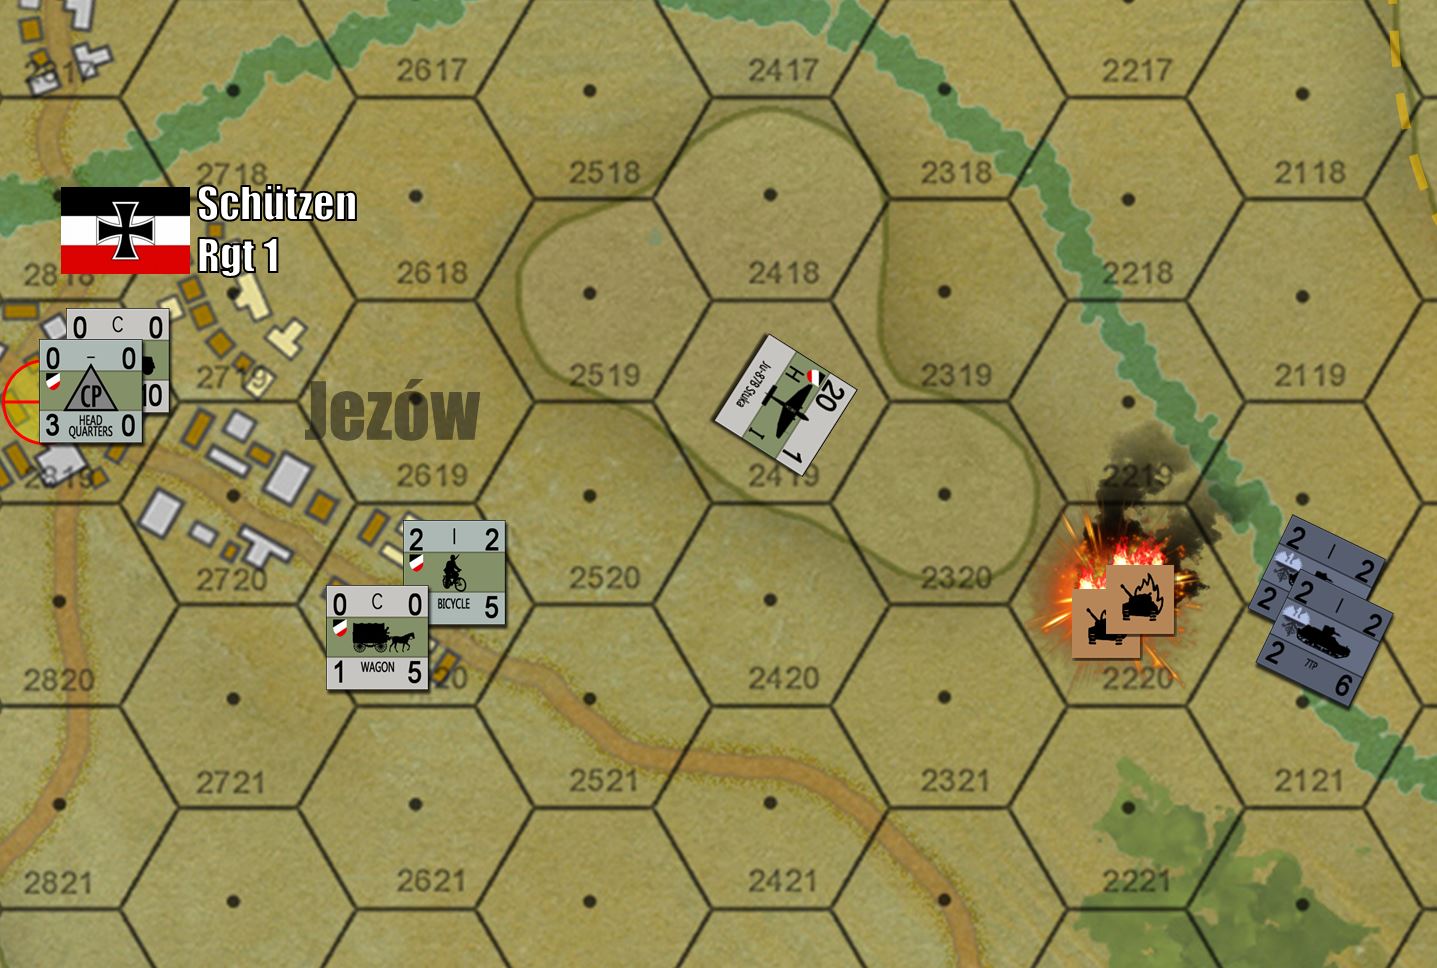 Here's one that got missed on the original roll out ... you can't have a Poland 1939 campaign without some Stukas. Sadly for me (German player), Yavasa was using his light tanks pretty aggressively. Note these two platoons of tanks rolling toward by captured objective hex in Jezów. Hence, I was forced to use my limited Stukas to secure my flank and rear, rather than kicking in the front door toward more objective hexes further north.
So we only got five turns through what’s normally a ten-turn game. No worries, this was just a demo game / tutorial. We hope to come back and do some more at a later time (schedules permitting) to continue our 80th Anniversary Commemoration of the 1939 campaign and the start of World War II.
We might set up a forum thread post rather than a project page, so both me and Yavasa can enter materials / photos / screen shots / battle reports, etc.
AirWar C21 Videos - Elesar2590 v. Oriskany
Two 30-min (approx) videos with the highlights of the AirWar C21 game recorded recently on Sitrep Podcast Twitch Channel.
@Oriskany: Fighter Regiment 921, VPAF (x4 MiG 17 “Fresco” + SAM support)
@Elessar2590: US Navy Squadron VF-51 (x2 F-4J Phantom II)
Enjoy!
Sitrep Live Stream
Our Sitrep Live Stream kicks off in about an hour, where we’ll be featuring Australian forces, including new units, in an expanded rules set for Valor & Victory set in Vietnam. In this game we’ll be seeing how the corrected helicopter rules work, along with polished anti-aircraft rules, antitank fire rules, new Centurion tanks of the Royal Australian Armoured Regiment, and so on.
The basic scenario:
1969, II Corps Sector, Phuouc Tuy Province, Southeast of Saigon – an Australian UH-1 Iroquois “Huey” on its way back to base camp has been shot down by a National Liberation Front (VC) RPG. The bird has crashed in a former Michelin rubber plantation just a few hundred yards outside the perimeter of 9th Battalion, RAR. There are casualties, but also survivors. Now, a hasty armored force is sortied out of 9/RAR’s base camp to secure the crash site and rescue the casualties before they are overrun by elements of a Viet Cong main force battalion.
The game will be played between myself and @elessar2590 – so we’ll see what happens!
9PM UK Time, 4PM East US time, 6AM Monday AEST
Elessar2590 takes a turn as "Maverick's" Dad
Okay, everyone … I’ll try to upload some kind of video highlights of this recorded game this week, but for now, here is a traditional battle report for the game of AirWar C21 my friend @elessar2590 and I had last Sunday.
AirWar C21 is a great system by Wessex Games, available on Wargames Vault, recreating jet air combat in the modern age. Think X-Wing except real. For this game, I used the Data Annex supplement for slightly older aircraft to create a game set during “Operation Rolling Thunder,” the American tactical bombing effort against North Vietnam during 1965-68.
Elessar590 will wind up playing the Americans here. These are US Navy F-4 Phantoms in 1968 Vietnam, so just for fun we decided they were from Squadron VF-51, based aboard the carrier USS Oriskany. Movie buffs might know this is the squadron of “Duke” Mitchell, father of Tom Cruise’s “Maverick” Pete Mitchell in TOP GUN.
So let’s see how Maverick’s dad does today!
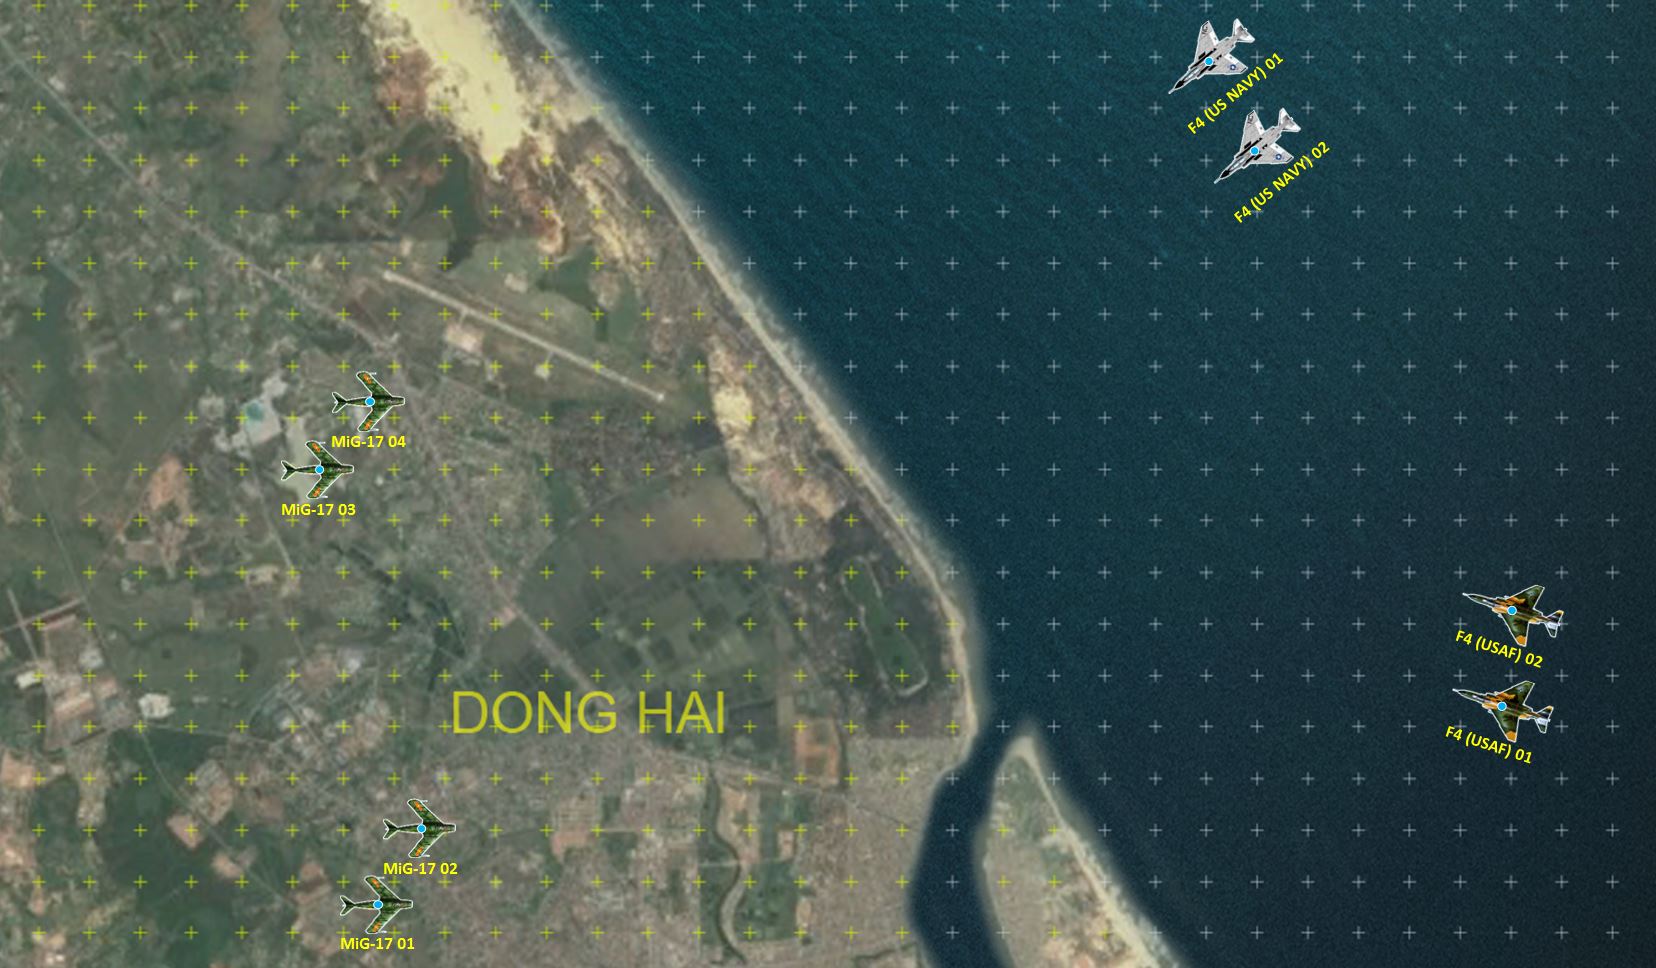
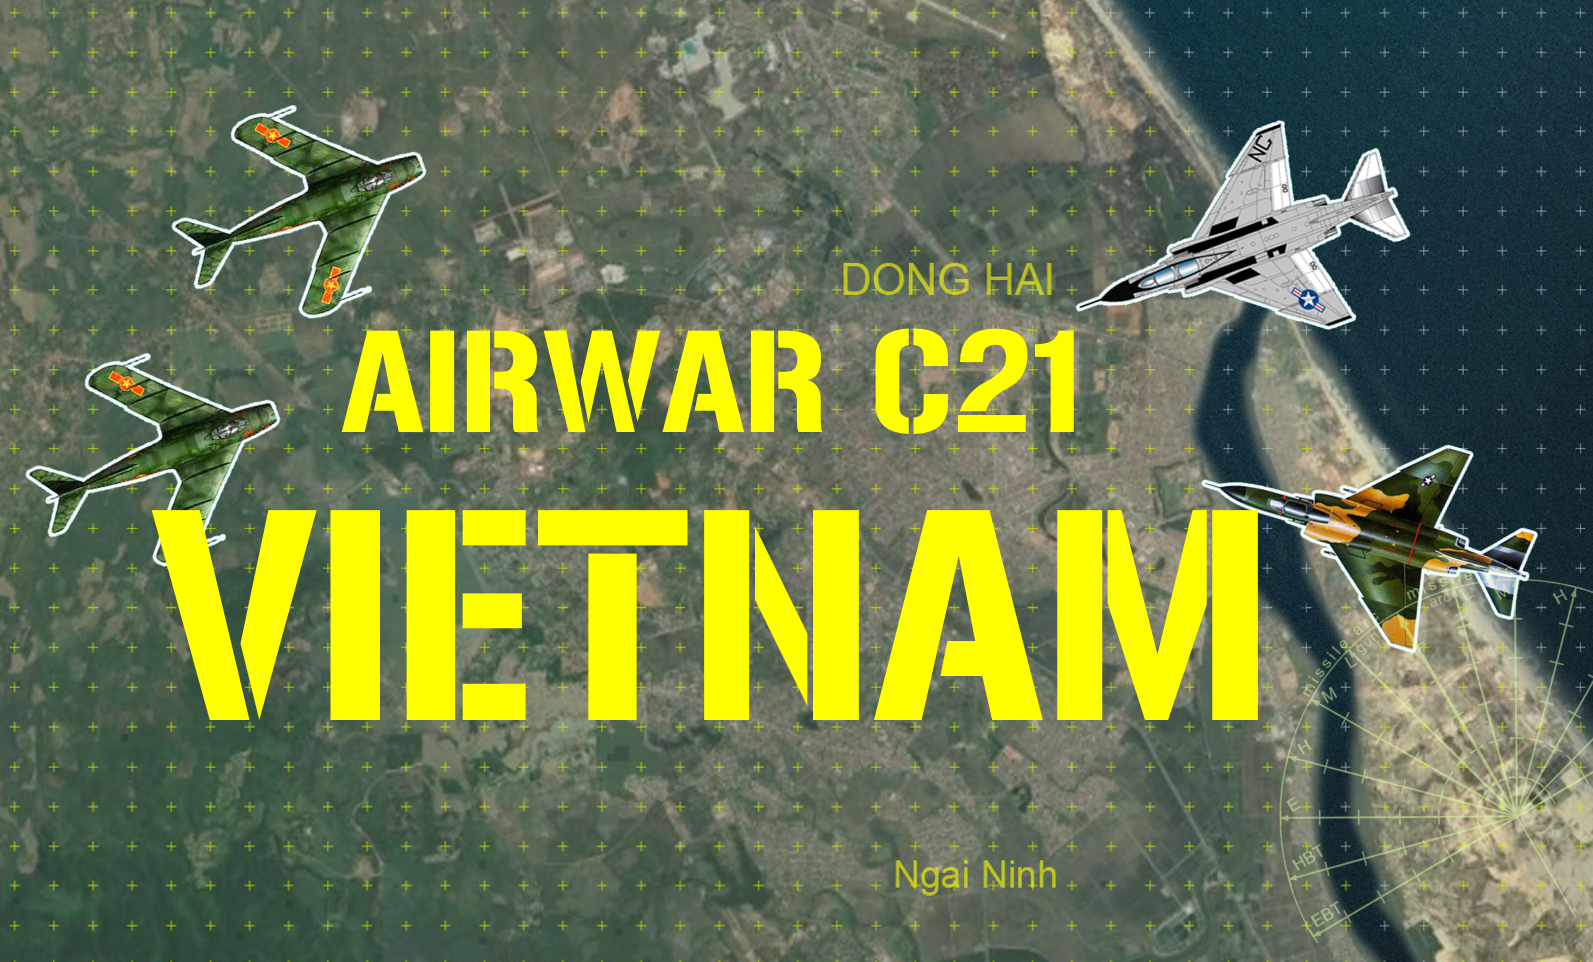 The scenario will be a simple fighter sweep / interception just north of the DMZ, near Dong Hai, North Vietnam, set near the end of 1968. Two US Navy F-4J Phantoms (Squadron VF-51, based off the Essex class carrier USS Oriskany) will penetrate North Vietnamese airspace, where they will be intercepted by four MiG-17 “Fresco” (and/or Chinese Shenyang J-5 knockoffs) fighters of Fighter Regiment 921, the first and premiere jet-powered formation of the VPAF (Vietnamese People’s Air Force) at this time.
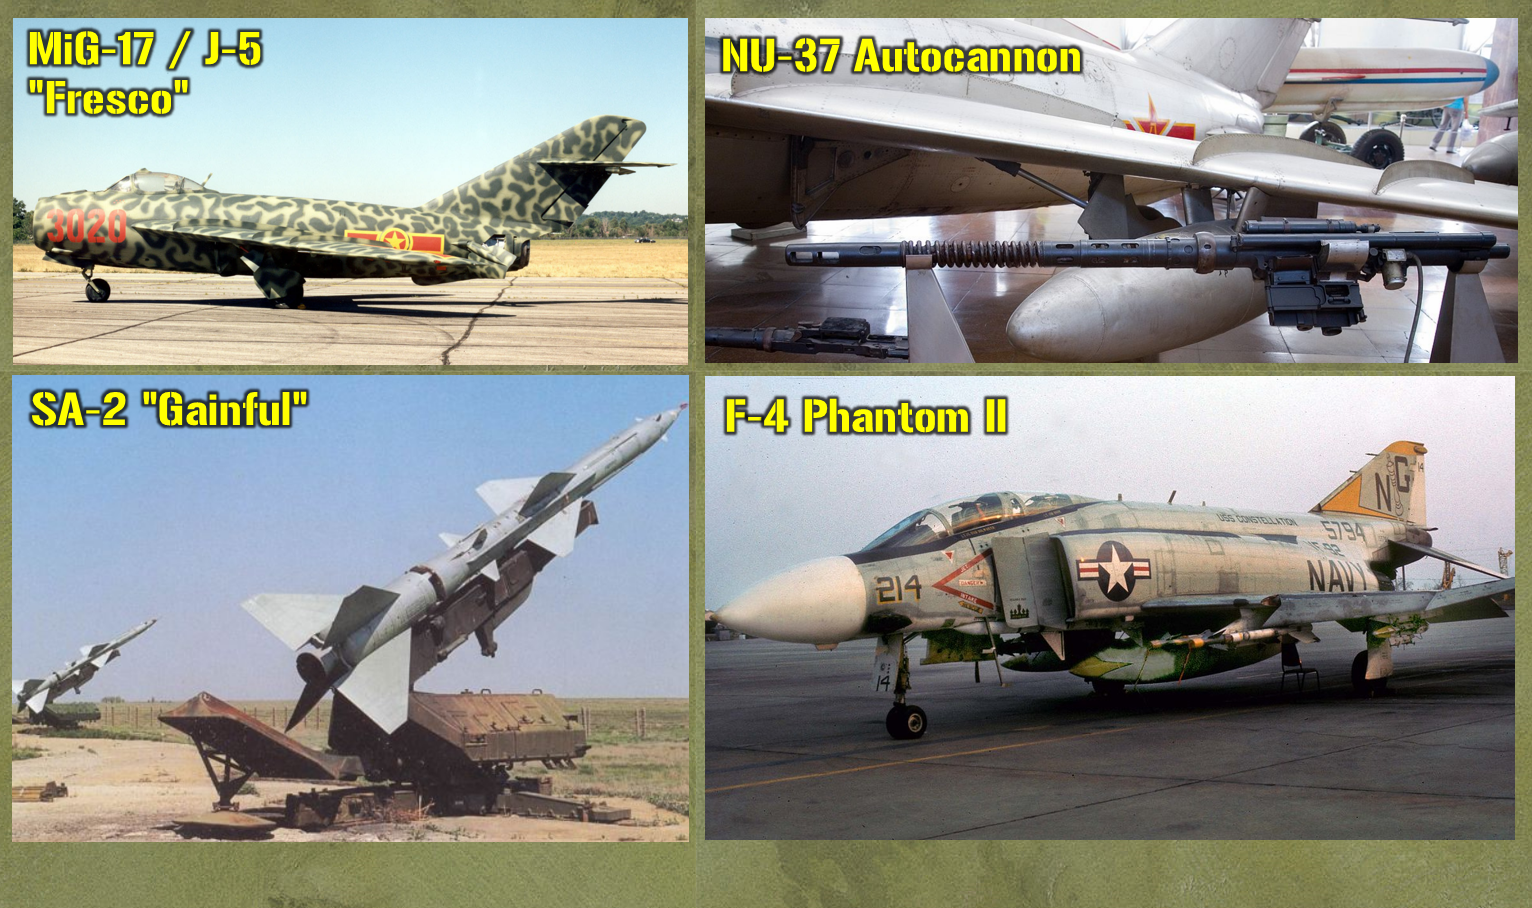 So here’s the equipment featured in this game. Obviously we have the MiG-17, each with one Nu-37mm autocannon and twin 23mm autocannon. Now MiG-17s carry NO MISSILES, so I decided to gun them up with ADDITIONAL 37mm guns, one on each wing, via external hardpoints. The North Vietnamese will have support from a battery of SA-2 “Gainful” surface-to-air missiles, the “flying telephone pole” B-52 killers. Not the most accurate things in the world, but against these Phantoms, if even one of them hits … Please note this is the “pre-Top Gun” era Phantom, a “J” variant (flares, ECM pod, and chaff) but NO GUNS. This was the era when the US was just realizing that missiles aren’t in fact ALL THAT COUNTS in air-to-air combat in the latter half of the 20th Century, but they have a fleet of fighters without internal gunnery weapons. Future variants of the Phantom and new aircraft will ALWAYS gave guns (usually the M61 20mm Vulcan rotary cannon) but for now, quick-fix measures are the best available. Hence these Phantoms have Mk 4 external gun pod, with twin Mk 12 20mm single barrel cannon. By no means the best … but give the North Vietnamese guns … Also, each Phantom will carry x2 AIM-9G Sidewinder SRAAMs and x2 AIM-7E Sparrow MRAAMs. This is a half missile load, but those gun pods are heavy. These variants of the Phantom, Sidewinder, and Sparrow are the most advanced I can “legally” use given the timeline of the scenario.
 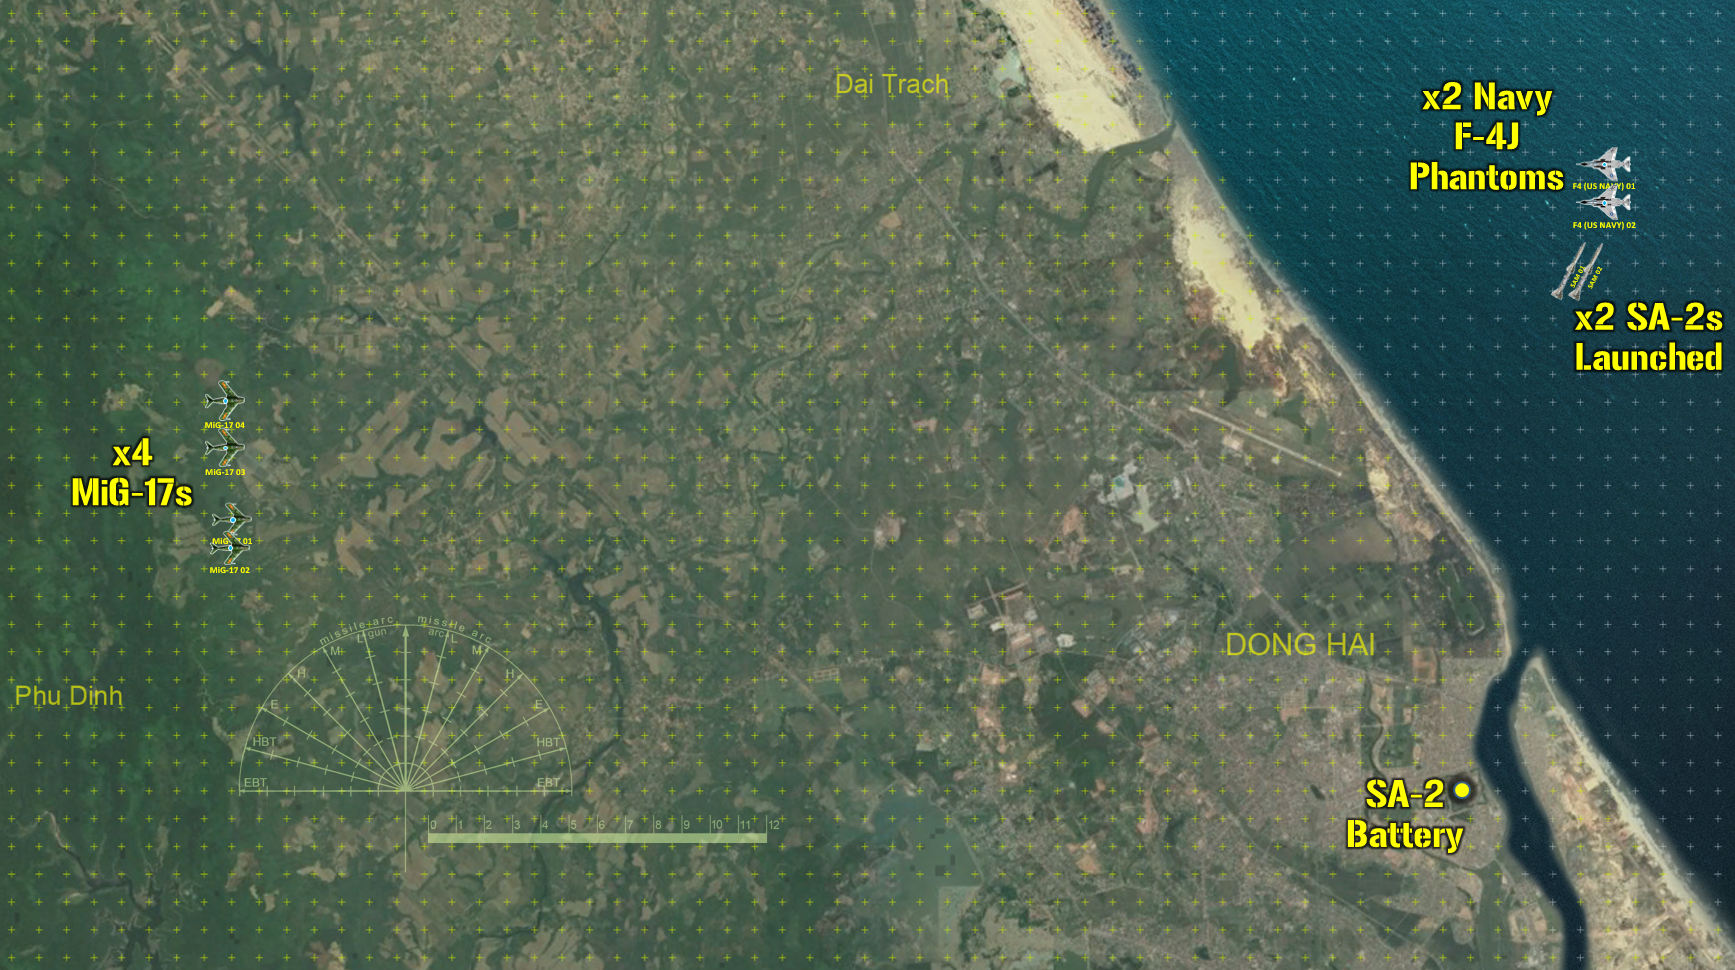 Here comes the initial approach. I didn’t know which side Elessar2590 would want to play. In the live stream he said he was cool with either side. So I rolled a dice and I wound up with the Socialist Heroes of the People of Vietnam. Death to the Yankee Imperialists! The Phantoms are MUCH faster than my poor little MiG-17s … but my MiGs are much more maneuverable, I have twice as many, and of course I have missile support from the ground. Then again, Elessar’s Navy pilots have missiles as well. For now, Elessar’s Sidewinders cannot get a lock (these are the G variant, they have to be BEHIND me). The Sparrows can lock on from any TARGET angle (semi-active radar homing) but they are too far away. Not so with my SAMs, which can try three locks in a turn. I get two (my radar rating is 5+ on a d10), so two SA-2s are off the rails and tracking. Now they will be hitting the Phantoms from the front … and deflection IS a major factor here. Elessar dumps chaff, but maybe I’ll get lucky …
 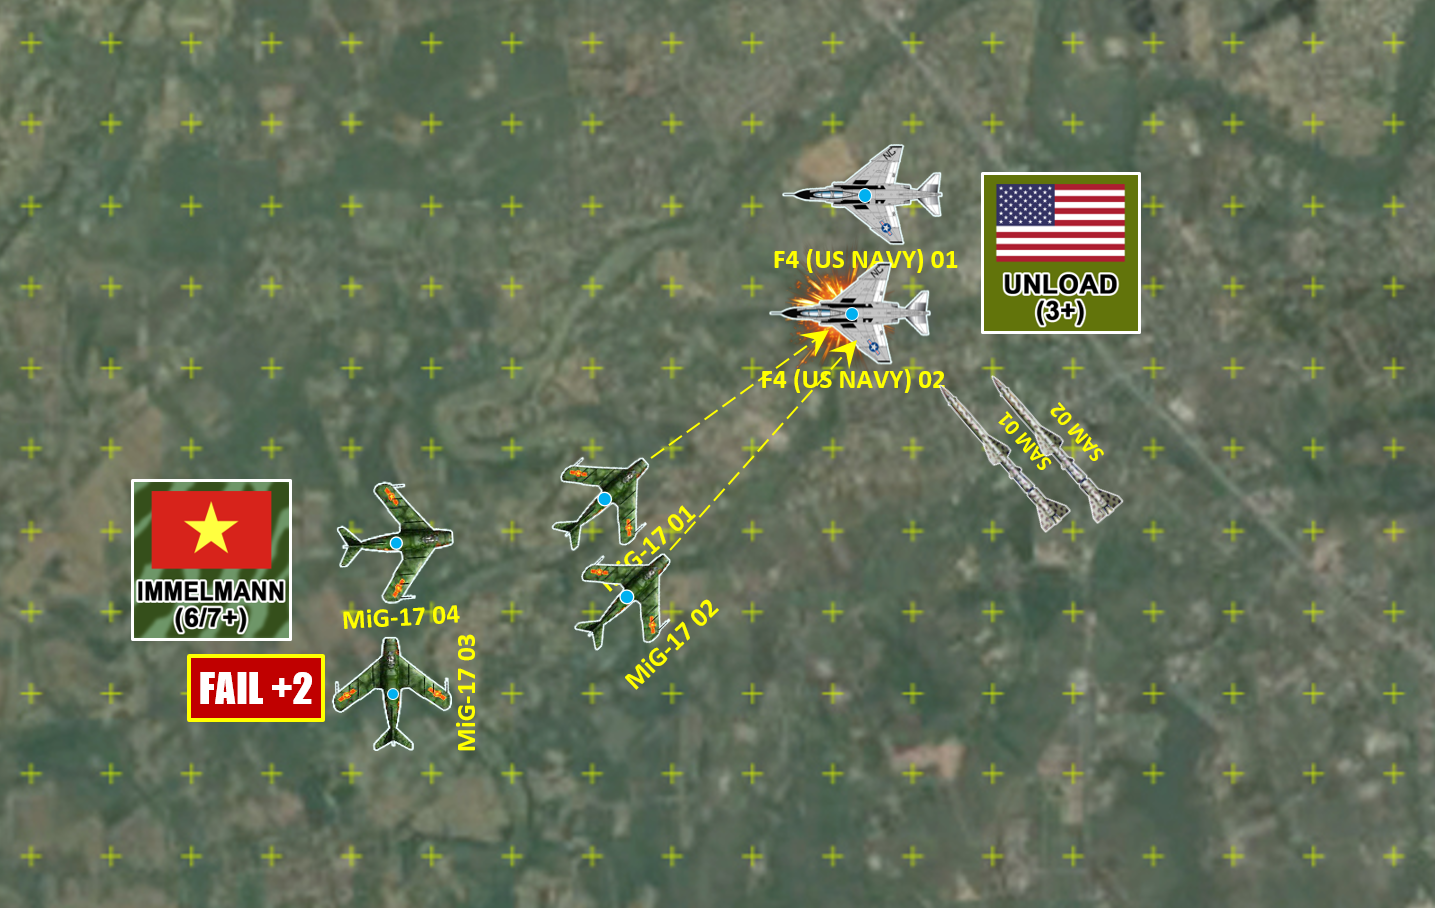 My missiles miss. Elessar chooses the “Unload” maneuver, going into a powered dive and basically dumping altitude for what the Phantom does best, raw speed. Two more SA-2s are off the rails (I have six in all), and these are approaching from the tail … easier to hit. MiG “Pair One” cuts inside the Phantoms for a gunnery burst. It’s not great, again note the high angle of deflection, and the range could be better … but I hold the hammer down and put a SUSTAINED BURST from all five guns on two planes (ten autocannon in all). Yes, I get some hits, but Phantoms are big and Phantom 02 survives for now … damaged but still in the fight. MiG Pair 02 could had sealed the deal but they lost initiative, and one of them fluffed their Immelmann roll to boot (almost stalled out … MiG-17s are only “medium” powered aircraft) .
 Again my SAMs miss, and will spend the next 6-7 phases trying to get a lock for my last two missile launches. Man, I need some new SAM operators. Meanwhile, Phantom 02 has previously launched a Sidewinder from behind MiG 04, while Phantom 01 has launched a Sparrow from the front. I have selected a “BREAK” maneuver to avoid these warheads, and made the roll, giving me a nice bonus to evade incoming fire. I dodge the Sparrow but not the sidewinder, which rolls “6” on the d10 damage, blowing the MiG-17 out of the sky. SPLASH THAT SUCKER, YEAH! Another missile is then launched at MiG 03. Meanwhile, I seem to have forgotten how to roll well at initiative, or maneuver checks for that matter. COME ON, GUYS! UNCLE HO IS COUNTING ON YOU!
 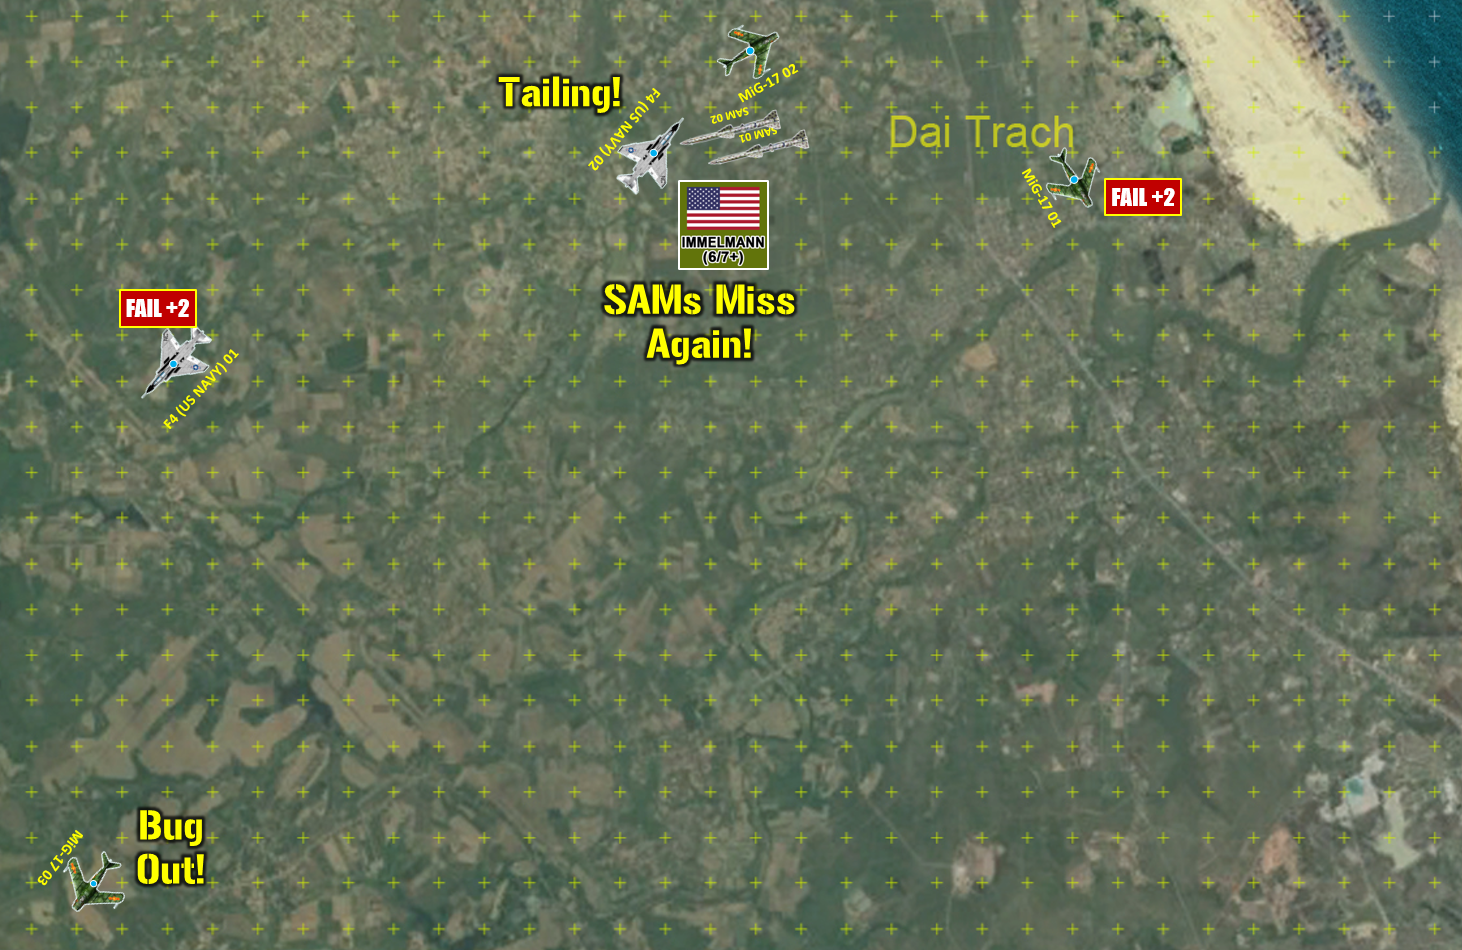 My last two SA-2s finally launch. Do you think they hit? Oh, of course not. MiG 01, meanwhile, has been but by those Phantom gun pods, I have lost a maneuver class (control surfaces hit) and all guns … so he’s now a flying clay pigeon whose best move is to dump altitude for speed and bug out to the southwest. Damaged or not, Phantom 02 is now TAILING the SIX of MiG 02. Elessar is in position and makes the tailing roll (this rule allows you to stay behind an eligible target and move with him regardless of initiative) … but my airbrakes, slower stall speed, and much tighter turn radius will fly the bird to the Yankee dog’s efforts to stay on my six. If only my wingman (MiG 01) hadn’t failed his Split-S roll …
 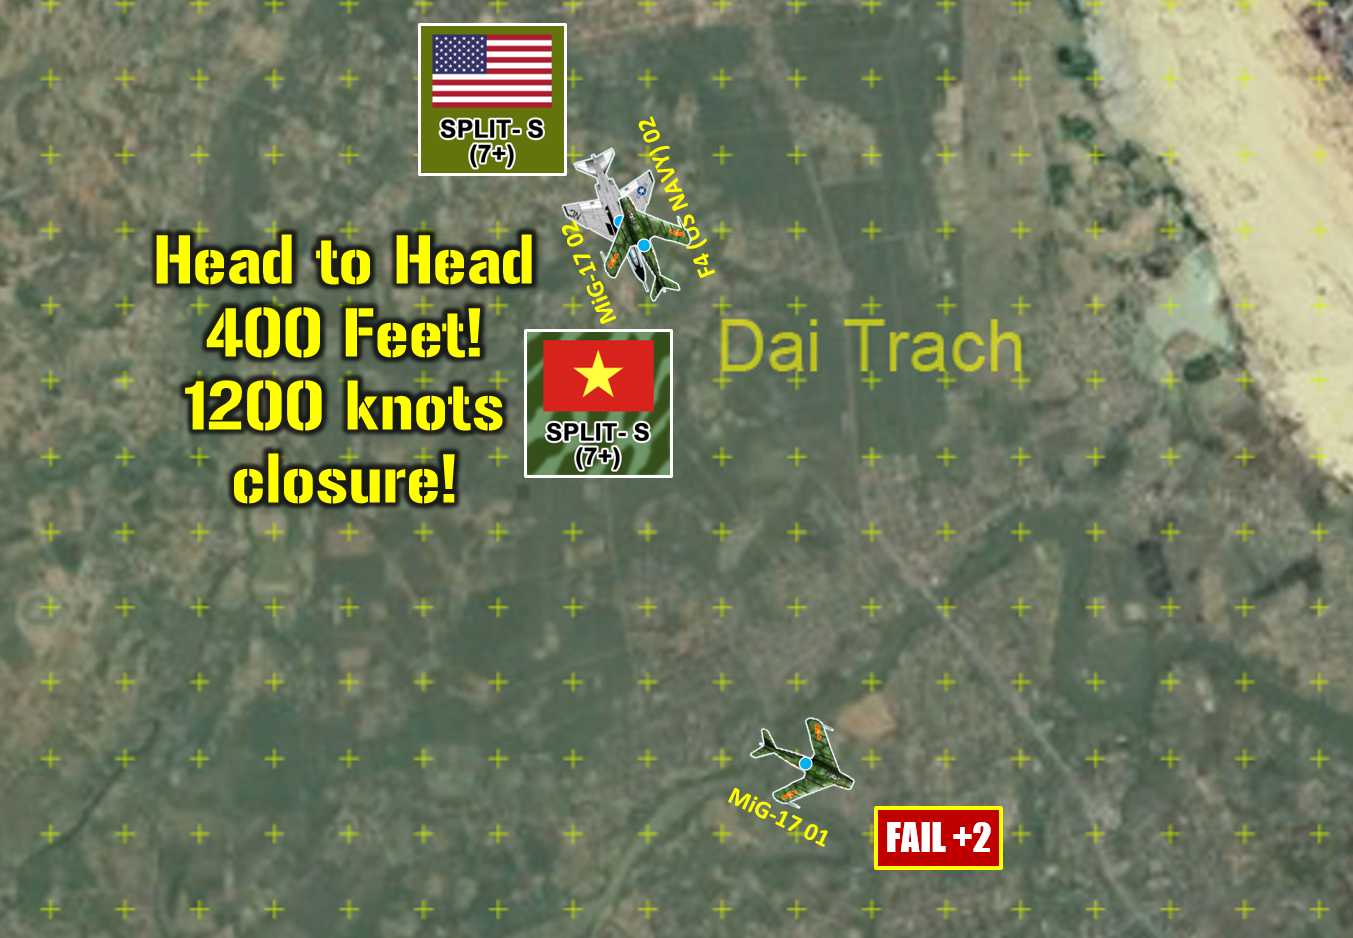 Yes, this game gets desperate at the end. After cutting to within 400 feet of me at one point, Phantom 02 overshoots. I pull a Split-S, rolling on my back and curling down, pulling out and rolling back over with pretty much any facing I choose ... Right at the Phantom. Unfortunately for me, Elessar’s declared the same maneuver (yes, declarations like this are made blind). Long story short, we wind up 1000 feet lower, screaming toward each other at 12” a turn (each 1” of movement = 50 knots, each grid on this map is ¼ mile). So again we’re at 400 feet or so (blue dot designates actual position of the aircraft) … each doing 600 knots for 1200 knots closure. ALL GUNS FIRE! He only nicks me but I clobber the Phantom, doing another three points of manage. He’s now at 5 damage, over half, so he’s now “Crippled.” Crippled aircraft have half speed, which he’s now exceeding by 2. That’s two MORE damage points. He’s out of ammo, and his missile system is basically ripped out of the plane, and his damage is now 7. He has ONE DAMAGE POINT LEFT … completely unarmed, and crippled. I CAME SO CLOSE!
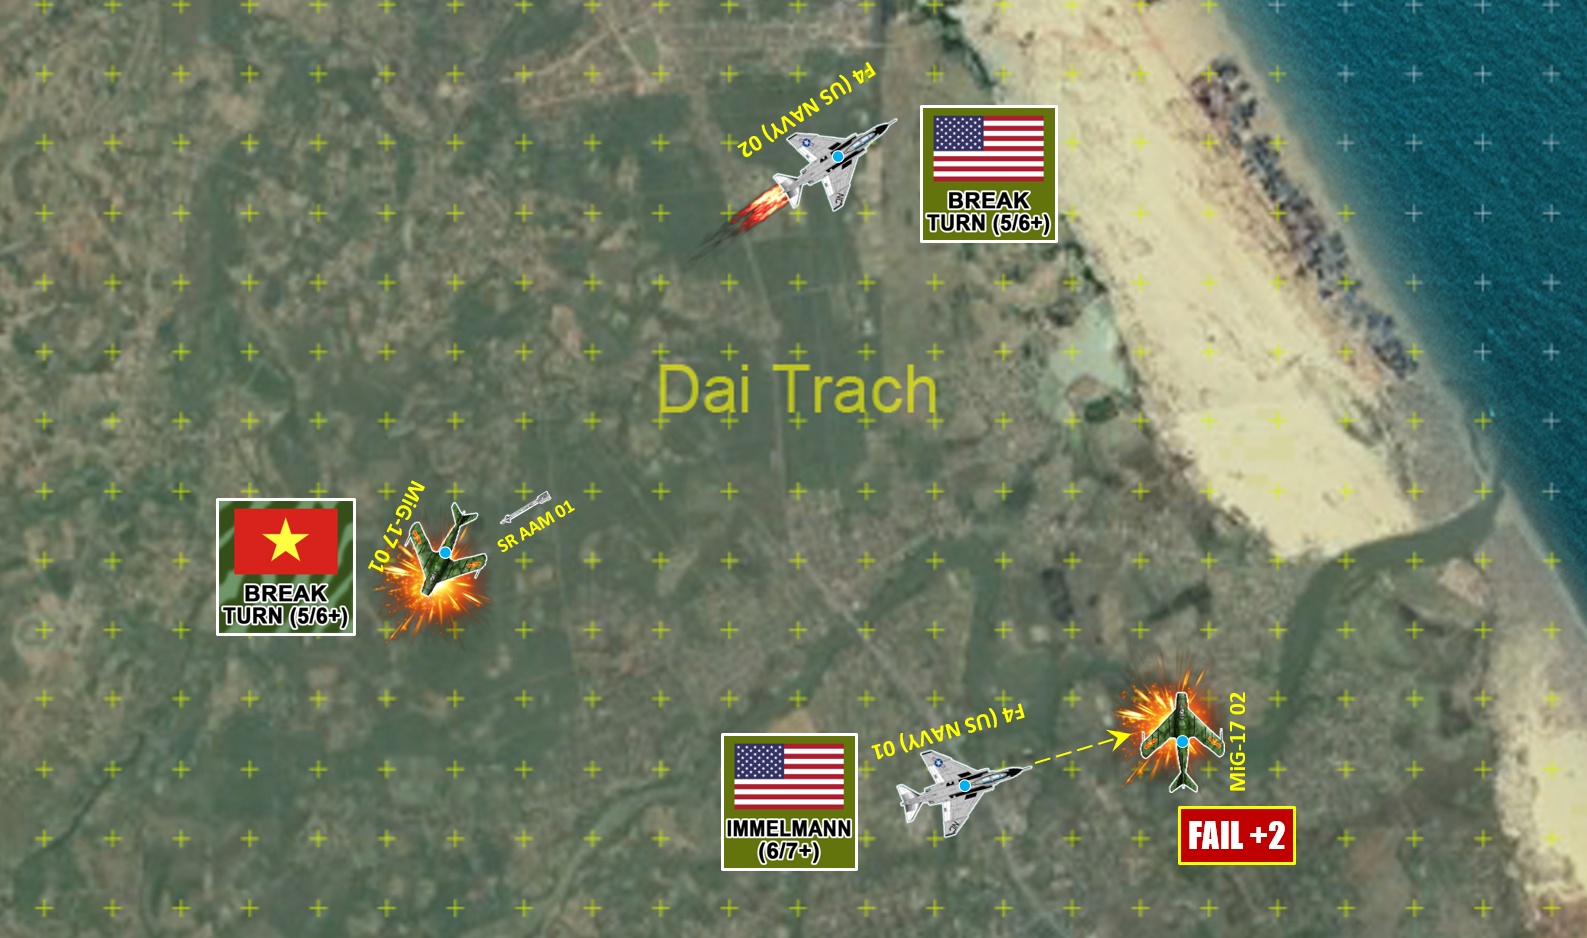 Well, the game ends on Turn 6 with merciful speed. As Phantom 02 bugs out, Phantom 01’s Sidewinder missile from last turn hits MiG 01 despite his successful Break Turn … and a half-deflection gunnery shot from Phantom 01 also hits damaged MiG 02. That’s three MiGs shot down and one bugged out (all MiG pilots made successful bail out checks but one), after which Phantom 01 will be escorting his limping, smoking, crippled, unarmed wingman back to the carrier.
 CONGRATS ON THE VICTORY @elessar2590! You’re warned, though! I’ll get you next time! 😀
AirWar C21 - North Vietnam
Later today I’m having a game of AirWar C21 with @elessar2590 – where we’ll be in the skies over North Vietnam as part of the “Rolling Thunder” operations that took place from 1965-1968.
We hope to have this game streamed live on the Sitrep Podcast Channel on Twitch, available here:
Our time is set up for 9PM UK time (4PM East US time, 6AM Monday Australian East Time).
We hope you’ll come by and check us out!


Normandy - D+21 - West of Caen
So yesterday my friend @damon and I had a great game of Panzer Leader, meant as a “historical approximation” of the Sherwood Rangers’ participation in Operation Martlet. This was an attack launched in Normandy during the last days of June, 1944, west of Caen. The objective was to pin German forces in place and prevent lateral shifts of reinforcements against the upcoming (much larger) attack of Operation Epsom, one of many British attempts to clear German divisions from the vicinity of Caen.
The Sherwood Rangers were requested by @damon , I found the battle, researched its general layout and topography, designed the scenario and the new map, and facilitated the game. I played units of the 12th SS Hitlerjugend and Panzer Lehr, while Damon fielded forward elements of 8th Armoured Brigade (Sherwood Rangers’ parent formation). I also included other units of 8th Armoured, including most of 4/7 Dragoons and a little of the 24th Lancers, as I’m not 100% certain they were there on this particular day (they may well have been, I only had a couple days to research this and design the game).
The three historical phase lines of this assault were Barraccuda (through the town of Fontenay-le-Pesnel), Walrus (extending ENE out of the high ground of Tessel Wood) and “Albacore” (roughly along the line of towns Vendes and Rauray).
These phase lines were used as the basis for the seven objective hexes. Damon’s British must take four of them to win the game. Thus, he only has to match the rough historical outcome of the attack, not its actual planned objectives, which were not reached on the day in question.
Again, each hex is 150 meters. Most counters are a platoon, troop, or battery. The game lasts 10 turns.
Oh, one more thing before the rivet-counting snipers start taking shots … these British tank troops are “intentionally inaccurate” historically. Again, Panzer Leader runs on platoons / troops. So each of these Sherman counters should read 10-A-8, math that is worked out to represent a four-tank troop of three “vanilla” Shermans and a Firefly. I gave Damon the choice and he elected to break up his three battalions into specialized troops, so each squadron has three counters of 9-A-8 “pure” Shermans and one of 14-A-10 Fireflies.
 An overview of the map, initial German dispositions (Panzer Lehr’s right wing in grey, 12th SS HJ left wing in black). Along the north yellow dotted line is the start line for the British. The three historical phase lines are shown, along with the seven objective hexes in yellow targeting icons (some are obscure by German units). Note that we are NOT doing this whole battle “full bore,” i.e., with the 147th Infantry Brigade / 49th West Riding Infantry Division (the formation 8th Armoured Brigade was supporting in this attack) or the main line of German resistance, drawn by 26th SS Panzergrenadier Rgt / 12th SS HJ Division. After the detailed, high-density, infantry-heavy slaughter of Omaha, I was in the mood for a more manageable, armored maneuver game.
 Damon starts his advance south, making contact with an over-stretched, understrength detachment of SS PzGrRgt 26 (really only a platoon of infantry, a battery of 7.5s, and some transport). Tow supporting British armored battalions (understrength) flank to either side.
 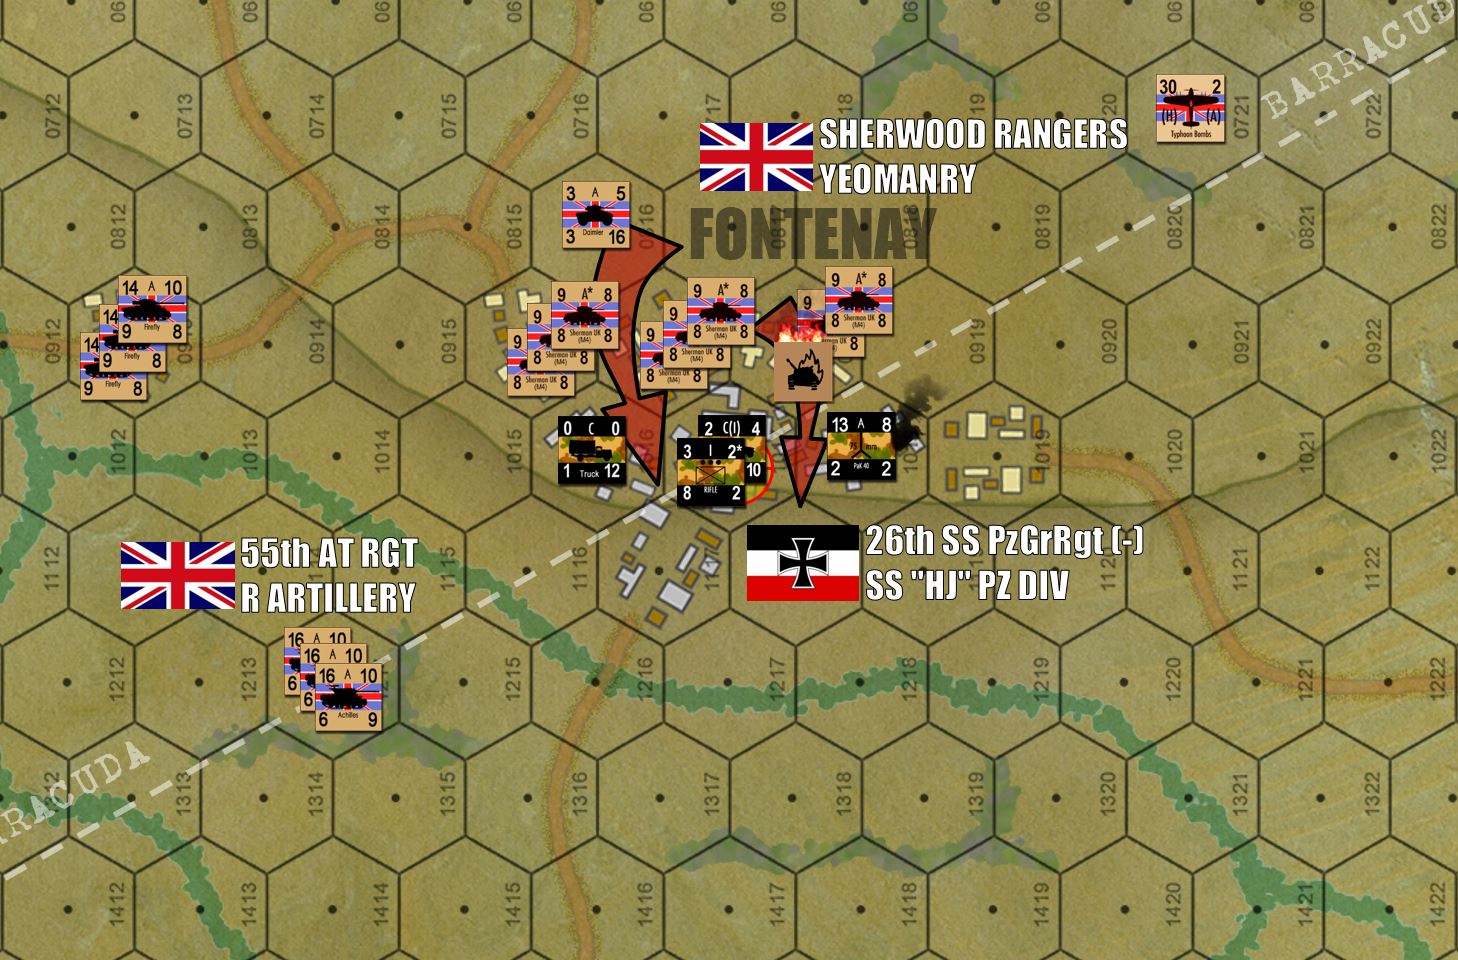 The battle in the town heats up. With the Germans dug in “heavy” urban hexes (gray buildings = stone, brick, concrete, etc.), they’re proving tough to dig out. One troop of Shermans is already afire.
 Off to the east, 4/7 Dragoons confronts 20 Panthers and some SS armored cars. The problem facing Damon here is a daunting one. Any German counter deployed in a hex containing a green “hedgerow” hexside is considered concealed per Panzer Leader rules, until it fires or an enemy unit moves adjacent. So the Germans are almost certainly going to get the first shot. Not only that, but by using split move and fire rule, they can then displace and “hide again.” Normally this isn’t that big a deal, as you can shoot the Germans as they move, but these Panthers are just fast enough, and these hedgerows are just close enough, where that window will NOT be wide enough for Damon to return fire in most cases. So yes, you force the Germans back ... but you never kill them and you are literally building a road of burning Shermans. Welcome to the hedgerows. Much like the Allied commanders of the day, Damon must find a way to break this dilemma. Meanwhile, my ATGs in the French farm open fire on transport units trying to tow 17-pounders into position. I hit one while it’s still limbered. It gives my position, but it was worth it for a kill on a battery of 17-pounders. You can see what Damon was trying to do ... set up more angles on my Panthers so at least when he flushes them (usually at the cost of more burning Shermans), at least SOMEONE gets a shot at them. Now in reality, this “flushing” would be often attempted by L5 spotter aircraft or infantry. But this was a game we were trying to wrap up in less than the 9.5 hours we spent on Gold Beach before.
  Damon wisely gives up the idea of 24th Lancers on Tessel Wood (for now), consolidating the understrength battalion with Sherwood Rangers to put pressure on the German center. AS for me, I know Fontenay is lost, I’m just hoping to plug the British up there as long as possible. Already it’s. given me time to move up more of the SSPzRgt 12 and elements of SS sPzAbtg 101. However, Typhoons are now overhead, ready to hit SS tanks when the “hedgerow hop” ... depending on WHERE exactly they hop (in this terrain I have PLENTY of choices). Meanwhile, 2.0cm FlaK halftracks that took a poke at the Typhoons were in turn spotted by Shermans and shot into flaming wreckage (German “wreck” counter at lower right). That shot was at just over 1000 yards! Well done!
 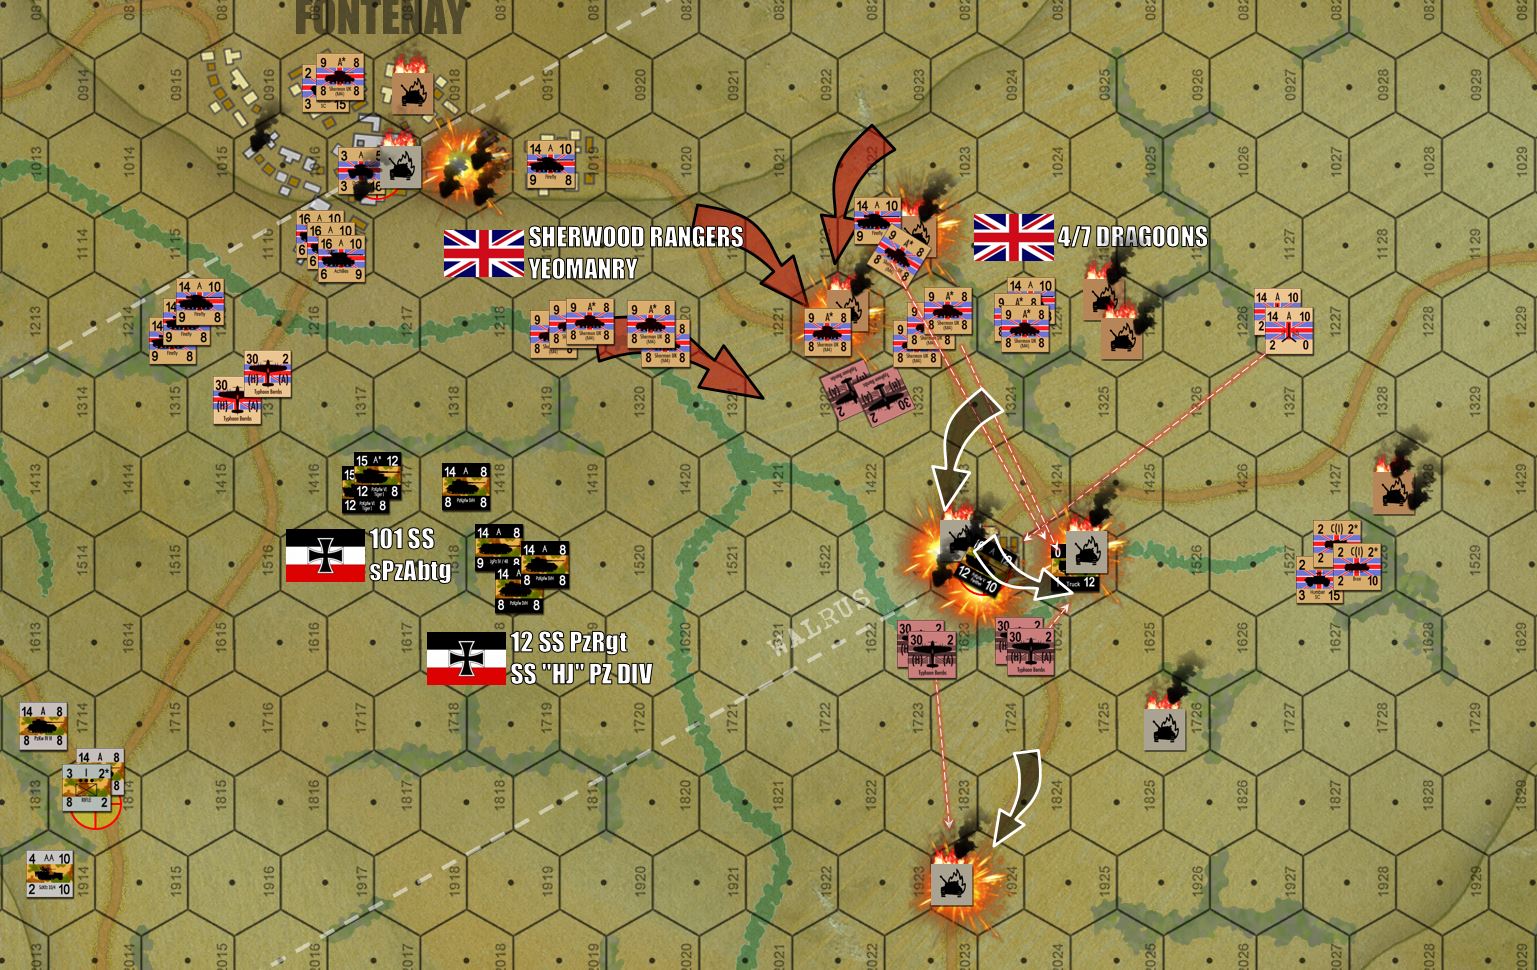 At last, German resistance ends in Fontenay. One MORE turn to redeploy, and finally Damon launches a bloody, point-blank assault on SSPzRgt 12 on the east. My fifteen Panthers fire, actually don‘t do that well, (only two Sherman platoons eliminated and a third “dispersed”). Then it comes time to run. The problem is, Damon how has close to seventy tanks within a kilometer or so, there are a lot less hiding places for me to bolt to after my “bushwack” fire. One Panther platoon is takes cover in the farm. I can’t put more in there because there’s already burning armored cars in there (wreck counters take up “space” in a hex, they count as a unit for stacking purposes), and my ATG battery is still in there. Just to get the ONE Panther platoon in there I have to sacrifice my trucks (transport for the ATGs). Another Panther platoon tries to run for down the road, but the Typhoons re-enact a classic Normandy moment, throwing rockets into German armor caught on a road in daylight. Another platoon dies in the stream, where it tried to take hull-down positions. Only the platoon in the farm survives, and even they are pinned. They’ll eventually escape, put I’ve still lost two Panther platoons for four troops of Shermans ... not a good trade for the Germans at all.
 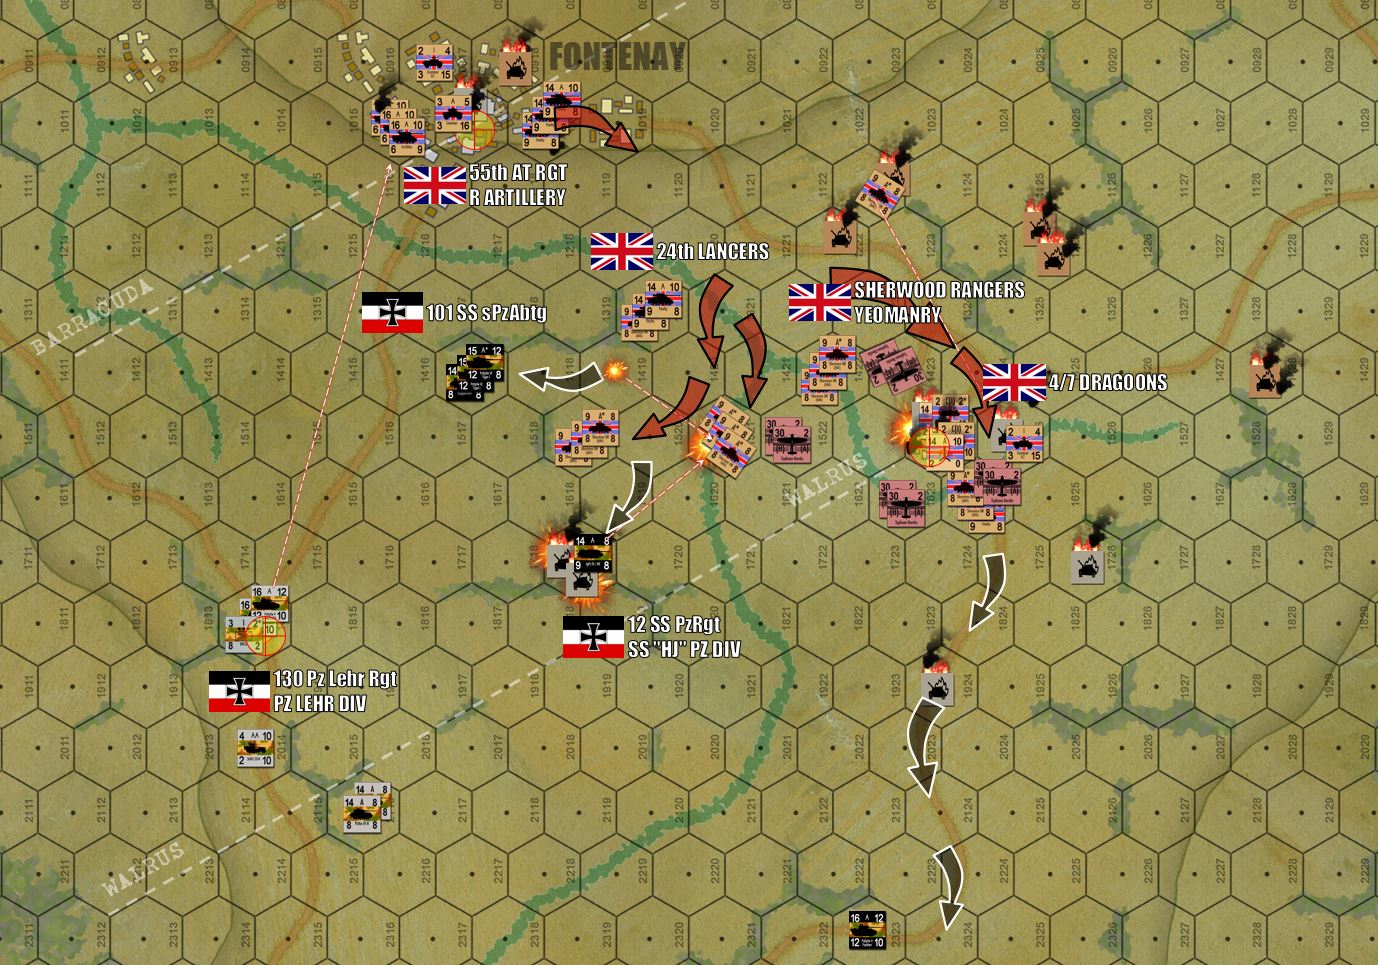 Emboldened by success, Damon’s 4/7 Dragoons and the Sherwood Rangers complete the cave-in of the German right wing, pivoting inward to roll up Phase Line Walrus. Other SS armored units now get to fire, but again I don’t do terribly well here. PzKpfw IVHs and even Tigers at LESS THAN 300 METERS fail to kill Shermans (okay, I pin down a down squadron, chalk that up to “Tiger Terror”). But of course Panzer Leader is a game smart enough to recognize that Tigers aren’t the scariest thing on the field by a long shot (at least if you’re a British tank crew). Also, those Typ0hoons are positively murdering me. The good news, they’re now OUT OF ROCKETS. Also, my Tigers have all escaped, displacing to new firing positions 300 meters further down the hedgerow. In case you’re wondering what Panzer Lehr is doing all this time, they’ve now redeployed to cover the crossroad objective at the left hand side of the board, and they’re also covering the heights of Tessel Wood. Long story short, they’re facing off against the 55th Antitank Regiment / Royal Artillery (M-10 Achilles), still deployed on high ground in covered overwatch positions in Fontenay.
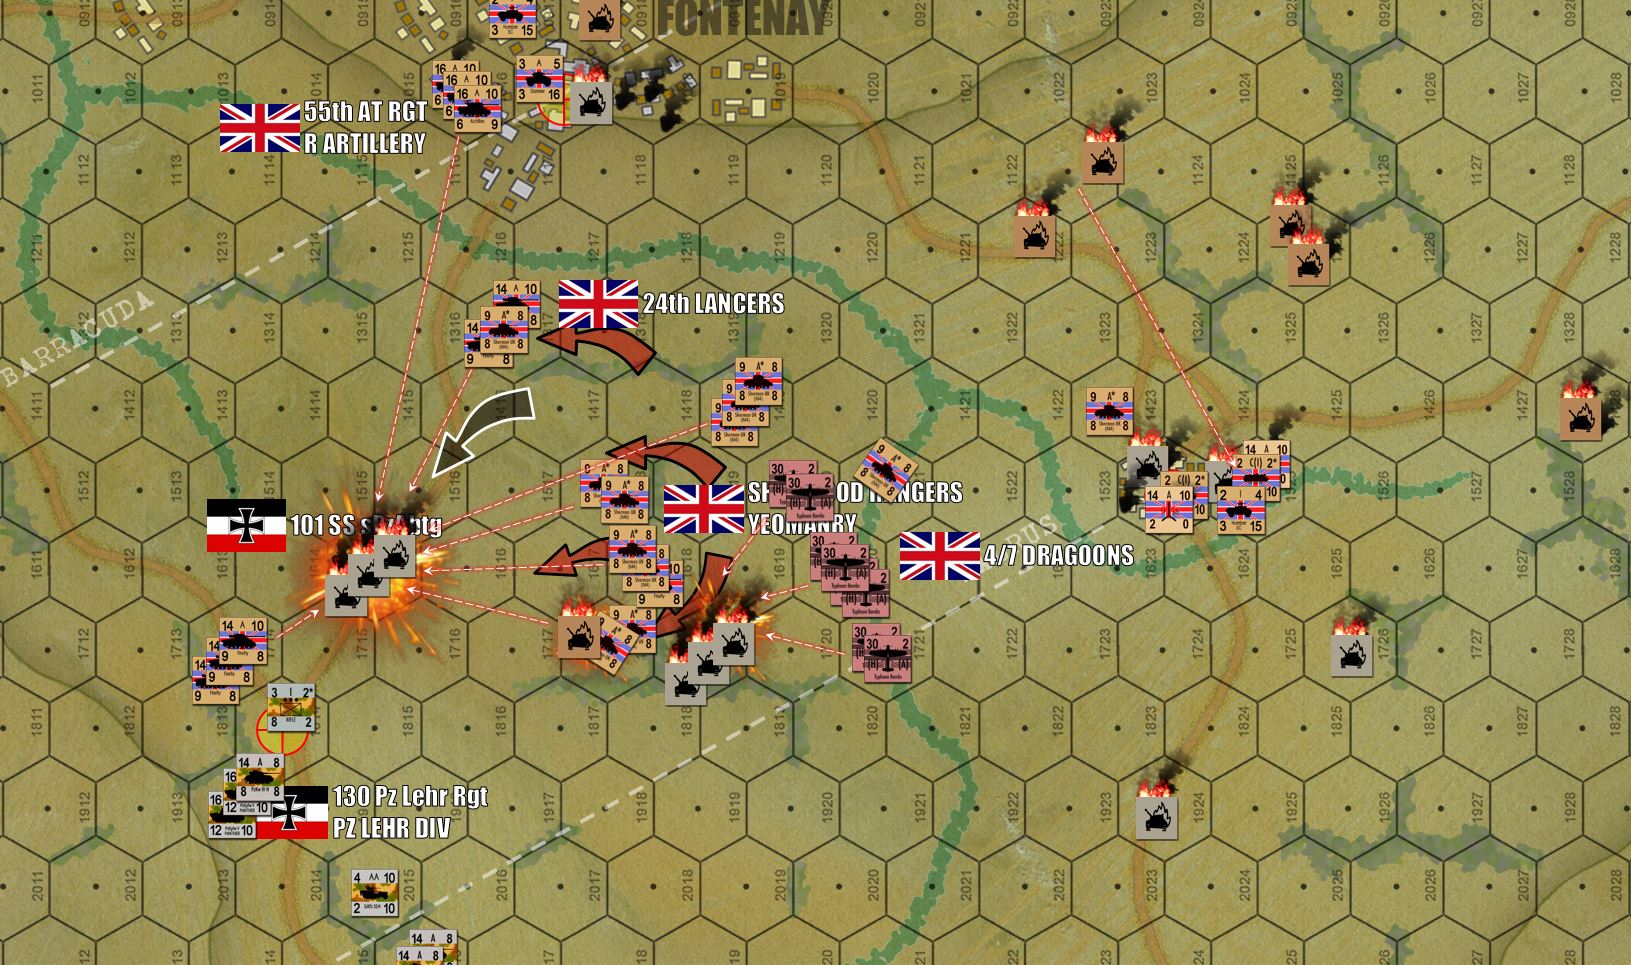 Again, the SS has stuck to its ground perhaps just a little too long. My Tigers and last PzKpfw IVHs (and JgPz IV / 48s) scored some more killed Shermans, but as they try to pull out ... My real problem here is that Damon’s learned how to assault hedgerows. You approach en masse and from MORE THAN ONE DIRECTION. Note the Squadron of 24th Lancers flanking my former position from the north. Now, no matter which way I bolt out of the hedgerow, I’m getting pinged by someone. And by Someone, I mean EVERYONE ... Because these Tigers aren’t as fast as my Panthers, obviously. In that open ground, a whole company of SS panzers is positively murdered from no less than seven positions ... seventy five tanks open fire and that’s the end of two platoons of Tigers and one of PzKpfw IVHs.
 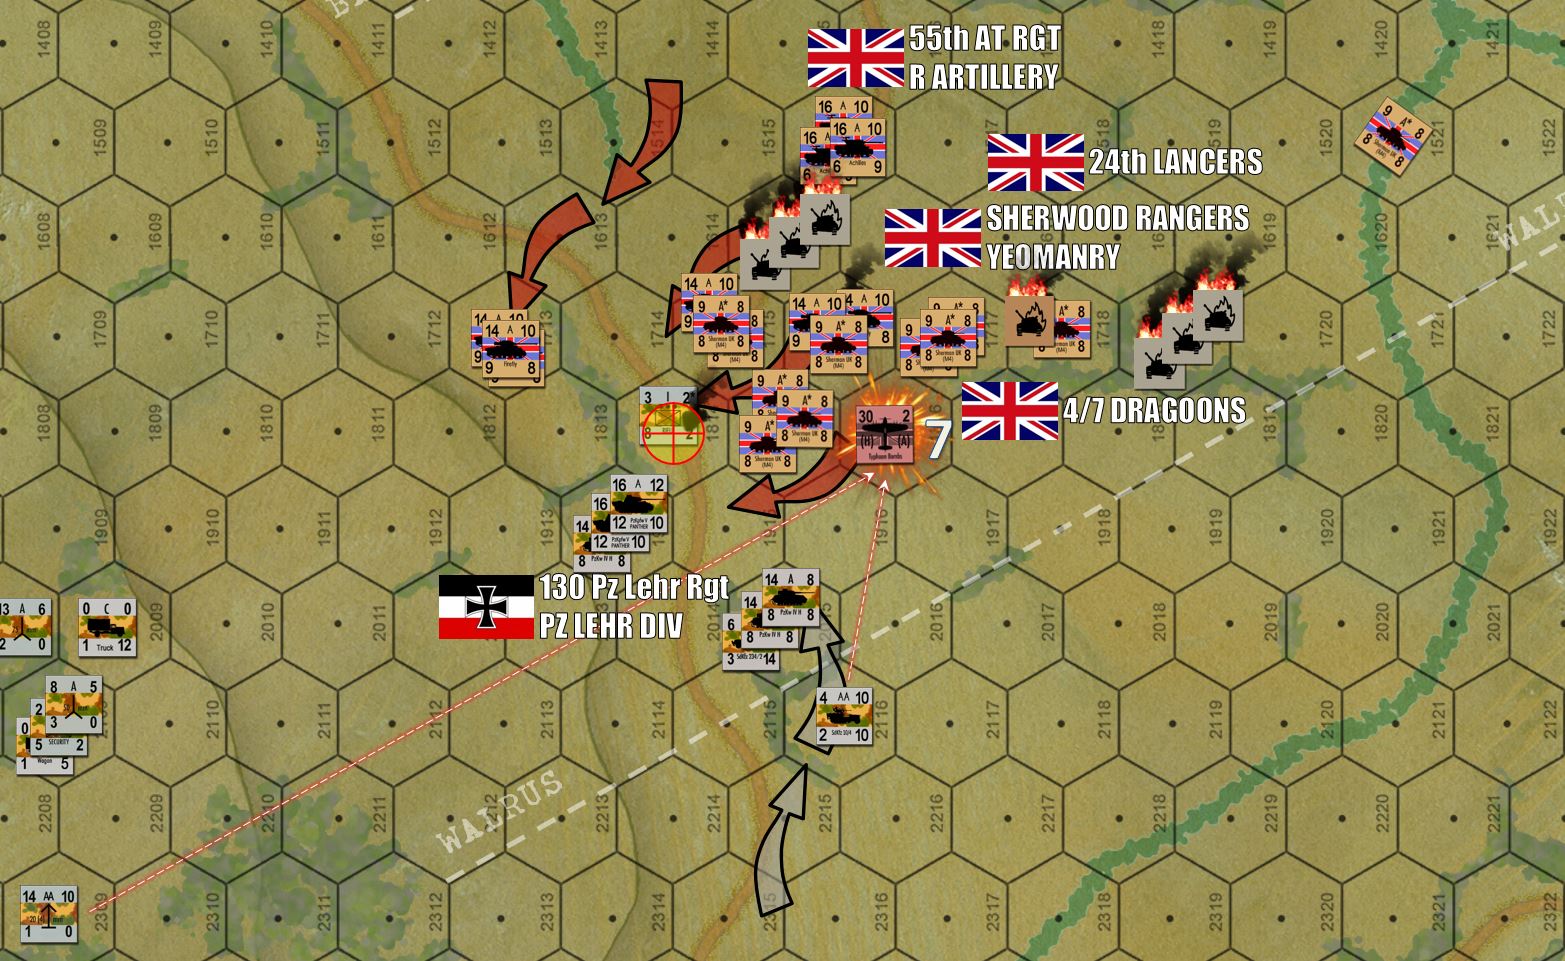 With SS Pz Rgt 12 more or less blown out of war (SOME survivors further south in Tessel-Bretteville), on Turn Nine Damon pushes forward in a combined regimental shove southwest toward the crossroads at the west end of Phase Line Walrus, and another objective hex. My Panzer Lehr Panthers and Mark IVs bide their time, invisible under cover. I know the clock is ticking against Damon and I can afford to wait until he HAS to shove right up against me for a very unhealthy dose of point-blank ambush fire. As his Typhoons come in for a strafing attack (again, all rockets expended but they still have guns) against the Lehr grenadiers in the objective hex, two FlaK positions even manage to shoot one of the Typhoons down!
 BOOM! Damon makes the fateful shove. My cagey Panzer Lehr crews positively MAUL his attack, some Pumas even getting some shots in. We kill three troops of Fireflies (ouch) and one of Shermans, Immediately falling back down the road toward Tessel-Bretteville and Vendes. We almost all escape, too, British counterfire manages to pin one platoon of PzIVs ... which would probably be surrounded and destroyed on Turn 11.
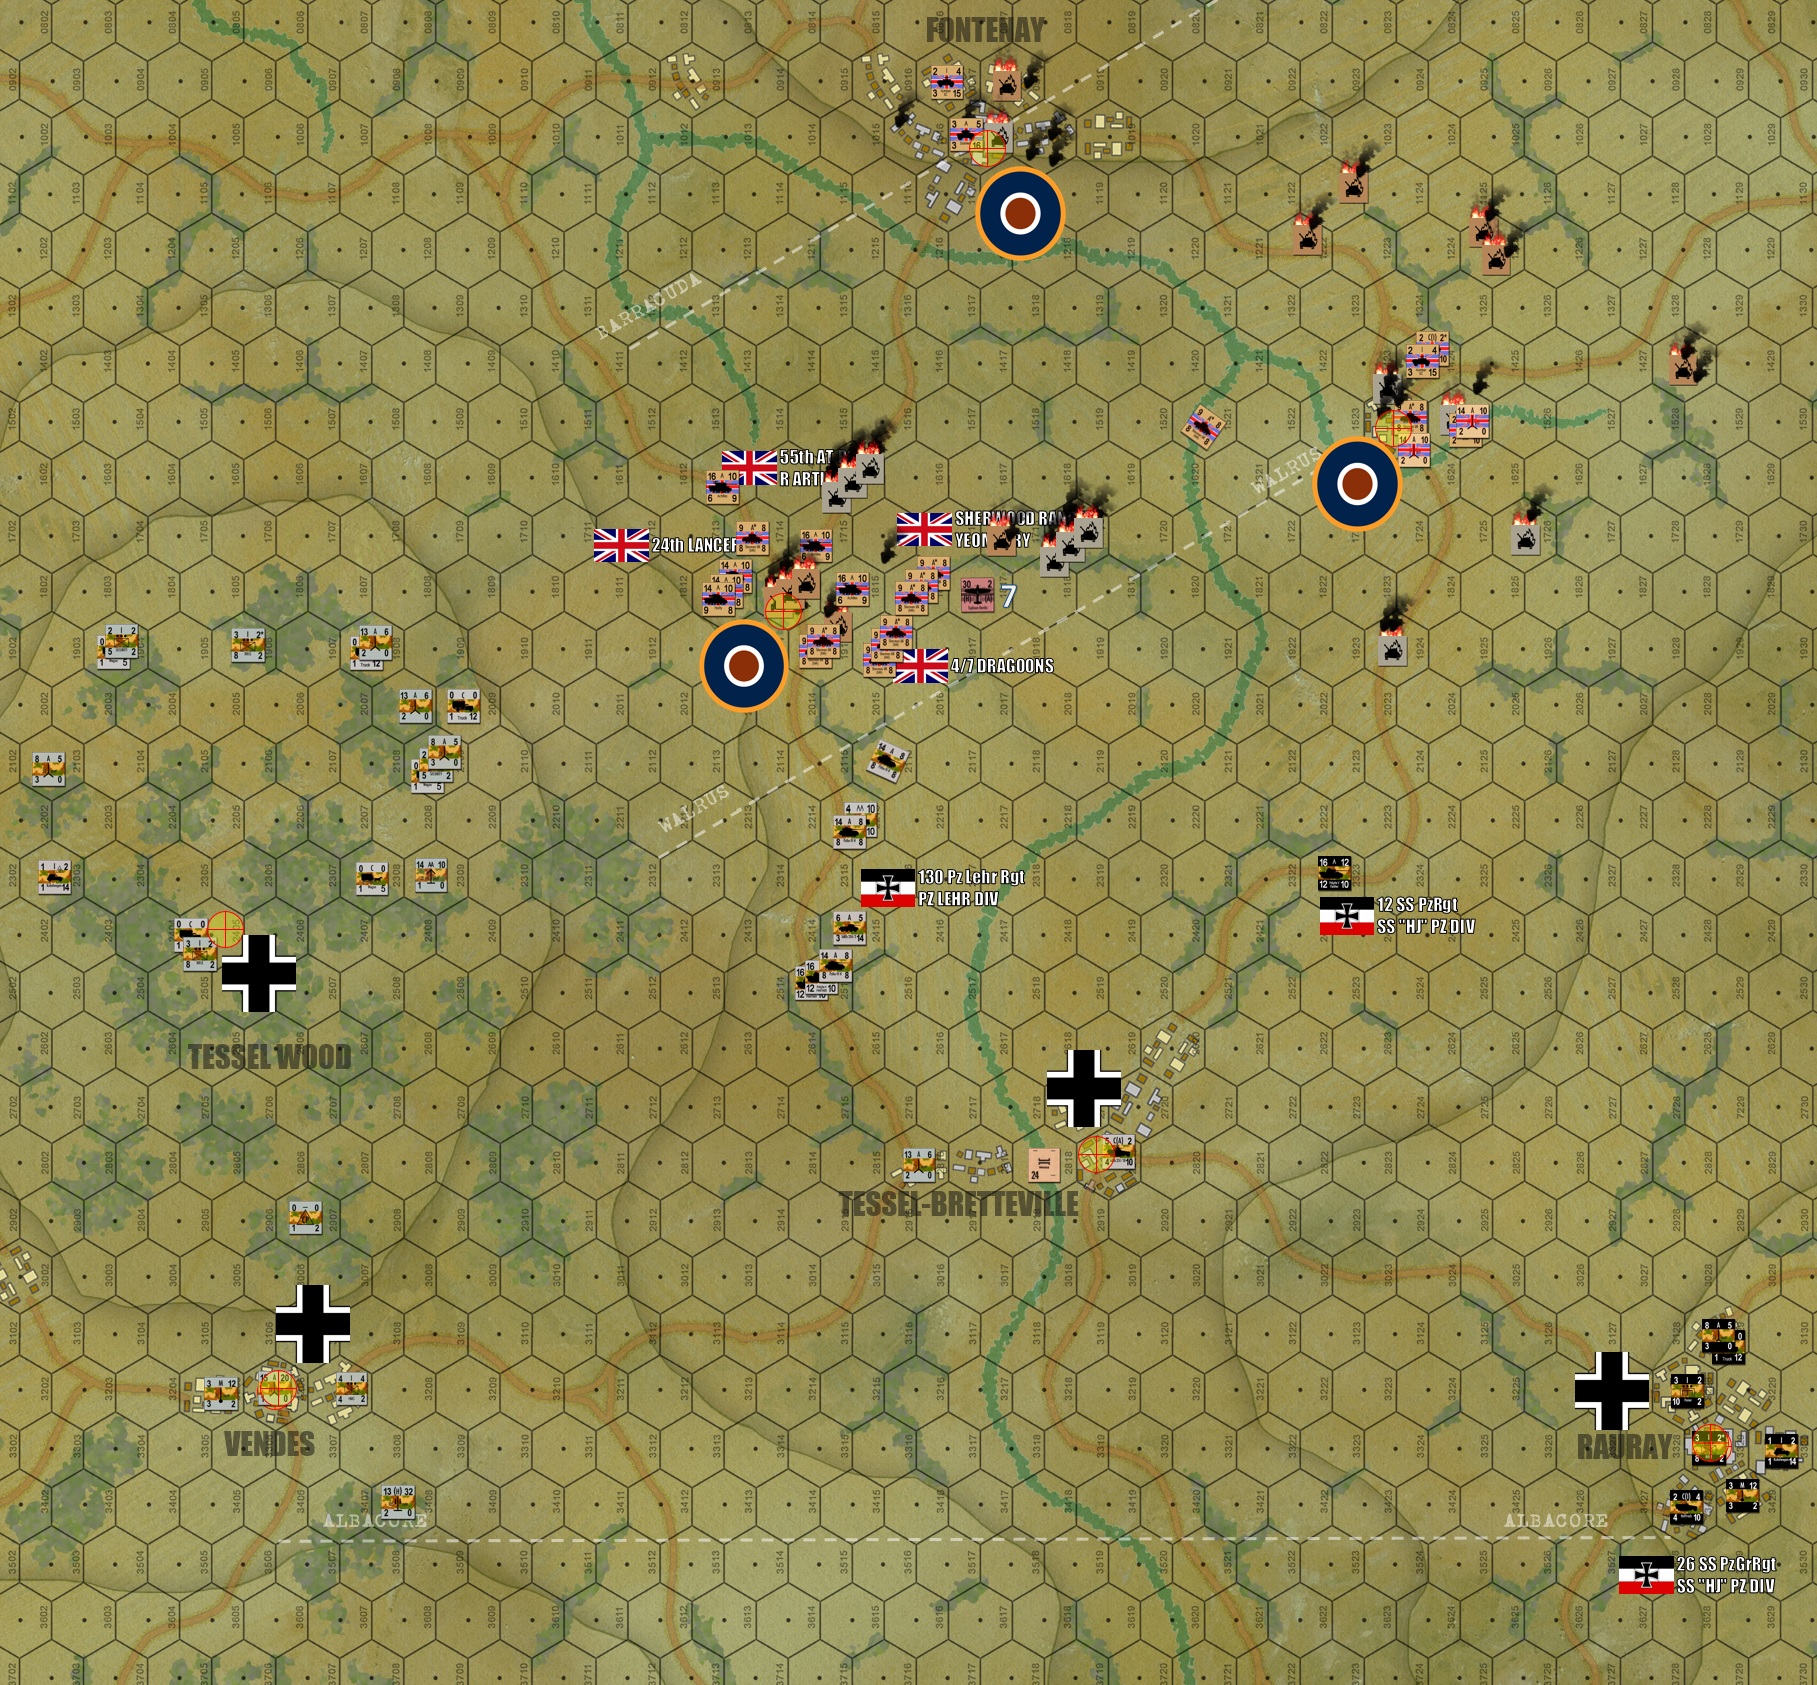 So that’s Turn 10, and that’s game. Of the seven objective hexes, the Germans still hold four, making this a bloody and narrow German win. Cheers to Damon for continuing to try Panzer Leader (he’s braver than most in this regard) and yes, he IS getting better. I swear I could almost see the light bulb going off starting on Turn 5 and 6 ... regarding just how WEAK the German forces are despite their “scary cats” ... assuming you attack them in a well-managed, multi-directional bum-rush. Even a Panther can only kill one Sherman at a time, after all. The problem was ... it was Turn 5 or 6 ... and the game was already half over by then. What beat him wasn’t my tanks, it was time. Note that Tessel Wood is now VERY WEAKLY defended ... with two more turns he could run his faster M-10s or even his scout cars up there and at least have a go at it. Again, once he takes FOUR objectives ... more than half ... he wins (i.e., roughly Phase Line Walrus ... the approximate historical result of the attack).
 Part Three Finale of the Oriskany vs. Gianna Vietnam Game posted
Good morning, all ~
The third and final part of the Valor & Victory: Vietnam game between myself and Gianna ( @stvitusdancern ) is finally up. See just how close this one finally came in the end, and hour our new Special Forces units work against PAVN / NVA communist regulars in the III Corps Central Highlands along the Laotian border!
Guns Fall Silent on Omaha - It Is Finished.
Turn Twenty, and the game overall, is finally complete.
At twelve minutes a turn, this puts us at 240 minutes after H-Hour, four full hours.
In all, this game took seven days, playing at least 3-4 hours a day. So how did it go?
Well, as students of the battle will tell you, the Americans are already kind of running away with it. We’ll get into the “how and why” of it later, but for now let’s see how this game finally burns down to a conclusion of our re-creation of D-Day on “Bloody Omaha.”
 Turn 16: As expected, the badly-damaged German center collapses almost immediately. The St. Laurent Objective Hex is taken, joining the Les Moulins/Dog Three draw on the left flank of 116/29th InfDiv with the right flank of 16/1st InfDiv coming down the Easy Three draw.
  In the west, the Americans follow up the win at Vierville with an infantry powerhouse attack on the next objective, Chateau de Vaumicel. Other ranger units are already splitting off to secure exit hexes off the west end of the board. Historically this was the start of an effort to reach fellow Rangers at Pointe du Hoc.
 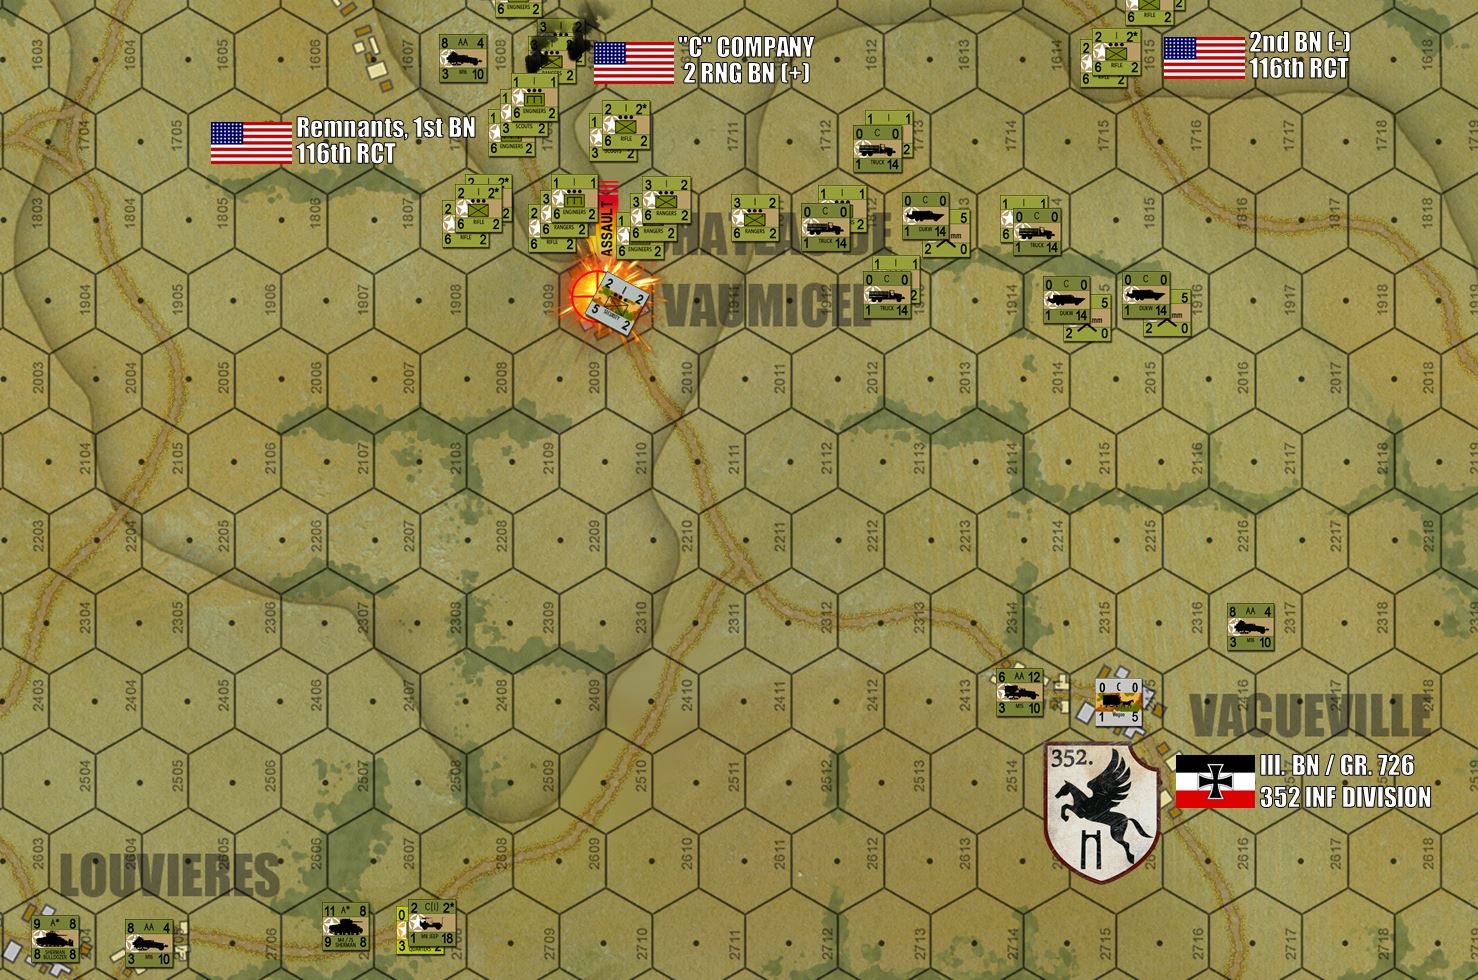 Further to the south, we see that the entire III. Battalion / 726. Grenadier Regiment / 352nd Infantry has been reduced to a single horse-drawn wagon team. Seriously. Five horses, ten men, five wagons. Their equipment is probably a handful of rifles and pistols, and a good bottle of French wine if they’re lucky. Drink it fast, boys ... the Americans are already encircling you and closing the road to Louviers as well.
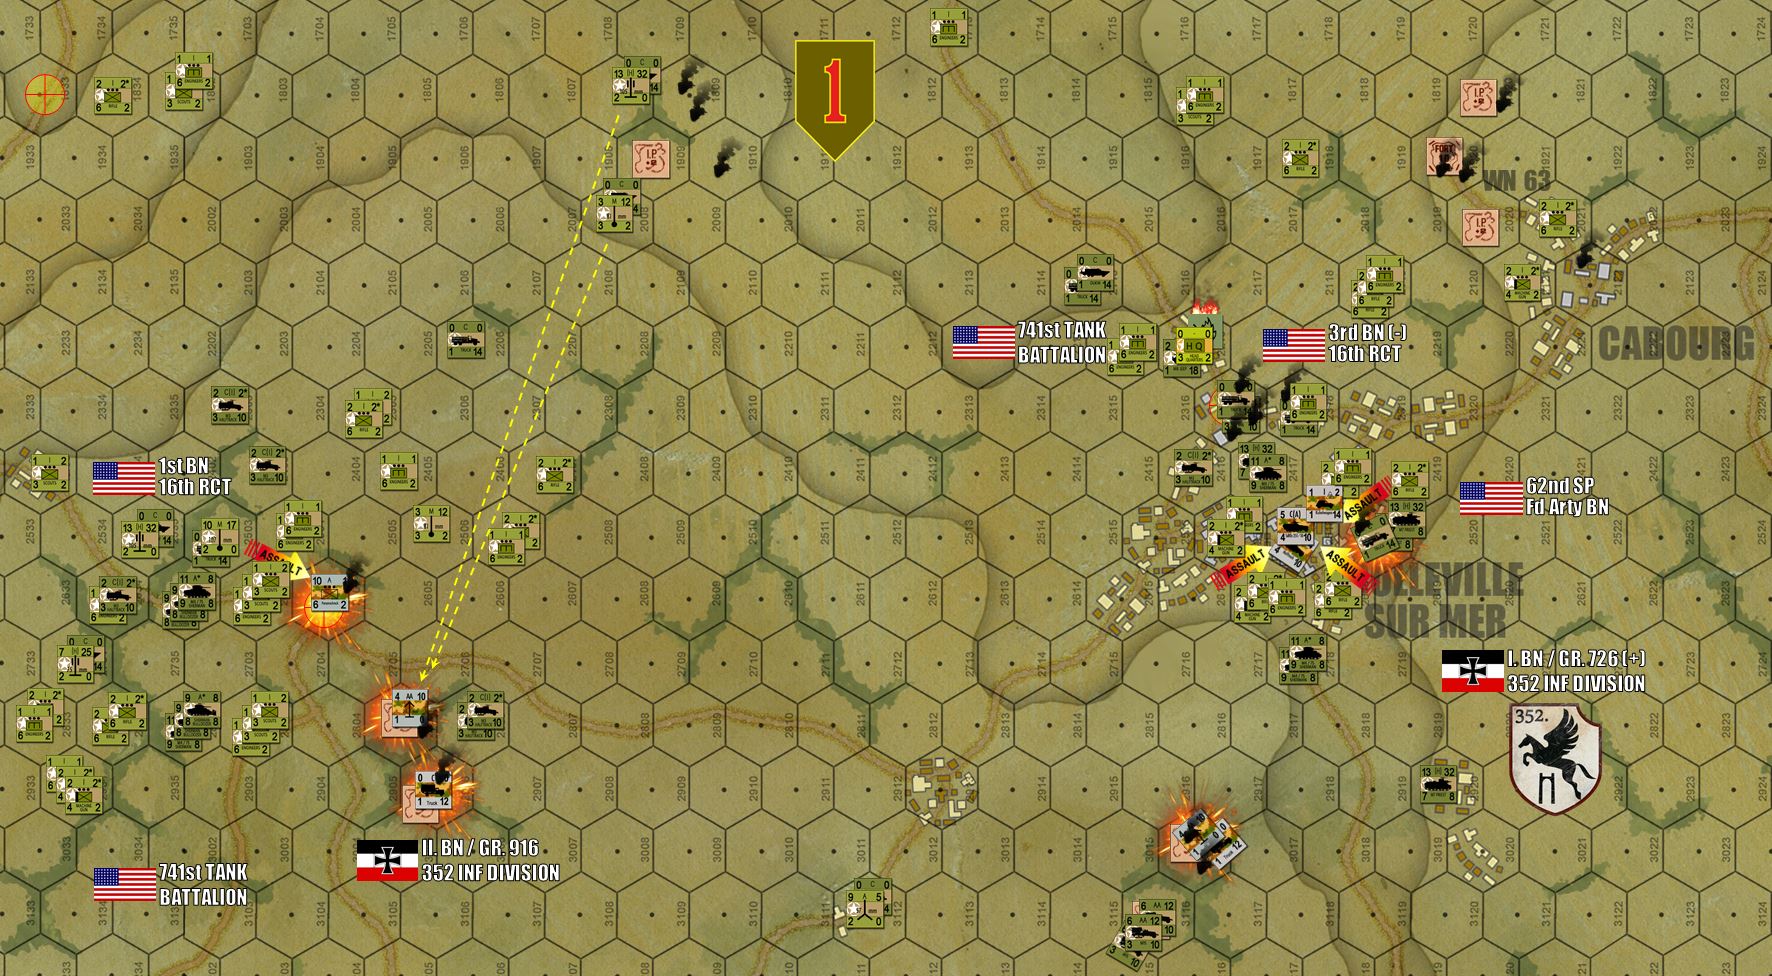 Turn 18, and the last battles are sizzling down in the east. Historically, Colleville-sur-Mer wasn’t really secured until D+1, and here the Germans are putting up a tough last resistance as well. But their left wing is gone and faster American mechanized units area already behind them, taking out supporting FlaK positions SSW of the town. To the west, American spotters have called in coordinates to the only land-based indirect artillery mission the Americans will make in this game, splashing 81mm mortars and 105mm field howitzers on the last FlaK positions of II Bn/916 Rgt.
  Turn 19: The Americans spread out and occupy every village and road in the southwest corner of the board, totally securing this whole section of the board. This is at least 2 miles deeper than the Americans historically secured in this sector.
 Same in the southeast. For the record, this was the approximate “phase line” predicted in V Corps HQ operational planning. Historically, they didn’t come close. But here we seem to have actually pulled it off.
 Turn 19, the second big “Operational Wave” starts to come ashore, two ENTIRE NEW Regimental Combat Teams (RCTs). To the west we have 115th RCT, originally part of 29th Infantry and assigned to come in on 29th’s beaches (Dog Green, Dog White, Dog Red, and Easy Green). To the east we have 18th RCT, part of 1st Infantry. Now historically, the western landings were so bad, the decision was made to change 115th’s landing site and put BOTH of these RCTs on East Red and Fox Green, reinforcing the 1st Infantry that was actually making better headway. But since both divisions are doing pretty well here, I kept with the original plan and landed 115th on the original target. Hey, it’s not every day you get to make a CORPS COMMANDER decision in Panzer Leader. Oh, and by the way ... Turns 1-19 of this uber-game were the MORNING landings (16th and 116th RCT). 115th and 16th RCT are the MID-DAY landings. In the afternoon a THIRD wave would land a FIFTH regiment, the 26th (the balance of 1st InfDiv) on Easy Red and Fox Green. The last part of the 29th InfDiv would not land until the next day (175th Rgt). So even with this whole second wave, we’re only looking at the first two-thirds of what these two divisions would but ashore, and ANOTHER WHOLE DIVISION (2nd Armored – “Hell on Wheels”) was behind that on June 8th IIRC.
 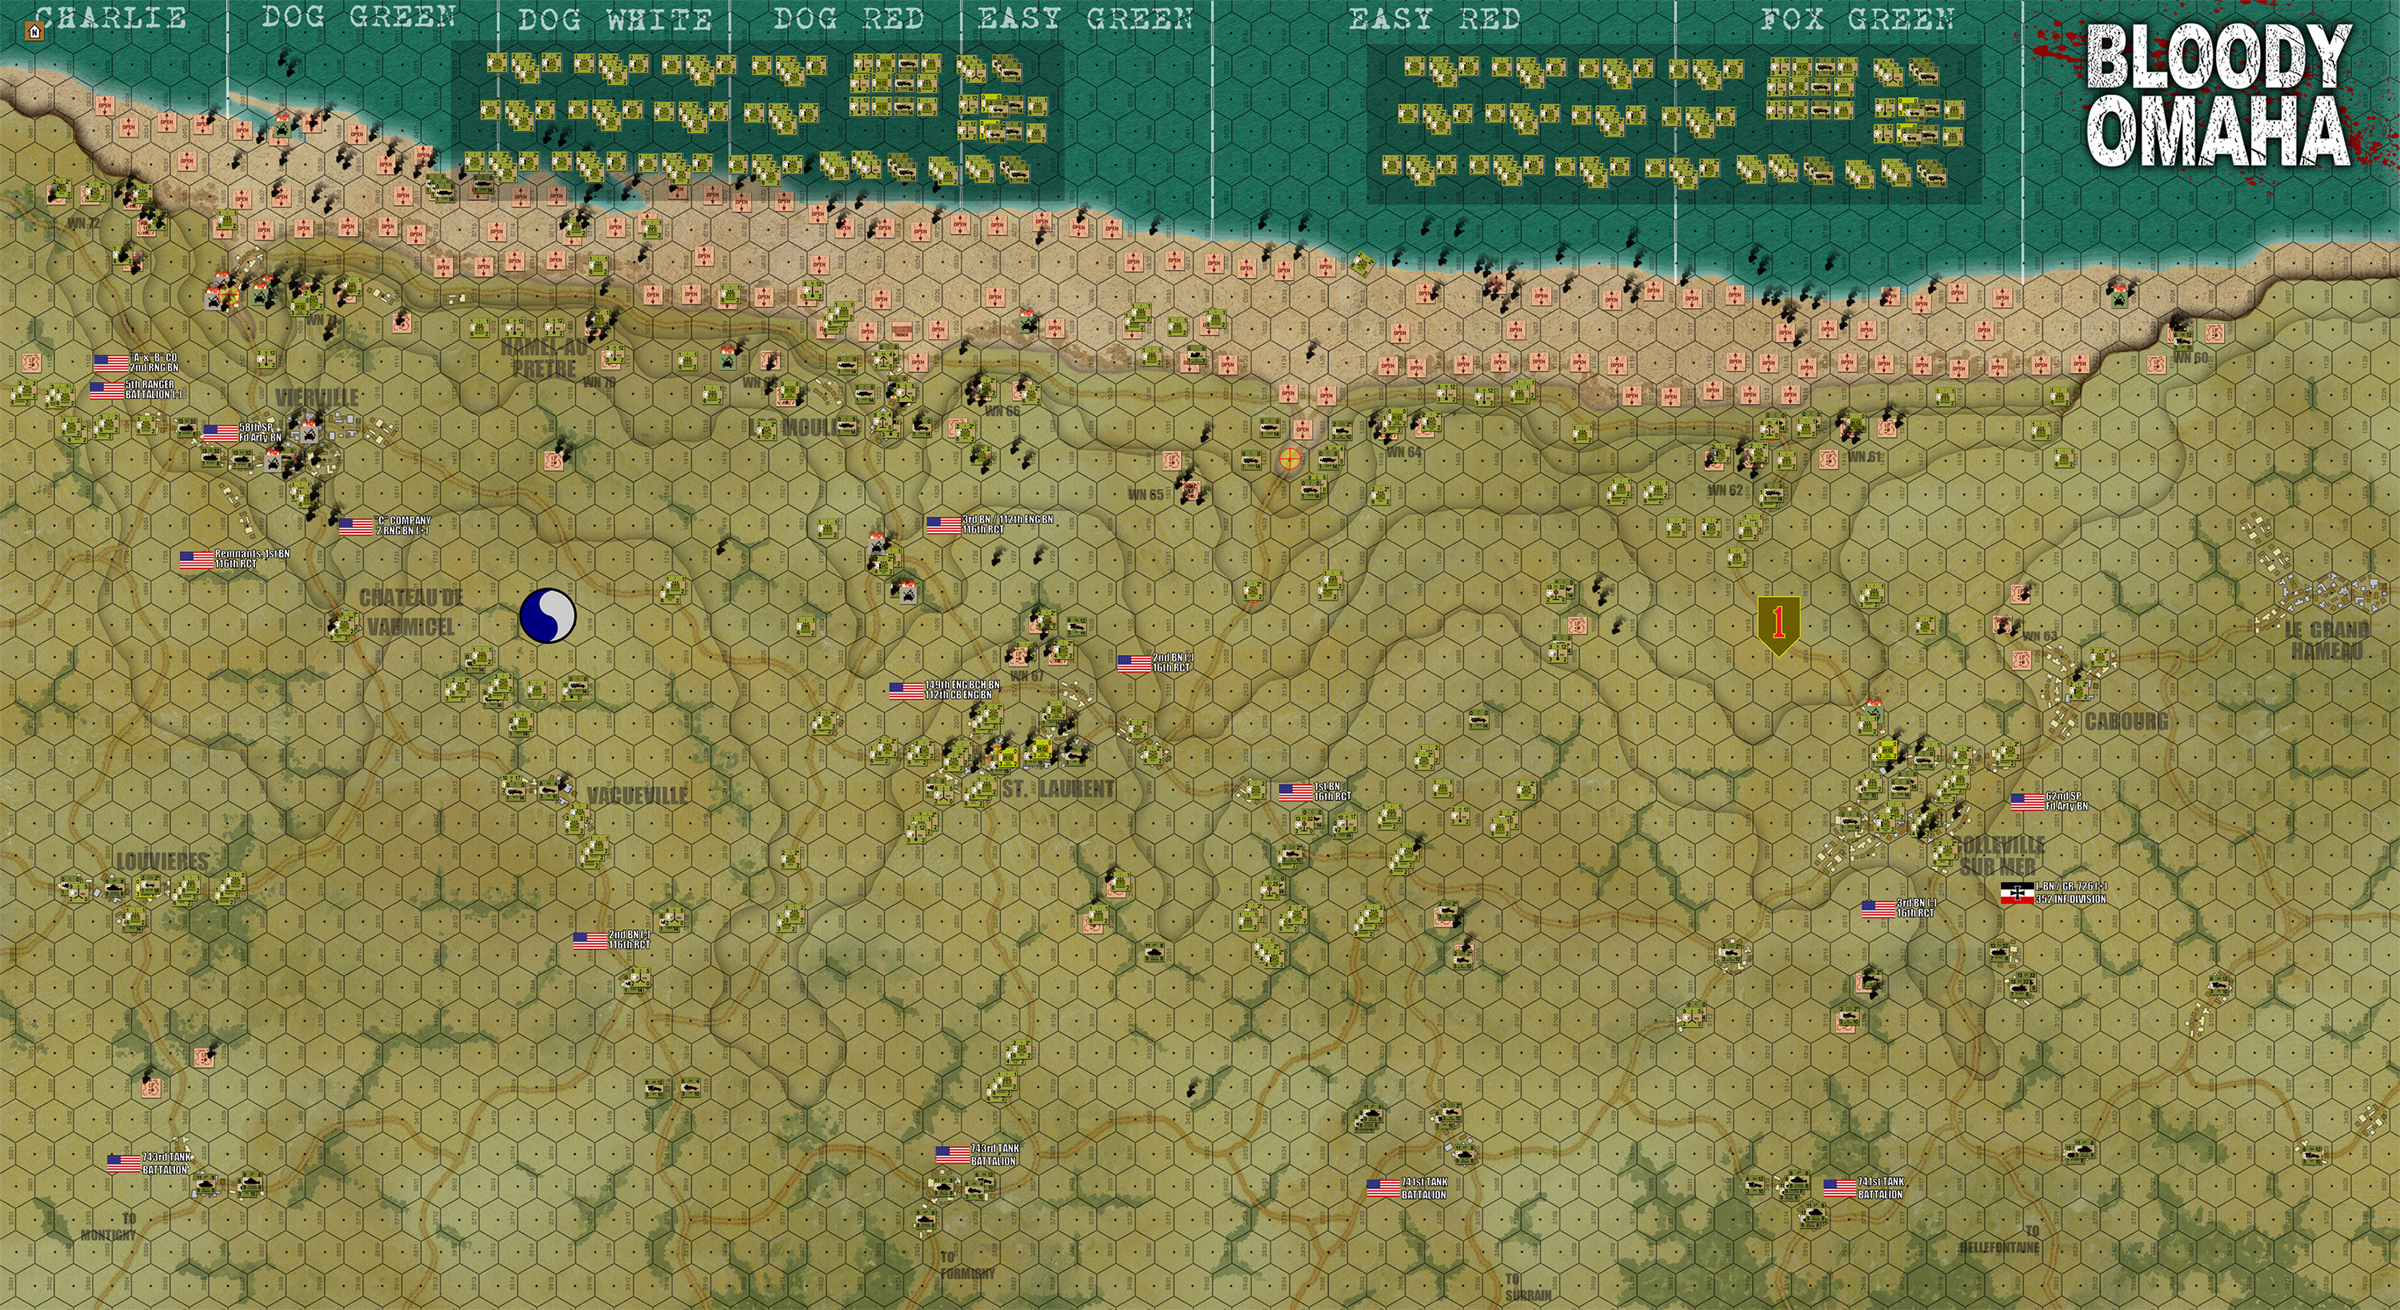 So here is a full-screen blow up of the whole battlefield at the end of Turn 20. Open image in new tab to get the full resolution. Yes, the Americans won, badly. As in “imbalanced” badly. As in they were definitely more than a little “OP” in this scenario. True, American losses were rough in the first three or four turns. But I’ve taken another drive through the numbers, and compared my statistical results with more reliable historical results from the actual US National D-Day Memorial Foundation (spoilers, the casualty rates usually published in most “credible” books are waaaay too low). Higher historical casualty figures, combined with American game losses being lower than first surmised, means that this game delivered an American casualty rate lower than the historical record (not higher as I first said). So a lower American casualty rate, combined with a much faster rate of success (particularly in the west, the Americans achieved a deeper beachhead in four hours than the historical Americans did all day) means the Americans really ran away with this game once they got off those beaches and up on the bluffs. Seriously, after Turn 6 or so practically not a single American unit died unless I made a blatant error or units were lost in landing accidents.
 Here is a historical outline of actual results at the end of the first day. AS you can tell matching up the towns here with their counterpoints on the map, the Americans unmistakably overran these results by a wide, wide margin. A much higher rate of American tanks making in ashore, plus the arrival of the 56th and 62nd SP Field Artillery Battalions (M-7 105mm SPHs), really made a crushing difference. These units were real and accurate, but were delayed historically - they didn’t land until much later and didn’t really get into action on D-Day. In this game, though, they made a gigantic difference. So I guess this game shows what might have happened if the American transport and landing operation had actually gone closer to plan? Indeed, we came pretty close to achieving the planned phase line for V Corps on D-Day. But as far as the actual historical results go, we blew these out of the water.
So the game is finally done. Yeah, the Americans turned out to be a little OP. After Turn 6 or 7 it was really a steamroller, with the Germans more or less helpless. While this happened historically, if didn’t happen until MUCH later in the day. I’m not saying that games always have to go as history prescribes, but clearly too much of the American landing plan went like clockwork here, and as a result the Germans never stood a chance. Had this been a live game, the German player would have spent the last 16 hours of gameplay as a patient speed bump only hoping to flatten a few tires as he was ruthlessly run over.
This was a reason I really didn’t want to run this game live. There is no point system for Panzer Leader. Followers of the game know there is just no way the system has room for that. Designing scenarios is about experience, research, and gut feelings. Needless to say, it is an inexact science. In small or medium sized games, a 5% “wobble” is no big deal, one or two dice rolls can sort that out. But in a game this gigantic (seven days, at least 3-4 hours a day), even a 5% wobble can quickly get out of control.
A detailed breakdown of American game losses by beach assault zones:
- Charlie / Dog Green: 24 counters (240 killed, 480 wounded)
- Dog White: 14 counters (140 killed, 280 wounded)
- Dog Red: 14 counters (140 killed, 280 wounded)
- East Green: 12 counters (120 killed, 240 wounded)
- Easy Red: 24 counters (240 killed, 480 wounded)
- Fox Green / Fox Red: 19 counters (190 killed, 380 wounded)
Total: 107 counters (1,070 killed, 2,140 wounded, 3,210 total casualties)
This is actually a little lower than the historical result. Yes, most sources will cite “about 2,000 American casualties on Omaha” – that is complete horsesh*t, due in part mostly to American GRUs (Graves Registration Units) use of the “Missing” category for men killed who cannot be positively identified or are not found (like all those who drowned in the Channel). The more recent and realistic figure posted by the US D-Day Historical Association (since picked up by other sources) gives 2,501 Americans killed on D-Day, with 979 in the airborne drops, 152 on Utah (including boating losses), and about 45 at Pointe do Hoc. This leaves about 1,325 on Omaha killed, with easily double that in wounded for a casualty rate on Omaha alone closer to 4,000.
As you can see, the Americans in this game suffered far less than that. AND far surpassed the historical results on the beachhead. So this game was a little tilted toward the Americans.
If we run a SECTION of this live later, we’ll stiffen the dice roll for American tanks making it ashore, delay the M-7 Priests to when they ACTUALLY landed instead of when they were PLANNED to land, and reduce the American airpower (which was very spotty in effectiveness on the day). One thing we’ll keep in the naval gunfire support. The battleship USS Texas closed to within ONE MILE to deliver point-blank fire with 14” guns, some destroyers closed to with 450 yards of the shore (insane for naval scales, the ships technically would have been ON THE TABLE about three hexes out into the water).
Still, it was a great game. I learned a lot.
If you’ve made it this far, thanks for reading! We have more Panzer Leader in the works, this time with British units fighting inland in the weeks and months following the landings.
And again, if you’re ever interested in trying some of this out yourself, ping me an e-mail and I’ll add you to the weekly mailing list!
Omaha Mega Game: The Home Stretch
Turn Fifteen is now complete, putting us at three hours after H-Hour on Omaha Beach.
The game is now three-quarters over.
Waves Six, Seven, and Eight are now ashore, more or less wrapping up the first big assault landings of 1st US Infantry and 29th US Infantry Divisions (reinforced). The next big group of landings will constitute the mid-day “second assault” landings that more or less put the rest of these divisions ashore (18th Regimental Combat Team for 1st Infantry and 115th Regimental Combat Team for 29th Infantry Division).
Throughout this third hour of the invasion, the Americans continued to face very tough resistance from localized German strongpoints, even as the overall German position began to disintegrate. Furthermore, seemingly endless waves of engineers (including US Army construction engineers, combat engineers, and US Navy Beach Battalions) have opened huge gaps in German beach obstacles, minefields, and the Omaha Beach shingle. This means that follow-on waves have had very few losses coming ashore (still a handful here and there), and a much easier time getting up the bluffs through the opened draws to joined the fraying and bloodied remnants of earlier assault waves (some companies are down to a single platoons, some battalions are down to less than 120 combat effectives).
Yet even as the American position begins to solidify, off-board support is beginning to dissipate. The American air strikes have now all shot their bolt and returned to base. Eight P-47s were shot down and six damaged. Furthermore, naval gunfire support has reduced as priority targets are shifted further inland against German communication and transport routes.
“The Longest Day” … and the longest game, are by no means over yet …
 Starting off on Turn 11, the American vanguard on the far eastern wing of the battlefield runs into serious trouble. At the outskirts of Colleville sur Mer, the spearhead of what has until now been the most successful American invasion sector is knee-capped HARD by determined German “second-line” troops, including more of those damnable bicycle couriers (admittedly supported by flanking fire from multiple 2.0cm FlaK batteries). The American spearhead is thrown into chaos as Shermans and M16 AA Halftracks are pinned down, while infantry halftracks actually blow up and start burning. M7 “Priest” self-propelled howitzers are coming up to help, but they also have to deal with the fire to the flank as well as t he front. These German defenders are “older” troops, sometimes previously wounded, sick, or otherwise “second class” men. Well, they’re doing a “first class” job here. Don’t ever make fun of “Opa” again, these German grandfathers still have some kick to ‘em!
 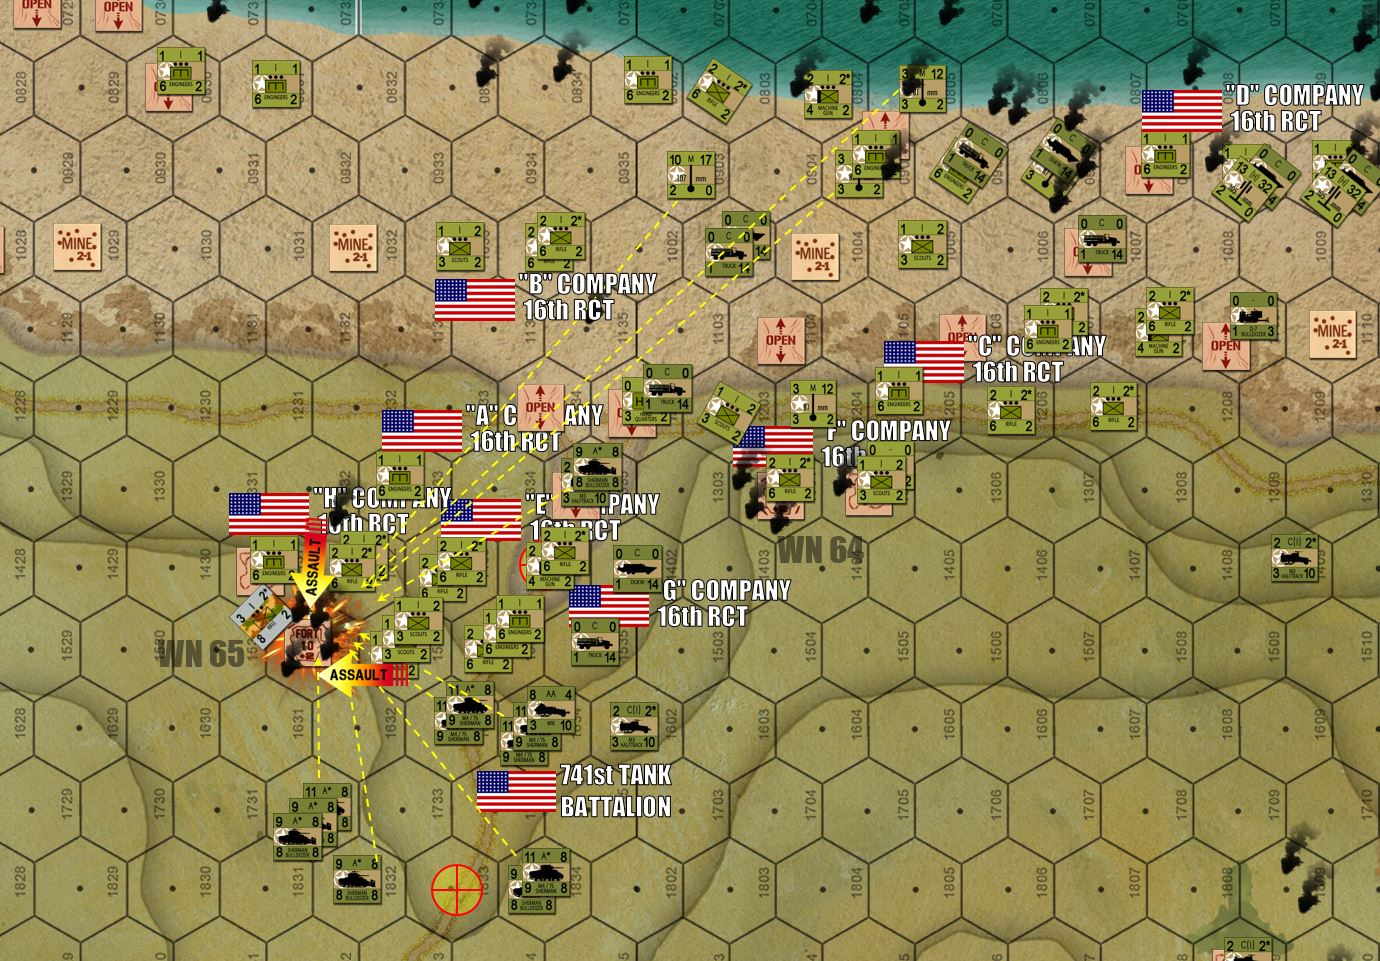 Closer to the center, the last German defenders of Wiederstandnester 65 are finally hammered into submission and then assaulted by six times their number, and even this this attack BARELY succeeded. German infantry in fortification hexes can be EXCEEDINGLY difficult to root out. But this finally completely opens the EASY ONE draw and clears the right wing of 16th RCT / 1st InfDiv.
  Almost any amphibious assault Panzer Leader game is all about the engineers. Check out the humble little D-7 bulldozer section, happily beavering away at opening he shingle along Easy Red Beach. The other bulldozer section was actually lost after a missed landing check put them right under the muzzles of a German 5.0cm antitank gun pit way over on Fox Red Beach. Remember that NO VEHICLE of any kind can enter or cross that dark brown “shingle” band until it is cleared with an “OPEN” marker. This makes the work of these D-7s, the Sherman dozers, and the engineers on foot absolutely crucial to anyone after the first wave (and this game will eventually put TEN waves ashore).
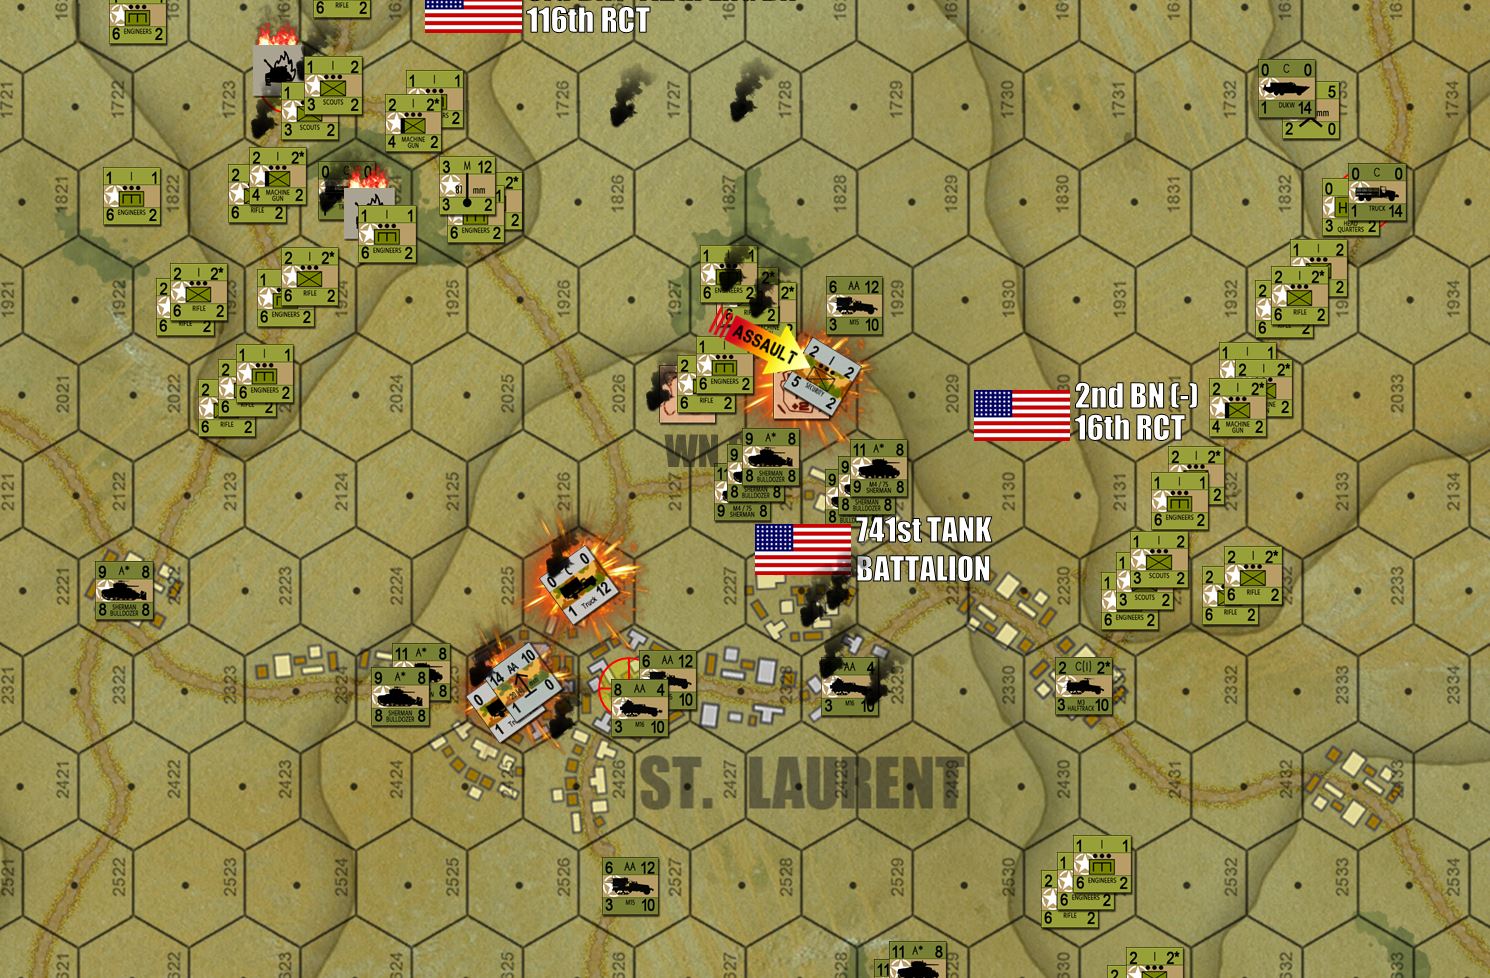
 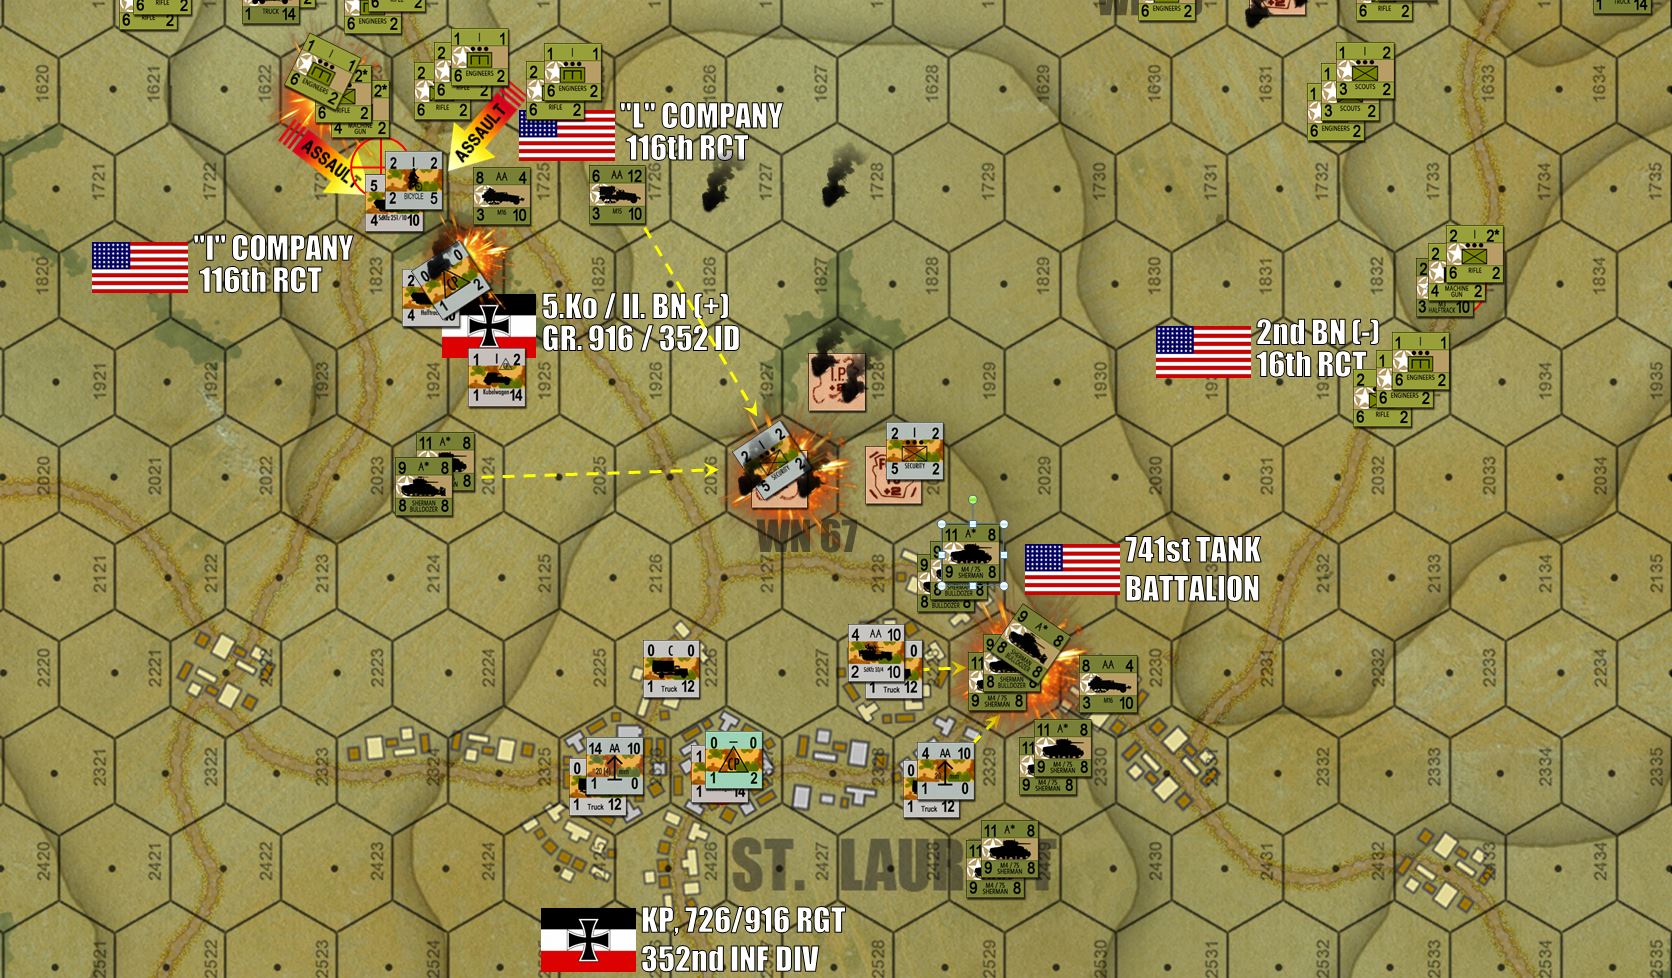 The town of St. Laurent was more or less the center of the German position on Omaha Beach. Here we see the forward spearheads off of 116th RCT / 29th Inf Div (3rd Battalion off of Easy Green) and 16th RCT / 1st Inf Div (2nd Battalion off of Easy Red) more or less converging from the northwest and northeast, respectively. 3/116 (Company I and L, specifically) is still engaged in a bit of a scrap against 5. Kompanie / II Bn / 916th Grenadiers along the Les Moulins road, while the 741st Tank Battalion had charged in and taken the first round of fire from desperate German 2.0cm FlaK positions. Hardly the kind of weapon you need when you’re assaulted by 47 Shermans, but it’s “stand or die” time for the Germans. The light blue “CP” marker is the overall German commander for the battlefield, and his hex is one of the 11 objectives the Americans HAVE to take. The Germans are definitely being wiped out here, but these are mostly stone and brick buildings here ... and the Americans are on the clock.
  Turn 13 in the west ... the end in Vierville. Note the remains of 1st Battalion / 116th RCT and Company “C” / 2nd Rangers (Captain “Miller’s” unit). This is definitely the “mop up” phase, at least on this corner of the battlefield, not to mention a little bit of payback for the slaughter inflicted on these men when the first hit the beach. For comparison, 1/116 has 5 counters left of its original 20, and C/2nd Rangers has three of its original five. All the other American counters in this attack are swept up fragments of other shattered battalions or reinforcements from follow-on waves.
 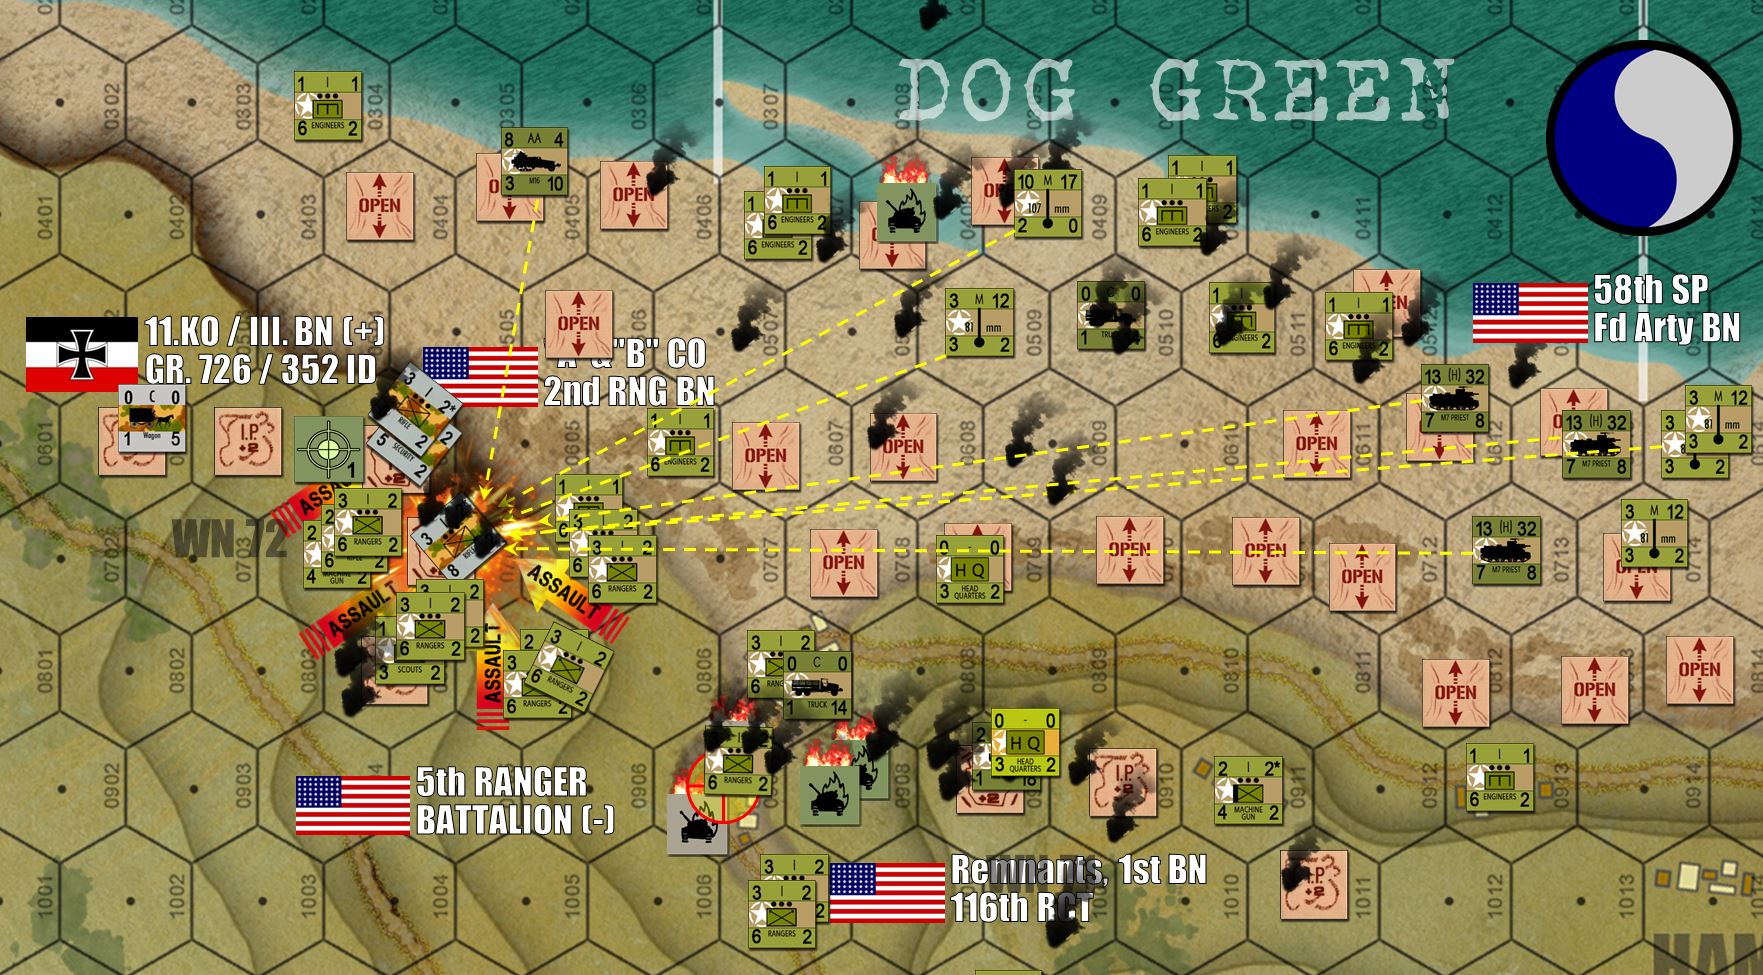 Turn 14, and Wiederstandnester 72 (the furthest one to the west) simply won’t die. Part of the problem here is the terrain, the steep cliffs facing the beach (dark brown line) preclude any assault, narrowing thr frontage available to 5th Rangers and Able and Baker Companies / 2nd Rangers. But now a full BATTALION (three batteries, or 18 guns) of 105mm M7 “Priest” self-propelled howitzers are positively unloading on this bunker, as well as four batteries of battalion mortars plus the regiment’s battery of 4.2 inch “chemical” (white phosphorus) mortars. In all, 48 pieces of artillery blasting away over open sights at this thing, and still an assault of 440 troops (including rangers and combat engineers) cannot take it down. The Germans are NOT going gently into that good night.
 As the Les Moulins Road is cleared, and the Shermans of 741st Tank Battalion shatter the right wing of the St. Laurent position, the Germans here seem more or less doomed. But the Americans get a little cocky with their 7th wave artillery, and even as they’re being destroyed, German FlaK batteries manage to pick off two batteries of American 75mm howizters as they’re dragged into position by soft-skinned “DUKW” amphibious trucks. That’s four more American platoons added to an already shocking casualty count (even higher than the historical battle actually). The Germans may be going down, but they are going down swinging.
 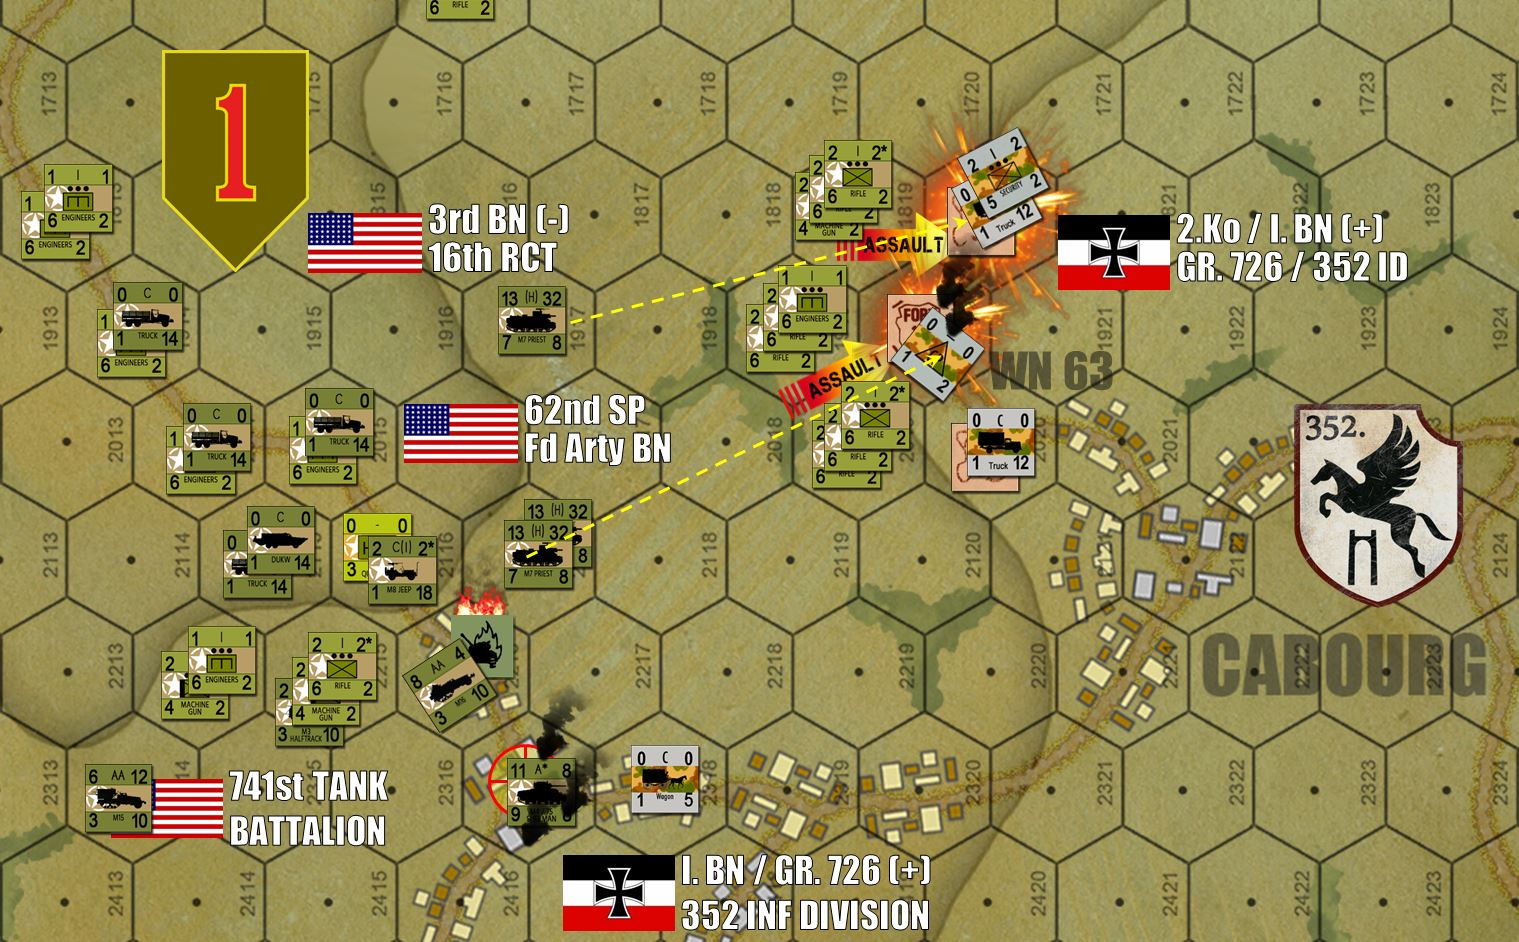 Still on Turn 14, on the far eastern edge of the board, the end for Wiederstandnester 63. It takes self-propelled artillery a little bit of time to get into position (62nd Self-Propelled Field Artillery Battalion, attached to 16/1st InfDiv), but once they do they are a virtual blowtorch burning holes wherever they can reach (and they can reach a loooong way). Meanwhile, the heroic “Opa” company in the northern outskirts of Colleville have been overwhelmed. That Sherman platoon at lower left moves in to occupy that objective town hex.
  Turn 15, Wiederstandnester 72 FINALLY goes down. At last, the guns fall silent over the carnage, wreckage, and devastation of Dog Green Beach. It’s been three hours. Historically it was more like FIVE OR SIX hours. It definitely wasn’t the twenty minutes or so we see in Saving Private Ryan. Every smoke marker is an eliminated platoon, but please remember at least a third of these are German, especially to the south. Still, the American cost here has been ghastly. But with more tanks actually making it ashore in this game than made it historically, and more immediate air and naval support committed to this sector, things could have gone far, far worse (again, historically this took 5-6 hours, or up to 30 Panzer Leader turns).
 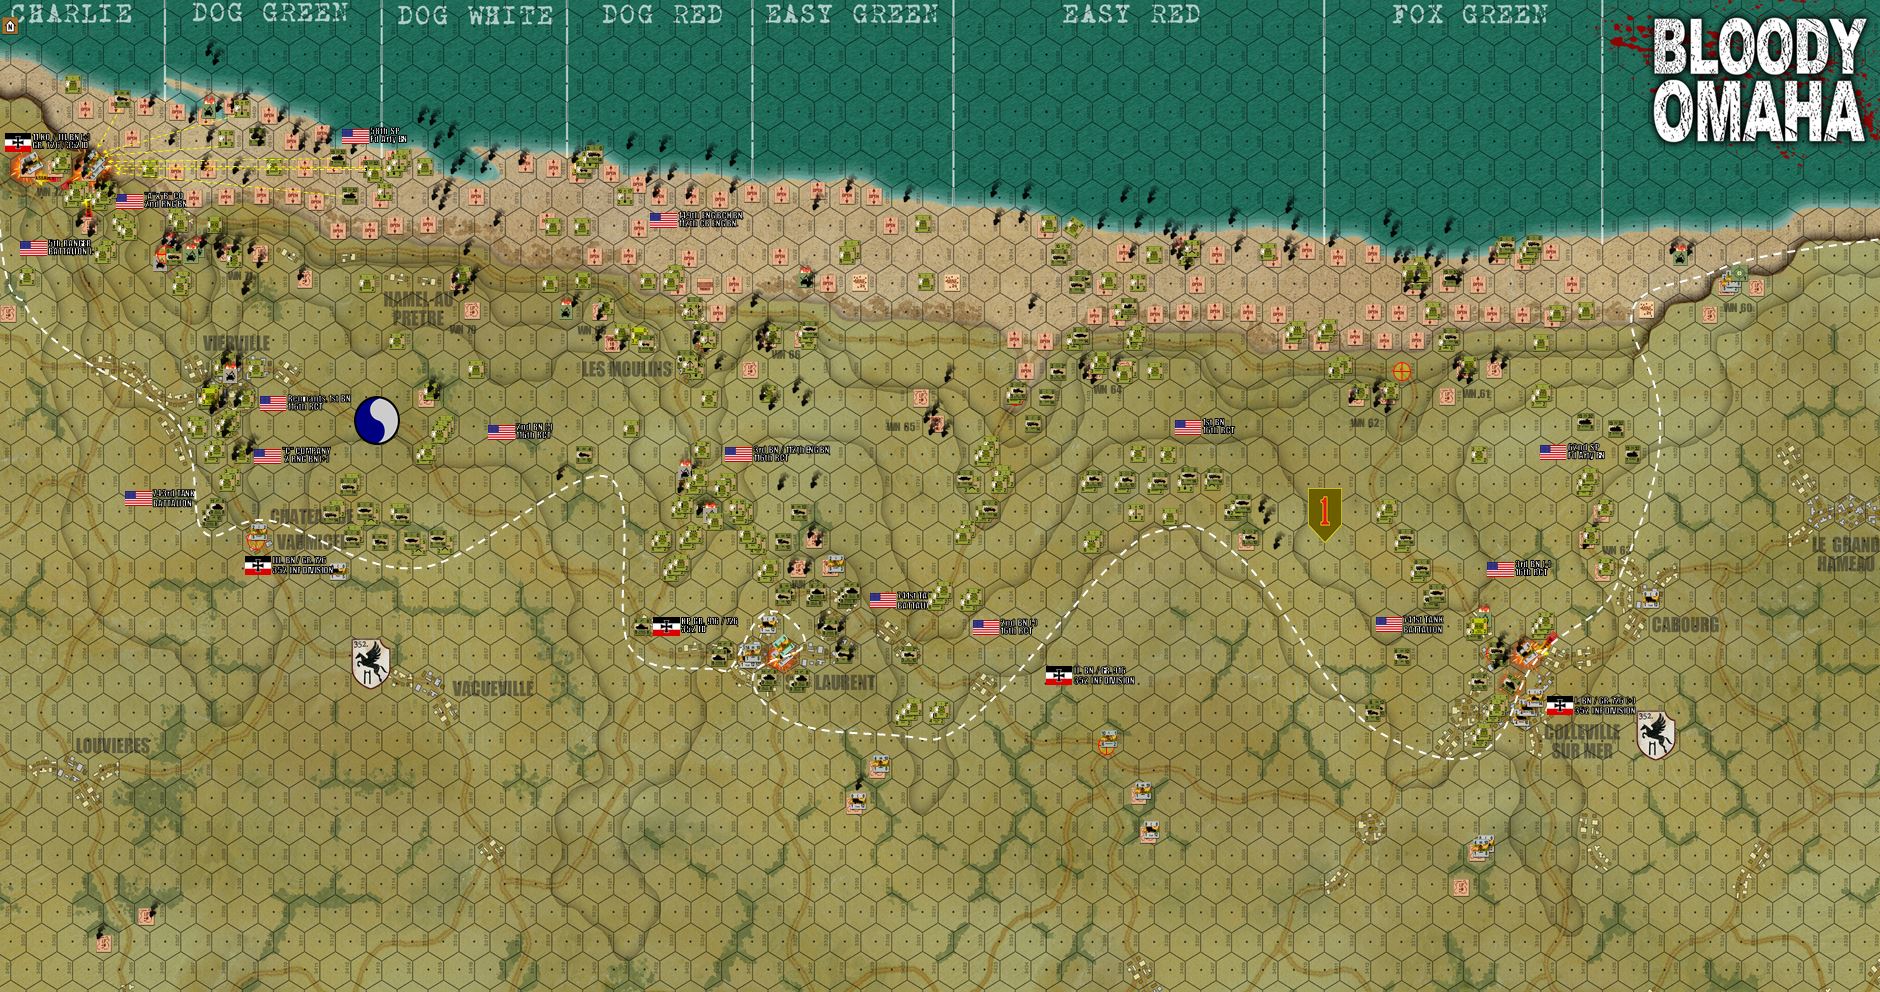 H+180, three hours in. American gains in the center and east more or less match the historical result (not quite 1.5 miles at their deepest points, about 3/4 of a mile at their shallowest), but American gains in the west are much better. Over all, however, the Americans have paid for this accelerated pace of advance with a higher casualty count. TWO objective hexes remain in German hands (including that stubborn little pocket in St. Laurent) but they’ll be giving up the ghost very quickly. I won’t lie, the Germans are probably going to be tabled here. Almost 300 American counters have been put on the table at one time or another, and only about 15 German counters remain (one WN strongpoint remains to the extreme east, just under the “BLOODY OMAHA” logo) It’s all about getting off that beach. As long as you’re ON THE BEACH, pre-sited German artillery and fortified machine guns will tear you to shreds. Once you’re up on the bluff, however, the “slaughter shoe” immediately shifts to the other foot.
 Omaha Mega Game - Half Complete
Turn Ten is now complete, putting us at two hours after H-Hour on Omaha Beach.
The game is now half over.
Waves Four and Five are now ashore. The last German heavy artillery has been silenced (10.5cm, 15.0cm, and nebelwerfer batteries), and engineers have started clearing not only blocks across the four vital exit draws off of Omaha Beach, lanes through the beach shingle, and paths through German minefields, but also gaps in the beach obstacles at the water’s edge. The tide is coming in, after all, and American waves Six, Seven, Eight, and Nine are still due. In game terms, any American unit trying to land in a hex marked “OPEN” (after a successful engineer check) does NOT have to make the “landing survival roll” that has been killing or dispersing so many American units just trying to enter the game.
But two blocks remain across the crucial draws. The Americans only hold three of the eleven objective markers. And five German “wiederstandnester” fortified strongpoints remain intact, garrisoned, and offering brutal resistance on the bluffs and across that blood-soaked sand.
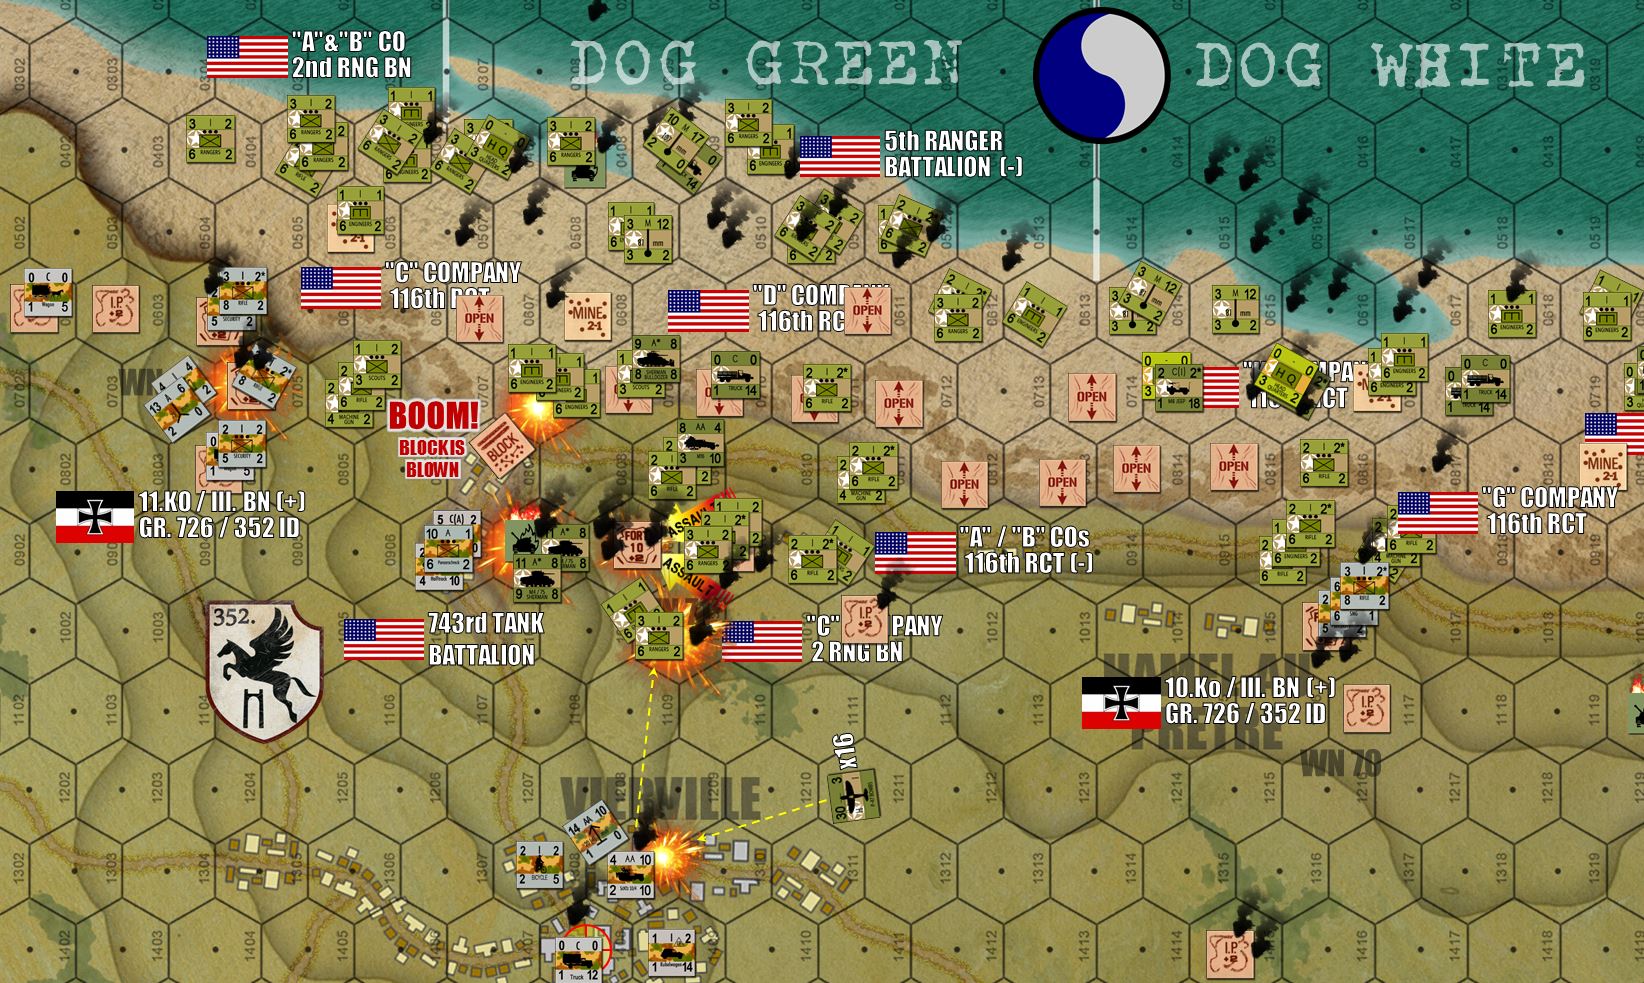 Turn 07 – Wiederstandnester 71, the historical bunker that we’ve all seen dispense so much carnage in Saving Private Ryan, is finally stormed by none other than “C” Company, 2nd Ranger Battalion, the historical unit into which “Captain Miller” and the other characters were written. They even had engineers with them (reflecting the flamethrowers used in the final assault on the bunker). Some of the Rangers and their engineers, however, have actually been destroyed by German 2.0cm flak firing from Vierville, in turn destroyed by P-47s making strafing runs. Ironically, this is NOT how it happened historically. The Rangers never made it up the bluff until this bunker and draw were cleared by other units from the east. So they had to endure up to five hours of what we see in the movie, and never “won” in the end, facts which I often cite to show that the Dog Green landings were provably MUCH MUCH worse than even than epic scene tries to show. Historically, Wiederstandnester 70 and 69 fell first, and Brigadier General Cota (XO, 29th Infantry Division) led a big hook from the east through Hamel au Petre and the outskirts of Vierville to clear that draw from the east in mid-afternoon. But as we saw earlier, in this game BGen Cota has actually not made it ashore (Robert Mitchum in The Longest Day), instead sunk against German beach obstacles in an earlier turn. Meanwhile OTHER engineers (146th Engineer Combat Team) have blown the block across the DOG ONE draw. This exit off Dog Green is ALMOST open!
 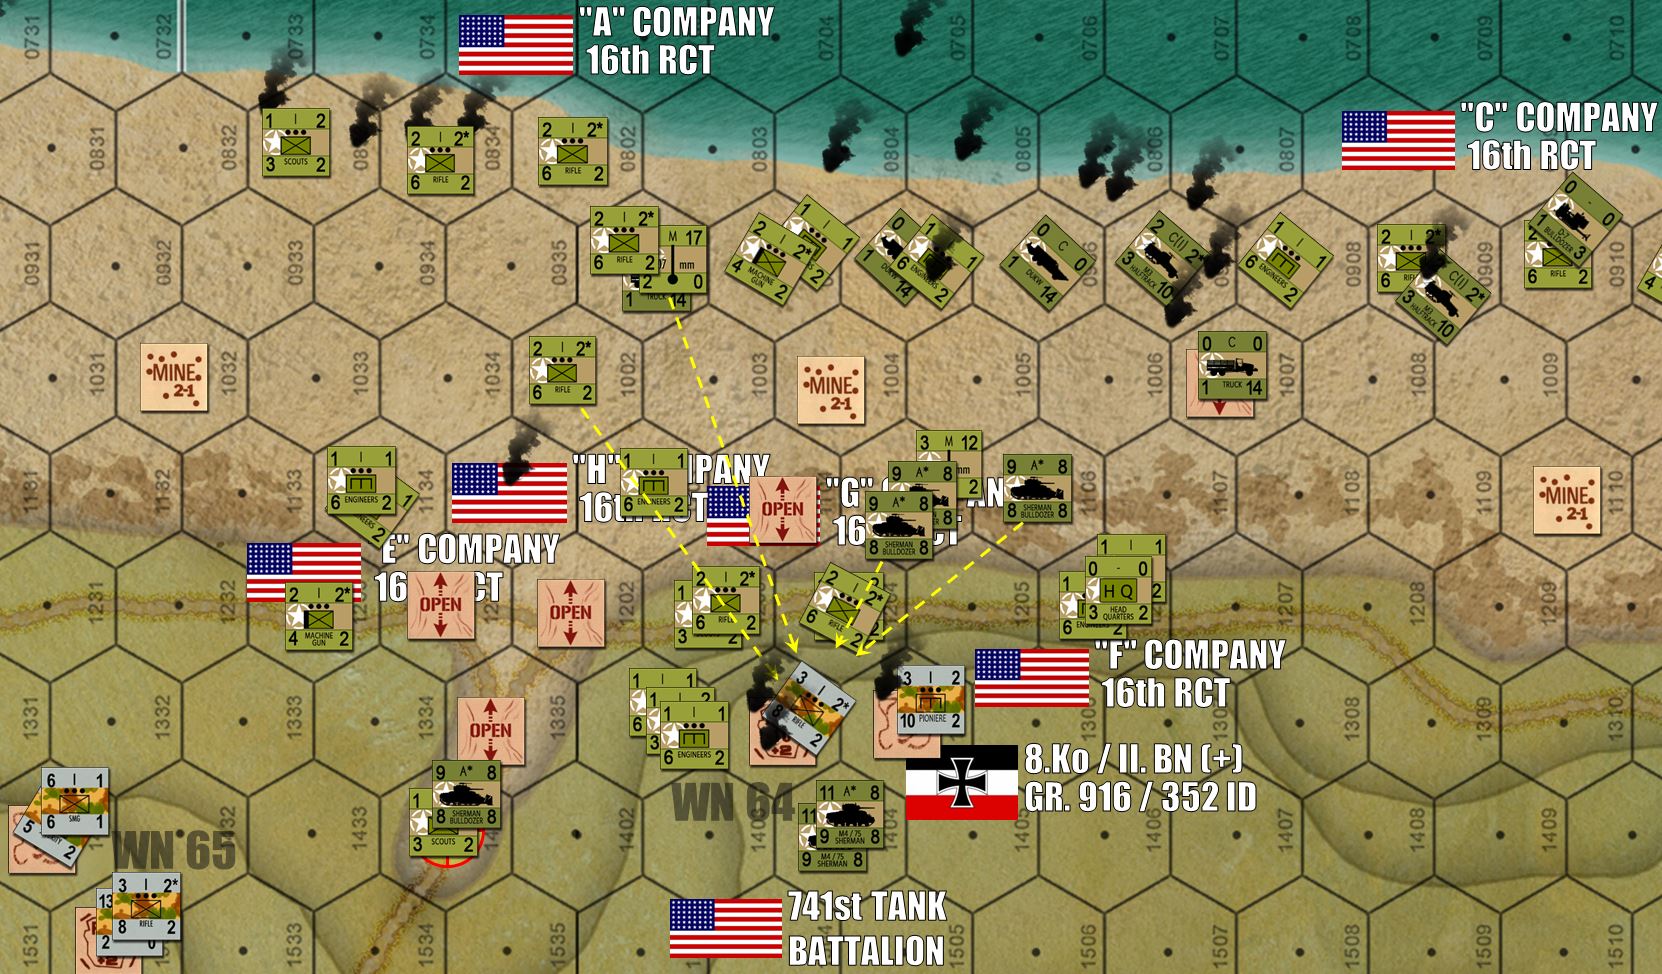 How strong are these Germanbunkers? Well here we have 27 Shermans, a BATTERY of heavy 4.2 inch mortars, another battery of 81mm battalion mortars, and the bulk of 2nd Battalion / 16th Regimental Combat Team / 1st Infantry Division wailing on WN64 overlooking the EASY ONE draw … and still 8. Kompanie / II Bn / 916. Grenadier Regiment is holding out.
 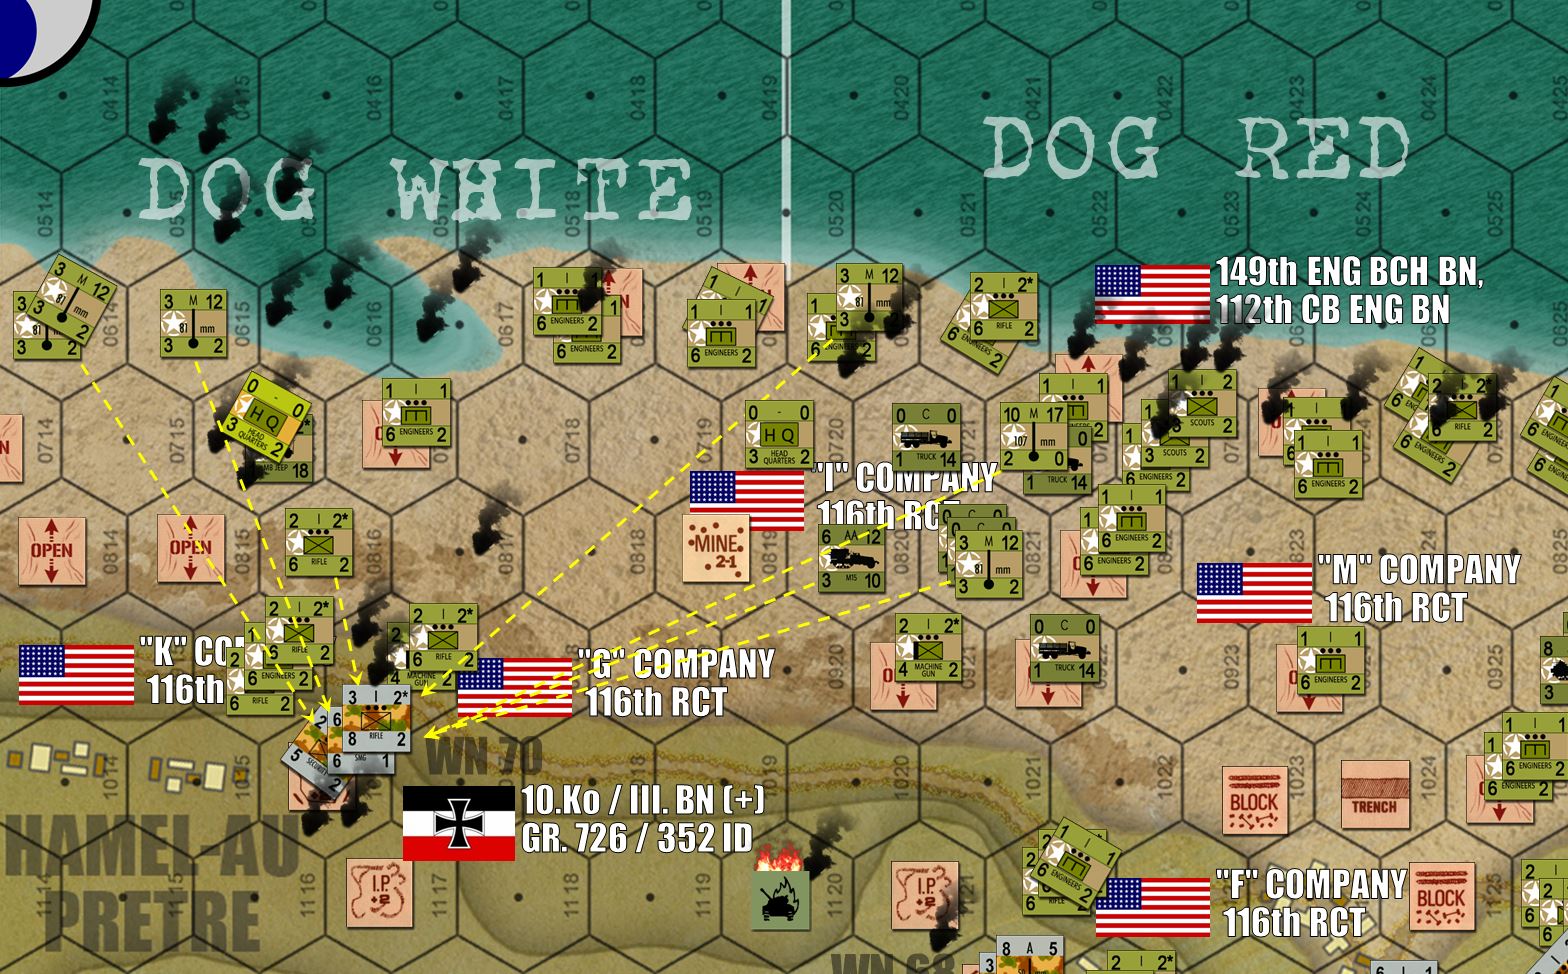 Into Turn 8, the Germans are also ferociously holding out at WN70 at Hamel-au-Pretre. Here we see more 4.2-inch “chemical” mortars (the “10-M-17” mortar battery at upper right). This is “D” Battery / 81st Chemical Mortar Battalion, so named because the 107mm mortars were originally intended to lay smoke and also white phosphorus shells, officially considered “chemical” ordinance by the US Army at the time.
 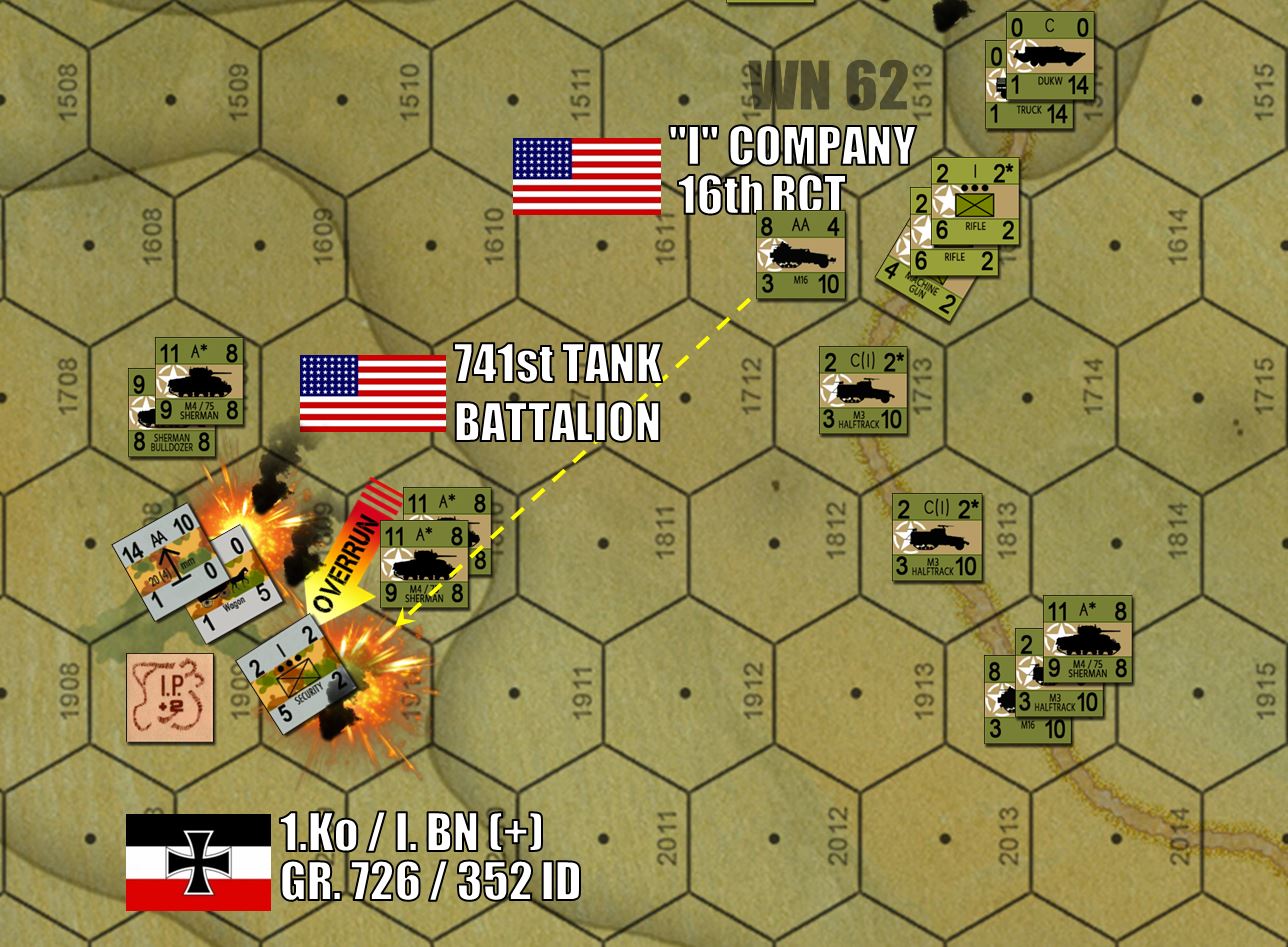 On the east flank, things are going better for the Americans. EASY THREE was the first draw to be opened, and Shermans are now two kilometres inland and beginning to take out German support positions. Two of these counters (each is a platoon of five, so ten tanks in all) rolled up on this German FlaK battery, withstood German fire, and then blasted it to smithereens. The platoon of garrison troops with the FlaK tried to run, but were pinned down by the quad .50 caliber fire coming off that M16 halftrack to the northeast during opportunity fire. These pinned troops were then overrun by two other Sherman platoons. Bute the “DUKW” amphibious trucks, American vehicles landed in the later stages of D-Day.
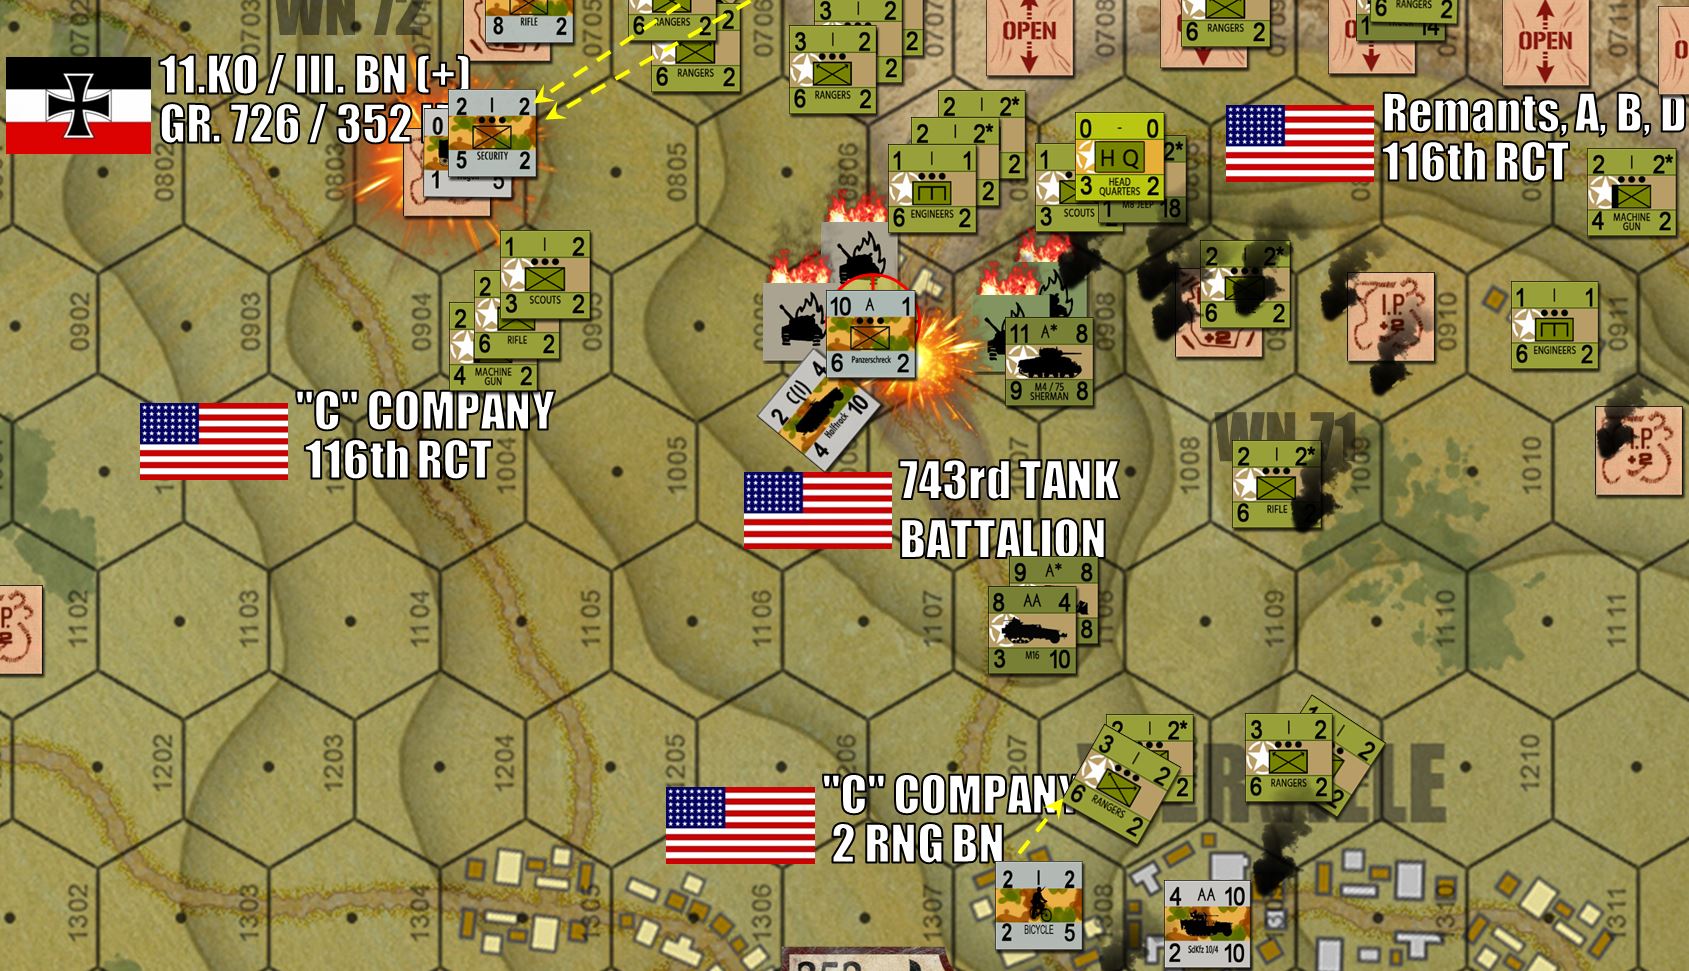 Into Turn 9, Shermans are not doing so well here in west, where the objective hex behind that blown block is held by German halftracks and “Panzerschreck” equipped infantry (panzerschreck was basically a German copy of the American “Bazooka”) of 14. Kompanie / 916. GR / 352nd Infanterie Division. One halftrack platoon was already destroyed before this turn (equipped with light 3.7cm AT guns). Now another SdKfz 251 platoon is destroyed. But meanwhile, these panzerschreck infantry, assisted by 7.5cm AT fire from the other shoulder of the draw at WN72, have wrecked two five-tank platoons of Shermans. Meanwhile, the Rangers have pushed inland, and have kicked off a battle in the town of Vierville itself. One platoon is pinned down by an SdKfz 10/5 halftrack with 2.0cm autocannon. That’s understandable. But another platoon of RANGERS is pinned down by lucky opportunity fire from that BICYCLE SECTION? Okay, lucky roll, but I’ve said it before. German bicycle troops are MIGHTY!
 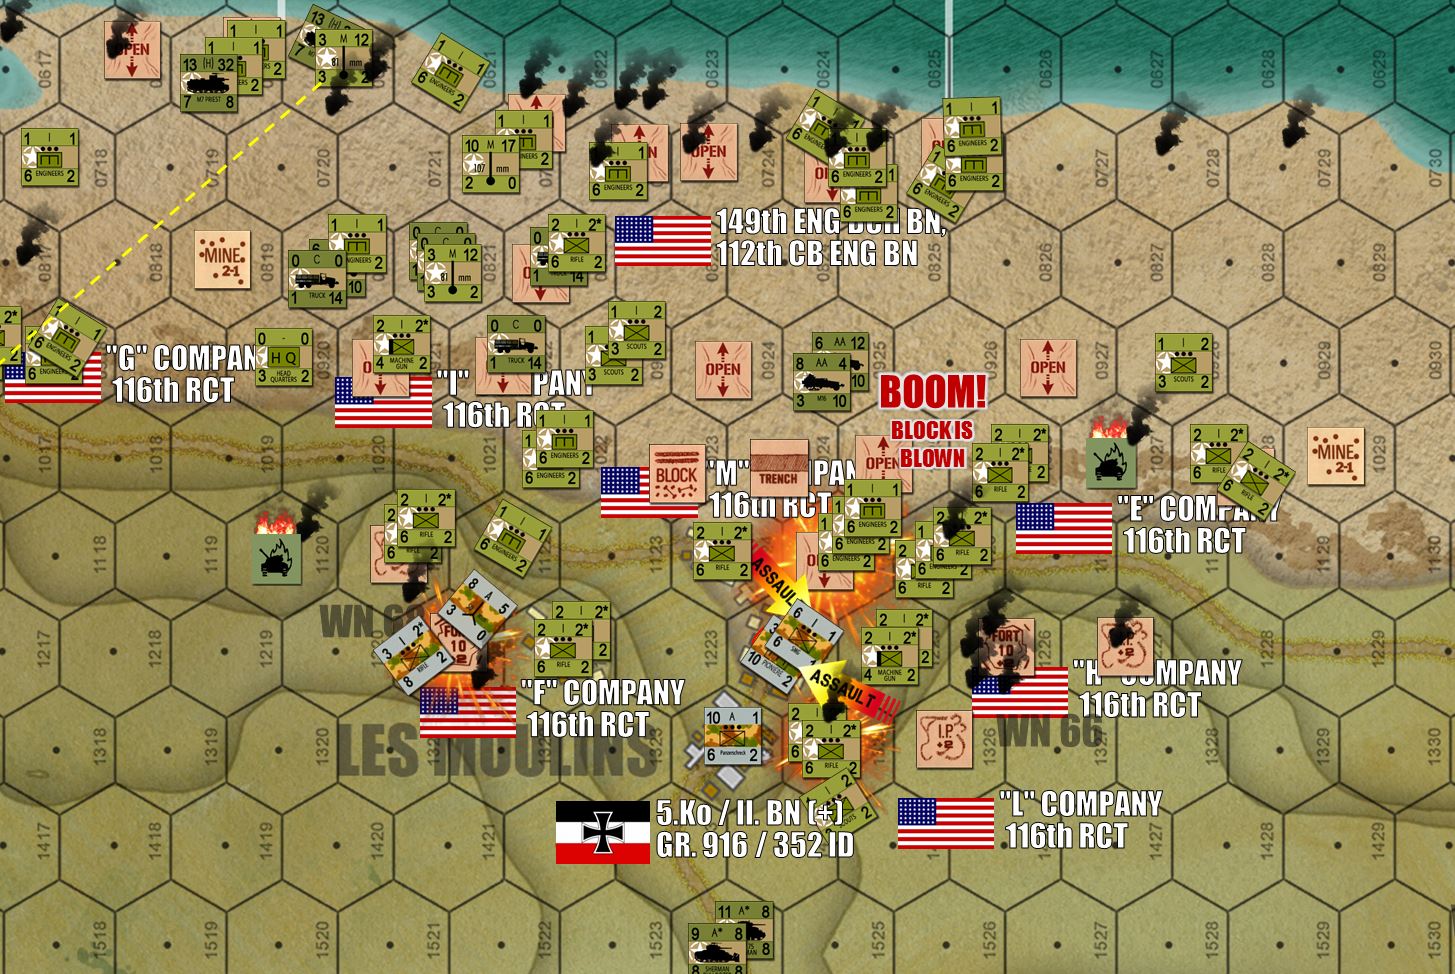 Still on Turn 9, the last block is blown at DOG THREE. Meanwhile, bloodied and exhausted survivors of 2nd Battalion (How, Easy, Fox Companies) and 3rd Battalion (Mike and Love Companies) of 116th Regimental Combat Team then assault the German company dug into the abandoned French buildings at Les Moulins immediately behind the block.
 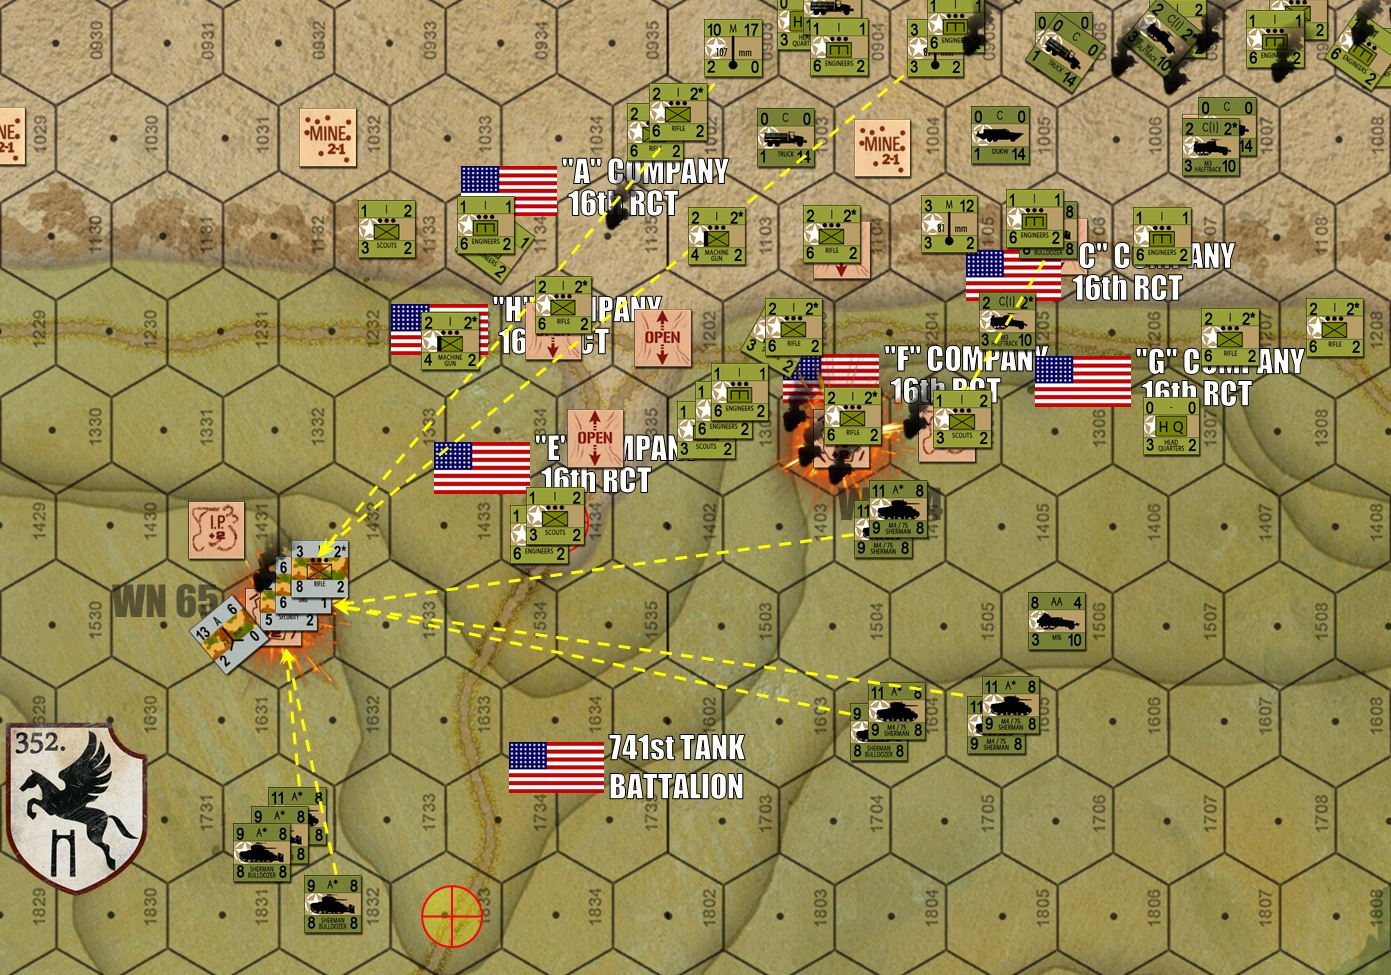 Turn 10 starts out with a frustrating American barrage positively POURING fire into WN 65 at the EASY ONE Draw. At least the 7.5cm PaK 40s have been taken out, so the American tanks of 741st Tank battalion can come closer in relative safety. Meanwhile, Fox Company / 2nd Bn / 16th RCT has taken WN 64, along with plenty of engineers support (bangalore torpedoes, flamethrowers, and satchel charges).
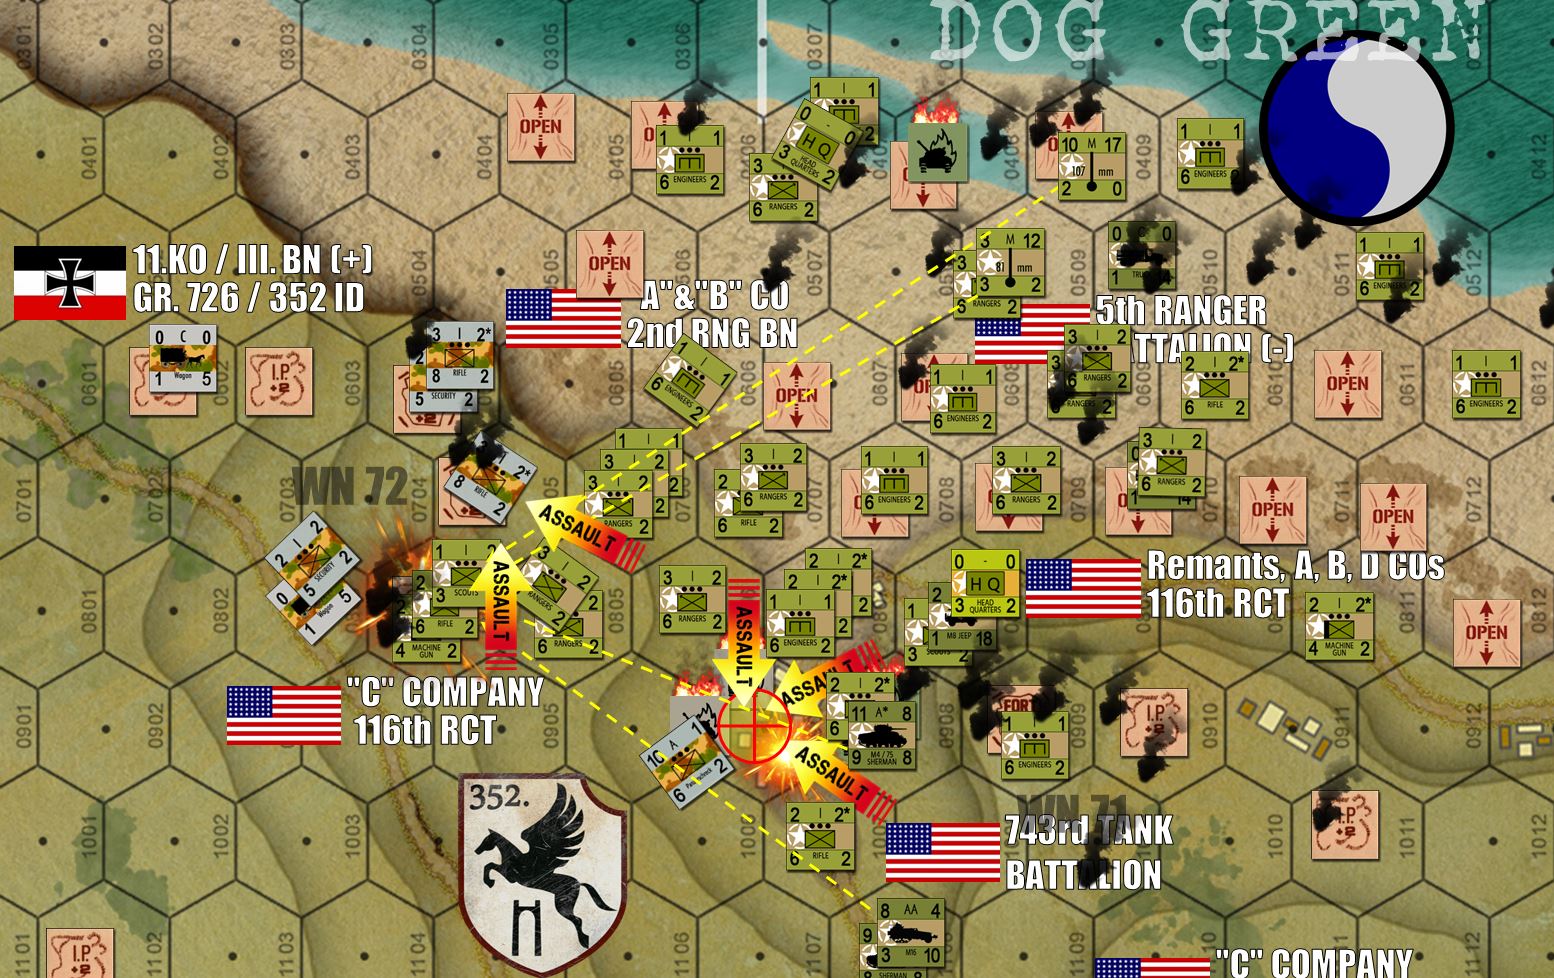 Turn 10 … and the Americans are done playing around. The beachbuildings overlooking the DOG ONE draw are assaulted by 80 Rangers, 160 riflemen of 29th Infantry, and 40 engineers, attacking from four directions. At last the Germans are crushed in this hex, clearing the beach exit behind the concrete block previously blown. Meanwhile, another 240 American infantry assault part of WN 72. This assault will be tougher, as the American approach is limited by steep, impassable cliffs rising off of Charlie Beach to the north. But the assault is precipitated by a heavy barrage of battalion mortars, 4.2-inch chemical mortars, tanks, and two types of AA halftracks. Meanwhile, note that successive waves of engineers have been rolling to place more and more “OPEN” counters on beachside landing hexes. This is going to drastically reduce the losses incurred amongst successive waves landing on the beachhead.
 At last the Hamel-au-Pretre bunker starts to crack, only after two batteries of M-7 “Priest” 105mm self-propelled howitzers land and open fire point-blank over open sights sight into the bluff. That’s 12 guns, plus four BATTERIES of 81mm mortars (24 tubes in all), plus the direct rifle and machine gun fire of six platoons of rifles and engineers and scouts (call it 240 men in all). Even the regimental commander’s jeeps join in with their .50cals (bright green HQ unit). These RCT command teams landed in multiple phases … so let’s say Brigadier General Cota found another LCI to put him ashore after his first was damaged or sunk. Robert Mitchum is back in the battle!
 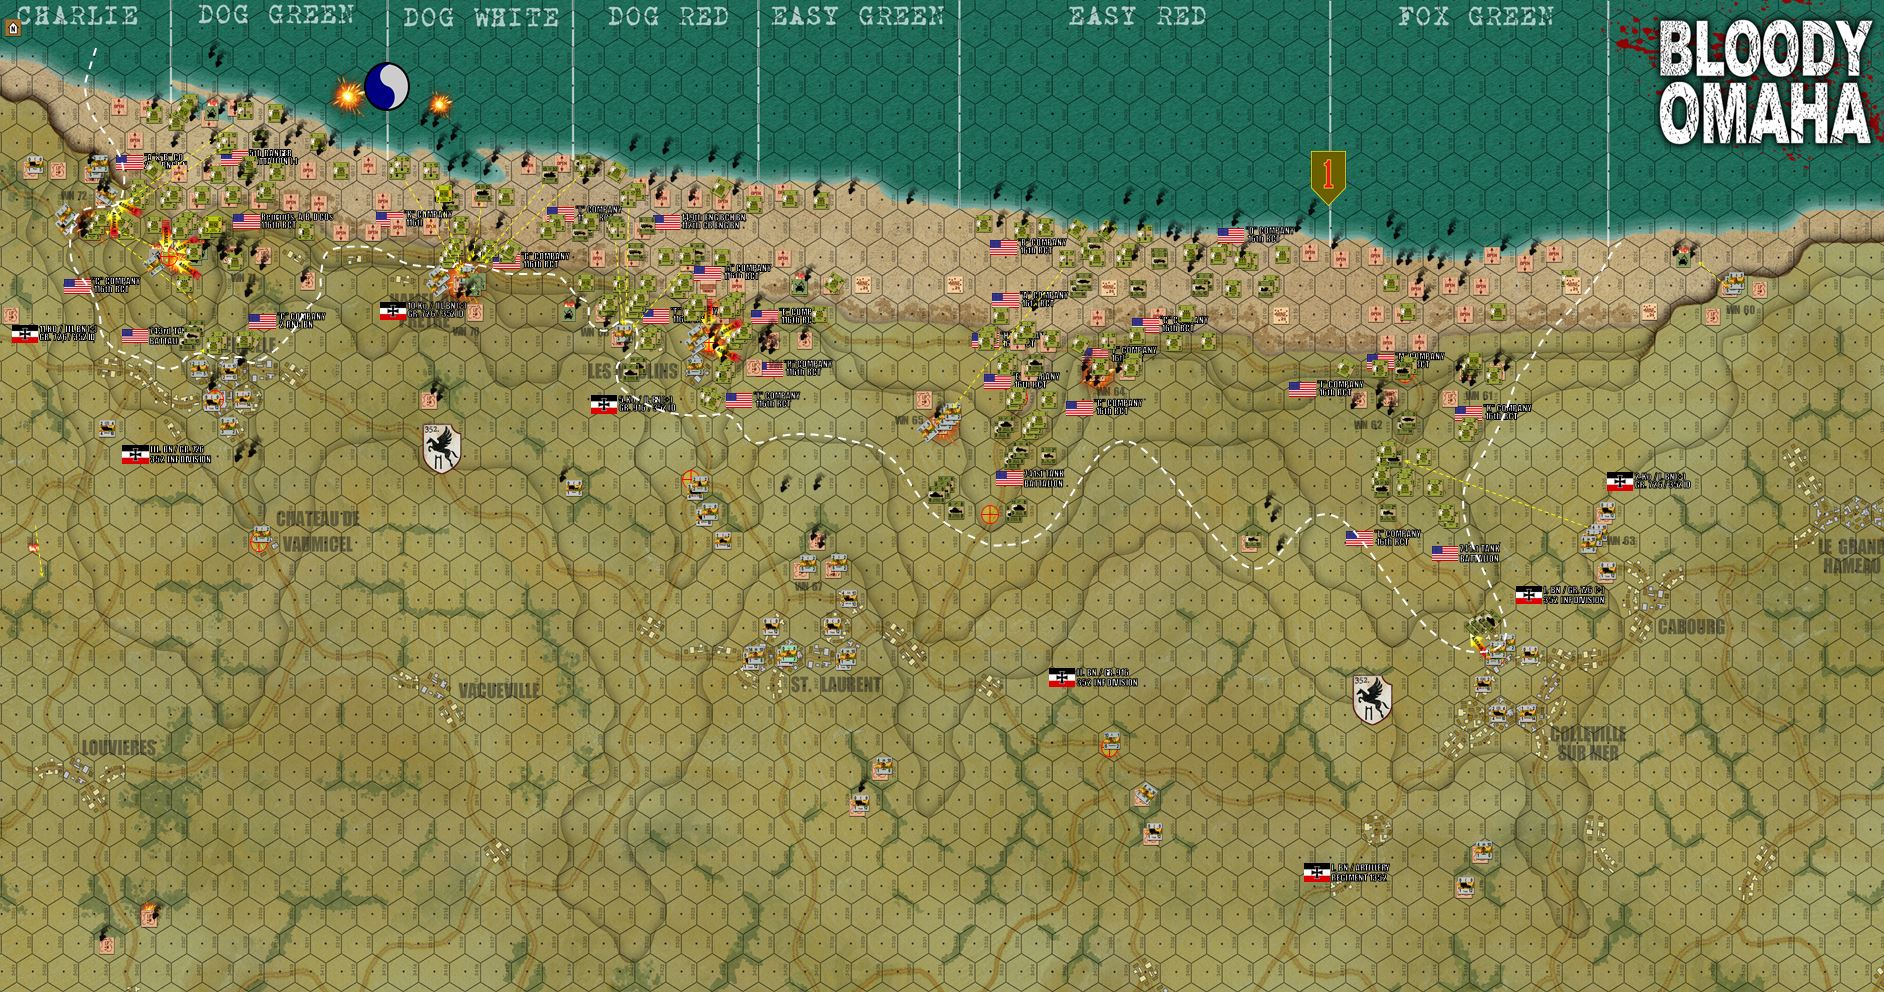 The overall situation at the end of Turn 10. The white line shows the extent of American penetration so far. As you can see, the game is pretty serious in its historical detail, but player agency and the luck of the dice ARE throwing a few curve balls in here, this beachhead is NOT shaped exactly like the historical result. While success was much heavier in the east than the west, the thick bulge in the extreme west north of Vierville should not be there. Instead, better penetration was effected just to the east of that, near Hamel-au-Pretre. Pretty much reverse the results of Dog Green and Dog White and you have a pretty close to historical result. SO FAR, American casualties are actually a little worse than they were historically, we’re running about 120 units “eliminated” in game terms, delivering an approximate 4200 casualties, with about 1,050 of those killed. Then again, we’re making progress faster than American made historically, especially in the bloody west. The Germans, meanwhile, have lost about 40 units. While their number of killed will thus be naturally lower, ALL survivors (wounded or not) in eliminated platoons are considered POWs. In total German losses are looking like about 2,000, with 320 of these killed and the rest wounded, taken prisoner, or both.
 LIVE STREAMING OMAHA
So this game is so big I’m literally getting 1-2 turns done a day. Five turns are done so far, meaning this game is 1/4 over.
I’ll be streaming Turn 6 today, maybe even Turn 7 if we make good progress.
If you fancy dropping by, here is the Sitrep Podcast Twitch Channel:
I hope to be on at about 4:30 Eastern US, so 9:30 UK Time.
H-Hour +1 Hour ... A Ray of Hope?
Turn Five is now complete, putting us at one full hour after H-Hour on Omaha Beach.
Wave three is now ashore, and finally the American losses in initial landings are starting to slacken off. Almost all German artillery is now silenced or at least suppressed, sharply reducing the rate of wholesale butchery taking place on those bloody sands. A handful of German “wiederstandnester” strongpoints have also been taken, American infantry and even some tanks are now up off the beach and atop the bluffs. But other strongpoints remain in place and continue to exact a grim toll on American units trying to assault them, and also further assault waves still hitting the beach.
American air power is now more or less exhausted, although surviving P-47 Thunderbolts can still linger and attack light targets with machine guns.
But dare we say … there are a few rays of hope?
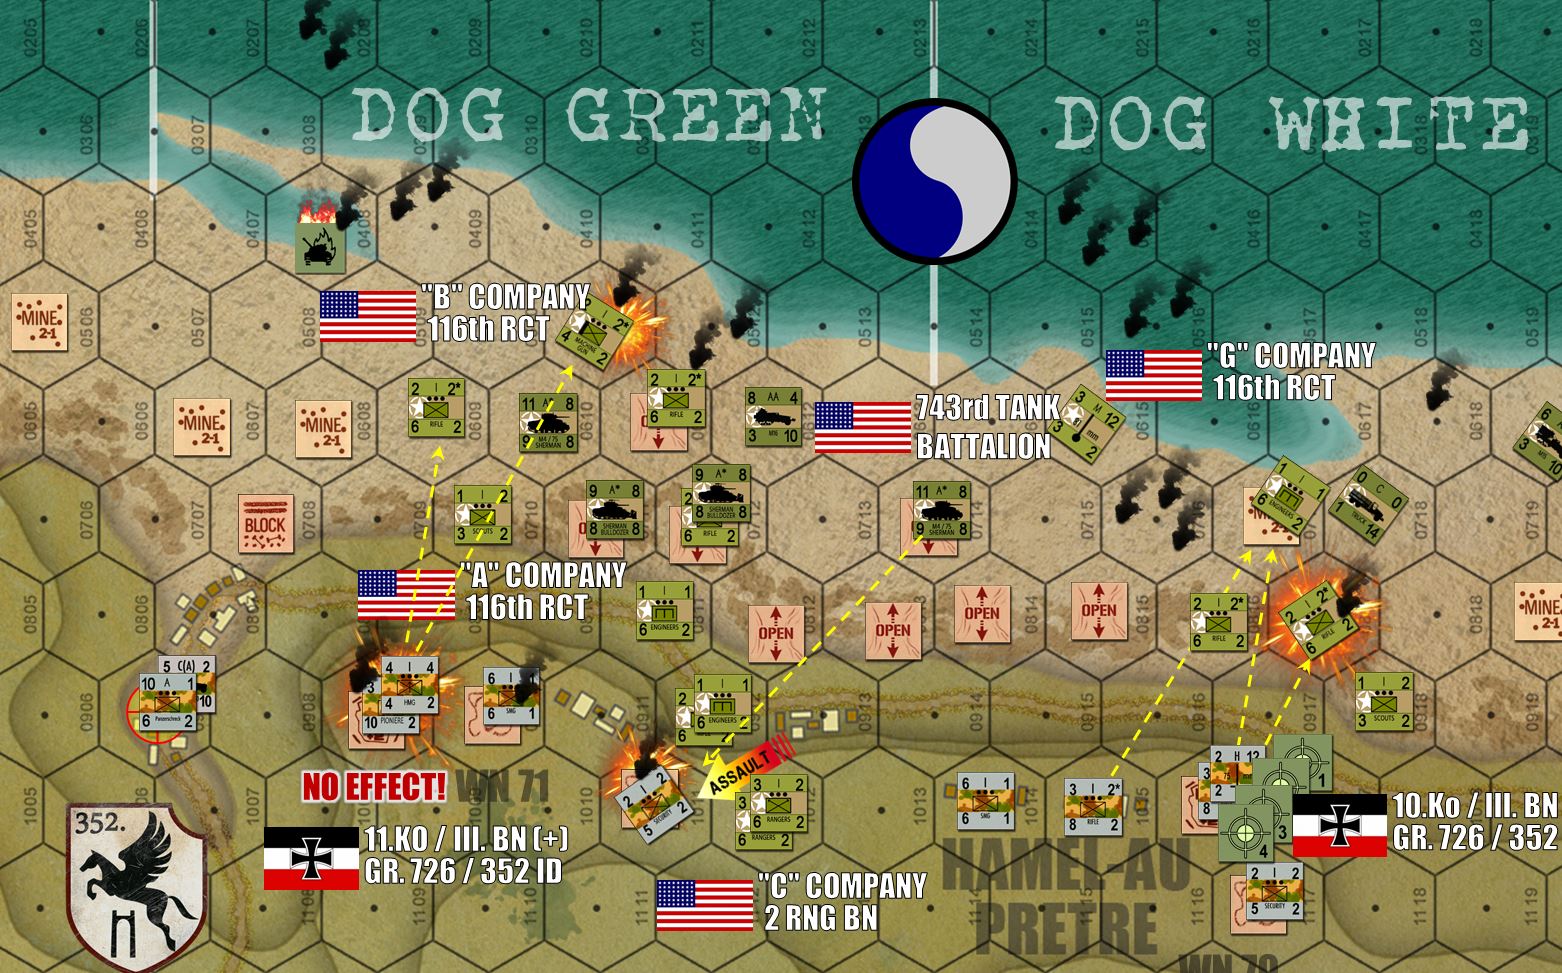 The far western shoulder of Omaha Beach at the end of Turn 04. A full-strength naval gunfire strike did NOTHING to the Germans in WN71, even as “C” Company / 2nd Rangers and some survivors from “A” Company / 116th manage to launch the first close assault through the German trench system supporting the flanks of WN71.
 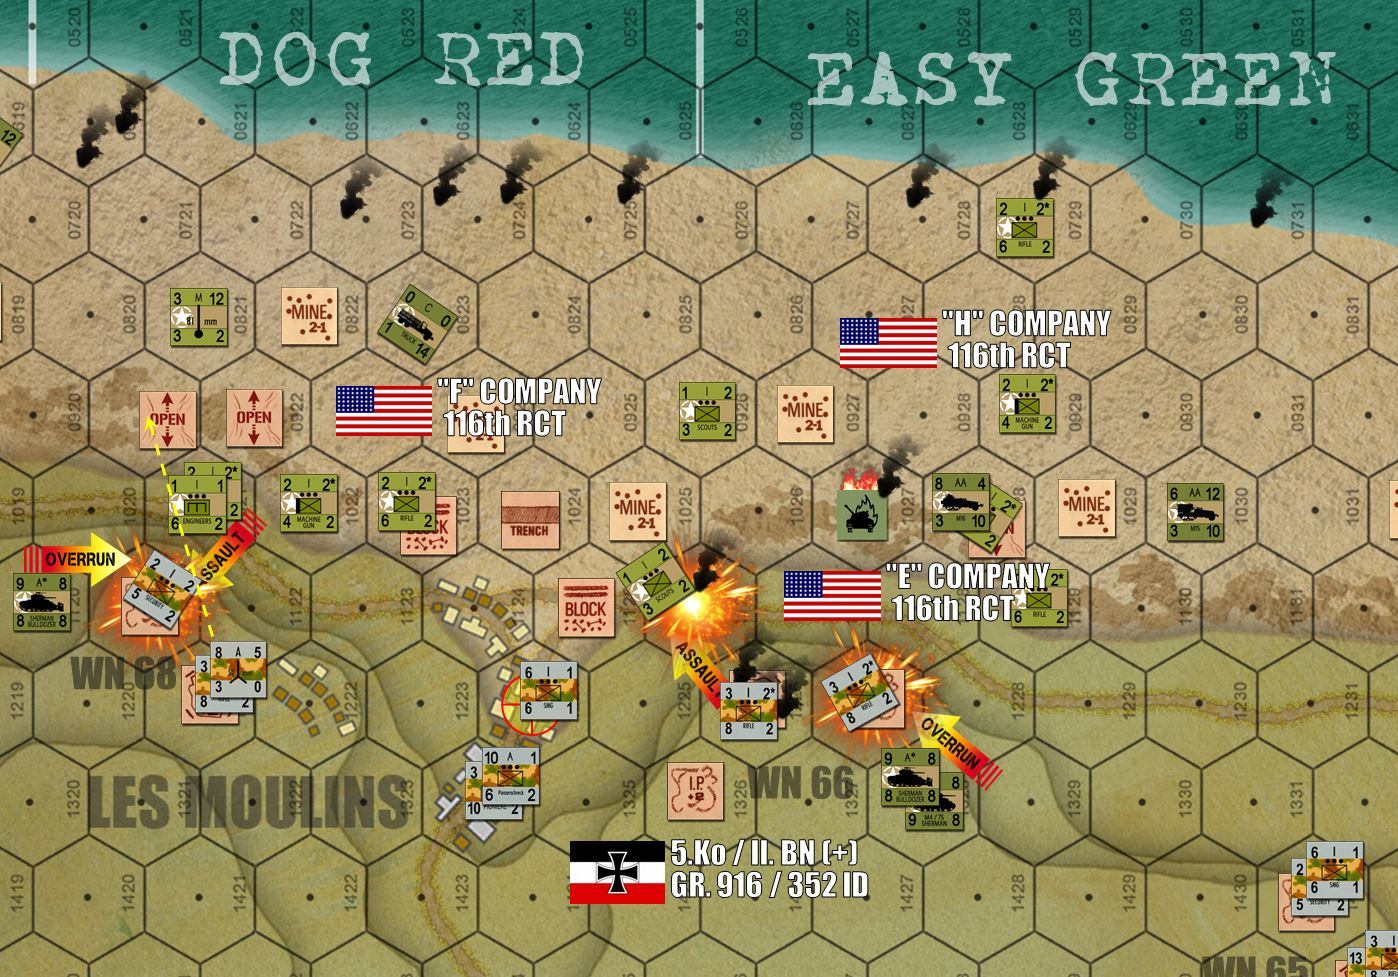 Further east, we see the game’s first successful armor overrun, with two platoons of 743rd Tank Battalion smashing German infantry in the trenches flanking WN66 overlooking Easy Green. Other assaults and overruns at WN 68 have not been so successful.
 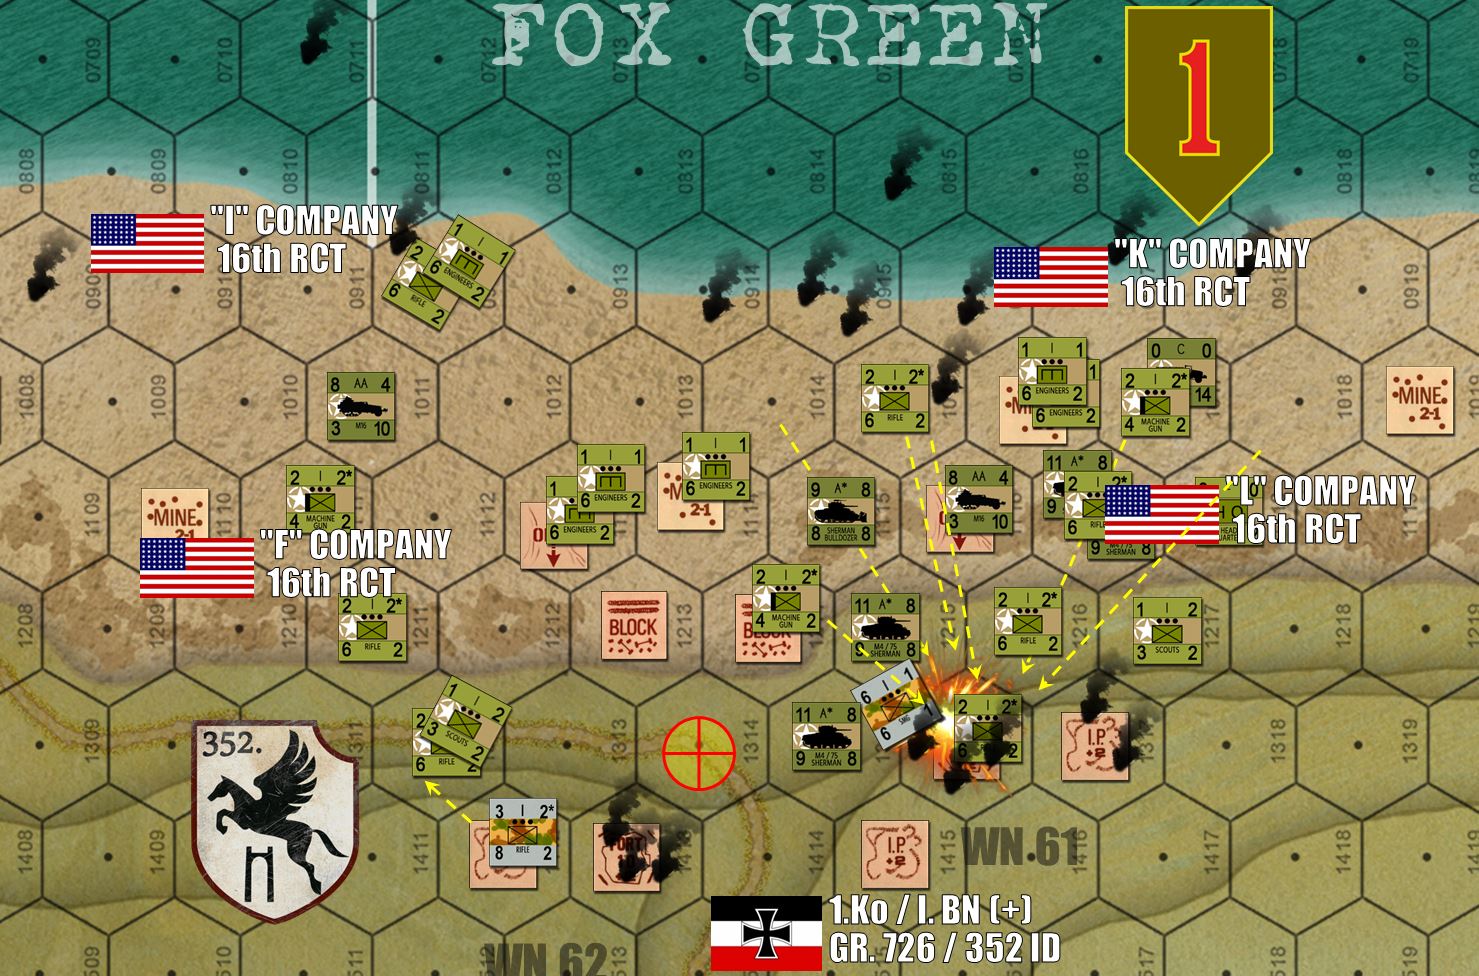 On the far eastern shoulder of Omaha, 16th RCT / 1st Infantry Division is simply pouring firepower into WN 61 and simply blowing it apart. Tanks and “M16” AA halftracks (x4 .50 caliber machine guns, and that’s a platoon of five such vehicles) have cleared the German fortification hex, then occupied by American infantry in the movement phase. Some vehicles have the ability to move after they fire, which is why some of the “fire arrows” seem to be coming from empty beach hexes. Those units fired and then moved later in the turn.
 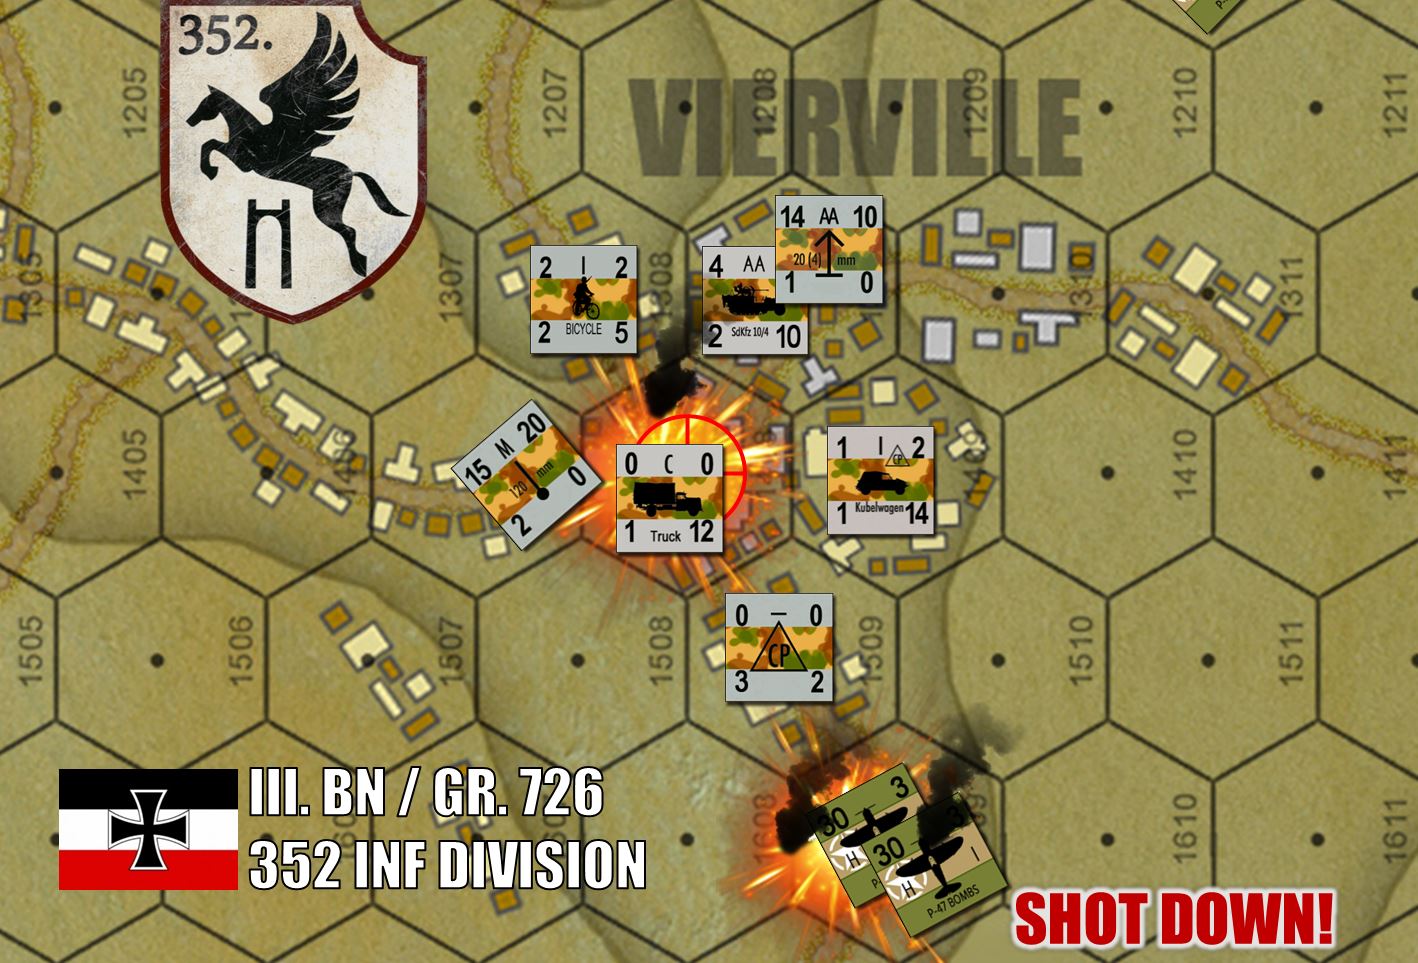 Other parts of the attack aren’t going so well. German 2.0cm flak (both a quad-array battery and more mounted on SdKfz-10/4 halftracks) have shot down not one but TWO P-47 counters (up to four aircraft in all). But one bombing mission finally bot in and finally silenced this regimental battery of 15.0 cm mortars.
 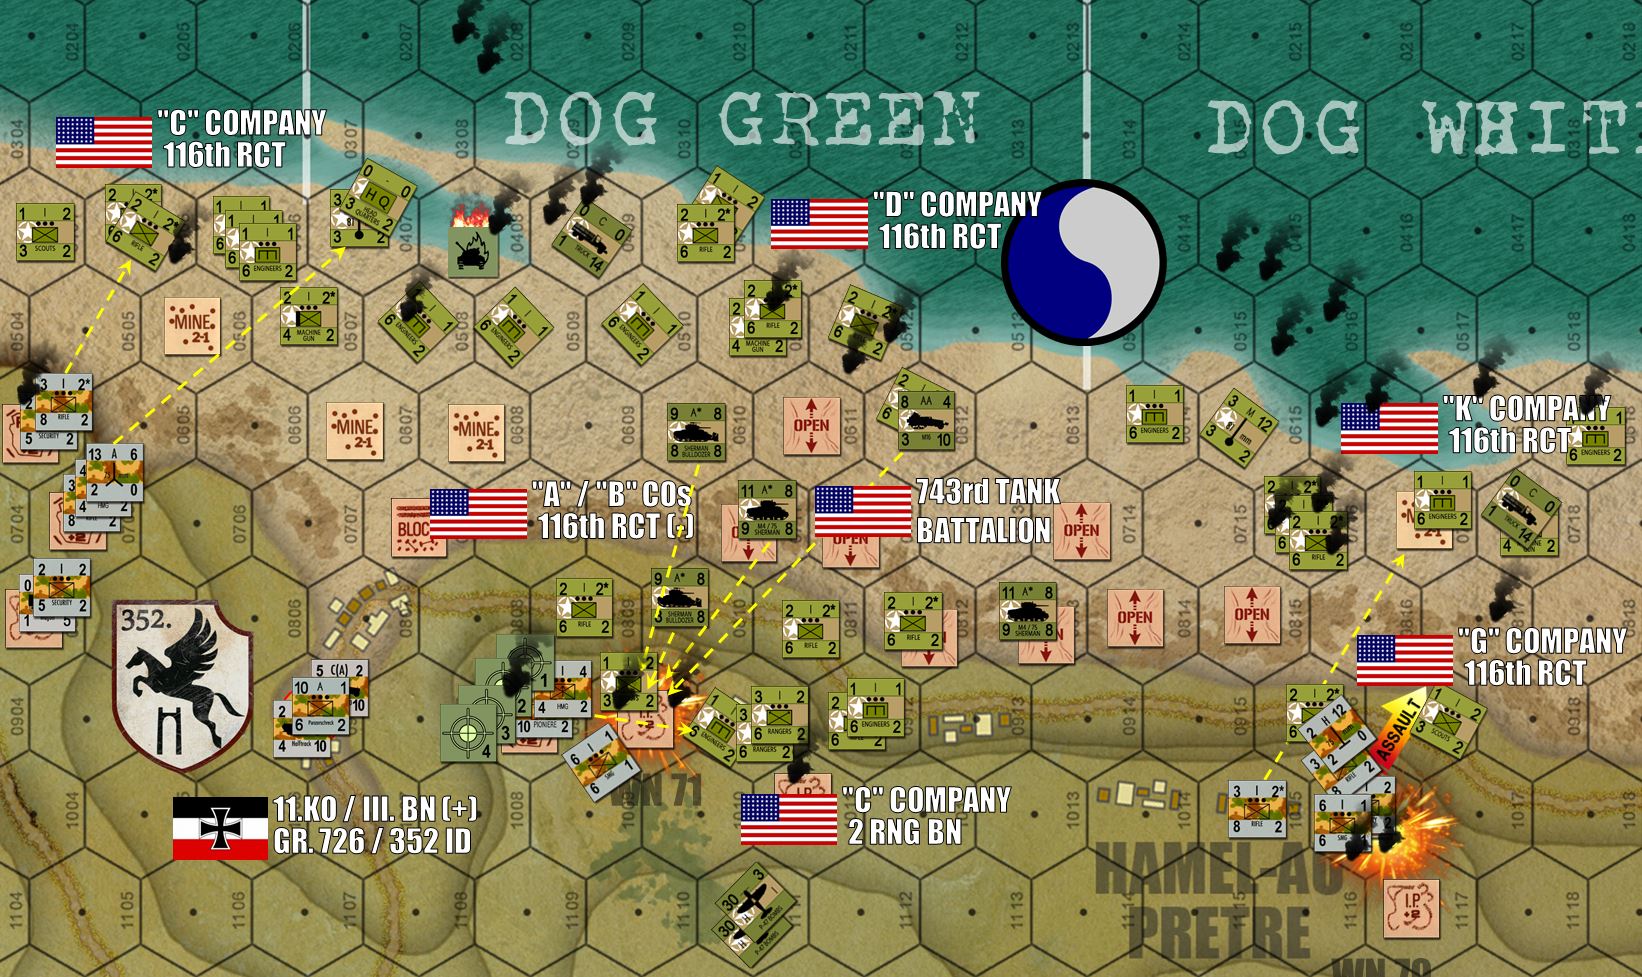 Dog Green and Dog White beaches at the end of Turn Five, ONE HOUR into the Normandy assault. They are tightening the noose on WN71, but it’s still causing casualties as the Americans struggle up the Vierville bluffs. The third wave is ashore (“C” and “D” Companies / 116th RCT) but as you see, landings are still chaotic.
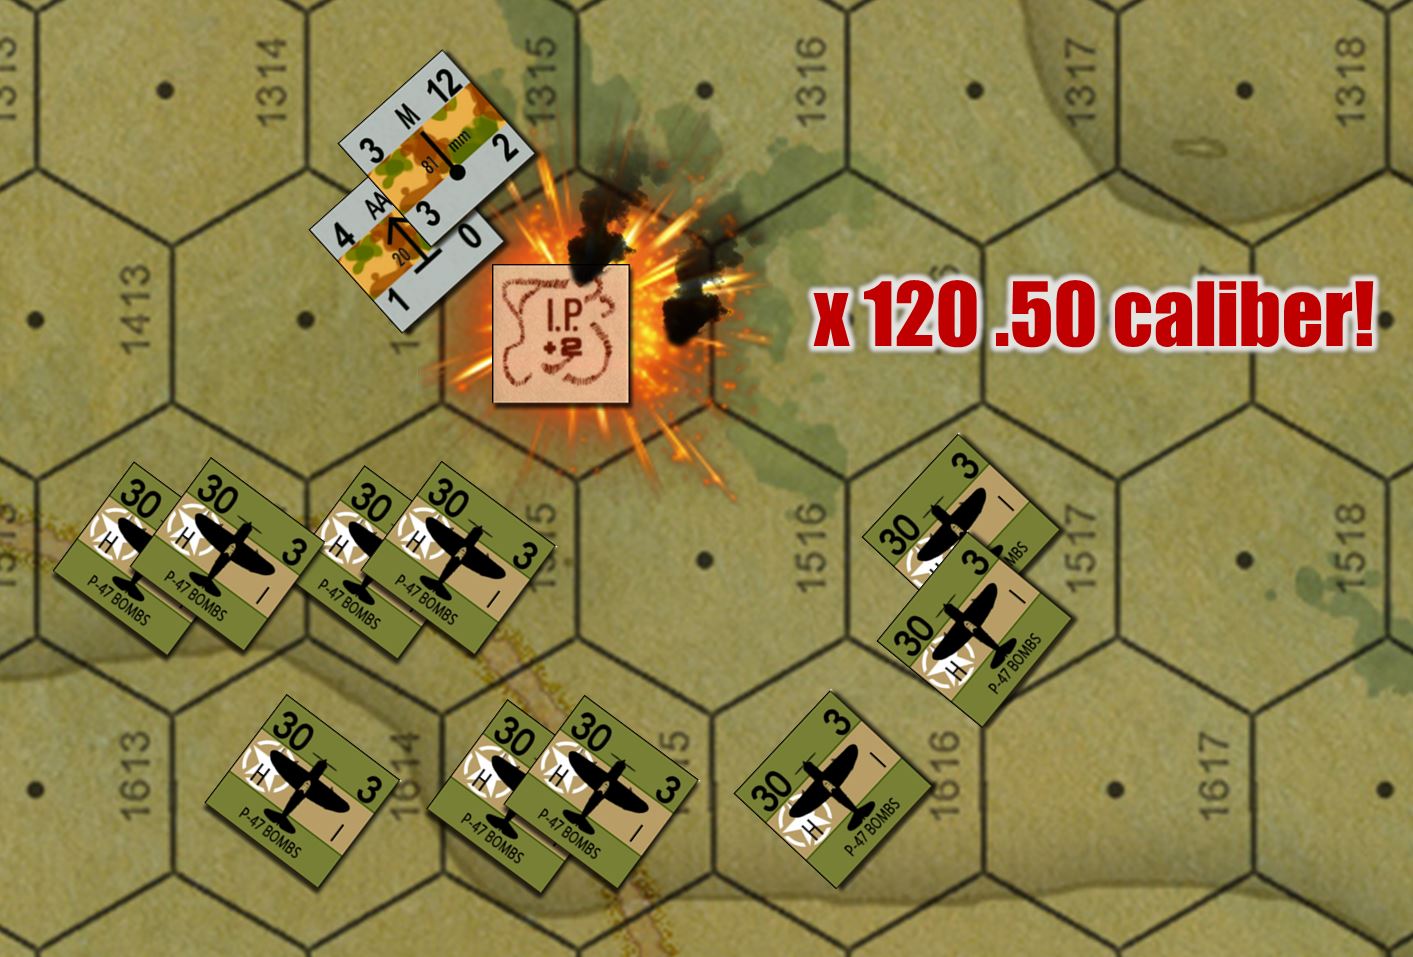 After P-47s drop bombs, they can linger on the board for four turns and make strafing attacks with their guns. 30 = their bomb attack (once), 3 = their MG attack (four times). These guys are massing for a huge strafing attack on German battalion 8.0cm mortars and a 2.0cm FlaK pit. Each counter = x2 planes, and each plane carried x6 .50 cal HMGs. So that’s 120 .50 cals coming in hot! Yeah, those German light artillery positions are toast.
  At Easy Red beach, there is a moment of hope! Two platoons of engineers hand made it to the block covering the “Easy One” draw. Technically those two Sherman platoons at lower left hold the objective (yellow target icon) but the Americans don’t get the victory point for it until the blow the block and open the draw OFF THE BEACH. This is two chances at a 1-2 on a d6 (one roll for each platoon). But neither succeed. The charges go off but the blocks remain in place (historically some of these concrete blocks were up to 50 feet deep in places).
 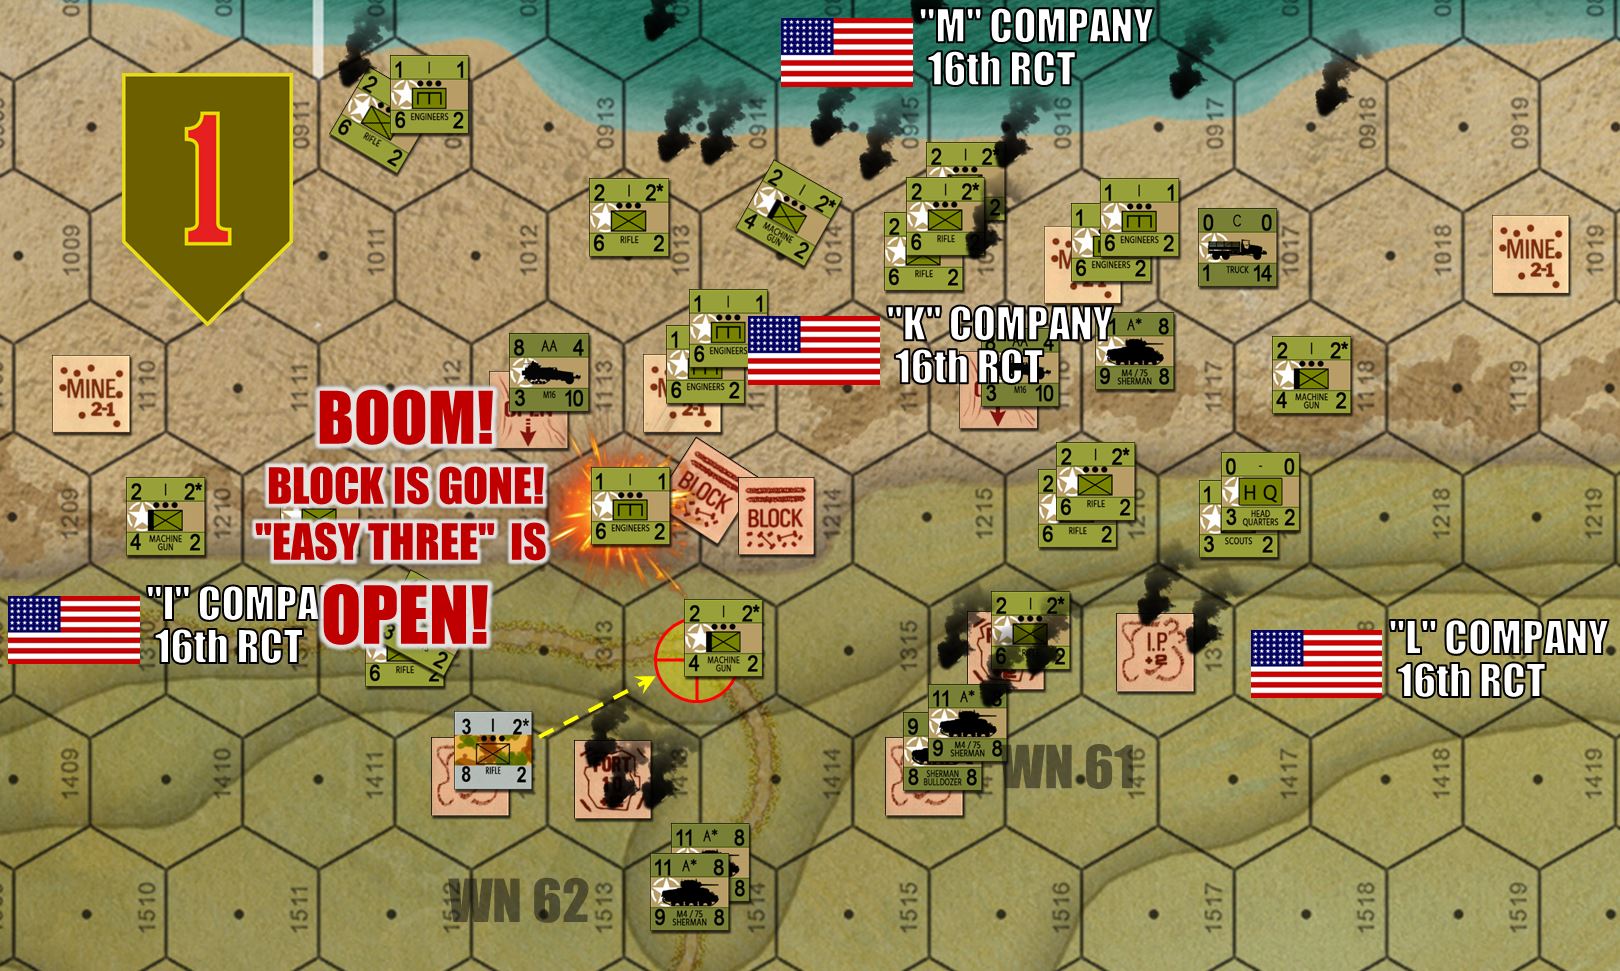 Further east, at the very edge of the assault zone, there comes the first REAL CRACK in the Omaha Atlantic Wall. One platoon from “A” Company / 37th Engineer Combat Battalion has reached the block at “Easy Three” draw and blown it sky friggin’ high with a successful 1-2 roll on a d6. Meanwhile, the weapons section from “Ida” Company / 3rd Battalion / 16th RCT / 1st Infantry Division has occupied the objective hex at the other side of the draw. THAT’S IT! The first draw is open!