The Desert War: Gaming WW2 in North Africa Part Two – Early Successes
August 24, 2015 by crew
In this article, we continue our journey through the North African campaigns of World War II, discussing how these battles can be brought to the tabletop. If you’re just joining us, please check out Part One of the series, where we take an overview of the Desert War and examine its opening campaigns. But for now, pull on your sand goggles and climb back in that turret, it’s time once more to brave the windswept desert!
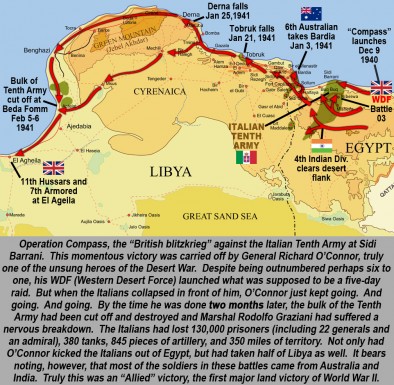
In Part One, we saw how the Italian Tenth Army, striking out of their colony in Libya, invaded the British protectorate of Egypt in September 1940. Despite a huge advantage in numbers, Marshal Rudolfo Graziani’s 200,000+ men (compared to just 30-35,000 of General Richard O’Connor’s “Western Desert Force,” or WDF) advanced only as far as Sidi Barrani, about 60 miles inside Egypt. There they stopped, and simply dug in.
The Italian 10th
There were many reasons for Italian hesitation. The Tenth Army was almost completely unmotorized, and 200,000 men can’t just walk across the Egyptian desert. Also, many Italian commanders only wanted to establish a foothold in Egypt so they could claim it when the Germans forced England to surrender. But of course Britain didn’t surrender, and O’Connor was soon ready to strike back with a plan he called Operation “Compass.”
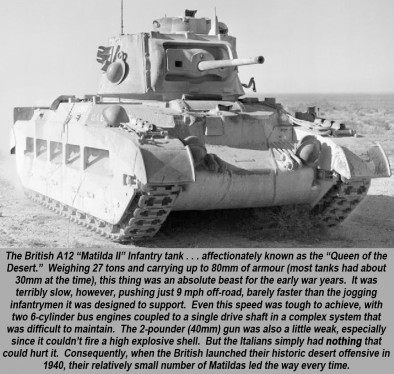
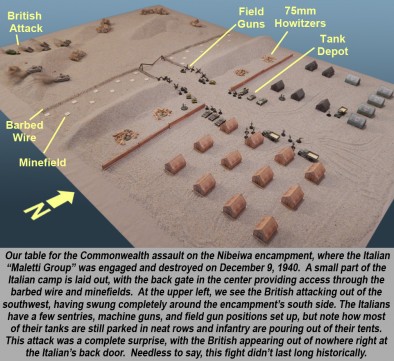
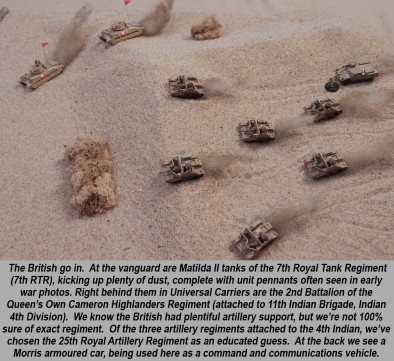
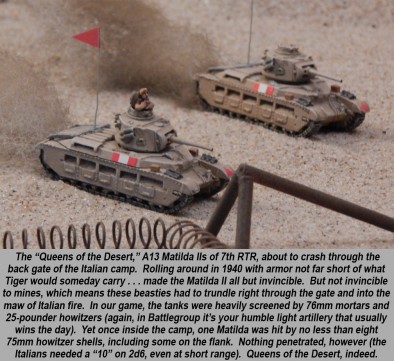
One of the first big engagements of Operation Compass would be called “The Battle of the Camps,” where the Commonwealth would hit the Italian encampments around Sidi Barrani in a series of flanking attacks. Among these was O’Connor’s heaviest striking unit, the 7th Royal Tank Regiment (about fifty of the heavy Matilda II tanks), hitting the encampment of the Italian “Maletti Group” near Nibeiwa, Egypt.
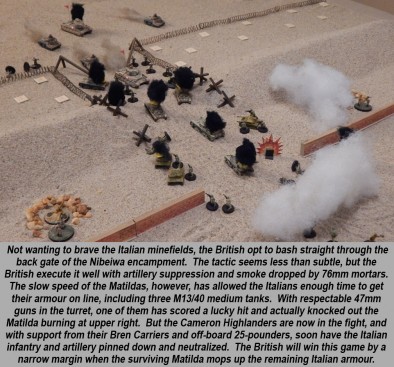
Essentially, the Italian camp was set up like a Roman fort of old, with a square perimeter and neatly arranged “streets” of tents arrayed within. The perimeter was well-braced with barbed wire and mines, but a lane was left through the minefield in the back of the fort to allow Italians to enter and exit. This was the fatal gap that the British were aiming at, having swung easily around the camp’s southern flank to strike it from behind.
The 7th RTR was a very special unit. At the time it comprised the only heavy armour in North Africa, and these 50 Matilda II tanks were half of those available to the entire British army. Attached first to the 4th Indian Division, then 6th Australian Division at Bardia, and finally the 7th Armoured Division, they spearheaded virtually every attack in Operation Compass.
As discussed above, Operation Compass was an unqualified success. By the time it was over, O’Connor’s troops were reporting POWs taken in “acres” (e.g., “we have 5 acres of officers and 200 acres of other ranks”). It could have kept going, perhaps to take all of Libya and end the Desert War almost before it started. So why didn’t it?
The Desert War Continues
First, the machines couldn’t take it. The Matildas of 7th RTR (those that remained after two months of solid combat) were falling apart. Significant forces were also needed for the British counter-invasion of Italian East Africa (taking Ethiopia, Italian Somalia, and Eritrea, and RE-taking British Somalia). At a stroke, O’Connor lost the 4th Indian Division, a third of his force.
But the real deathblow for Compass came from Winston Churchill himself. Back in Europe, the Germans were preparing invasions of Yugoslavia (the pro-German Croatian government had been ousted by anti-German Serbs) and Greece. Determined as always to hold the eastern Mediterranean and protect the Suez Canal, Churchill ordered the 6th Australian to the Balkans, where it was largely destroyed in the hopeless battles of Greece and Crete.
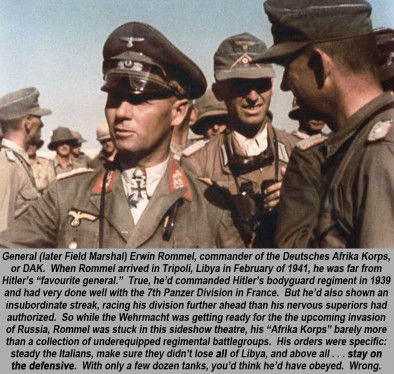
This left O’Connor with only one division, the 7th Armoured, and it had shaken itself to pieces in “Compass.” So, while it was refitting back at Alexandria, the British could only dig in at their forward positions in El Agheila. To add to their woes, meanwhile, a new player was just then arriving in North Africa: Erwin Rommel and the “Afrika Korps.”
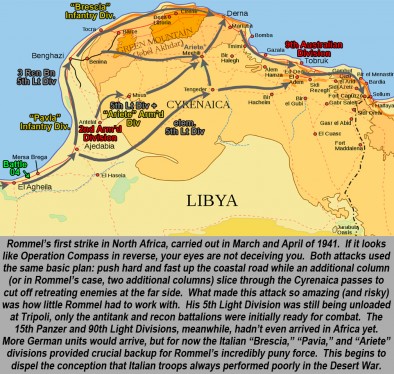
Despite his orders to remain on the defensive, Rommel immediately started planning for the attack. This was especially daring considering that most of his “Afrika Korps” hadn’t even arrived yet, and he started his first big offensive with only two battalions of the 5th Light Division (less than 1,000 men).
Fortunately for Rommel, the British were in even worse shape. To replace the 4th Indian Division (transferred to East Africa), the 6th Australian (being chewed up in Greece and Crete), and 7th Armoured (refitting in Alexandria), they brought in the 9th Australian and 2nd Armoured Divisions.
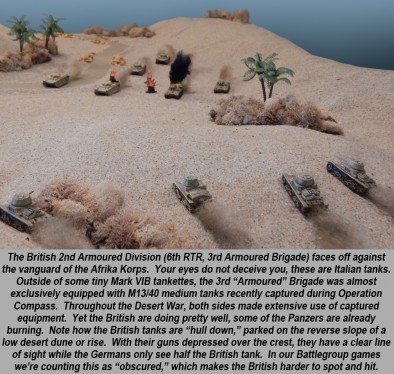
Now while the 9th Australian would later become one of the most famous units of the Desert War, here the division was inexperienced, incomplete, and under-equipped. The 2nd “Armoured” was even worse, they hardly had any tanks and had to use wretched M13/40s captured from the Italians during Operation Compass.
Rommel Strikes
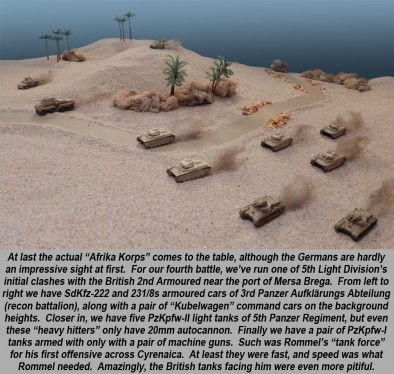
The first scraps involving the Germans in North Africa came in late February 1941, with skirmishes of armoured cars and motorcycles running into British and Australian patrols near El Agheila. Later, as 5th Panzer Regiment of the 5th Light Division arrived, Rommel grew more aggressive. In late March he ordered 5th Light Division’s commander (General Johannes Streich) to break through the British positions at El Agheila and capture the port of Mersa Brega.
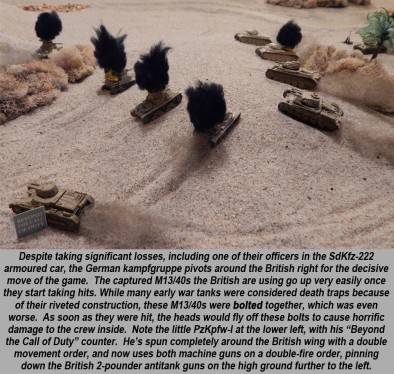
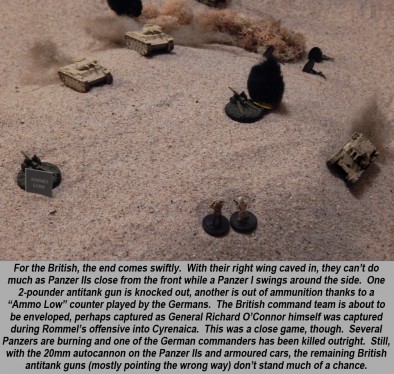
Our fourth game attempted to recreate part of the action along the El Agheila-Mersa Brega road, fought on March 30, 1941. The Germans fielded part of the 5th “Panzer” Regiment, made up of extremely light Panzer I and II tanks. But with only captured Italian M13/40s and a light screen of 2-pounder antitank guns, the inexperienced 6th Royal Tank Regiment (2nd Armoured Division) was unable to stop them.
Once it began, the German blitz back to the Egyptian border was unstoppable. Tobruk was cut off and bypassed. On April 10, Rommel tried to take it on the fly with parts of his newly-arrived 15th Panzer Division but the 9th Australian gave him a bloody nose for his trouble (killing the battlegroup commander, a German Count of all things). Nevertheless, the 9th Australian was bottled up in the city, and the historic “Siege of Tobruk” had begun.
There was more bad news for the British. The German offensive through Libya was so fast that their commander, General Richard O’Connor, was actually captured along with a good part of this staff. Yet once he reached the Egyptian border, Rommel was compelled to stop just as the British had been against the Italians. Supply lines could only be stretched so far, and Rommel’s “corps” of divisions was still woefully incomplete.
Of course, the Desert War was far from over. On the contrary, it was rapidly growing from a colonial scuffle to a full-fledged “front” of World War II. As both sides tried to reinforce their armies, they ran into the cruel limitations of what could be accomplished in such a harsh environment, especially with enemy aircraft, warships, and submarines sinking so many supply ships.
Such factors further evolved the Desert War into a full air-land-sea campaign, one of the most complex and misunderstood arenas of World War II. Next week we’ll be taking a look at the next stage of the campaign, including the dazzling successes of “Operation Crusader” and Gazala where both sides captured stunning successes, only to see them turn to sand in their hands.
If you would like to write an article for Beasts of War then please contact me at [email protected] for more information!
"...this left O’Connor with only one division, the 7th Armoured, and it had shaken itself to pieces in “Compass.""
Supported by (Turn Off)
Supported by (Turn Off)
"Once it began, the German blitz back to the Egyptian border was unstoppable..."
Supported by (Turn Off)












A superb article for a good start of the week @oriskany
I like the fact that you have mentioned the supply lines and the problem of actually shipping in supplies to Africa with Malta being a significant threat for the Germans, not to mention some Allied submarines, but not only. The British faced a similar problem despite the fact that they practically controlled the waters if I can risk this kind of a bold statement.
Thanks, @yavasa . Indeed, the British would be able to threaten Axis supply lines through the Mediterranean (despite the relatively short distance from Sicily to Tripoli), at least after naval victories like the Battle of Matapan and the famous torpedo plane strike at Taranto. Up until these events, the Italian Navy was well-equipped with powerful, modern ships. Actually, even after this the Italian Navy was a serious force to be reckoned with, they just became very nervous about sending it out with so many British aircraft clouding the skies.
But you’re totally right, the German and Italian air forces came very close to similarly choking off British supply lines, not to just Alexandria and Cairo but of course Malta. A whole article series could be written just on Malta, the Pedestal Convoy, Operation Herkules, the sinking of HMS Barham, Italian frogmen hitting British warships in Alexandria, etc.
https://www.youtube.com/watch?v=YdrISbwy_zI
As it was, the British often sent their WDF / XIII Corps / Eighth Army supply convoys all the way around Africa, the Cape of Good Hope, and back up through the Red Sea. Given shipping losses through the the Mediterranean, I think the British judged it better to be late, than never. 😀
And thanks for bringing up British submarines. Like the Germans against the British and Americans, and the Americans against the Japanese, the British submarines truly turned the Med into a very dangerous place for Italian merchantmen and warships.
Ah, since you mention some Brit subs, you cannot forget about the “Terrible Twins” – two Polish submarines fighting in the Med. Here’s some reference I have managed to find in English on the web.
http://ww2today.com/11th-november-1943-polish-submarine-sinks-german-schooner-in-mediterranean
https://en.wikipedia.org/wiki/ORP_Sok%C3%B3%C5%82_%281940%29
https://en.wikipedia.org/wiki/ORP_Dzik
Now that I did not know. 🙂 Awesome, thanks!
We’re definitely keeping an eye on Polish contributions in the Desert War, particularly the Polish 1st Carpathian Brigade (and the 11th Czechoslovak Infantry Battalion) that participated in the “Siege of Tobruk.
Basically, the famous 9th Australian Division was originally bottled up in Tobruk and offered fierce resistance against primarily Italian divisions while the Germans traded blows with Wavell, Cunningham, and Auchinleck (Operations Brevity, Skorpion, Battleaxe, etc).
Eventually the 9th was switched out buy sea and replaced with units like the 32nd Tank Brigade and 70th Infantry. From what I can tell, the Poles and Czechs were attached to this new force and helped hold Tobruk against all comers (the siege eventually lasted 240 days or something) until finally relieved during Operation Crusader.
More on this in Part III. 😀
Part III is going to be even more interesting then. Correct me if I am wrong but hadn’t Australian Rats of Tobruk compliment the 1st Carpathian Brigade as The Rats of Tobruk?
Here’s an interesting video of Eden visiting the Carpathian Brigade in 1940
https://www.youtube.com/watch?v=sLPoAd_mgoU
It’s definitely possible, @yavasa . I’ve done a little more poking around and found when the Carpathian Brigade arrived in Tobruk. August of 1941, about three months after the siege started, but definitely before the 9th Australian was withdrawn. So they were definitely in Tobruk fighting together for a while.
Ah, these old wartime newsreels. 🙂 The epitome of unbiased journalism.
Part III will be Crusader and Gazala
Part IV will be El Alamein
Part V will be Tunisia
So I am waiting for more @oriskany
Another great and informative article like part one. Was fun to read.
Only one note. It’s “Kübelwagen”. I wouldn’t mention it but you used “Aufklärungsabteilung” so I think you and all others should know the right spelling.
Nethertheless… Great work!
That’s just a straight-out typo on my part, I can’t even blame the special characters because it’s part of the IMAGE caption and not the text that gets imported. 🙁
Also, my sources are giving me different information, I’m not 100% sure which is right. Is it Aufklärungsabteilung (reconnaissance detachment) or Aufklärungs Abteilung? I have different sources giving it to me in different ways, and yes they are both German sources.
German like Danish and the other Scandinavian languages, like combined words – My guess is that you can use both, depending on the context. The combined for “the” and the split for “a”, but I am far from a linguistic expect ; )
When in doubt, mash the words together. The more letters the better! Scrabble must be a really cut-throat game in those countries. 😀
For me as a German it’s easy 🙂
After the word Aufklärung (reconnaissance) is an “s” (Bindungs-S or combining-s) so the Abteilung (detachment) comes direct afterwards. The combined version is the only right form. Unfortunately even most Germans don’t do it right… the english influence is much to high nowadays 😉
But I wanted to help you not to blame you, because it’s not a shame to make errors in foreign langugaes. And German is a language wich is predestinated to make errors 😉
Time for some revenge . . . It’s “too” high”, not “to” high. Bwahahaha!
Just kidding, of course. 🙂 So long as you don’t put “two” high. 😀
I always thought English was the craziest language in the world to learn. After all, when I write these articles I have to set my MS Word filters to “English UK” instead of “English US,” because the spelling of many words and some of the grammar rules are different.
a very well done article.
Thanks, @siberianvii ! 🙂
Very well done. I really liked the high lighting of the use of captured equipment. Most people are aware of it on the OST front and the Germans doing it but many are unaware that the allies did it as well.
Absolutely, @tibour , and thank you very much! The Desert War practically ran on captured and re-captured equipment. Many people have heard of Rommel’s command truck he called “Mammoth,” which was a captured British truck. The Germans also loved using captured Matildas because of how thick their armor was. The British certainly didn’t *enjoy* using these M-13/40s here at El Agheila, but the unfortunate 2nd Armoured Division didn’t have much choice.
Then again, the British certainly had a HUGE stockpile of captured Italian equipment after the end of O’Connor’s Operation Compass and the disintegration of the Tenth Army. I think it was a British radio announcer who made a crack on this . . . with a parody of Winston Churchill’s famous line regarding the Battle of Britain:
“Never in the annals of human conflict . . . has so much, been surrendered by so many, to so few.”
This is also part of what made the fighting so ferocious. Whoever controlled the battlefield at the end of the day would get to recover their own tanks and probably repair most of them . . . not to mention a few of the enemy’s to be repaired and put back into action facing the other way, after a quick paint-job, of course! 😀
Excellent reading! I recently finished Hans von Luck’s book and found his account of the desert war to be very interesting, especially the ‘down time’ and ‘chivalry’ parts.
Great series!
Thanks, @neves1789 . Very glad people are liking the articles. 🙂 Von Luck arrives in Africa in time for the Gazala offensive of May-June 1942, I believe (Operation Venice). Definitely covered in more detail in Part III, so stay tuned! I know von Luck was badly wounded at Gazala in the groin of all places (ouch) . . . stayed in the field with repeated injections of morphine (must have fought half the battle stoned) . . . until his groin wound became infected. Yikes! Yes, I’m cringing as well. 🙁
Another great read for German perspective in Africa is von Mellenthin’s “Panzer Battles.” I believe he was one of Rommel’s staff officers for a lot of these battles.
Over 50% of all DAK trucks were captured or of foreign origin. Plays havoc with your logistics chain…
Oh and while von Luck’s memoirs are a good read I would take the whole book with a healthy pinch of salt…
I think my favorite “okaaay” part of von Luck’s memoirs are the repeated trips to a certain house of ill-repute, in Bordeaux, I think . . . and yet “nothing” ever happens. 🙂 Oh, and the pages describing the various wines he encounters are just riveting.
Ah, house of ill-repute plus wine? Nothing happens? I need to read this book by von Luck 😉
It’s very discretely alluded to, @yavasa , I don’t think he ever comes out and just says it. When he’s with Rommel’s 7th Panzer in France, and “Case Red” pivots south and they basically take an almost unopposed road trip down the west coast of France, he eventually winds up in either La Rochelle or Bordeaux or one of those Bay of Biscay towns . . . and meets a “very friendly group of girls,” “went there many times,” “always greeted me with a smile despite my uniform . . .”
Hey, I was in the military many eons ago. Those kinds of places always “very welcome” to guys in uniform. 😀
He also spends a lot of time discussing his “adventures in wine.” “I found three case of whatever-whatever . . . I had a car to take it back to Paris where I could have it shipped home, but I had orders to go somewhere else, so I gave it to guy who’d take it to Paris for me in exchange for one of the cases . . . I never saw him again . . . blah buh-blah . . .” 🙂
I can’t remember specifics because I usually skip these pages, but you get the idea.
I cut him some slack, though. Any guy who came back from Africa with infected shrapnel in his groin deserves a break, eh?
After coming home with that he might not think of going on an other French road trip like that
I find the whole ‘I stopped Goodwood with these flak guns’ more to raise an eyebrow too…
Indeed. The rest of 125th Panzergrenadier Regiment, or 21st Panzer Division for that matter (not to mention 503 sPzAbtg) had nothing to do with it.
Actually, did he ever claim he and those four Luftwaffe FlaK guns “stopped” Goodwood? I just remember the part of the story where he had to pull his pistol out on them to get them into action.
“Sorry, sir. We’re here to shoot down aircraft. We don’t do antitank work.”
“Oh, really?” (hauls out the Walther) “Now you do.”
Oh he mentioned it plenty of times… on every British Army tour he went on… and the story was different each time.
Plus try and find an 88mm flak unit in that area on that day…
He was a good self publicist for sure… Sadly at the detriment of Beckers assault guns that did the real work that day. But then the whole story is clouded with errors. German kill counts don’t match British vehicle returns for the day either… Though with the amount lost the British recorded it’s hardly worth worrying about. Was certainly a turkey shoot.
Great article and the pendulum begins to swing between Egypt and Tunisia.
On a side note I read the Matilda II did have AP shells but none were shipped to Egypt. @oriskany
Don’t you mean HE shells?..The 2pdr never had any in active service
Yeah, @torros , from what I’ve read the 2-pounder never had an HE shell designed for it, or the 2-pounder couldn’t fire an HE shell, or something like that. What @zorg might have meant by no HE shells was the standard ammunition load for the Matilda Support or Crusader Support tanks. (??) These had 3″ mortars but almost entirely carried smoke shells for some reason, with only 3-5 actual high explosive shells. No real reason other than quartermasters doing things “by the book.”
This was just another of the great little gems about the Battlegroup game system (to pull this back a little to gaming 🙂 ). I knew the 2-pounder didn’t have any HE, and pored through the books looking for how Battlegroup would handle it. “There’s gotta be a special rule for that in here somewhere.”
Nope. But when you look at the base “stat line” for 2-pounder guns, the HE line just isn’t there. It gives AP penetration values for different ranges (which are cross-referenced against armor levels for a change to penetrate on 2d6) . . . but the HE info is simply, and beautifully, omitted. Perfect simplicity in design. SOME GAMES I could mention (cough, cough) would have some kind of top-down “training wheels” rule written just for the Matilda II, and then again for the Crusader II, and then again for the Valentine III . . .
I just hope people don’t think that omission is some kind of typo. 🙂
Actually… There was an HE shell but it was never issued to tanks. Not sure it ever saw use. Only time I have seen it mentioned is on the 1951 load out for a Daimler armoured car.
Most WW2 games I play don’t allow the 2pdr to fire HE. You just have to have it supported effectively with infantry which is how it was and was meant to be I guess
Well I guess the assumption was the CS tanks would help with HE, but yes, infantry work required.
yup HE not AP.
Thanks, @zorg.
Yes, pendulum is right. Back and forth, back and forth. It really starts to become apparent in Part III. In the graphics work, I try to condense several cycles of offensive-counteroffensive into one map and almost immediately it turns into a mass of scribbled arrows.
It would almost be funny of thousands of people weren’t dying with each swing of that pendulum, or the armies weren’t leaving fresh graveyards with each visit to same battlefields.
Wrong again they designed a HE shell but never went in to production?
https://en.wikipedia.org/wiki/Matilda_II
Only issued post-war for armoured cars as I mentioned above. Don’t think it was even ready till 1944.
Though I have heard rumours that the Australians had an HE round for bunker shooting out in the Far East but never substantiated that past vague rumour. Can’t imagine it would be that effective as the HE load is quite low.
@zorg and @piers – indeed, the HE load for a 2-pounder / 40mm would be, what? Roughly equivalent to a 40mm HE-FRAG grenade fired today? I’m sure you would get SOME extra damage from the extra velocity of the impact, but yeah, I’ve seen two-pounder shells. Not sure how much HE you could pack in one of those. 😐
I know the US Navy loved the Bofors 40mm for quad-AA mounts on their ships, later in the war I **think** these started to be capped with HE with proximity fuses? Might have only been the 5″ guns, though . . .
They may have tried delayed fuses for a bit more penetration??
I honestly have no idea. 🙂
Interesting was that a bit of aussie ingenuity?
Could have been, but I suspect it’s confusion with the 2 pounder naval round or the 40mm Bofors shell… but you never know.
Thing is the HE filling in the 2 pounder QF is low, not sure it would be a ‘bunker buster’ though I wouldn’t want one coming through a bunker slit that’s for sure…
On the topic of HE shells, infantry support, and busting bunkers . . . and while I have @piers on the thread . . .
In Battlegroup, when you issue a “Fire and Maneuver” or “Maneuver and Fire” order to a vehicle, do you get to fire ALL the vehicles weapons that can be brought to bear (i.e., coaxial, hull-mounted, pintle-mounted, whatever is allowed to hit a target)? And on an “Open Fire” order, the tank gets to shoot all these weapons twice?
I only ask for two reasons:
In our Desert War games, we’re finding that even relatively poor Italian tanks, even CV-35s and Bren carriers and the like, are having a relatively easy time pinning light enemy antitank gun crews (British 2-pounders, Italian 47mms, etc) . . . i.e., antitank guns that don’t have the greatest of ranges.
We’re giving the gun crews the “obscured” bonus if there’s even a question of a “hull down” position, and a corresponding “hard cover” save.
Granted, the guns usually get to fire first on an “Ambush Fire” reaction order, they HAVEN’T moved (so don’t take that penalty), so the approaching armor usually takes a few good hits . . . But after that it seems really easy to pin down the antitank guns.
I was just asking because I know some MGs and the like have “crew requirements” on the Small Arms Rate of Fire Table, in order to fire at full ROF. If there are two guys in these early war tank turrets, and the gunner is firing the main gun, does that mean the coaxial gets to shoot as well? Or does the gunner have to choose?
I honestly don’t know if we’re doing this incorrectly and thus making vehicles like the M13/40 “overpowered” (wow, when did you think you’d ever hear anyone say THAT?), or if this is a symptom of the very long lines of fire we’re playing with just because we’re in the desert.
No you choose which to fire, main gun or MG. Not both.
Remember a vehicle MG also only gets 3 dice.
And don’t forget to spot for each aimed fire…
Oh yes, we’ve totally been doing that. Otherwise games would be over on Turn 2. 🙂
Gotcha, @piers . Makes sense. And damn, I’ve been having vehicle MGs only fire 2 dice because I figured they were LMGs. In most of the vehicle data charts, MGs are just listed as “MG,” without specifying light, medium, etc. But the small arms table lists LMG, MMG, HMG, etc.
But now that I think of it, you’re right . . . most were .30 caliber or so, belt-fed . . . so I guess they would qualify as MMGs. ROF of 5 (MMG) just seemed too high so we called them LMGs.
But if the crew for an MMG is two, and there’s only one crewman operating . . . say a hull-mounted weapon, that’s half ROF anyway (“reduced” crew). So, yeah . . . ROF of 3 . . . just like you said. 🙂
Sorry, I’m thinking out loud and spouting stuff you already know. I just like the way this system is put together and how everything clicks into place.
Anyway, thanks for clearing it up. We’ve been dealing with some questions about firing just hull machine guns (if any) or coaxials IN ADDITION to main guns.
The ones that are really nasty are the PzKpfw-IIs with the 20mm autocannon. We’ve been firing these at the ROF 6 specified on the chart. That’s not TOO scary until they sit still for a second (hopefully hull-down, that “N” armor’s not stopping very much) and take an “Open Fire” action. 😀
A Panzer II is scary if you are infantry… It runs away from Matildas.
I absolutely LOVE the “dust cloud” effect behind the tanks. It adds that little touch of realism to the battlefield and gives is scale.
I also have to say I’m glad none of my units were in that blood bath at the “back gate”.
Thanks, @gladesrunner . It’s a simple pinch of cotton from the craft store with a “dusting” of brown spray paint. Big ones for tanks, smaller ones for tankettes, trucks, halftracks and the like.
This reminds me . . . I’m sure everyone already knows that to see the photos at LARGER RESOLUTION, just click on the image in the article. But, once you get that open, right click on the image and either hit “open in new tab” or “view in new tab” in Google / IE, or “View” in Firefox. This brings it up in the original 1008p / 7” resolution. This might help particularly with some of the maps.
Thanks again!
Excellent reading yet again!
Will you touch on the U.S. arrival in North Africa?
Absolutely, but it’s a little ways off. So far we’ve had Part I (Overview and Origins), Part II (Early Successes – Compass and Rommel’s first strike) . . . Coming up we have:
Part III – “Pushing the Envelope” – both sides expand their forces and try to push their armies as far and as fast as they will go. Crusader through Gazala.
Part IV – “Turning the Tide” – El Alamein
Part V – “Endgame” – Tunisia, with one American battle at the very end.
I’m certainly not trying to marginalize or exclude the Americans, Eisenhower, Bradley Patton, or even key British figures like Alexander or Montgomery. I just took the Desert War and divided into five roughly equal parts (one for each article). The “iconic” Alexander and Montgomery don’t show up until halfway through Part IV and the Americans until Part V. Patton might not show up at all, it depends on whether I do El Guettar or not (which he wasn’t actually present for, at least not the important part, regardless what the movie says) 🙂 If any of Patton’s II Corps forces make an appearance, it will be in the last few paragraphs of Part V.
Just goes to show that there was a long, loooong war in the desert before these more famous figures arrived on the scene.
Some Australians used base fuzes and removing the graze fuze to help with penertration. It was a similar system that HESH and HEP used later
One part of Operation Compass I would have loved to include (but for space and time limitations) was the final cutting off of Tenth Army’s retreat at Beda Fomm.
Even while the 6th Australian Division was still fighting and mopping up at Bardia, O’Connor had sent the 7th Armoured Division around this position to isolate the all important port city of Tobruk, about seventy-five miles beyond. O’Connor knew better than to send tanks into a fortified city, so he simply kept it cut off until 6th Australian could come up and invest the city, freeing 7th Armoured to push further west.
By this point, however, it was become apparent that even this runaway “British Blitzkrieg” was reaching the. For the combined assault on Tobruk, for example, the famed 7th RTR could field only a dozen Matilda tanks. This is where the British, desperate to keep their offensive moving, requisitioned dozens of Italian M13/40s, painted huge white Kangaroos on them, and issued them to Australian 6th Division.
The next target was Derna and its important airfield, where the Italians mounted surprisingly stiff resistance before being finally compelled to withdraw south down the “back coast” of Cyrenaica.
Here’s where the lead elements of 7th Armoured just barely cut them off, having cut across the inland passes of the Cyrenaican plateau. The clattering tanks of 7th Armoured would have never made it, so the British took every WHEELED AFV they had, attached some motorized infantry, gave it all to Lt. Colonel John Combe of the 11th Hussars, and sent it racing ahead.
They beat the first withdrawing columns of the Tenth Army at Beda Fomm with just 30 minutes to spare. With the 6th Australian and 7th Armoured closing from the north and east, and this light force blocking the road to the south, the Italians had nowhere to go. It was a slaughter, the scene afterwards reminiscent of the Sinai Highways of 1967 or the Basra Highway of 1991.
After three days of mopping up, it was all over. General O’Connor sent word to his boss, General Wavell, with the famous message: “Fox killed in the open,” communicating that Operation Compass was finally over, and Britain had won her first land victory in World War II.
As always erudite and flowing. You know that book or series of books, must be itching ever worse with each brilliant article you produce. I was as always at the place where you are doing battle. Am I alone or did anyone else remember a programme of news reports to as modern TV report but at the time of the actual event, and when it started or finished there was someone saying something like “1066ad hastings, YOU WERE THERE!” Anyway it reminds me of that.
The other is that the war was as much about the third army for any force(s) out there. Egypt then was not even anywhere near anything it is today, the socio and economic realities made it a place where even the nomadic tribes would switch allegiances wit the wind selling information to all sides. I war at sea knowledge and the ware about’s of your enemy is invaluable and this was a sea battle, only this ocean was made of sand.
Not necessarily relevant but my uncle Geoff used to say that although neither side wanted capturing obviously, but the fear of being captured was not the same ever as say in any of the european fighting. This was as much in part by the fact that the Germans only fielded their normal troops here. The second was that information on your enemy was king and a beaten prisoner may give up information eventually, but a better treat fed and watered one was more likely to give over that information much more readily and more accurately. Geoffrey did not serve at the beginning in the desert rats later a sergeant in an artillery section, I was looking at his past and talking about his medals medals only a week or two back.
I aren’t sure wether true or legend but did the desert war break down into a conflict with timetabled day, or is that just complete crap.
Thanks very much for the kind words, @chrisg ! 🙂
SHIFTING ALLIANCES: Absolutely. Although Libyan Colonial regiments and Egyptian Dominion forces served either the Italians or British steadfastly, There were large portions of the population that weren’t especially loyal (or even under the control of) these local Libyan or Egyptian administrations. The writings of von Luck and especially the stories of the LRDG talk a lot about local guides and agents who would play both sides.
INTELLIGENCE: Intelligence on enemy dispositions, deployments, strength, and especially status of supply was indeed crucial. For all its elan in combat and raiding, the LRDG was founded as and always remained primarily a deep desert reconnaissance force, watching Axis roads out of Tripoli and Benghazi and simply reporting how many trucks were carrying ammo, fuel, and most importantly, water . . .
CAPTURE: As you uncle says, and we touched on briefly in Part One, there was a certain (small but noticeable) degree of “fair play” shown between the armies. When someone was captured (especially pilots, scouts, that kind of thing), the captors would sometimes find a way to let the other side know, just so no one was imagining their mate dying of thirst in the desert.
I’ve come across one story with Rommel when he basically got himself cut off behind British lines during the opening phases of the Gazala offensive. A captured British major demanded more water for his men. Rommel replied that the British POWs were getting the same half cup of water per day as his own men. And if this last attack to break back to German lines failed (he’d been trying for four days), the major himself could carry Rommel’s letter of surrender to the British.
DAILY “SCHEDULE” : There’s some truth to this. A great book is “From Alamein to Zem Zem” by Keith Douglas, who served in a troop of Crusader III tanks with 7th Armoured (Desert Rats). He gives a vivid account of how this campaign actually felt to the British in the field. We was wounded near the end of the Tunisian phase of the campaign and while he was convalescing, wrote this book. A good thing, too, because when he re-joined the 7th Armoured and landed in Normandy, he was killed in a tank duel just a week later.
http://www.amazon.com/Alamein-Zem-Keith-Douglas/dp/0571241948
Anyway, because supply was so difficult in the desert, there really were long stretches of time when both armies pretty much knew nothing major was going to happen, especially earlier in the campaign (41-42). Stand-to, patrols, vehicle maintenance, a “spot of tea” . . .
And that anecdote about Rommel sums up why he was a poor army commander…
No argument here. 🙂
Hey Oriskany I would like to put you on the spot as I haven’t played the Battlegroup rules. How do they compare to Flames of War? Lately I have been playing more Bolt Action but I still have massive 15mm scale armies. Battlefront really turned me off with their Soviet rules in general and I am looking for a system that is more historically accurate and still playable.
Put me on the spot, eh @tibour ? No worries, this isn’t a spot I mind being on, although I must start out by saying that I haven’t played that much Flames of War. I may lose some readers here, but honestly the game isn’t really for me, and Battlegroup is (in my humble opinion) superior.
I come from a background of hex-and-counter command tactical games like Panzer Leader, PanzerBlitz, GDW Assault, Bundeswehr, Boots-n-Saddles, BAOR, Arab-Israeli Wars, MBT, IDF, and yes, even Avalon Hill’s old 1989 “Team Yankee” (nothing new under the sun, so they say). In these games, because they are not limited by the scale of the table, “true lines of sight,” or the scale of the miniatures (the larger the miniature, the more pronounced this problem becomes), the emphasis can really be placed on actual tactics of the period, forcing/encouraging/rewarding the player for actually using tactics, etc.
This is where Flames of War SOMETIMES comes up slightly short. Again, just my opinion, but here are a few examples:
I was watching FoW FTW and saw them talking about the “Jumbo Sherman” rule. Now I may not understand this correctly, but it seems that when the German fires at a mixed force of Sherman types, the first rounds automatically call to the Jumbo. Wow, really? In other games, if you want a certain unit to draw enemy fire, you have to put them out in front in a convincing manner (threatening enemy units, objectives, etc). You have actually EXECUTE the tactic, “play your opponent” and not just play the game, and not just tap a rule that says: “These are the tactics my force is using.”
“Spearhead” is another rule. In other games, if you want a spearhead, you have to actually FORM and DRIVE a spearhead. Same with “Infiltrate,” “Stormtrooper Move,” and others.
I don’t want to pile on here. Like I said, I’ve never played that much FoW and honestly a lot of what I have is second-hand. Also, I have friends on BoW and other places who use Flames of War’s basic system and use house rules to correct a lot of these imperfections. Also, many have been the times I’ve gone to Battlefront’s website and found some great historical information.
Overall, though, hands down Battlegroup wins over Flames of War (or Bolt Action, for that matter), again, just in my opinion.
Also, my “favorite” games (PanzerBlitz / Leader, Arab-Israeli Wars) make many of the same mistakes Flames of War made when it comes to Soviet units. My old Panzer Leader group spent the better part of 2011-2012 pulling the game apart and re-building it at a pretty fundamental level to correct these issues. So on the one hand, I can’t come down too hard on FoW for making those same mistakes, but at the same time understand how that kind of thing HAS to be corrected in any kind of game system serious about representing the Eastern Front.
Here, I’m using Battlegroup to run Desert War battles. Now, admittedly, the Battlegroup “Tobruk” sourcebook isn’t out yet. But the Battlegroup system has proven remarkably flexible once you have one or two of the sourcebooks and have a solid grounding in WW2 mechanized, combined arms warfare. After all, I first used it to run World War 2.5, and they damned sure don’t have that sourcebook. 😀
Last thing, the Battle Rating Counter system in Battlegroup is excellent. I was afraid it would be too random, but it really isn’t once you try it. Too many games (Combat Commander is a good example) are TOO random, they bring the chaos of combat into chaos in the game system in a way that’s just not fun if you get a rotten string of cards. But in Battlegroup, either side can fall apart at a “random” time once they start taking damage or other battlefield events occur. Also, because the opponent doesn’t show you his battle rating counters, you never know just how close he is to defeat. You can guess because you can see how many counters he’s drawn, but since you don’t know the value on those counters, it really adds to the “fog of war” feeling of the game. The enemy can be a breath away from total collapse and you’d never know it. This leads to “inexplicable withdrawals” like we see in combat, and desperate, last-ditch efforts . . . because you never really know how close you are to victory, and you always feel as if you have some hope of last-minute victory, even if you’ve in fact already lost.
Honestly, a great game. HIGHLY recommended.
Sounds good thanks I will have to get a copy of their core rules and give it a spin. I also started with many old Avalon Hill hex games and even did ASL for awhile I just prefer miniatures and a shorter game these days. To give FoW it’s due it is designed from the ground up to be a tourney system. With that in mind it is pretty good. They just really just dropped the ball with the Soviets especially the early/mid war non sense they put out. I could personally could care less about tourney’s I want to see real battles and see if the out comes can be changed.
Agree 100% about tournaments vs. “scenario” play. We build our own scenarios for just about everything and as a designer, our favorite result is always a tie 🙂 (or coming damned close). Of course, as players . . . we always want to win. 🙂
Also, you probably already know this, but you’ll need at least one of the Battlegroup source books to play. You can’t play with just the core rules. The .pdf version of Battlegroup: Kursk is available on PSC’s website for just £10.00.
http://theplasticsoldiercompany.co.uk/index.php?main_page=product_info&cPath=70&products_id=1120
Oh, and last thing. ASL? Yikes. That’s a heavy one, even for a hex-and-counter lover like me. Tried it a few times and definitely had fun, but simpler variants have come out recently that are easier to play (and recruit new players).
Great follow on read there @oriskany and the free sand came up a treat. Historians seem to like telling how the name Rats of Tobruk came about and they give it to us Australians and have excluded a lot of British servicemen who have just as much right to the name as we do. There were 4 regiments of Royal Horse Artillery, 2 light anti-aircrait and 1 heavy anti-aircrait artillery with us from the first day of the siege. Our veterans had deep respect for these guys.
Supply was always going to be a big issue in Cyrenaica. Before the war the Italians only laid down 173km of rail and it was light narrow gauge. The port of Benghazi which is the largest port in the area could only handle 45,000 tons of cargo per month. While Tobruk could only handle 35,000 tons of cargo per month and could only handle ships under 5,000 tons.
From what I have read at this time of the war the British CS tanks were used mainly to lay down smoke and most of them carried 5 HE shells or less each.
Concrete has some funny characteristics that are counter logical at best. A standard MG bunker of the type found on the western front if hit with a high velocity 75mm solid shot AT round, the round is most likely to bounce off it taking only a small chip out of it. On the other hand fire a low velocity 37mm high explosive round at it from say an FT-17 you will likely destroy it. That is one of the reasons the French carried their 37mm gun through on so many of their tank designs, to deal with bunkers. Yet that same round was extensively tested by the Finns and they found it could not reliability penetrate 10mm steel plating at 100m. The 2lber was a high velocity weapon and so there quite easily could have been technical issues in getting it to take a low velocity round. This may not have been as easy as it sounds coming into the war. Look at the designs that had one or the other type of gun installed and of coarse there were a few designs that had one of each. The tank and the guns they required are not completely and proven technology yet, this will happen over the next 12 months or so.
Thanks, @jamesevans140 . Indeed, while the 9th Australian Division was the most famous unit in the “Siege of Tobruk” (which of course was never really a siege, with supply by sea always at least partially possible) there were lots of other units in there with them. I think we’ve already mentioned the Poles of 1st Carpathian Brigade (11th Czech Battalion attached) . . . and of course the 9th was later pulled out of Tobruk altogether and replaced with the British 70th Infantry Division and 32nd Tank Brigade. Pulling up the OOBs for 70th Infantry, I’m finding some of the horse artillery units you’re talking about (1st, 104th, and 107th Royal Horse . . . all 25 lbrs, the 144th Field Artillery Regiment, even had some 60 lbr heavies), 69th Light AA Regt, plus all the battalions that made up the three line brigades (Royal Northumberland Fusiliers, Durham Light Inf., Essex Rgt, Borderers, King’s Own, Leisestershire, Queens Royals, Bedfordshire and Hertfordshire, Black Watch, etc.) No, that’s NOT the kind of detail I have off the top of my head, I just pulled up 70th Infantry’s OOB, dated 11/17/41. 🙂
Indeed there were very few roads through Cyrenaica (or really anywhere in North Africa at the time) . . . and only one real rail line that I’m aware of. This is part of what made possession of Tobruk such a big deal and why both sides fought for it so hard. To oversimplify a bit, it was the one decent-sized supply depot near the middle of the overall theater area. If the Commonwealth was winning and pushing past Benghazi, through Beda Fomm and El Agheila, they’d soon have 1,000 mile supply lines back to Alexandria and so NEEDED a closer supply depot at Tobruk. If the Axis was pushing through Sollum, Mersa Metruh, and eventually toward Alamein, they’d soon have 1,000 mile supply lines back to Benghazi and Tripoli.
I’m no engineer, but I’ve been told steel (or most metals, for that matter), have much better shearing strength and tensile strength than concrete, whereas concrete has much better compressive strength. Hence, damage that steel shrugs off will shatter concrete, and vice-versa. I think this is the idea behind “reinforced” concrete (i.e., “rebars” running though the concrete), trying to provide some degree of metal “bendiness” to concrete.
Also, “concrete” itself is a broad term. I’m sure @redben can tell us that the concrete used by the Romans was very different than what we use today, which is probably why our bridges are falling down (built under Eisenhower) while aqueducts stand tall (built under Hadrian). 🙁
FoW vs Battlegroup. I don’t exactly hold to your final position or that of @tibour however they are fully respected. All game rules have their sweet spot and sour note. Then there is what your own view of what you believe war to be comes into play. Also most game rules behave slightly differently according to the size of the army placed on the table. The different rule sets also react to this in different ways. Take too sides and give them 2 squads each. Then set the two sides 8″ apart. This game will last about a turn in FoW, so not very interesting. While in Battlegroup this game may last several turns and be fun to play. Now let’s take a really large game and bring on my friends Russian infantry regiment. Even on a 8’x6′ table it will take up to 3 turns to come on to the table consisting of over 700 individual 15mm model soldiers. At this size the actions of a single model soldier is irrelevant he not going to win the game for you, but he can contribute to it. So at this size it is better to use the collective actions of a fire team or squads. Go any larger and it would be better to use hex and counter. However my friend and I can set up one of these games and easily finish it in a day. By rolling for individuals in Battlegroup our workload just became 5 times greater and tedious. We may need a few days to a week to finish it.
When you have chosen an army it comes to you warts and all. Meaning there will be a national framework in place that you must use your tactics in accordance with if you wish to be historically accurate. The framework is made up of several things such as doctrine, training, experience, the ability for the state to financially invest, technological research, government views and morals and a number of other things. Of which one would be what your bosses tell you to do. After all it is only in hex and counter games we get to sit in the general’s chair. So we sit in far lesser chairs if we use models rather than counters. So this framework can come to us in the form of rules to keep our Major’s chair historical accurate and will save us from researching that part of it. This framework should assist me in using historically accurate tactics and punish me when I don’t. However all systems can be historically abused by those who are here for the fun but not the history. For those more interested in winning they will strive to bend and arrange the rules for their benefit and call what they do tactics. As I am here for the history first I prefer not to play with these guys as they can’t see the difference. FTW is on the cusp of the slippery slope. As I showed you not long ago what they did was technically just in bounds of the rules they were out of bounds according to the Truppenfuhrung. So my answer to the Jumbos lead the way additional (as in optional) rule found in Blood, Guts & Glory supplement is simple. If they insist on using that rule that’s fine as I have a historically accurate army list I lay smoke on the jumbo with some mortars making it a non target and then turn to the idiot Sherman in front with my Panthers or more likely my Mk4s and blow it away. There is also the gun tank rule in the core rules that on a 5+ roll would allow me to ignore the Jumbo rule and shoot at what I believe is the greater threat. After a couple of games the guy will stop wasting points on jumbos when they just spend the game sitting under a cloud of smoke. So I don’t see the sense in that rule but social engineering goes a long way. Historically the jumbo was an adaptation of the Sherman as an infantry tank like the Matilda and should be left to the independent tank battalions. Patton would have hated it. It was heavier, used more gas and did not have an AT gun.
Finally we come down to what your friends want to play as it makes no sense buying rules your regular gaming guys will not play
Awesome reply, @jamesevans140.
I’ll just begin by saying that I likewise respect your preferred choice in wargame systems, or really anyone’s choice, naturally.
And I’ll qualify my position again with two basic stipulations: I have played very, very little Flames of War and 90% of what I know about it comes second hand . . . and when it comes to Battlegroup, I don’t exactly play “chapter and verse.” I play with modifications, omissions, and additions that seem to fit the campaign in question. Although in all honestly, I don’t have to make very many. What completely flies out the window are army “lists” or point-ups or any of that. I guess what I’m saying is that there COULD be flaws in Battlegroup of which I’m not aware simply because I don’t use those aspects of the system.
Also, when I said: “I have friends on BoW and other places who use Flames of War’s basic system and use house rules to correct a lot of these imperfections . . .” I was talking about you and your crew, based on some of the other discussions we’ve had on this topic. Hell, my favorite “go to” game (PanzerBlitz / Leader) is the ugliest duck of them all, and only runs properly after heavy surgery. The truth is there isn’t a game I own I haven’t modified in some way, while most games my group and I enjoy (past or present) I’ve simply designed myself from the ground up.
I completely agree that games have a certain “zone” or “range.” Too small and the game is simplistic and boring. Too large and it breaks down under the strain. I would argue that the example given with two squads per side at 8” apart would be just as quick and “dull” in BG as FoW (one turn, maybe two, depending on terrain and whether either side was set up in an “Ambush Fire” reaction order). But honestly, I’ve never played a game this small in ANY system, it simply isn’t my thing.
Man, you actually field a Soviet rifle regiment in 15mm? You’re a braver man than I. =) That is DEFINITELY something I would do in hex-and-counter PanzerBlitz, even then that’s 42 pieces (about 2000 men) according to my sources, but that’s including engineers, the integral 82mm and 120mm mortar batteries, etc.) and of course depending on when you’re playing them.
I agree I would never, NEVER try to field a regiment in Battlegroup. The game only goes up to battalion, and even this is a little tough (I usually jettison some rules like ammunition count, unless the unit in question literally has an ammo count of 1 . . . which yes, some of them do).
** “When you have chosen an army it comes to you warts and all. Meaning there will be a national framework in place that you must use your tactics in accordance with if you wish to be historically accurate.” – – – agreed . . . to a point, especially in the case of the Soviets (which is what started the conversation between @tibour and I).
No army on earth has reinvented itself as many times (under such crushing conditions) or come such a long way from abject humiliation and defeat . . . to world-dominating victory, as the Red Army of Workers and Peasants 1941-1945. While I agree players should be “hampered” by the same limitations as the historical army in question, these have to be TONED DOWN because many game systems overdo it, portraying the army in question in very bold, un-nuanced, “I saw it on the History Channel so it must be true” strokes.
Even if accepted at face value, these “army characteristics” also need to be toned down to allow the player room at least a chance to explore new approaches to tactical problems. Again returning to the Red Army, they constantly reinvented their tactics, organizations, and doctrine several times over, under fire. Mikhail E. Katukov and his 20th Tank Division (later 4th Tank Brigade and 1st Guards Tank Brigade, and this was in three freakin’ months) . . . is a great (if admittedly exceptional) example.
In any case, these factors should be worked into the capabilities of the unit itself, almost “hidden” (if that’s the right word), and left for the player to explore, discover, be rewarded if he plays to his army’s strengths and mitigates his weaknesses . . . and punished if he does the inverse. It just seems (again, SEEMS, I don’t really know and in any case is just my opinion) that “top-down” rules published in the latest sourcebook simply impose these factors as if they were laws of physics.
** “. . . Government views and morals and a number of other things. Of which one would be what your bosses tell you to do.” – – – Agreed. I just think the game should place that in scenario victory conditions. A simple example might be a Soviet defense, in which ALL the Soviet player’s victory points come from the objectives he still holds. The German player gets NO points for Soviet units destroyed, only for what friendly units he still has. Thus, the German player is “subtly” encouraged to be careful with his precious few resources, attack indirectly, make the most of artillery and air support if available, and attack only when certain of hitting the Soviets on the blind side. The Soviet player, meanwhile, only cares about holding sacred earth of Mother Russia, no matter how soaked it is in Russian blood. The German player gets no points for Soviet kills, so why would he care how many units he loses?
Presto, you’ve now presented the German and Soviet players with the real conditions and priorities faced in the scenario you’re trying to create, without hitting them over the head with it or rules telling them “this is how you have to play your army.” They’ll naturally adopt German and Soviet tactics on their own, sometimes without even realizing they are German or Soviet tactics.
** “However all systems can be historically abused by those who are here for the fun but not the history.” – – – One and the same in my book. =)
** “For those more interested in winning they will strive to bend and arrange the rules for their benefit and call what they do tactics. As I am here for the history first I prefer not to play with these guys as they can’t see the difference.” – – – Agree 100%
I really like your smoke screen example that “beats” the Jumbo rule. And I didn’t know about the 5+ “pick your target” rule. See, this is what I’m talking about when I say I may not know enough about Flames of War to really be talking about it. Someone just asked my opinion. =)
To come to FoW FtW’s “defense” a little, these are very short videos they’re putting out about what sounds like a big game. They probably can’t go into all the details. I know in these Desert War articles, I’m having to really summarize, simplify, and “blur out” some very complex material. For those with a grounding in the history, it’s no big deal. But for readers for whom this all very new, I may honestly be giving some myopic impressions, simply because of all the things I’m having to leave out.
Anyway, this post is waaay too long here. I’ll repeat what I said before, I totally respect whatever game anyone wants to play, and even a “flawed” game (as if there were any other kind) can be remedied depending on the people you play it with and how they approach it. I sure as hell wouldn’t want to play PanzerBlitz at a convention or tournament. And yes, they still do here in the US . . . and it’s as bad as you’d think!
Any game is only as enjoyable as those you play it with…
But I wouldn’t play a game of Battlegroup with 700 figures… its not what it’s designed to do in all honesty.
It’s sweet spot for me, is between a single platoon up to three for an evening of gaming. So platoon to company level. I find the small games just as exciting affairs and the beauty for me is that one set of rules covers all levels I like to play at. If I was to use regiment sized formations I’d use Rapid Fire.
Our big weekend games run far more than a company thouhh and they do take a weekend but are arranged just for that. Our annual ‘big game’ is a yearly get together and the only time we field over company level forces.
I can’t offer a comparison to FoW as I have never played it or even seen the rules or books .
I would agree that the “best” scale to play Battlgroup would be 2 platoons or a company. I usually play company, company+, but I like a lot of armor in my games. If I was playing more infantry-heavy battles I would probably opt for two platoons at most. I only have so many infantry figures, after all! 🙂
Just this past Saturday we did an LRDG raid which was very small (at least for me), and naturally with practically no armor. I didn’t think I’d enjoy it that much but I gotta say that little skirmish was really a lot of fun. Small infantry skirmishes like that are not usually my thing but I might have to start looking into them more.
Some of the best games I have played have been 350 point infantry skirmishes. Though lots of tanks is always fun!
The whole ethos behind BG was to get toys on the table and give a fun, fast and exciting game that gave players constant tactical choices, inflicted the fog of war on them and set it all in its historical context.
I think we did that… but I’m obviously biased!
Currently I’m working on my own platoon level skirmish game, with a platoon being the standard playing level.
Thanks, @piers – in your post you say:
* “Though lots of tanks is always fun!” – – – I do love me some big tank battles. Although I have to admit that when I succumb to a moment of weakness and run an ALL-tank battle (in pretty much any game), I wind up disappointed. It just gets a little simplistic, and fight like this almost never take place in actual campaigns. The Desert War is something of an exception, there are quite a few “pure” tank engagements, especially early on. But combined-arms battles is something I feel BG does very well. I’ll always put tanks front and center though. I basically have enough infantry figures to support my tanks, as people who look closely enough at my photos will probably see. “Hey, weren’t those British riflemen ITALIANS last time?” 🙂
* “inflicted the fog of war on them and set it all in its historical context” – – –
I love the battle counter rating system. When I was reading the rules I thought it might make the game seem too random. But it really doesn’t, it adds just the right amount.
A) it makes individual scenarios very easy to balance. If one side seems too strong, just GENTLY lower their Battle Rating.
B) by adding new counters to the mix for different campaigns, it adds “flavors of possibility” for “campaign-specific” random events to happen. But these are rare, understated, and don’t take over the game. A goofy analogy might be taken from cooking a meal, you add just a DASH of spice, you don’t drown your meal in wasabi. 🙂
C) The fact that your opponent doesn’t show you what counters he’s had to draw, but you can see HOW MANY counters he’s had to draw, really starts to add a fog of war that creates so many “realistic” conditions it would take a full article just to list them all. How many battles have we all read about where the attackers erroneously thought the defenders were JUUUUST about to crack. Or the attackers fled because they didn’t know the defenders were a breath from collapse? Sure, you can look at the opponent’s counters and multiply by 2.5 for a reasonable guess, and because the quantities of values in the counter mix is beautifully bell-curved, you’ll usually be pretty close. But you never know . . .
And THAT’S the secret sauce in Battlegroup, at least for me. The MODERATION in army flavor, randomness, and other similar factors. Definitely there, definitely part of the background, and definitely has an effect, but never dominates the game.
D) When thigs in BG do get really random, it’s on just one individual unit or figure. I remember in MY VERY FIRST game of BG, I had an JS-3 coming around a bend and got hit. Roll for morale. Not only did it make the morale check, but got to roll for “Beyond the Call of Duty”, and then made THAT roll! BOOM, that 122mm gun pretty much tanked the whole American wing. Destroyed units = draw battle rating counters, and when my opponent drew his counters, he got a “Breakdown” counter and played it vengefully on that same JS-3. But then the JS-3 scored on the Breakdown table where “Something rattling, but the tank still drives fine.” Za Rodinu! Damn, these guys are winning the Order of Lenin! The point is the system allowed for some wild narrative, but because it was only one unit, it didn’t really warp the game one way or the other.
Some very nice points made by everyone
My own problem with a lot of WW2 rules is that they use points at all. But I think that is a completely different discussion for another thread
Agree on both points . . . not a fan of “lists” or points, etc.
And probably a discussion for another thread. 😀
@torros
Have a read of the article in this month’s Miniature Wargames on points systems. They use Battlegroup as a example of when a points system is used to give historical style forces and empowers historical play. Our scenario design helps a lot too to throw off any notions of balance in a gamey way and the lists are quite restrictive.
Of course… The historical scenarios in our books don’t use the points system anyway so you can play Battlegroup which ever way you feel.
Historical based scenarios of points based pick up games that feel like historical encounters. Battlegroup isn’t a tourny set of rules.
Or come for a game and try it!
I will have a look when I am in town tomorrow
Re: Battlegroup “scenario” play, absolutely, this is way I prefer. And while I don’t “point up” an army (naturally), I certainly use the “BR” values given for the various component units so I can try to at least land somewhere near the “correct” Battle Rating value for each side.
For us the main idea was to have a game that work for constructed scenarios but also for pick up games, but the key was that the latter had the same feel as the former.
We are able to theme it even more with a book per period of the war, as it was a war that really is very diverse at times.
One thing to note is that the earlier in the war, the troops you get for your points. In Fall of the Reich we usually play 650 points for an evening while an early war game at 450 points gives us similar sized forces…
Those big tanks sink a lot of points…
As for armour, Warwick is the tank lover and describes the game as focused on tanks. I love infantry and feel the game is focused on infantry… so a lot comes down to personal perception at the end of the day.
We made a game for ourselves to play, but it’s so nice to see so many others getting such enjoyment out of it. For us the books are driven by a love of the period and history, we sure as hell don’t do it for the money! For me the Blitzkrieg book was a real work of passion and a homage to my Grandfather who served in the BEF. I like to think we do justice to the historiography of the period and give players something that isn’t just a set of rules but may inspire them to further efforts, whether in modelling or in expanding their knowledge of a subject.
Oh… and we do like pretty pictures in our books!
The artwork, photos, and miniature tables featured in the books really are awesome. 🙂
Awesome responses here guys.
Please don’t get me wrong as I am an advocate both rule sets and was just demonstrating were each rule set was at its best. I focused a little more on FoW for your benefit @oriskany and any others not familiar with it.
I think ideally a rules set would consist of a core set of rules, advanced rules for those who want more details and flavour, rules for the different nations, a set of campaign rules and finally battle (scenario) rule set. In total they give you a mechanism to use your forces and a set of guide posts for you to apply your tactics between.
Our group tends to be historians first. When we are considering a new army we don’t go the the army lists. Instead we start downloading doctrinal material and historical accounts of campaigns, battles and the historical tactics that were in common use. We don’t regard this as restrictions rather they are challenges to our tactical abilities. To our way of thinking you could use modern tactics if you like for your WW2 battles. You then end up playing modern battles with very old equipment. These are voluntary restrictions we place on ourselves to better look at the period through their eyes and thinking. Having said that one of our members uses roughly the same compositions of an army using the same tactics regardless of the period. As long as he gets to roll dice and kill things he is happy.
We have used FoW for over 5 years now and we have pulled it apart examined its logical systems and modified it in accordance to our research. We will end up doing the same thing to battlegroup once we have fully mapped out the logical systems. We only have the Blitzkrieg expansion at the and probably will not make that many changes to it as we trust @piers research especially the battle of France. One thing we will look into is allowing the player to split the infantry squad into 2 teams while retaining the MG team. Mainly for squad and platoon level games to open up tactical opportunities. There would be no changes to the amount of orders forcing the player to be very selective to where his focus is on the battlefield. If it adds the desired effect we will retain the idea and abandon it if it does not. This process will continue and I suspect that after 5 years we will have made as many changes to it as FoW.
It does not mean that we are afraid of testing ideas (tactics) out. One example is The Finns handed control of their FT-17s to the artillery who dug them in on the second line of resistance. I believe that this was not the best use of them. In our test I redeployed them to the middle area of the eastern frontline known for its ruggedness and the Russians did not deploy tanks here due to the rugged nature of the terrain. Pre war tests in this area found the Ft-17 had higher mobility over the Vickers (T-26). I deployed them in their primary mission of infantry support and they worked great. We added T-26s reducing both movement and reliability as they broke clutches and gearboxes more frequently in this terrain type. If the FT-17 aggressively used its mobility they could handle a small number of T-26s. If you did not use them aggressively or slightly increased the number of T-26s then the bite of their 45mm guns decided the day. It was a fun and interesting test.
@jamesevans140
In Blitzkrieg most rifle sections are in two parts if they fought like that.
Yes I agree mostly with what you have put into Blitzkrieg but that is not the point. Have you tried what I suggest is the point. When I test this myself it will be in the form of immediate assault by a squad as per Truppenfuhrung for GD ref, FJ and the better trained Panzer Schutzen as per stosstruppen tactics refined during the inter-war. All these formations are well drilled in it and are not really covered by your work as close as you come are regular Schutzen. I know the British tested something similar prior to the war but I have not seen evidence of it use in the early war. In their version the section for the immediate assault detached the gun group to give cover. Then the section split into a rifle group of 4 to 5 men and what I call scout group of 2 men. Scout group would envelope to one flank giving accurate fire. While rifle group prepared to assault with bayonet and grenades from the opposing flank. If the platoon mortar(s) were available they would be used to isolate the assault point from the rest of their organisation by laying down smoke. What was argued against this immediate assault tactic is while the gun group can observe the rifle group and lift fire at the appropriate moment. The scout group is not in a good position to observe the rifle group and could cause unnecessary casualties in the rifle group. I use the term scout group as this is watch we call it in Australia as we have for a very long time now organised our sections into Gun, Rifle and the 2 man Scout group. Most rule systems simply give veteran and elite troops higher moral and leave it there. You and I know that this does not do them justice as that is only half the story. While they are above the average soldier in combat drills they also use more advanced tactics. It is here that I see the Battlegroup rules completing the marriage. With its system of orders you can include orders for the use of tactics reserved for veteran or elite teams in the same way you use orders for specialist teams. By doing this you add a lot of depth and flavour without adding anything to complexity. This is the brilliance that lies within the Battlegroup rules set. There is no criticism in what I have said here. I am saying look what can be done with the logic of the system of the rules and then we can apply the historical filters where required.
I agree 95%-99% with everything you say in your last post, @jamesevans140 . It sounds like we both want the same kinds of things in our games, we just have **slightly** (and I do mean slightly) different ideas of how to best get there.
I fully agree with the ideas of historical research, building an army that exactly matches (as close as possible) what was on a given field on a given day. When playing with a full regiment, brigade, or even the leading end of a division, “doctrine” will naturally follow assuming all these other factors are correct.
Admittedly, the smaller scale of games like Flames of War, Battlegroup, or Bolt Action make this a little harder. Here maybe you DO need a few “doctrine” rules per army or faction. Yet even here I would be cautious / hesitant. If the composition of your force (let’s stop calling it an “army,” as we’ve both agreed on other threads 🙂 ) is correct, and the rules are granular and realistic enough, and the objectives / victory conditions of the scenario are correct, doctrine will follow. Players will discover their own doctrine and tactics, which . . . and I love it when this happens . . . turns out to mirror the historical doctrine and tactics of the time.
It’s such a vicarious feeling, like you’ve almost faced the same challenge (in a purely academic sense, of course). You’ve stood in those boots, faced the same problem, and come up with a very similar solution. I mean, this is where doctrine comes from (or at least is SUPPOSED to come from).
I’m just SLIGHTLY leery of “doctrine rules” in most wargames. It feels like, at least in a commercially available game, it MAY present a slippery slope of passing judgement on a nation or army or war or whatever. Also, MOST wargame companies are spotty historians that are trying to appeal to a market (made up of people who know even less), and therefore may present a skewed example. Either way, you’re relying one someone else which I NEVER like to do. 🙂
Of course, none of this applies to what you and your group are doing, James, when you tweak a system like FoW. Trust me, I KNOW you do your research and cover your bases.
I guess it also depends on what we consider “doctrinal” rules. If we’re talking precise OoB / TOE data, realistic morale levels, command structures, and objectives per scenario, then YES, this 100% needs to be in a historical wargame. It’s when a game has rules that pretty much dictates (rather than “teaches” or “encourages”) how to play your force, eh . . . that’s when I get anxious.
I guess I should say for anyone who may not know us very well, this is what @jamesevans140 and I do, for hundreds of comments of a dozen other threads. Actually by now we’ve got to be over a thousand. We are certainly not “arguing.” This is just what we do. 🙂
Good ole FT-17s. Definitely underrated as WW1, Interwar, or even early WW2 tanks. There was supposed to be an action with FT-17s in this Desert War article series (Free French vs. Vichy French in Syria, 1942), but alas . . . space and time. Space and time. My two worst enemies these days. 😀
I suppose what people will say of you and I is that insanely (or worse) you and I even debate that we agree when we obviously do. 🙂
But that should not put anyone off commenting on what we are saying as we reserve debate for our own fun.
One large issue for all rule writers is that they must write for the largest mass appeal for their game or they will be on welfare very quickly. Most people in this large market segment that they are try to exploit (marketing term) for greatest percentage share have a Hollywood education concerning war. Many war movies have heroes and men that would have gotten themselves killed or arrest very quickly in any conflict in any army. So they come to this or that historical wargame rules with these expectations and will quickly reject rules that don’t deliver these expectations as their education about war says these rules are wrong. Over time their own research will set them on the right coarse and as their knowledge grows they will place demands upon the rules they use to reflect this. I refer to this as ‘your vision on what war is.’ It is not a single plotting point but rather a moment across a scale. This is why I believe rule sets should have a core set of rules and an advanced set of rules. The core set allows historical abuse and the advanced set stops it. So rules set like this can grow with the players knowledge.
It is like when I first started teaching my grandkids about tactics I said to them they are now the schoolyard bully and have a little gang and now it’s time to run around and beat up the weak kids. My mates thought this was a bit off the page but they were surprised just how quickly they learned tactics is all about leveraging advantage and not about just shooting each other. I worked with what they knew and encouraged then to widen this in a way they excepted and understood. A good set of rules should work in a similar way and is the essence of the point you have been making.
On the other hand if you are lactose intolerant you should not eat full cream ice cream. This is where national and doctrinal rules come into play ensuring historical strengths and weaknesses of your chosen force are there. If you want a highly trained and disciplined force that can engage and destroy a much larger force then a Russian infantry force from the 1939 Winter War should not be your first choice. Perhaps they should be looking at the British desert force you described in this article should be considered. No matter how much you like the Russian infantry force is never going to deliver what you want as other people who have more say have made it that way either through action or inaction. In the case of the Russian force you have to except if you choose to be historical that nearly a third of your force will have no military training and no idea of what to do. The other thing about your Russian force is that your officers under you will not issue a command if there is even the smallest amount of risk to it as they fear being shot by the NKVD if something goes wrong. All these restrictions have to appeal to you. On the other hand your have a force that just keeps moving forward regardless of how badly it is being shot up. Given these pros and cons the tactics that Timoshenko came up with was nothing short of shear brilliance. The rules that would cover this do not belong in the scenario rules as they are going to be in every historical scenario you play. If these rules are not present you may as well have one force list and call the forces red and blue.
The scenario rules should be there to ensure that the historical integrity of a particular battle are in place. Such as the removal of units from say a division due to the fact they were else where when this battle was fought and also include the non-divisional units that were there. They should include the rules historical events that had impact on that battle such as the radios not working in Market Garden. If a rule is going to be in most but not all scenario rules then it should be in the core, national or doctrinal rules as optional rules and called by the scenario. An example of what would be an optional rule for the core set of rules is night fighting and called by the scenario. A national rule for say the Finns is that their troops are ski troops when there is snow on the ground. A scenario rule could be there is snow on the ground but the Finns can’t have skis in this battle because when they were transported to the front by rail to meet this threat their skis were shipped elsewhere by accident. All this should not dictate to you what tactics you can or cannot use. But if you use your force intelligently with the resources you have available then many outcomes will be historically correct. This is the essence of my view point.
There is another issue that has impact but not discussed yet is there is nothing wrong with the force it is the force commander. All players have there own personality on the table. They can play very cautiously like Montgomery or at the other end of the scale they can be as brash as Patton. Interestingly I have played against very outgoing people who are timid on the table and others who play very aggressively on the table while they are timid and reserved in real life. So I think you need to learn exactly what kind of personality you are on the table. So many times I have seen people chose the wrong force for them such as a person who is over cautious on the table who pick a force that needs to be used aggressively with a lot of calculated risk. Predictably they go down in a screaming heap. Yet when I have looked at their army list I see nothing wrong with it and often some very good choices have been made just they had the wrong commander. This issue is not brought about by lack of tactical knowledge it has far more to do with trying to be something your not. Occasionally to spice things up we play games where you use your opponents army list of force. At some of these I have created what I considered to be a better fit for these ill fitted commanders and on most occasions they do extremely well with the army I have given them. On another point you get some amazing insights when you use someone else’s force.
I am not against non-historical battles either and these are brilliant for exploring the what ifs and why didn’t they. With my experience of testing the deployment of the Finnish FT-17s a number of battles were fought in terrain that was favourable to tank warfare fair and games in areas where the T-26 could not really perform but infantry battles were fought. So as a historian I can confidently state that the Finns were correct in entrenching their FT-17 as the T-26 would have made very short work out of them at ranges the FT-17 could not respond to. However they missed an operational opportunity by not redeploying them to the midlands. As they could have performed infantry support for what they were designed for and if the Russians fed T-26 tanks into the area in their usual piecemeal fashion of this war the FT-17 could have dealt with them. When historians say that something is obsolete they mean it can’t deal with the current beast on the other side. The Stuka was obsolete because it could not dogfight with a Spitefire regardless that a Stuka was a dive bomber and was never intended to dogfight. In this fashion they would call a Sherman assault tank obsolete with its 105mm howitzer before it was made because it can’t deal with a Panther even though the Sherman assault tank was an infantry support tank and never meant to engage other tanks. So to me the historians use the word obsolete far too quickly and without much consideration. I would agree if they said a Pz III F by 1944 as it was designed to fight other tanks and by this date allied medium tanks would simply tear it apart and even the light tanks would slap it around. 🙂
I know what you mean, @jamesevans140 , about playing the force “suitable” for your personality, strengths, and weaknesses on the table top. I remember back in the day a fellow I used to play Arab-Israeli Wars with, he’d always insist on playing the Egyptians. Which is strange, in that game you usually have to bribe the other guy into playing the Arab forces with pizza or beer . . . take turns or whatever. But he liked big plans with big moves, simple and direct maneuvers, and plenty of margin to take hits.
Playing the Israelis, yeah you have better equipment and troops and such . . . but lose one platoon of M60A1s or Centurions . . . and you could be in serious trouble. You have to be much more careful, much more “chess-like.” Anyway, my opponent hated this. He just liked playing “demolition derby” style, he’d have twenty wreck counters on the board, smile, and crack: “I’m just gettin’ started, b*tches!” 🙂
The same must be true for playing the Finns vs. Soviets.
Very interesting once again! You’ve mentioned here and in the comments section of the last part @oriskany that Churchill stuck his nose in and messed things up for the allies in North Africa – by pulling troops away and putting them into the Balkans…
Could you elaborate? Defending Greece seems to me like it would have been a very sensible thing to do, and while with hindsight I can see you’d be better off not fighting a battle you’d go on to lose, was this outcome obviously unavoidable?
Put another way, what exactly is your criticism of Churchill’s intervention, and what would you – or perhaps what would the British generals if not overrulled – have done differently?
Thanks, @angelicdespot , and great questions.
To answer your question, yes . . . Churchill’s personal and direct meddling in North Africa (exerted against both Wavell, C-in-C Middle East) and Richard O’Connor (Commander, WDF / XIII Corps) caused a lot of problems for the Allies. This continued with Wavell later with Operations Brevity and Battleaxe, Auchinleck and Cunningham with Crusader, and Auchinleck and Ritchie with Gazala, Mersa Metruh, and 1st Alamein in July, 1942. One of Monty’s best qualities, I’ve always felt, is resisting Churchill and launching 2nd Alamein only when he was damned good and ready.
Specifically in regards to Greece, the Balkans, and North Africa in the opening months of 1941 . . .
In December 1940, O’Connor launches Operation Compass with just two divisions initially, 7th Armoured and 4th Indian. Now Greece is already under attack by Italy, invading out of occupied Albania in November. However, Greece is doing well enough, not only holding the Italians but pushing them back and counter-invading into Albania.
Hitler could really care less about either Italian disaster (Greece/Albania or Egypt/Libya), because he’s already gearing up for Barbarossa on May 15, 1941.
Churchill sees things are going very well with Compass. He also wants to throw the Italians out of East Africa (Abyssinia, Italian Somalia, and Italian-occupied British Somalia). So he orders Wavell to take 4th Indian away from O’Connor’s successful Compass offensive (half his manpower), deploy it to East Africa, and gives O’Connor the new 6th Australian in return.
6th Australian, by the way, quickly proves itself at Bardia, Tobruk, etc.
Anyway, when a British-instigated Serbian revolt in Belgrade tosses the pro-German Croatian government of Yugoslavia, and the British start sending token troops to Greece to help against the Italians, Hitler sees the southern flank of Barbarossa as very insecure. He’d just spent all winter cobbling together an Axis coalition in the Balkans (Romania, Bulgaria, Hungary). But now, with an anti-German government in Yugoslavia, the Italians getting their asses handed to them in Albania and Greece, and the British starting to sniff around in Greece, Hitler must organize “Operation Punishment,” the invasion of Yugoslavia. While the army’s down there, they also resolve to take Greece.
So when this starts, Churchill takes 6th Australian away from O’Connor, who is WINNING . . . BADLY . . . in Libya. O’Connor’s about to take all of North Africa at a stroke, as soon as he can repair 7th Armoured’s vehicles to a sufficient extent. The Italians in North Africa have basically been destroyed. Churchill again gives O’Connor a new division to replace 6th Australian . . . 2nd Armoured. But 2nd Armoured basically has no tanks . . . and half the division goes to Greece anyway.
I guess the main criticism for Churchill is this . . . and this isn’t my opinion or “insight,” but pretty much the consensus of any writing on the subject. Germany invaded Yugoslavia and then Greece with basically twenty divisions, organized into five corps of the German Second and Twelfth Armies. That’s about 400,000+ men, PLUS 1st Panzer Group. The Italians were also involved with eight MORE divisions, and even the Hungarians. PLUS the Luftwaffe, PLUS fallschirmjaeger paratroopers, etc etc etc.
So, what difference would 6th Australian (plus half of 2nd Armoured) really have made? Unless the British could have immediately put in 300,000 men (basically, fifteen divisions, or two whole armies . . . and they could barely do this at Normandy in 1944), Yugoslavia and Greece were lost. But by taking those forces away from O’Connor when he basically had nothing in front of him except the Libyan Desert and the shattered remnants (and I do mean “remnants”) of Italian Tenth Army, Churchill forfeited the chance to win the Desert War at a stroke. Rommel wasn’t there yet in any kind of force, in fact if Compass had been allowed to continue (i.e., if 4th Indian had never been transferred to Abyssinia), the Desert War may have almost “never happened.” Rommel probably would have wound up a “nameless” corps commander in Russia somewhere.
In geostrategic terms, Churchill wanted to safeguard British control of the Mediterranean sea routes. Well, with Greece a foregone conclusion, the northern Mediterranean was a lost cause. But if the Allies had won in Libya in 1941, at least they could have held the southern Mediterranean without a doubt. Sicily would have been open to invasion in the summer of 41, not the summer of 43. Who knows what kind of forces Italy would have had to hold back from Barbarossa to prevent an invasion of their own country? Pressure could have been brought against the Vichy colonies of Tunisia and Algeria. The possibilities are endless.
As it was, the British STILL lost the northern Med and damned near lost the southern Med. Those southern Med sea lanes to Alexandria and Suez wouldn’t be secure until after El Alamein, almost two years later.
In simpler terms, I guess it’s just a question of Churchill throwing good money after bad. Those 15,000 men could never have made any difference in Greece, but could have made ALL the difference where they already were. He gave up a chance to shut down one front victoriously . . . to reinforce another front that he could never win. As a result, he almost wound up losing on both.
What would I have done differently? Well, I **think** Wavell’s invasion of East Africa could have been postponed a little bit (not 100% sure of the seasonal weather in that part of the world) Keep 4th Indian in North Africa (where the state was still fluid and favorable), and give O’Connor the 6th Australian, keeping 2nd Armoured in operational reserve, perhaps in Alexandria. Finish the war in Libya in February-April 1940, before Rommel has a chance to mobilize the DAK. Then go back to Wavell and hit East Africa. Greece is gone, don’t give it another thought, but on the plus side, you now own most of Africa, and can threaten two Axis allies, the Vichy French in Tunisia/Algeria and the Italians in Sicily / Sardinia.
Great, thanks @oriskany.
East Africa is Ethiopia, Somalia, Eritrea here, right? If delaying that plan would have meant postponing by a year – because of weather – would that have made much of a difference? If the allies had captured the whole of Libya, would Italian troops in East Africa have been much of a threat?
It’s interesting – the scenario you outline, opening up new possibilities, etc. – would be the perfect scenario to hinge a ‘what if?’ campaign around.
Thanks again. Looking forward to part 3!
Certainly, @angelicdespot –
Yes, I should have been more specific. “East Africa” = Abyssinia (modern Ethiopia), Eritrea, Italian Somalia (southern half of modern Somalia), British Somalia (northern half of modern Somalia – conquered by the Italians in August 41 as we saw in Part One), French Somalia (Djibouti), and even very small slivers of the Sudan that the Italians had taken (most notably, the British colonial fortress at Galabat).
Basically, this was one big mess of an operational area the British wanted to clean up and take in total from the Italians.
There was a lot going on here, it’s another of those great “little known sideshows.” On the Allied side we have a diverse collection of British and Dominion forces, Orde Wingate, “Gideon Force,” Emperor Haile Selassie, and the 65th Grenadiers of Savoy, one of the hardest-fighting units in the Italian army and the epic defense during the Battle of Keren (Eritrea). Even after the official surrender, some Italian units carried on a guerilla war into late 1943. I think when Italy officially switched sides with the fall of Mussolini.
Honestly, delaying the capture of East Africa by a full year MIGHT have had a real effect on larger operations in the Middle East . . . if only because Italian holdings in British Somalia, Abyssina, and Eritrea may have allowed them to choke off the Red Sea.
In later months and years, when the “classic” Desert War really started to heat up, British convoys would often sail all the way around Africa, coming up through the Red Sea, the Suez Canal, and finally to Alexandria. Talk about taking the long way around! But better late than never, because the sea routes through the Mediterranean were a gauntlet of German and Italian air bases in Sicily, Sardinia, and Libya . . . plus German U-boats. The terrible losses suffered by the “Pedestal” Convoy of 42 is just one example of how dangerous this trip was and why it was often preferable to take the much longer but safer route.
But if the Italians still held those colonies in East Africa, they may have been able to base anti-shipping planes to make travel through the Gulf of Aden / Red Sea almost as dangerous? Just theorizing on that one. Historically, this campaign took place in Jan-June 1941. If that had been in Jan-June of 1942, the threat to the Red Sea might have seriously hampered the big Eighth Army buildup in the summer leading up to El Alamein. Again, totally off the map of “history” here, and just casual conjecture.
You were clear about what you meant by East Africa in the article, but it’s different to how the term is used – at least in my experience – most of the time these days, so wanted to double check we were still talking about the same place in the comments.
So… If you were Churchill… You’re still sure you’d prioritise East Africa over Libya? 🙂
I’m not sure, @angelicdespot –
a) If I were truly “Winston Churchill,” smoking a fine cigar and enjoying cognac at 10 Downing Street, I’d leave the military decisions to the military commanders as the best world leaders usually did in World War II. At least in World War II, world leaders who listened to their general staffs (i.e., knew as much as they could about what was happening, kept the military focused on national priorities but ultimately let them do their job) would up like Roosevelt and Stalin. Those who actually “meddled” wound up like Hitler, Mussolini, and to a lesser extent, Churchill 🙁
2) If I were the “BRITISH” – or playing the UK in a grand-strategic game, I honestly don’t know if I could choose between East Africa or Libya. What’s more, I’m not 100% sure I would HAVE to, considering that Wavell was kicking @ss in Abyssinia in January of 41, the exact same time O’Connor was winning in Libya with Operation Compass. But YES, YES, YES, prioritize either or both . . . over Greece.
It’s not that Greece, Yugoslavia, or the Balkans aren’t important, its just that with 1 or 1 1/2 divisions, you can’t make a difference up there, while you can make ALL the difference in Libya and/or East Africa.
But of course, this is the ultimate in “Monday morning quarterbacking.” The British had already dealt the Germans perhaps a fatal geostrategic blow in Yugoslavia . . . I’m just not sure anyone knew it yet.
There was also the royal connection between the British and Greek royal households.
Odd as it may seem now, the desire then was to be seen supporting them.
Now see, I totally did not know that. 🙂 Makes sense, though. I know Churchill had a serious drive to hold onto Greece, from November 40 when the Italians tried to “invade,” through the German invasion, then Churchill’s “naughty document” with Stalin in October 44. Of course Churchill was no longer Prime Minister by the time the Greek Civil War started . . . pretty much right after World War II ended . . . but I’m almost positive the British were deeply involved in that affair as well.
Well Prince Philip is Greek… born on Corfu.
We had one of the Independent Parachute Companies down in Greece for the civil war, plus SBS and SAS.
Most European Royal families were linked to the Windsors from Queen Victoria and her many offspring. Churchill was a keen monarchist and the need to be seen supporting a monarchy, directly linked to our own by a common bloodline against a common enemy was possibly as important as the desert. It showed Britain’s willingness to stand shoulder to shoulder with its allies against the enemy and certainly helped post the invasion where British SOE and other forces were supported and welcomed by the Greek resistance having been seen to support them in 1941.
I **thought** I remembered hearing / reading that Churchill was considered something on a “royalist” (wasn’t sure if that was the right term, I don’t know British politics very well). I knew he was a Conservative and about his famous ancestor from the 1600s. But didn’t want to skip over and “wikipedia copy-paste” on a post. 🙂
Shit, I guess Churchill was even more old fashioned that I thought. I mean, yeah . . . “stand shoulder to shoulder” with our allies . . . by that I mean people the royal family are related to. But when it comes to “our allies” the FRENCH . . . yeah, we’ll totally betray them and sink half their navy at Mers-el-Kebir and Dakar. 🙁 That was what, less than a year before?
Indeed, the British needed to be “seen as standing with their allies” after a stunt like that.
Interesting points here.
Churchill considered himself the last of the Victorians and lined over that period. He was most certainly a royalist and considered that a duty was owed to it. But this is we’re it gets tricky. The royal families of Europe were already closely related by the second half of the 19th century when the totals of Denmark produced a truck load of daughter who were successfully married into the leading royal families of Europe. So by the 2nd Would War the totals of Europe were now double knitted together. Non-royalist have gone so far as to describe WW1 as a family squabble. I would not go that far, but I can’t deny the very close blood connection.
One of the big strategy concerns of the 18th & 19th centuries was the effective use of internal lines of communications both in attack and defence. Frederick the great was renowned in its use. Now take a look at the map of Africa you put up in your article. The British have unbroken territory from the Mediterranean down to the cape. This was known as the British Corridor and by this strategic thinking made them the masters of Africa as they could deliver an army (more like colonial police force) at any point along its length. So for any other European country with colonial aspirations the breaking of the corridor was high on the agenda. By WW2 the aircraft had weakened it real strategic importance but by breaking it British prestige takes a plummet. The last thing the British needed at the time.
Control of the Mediterranean was left the Italy by the Germans. The Greeks had evicted the Italians from their boarders. So typical of Churchill his interference caused both negative and positive repercussions. By going into Greece made it appear on German radar. It would cost the Greeks their independence and loose Crete. But the German reaction would mean that they would not reach Moscow by summers end and thus having effect on the outcome of the invasion of Russia. Churchill did not consider he would lose Crete or that he would instigate the delay in the invasion of Russia and thus change the war in Europe. It is just so typical of this very dynamic man. All because he believed he had a duty, whether the Greeks wanted it or not.
@jamesevans140 – I . . . MOSTLY agree with what you say about the Balkan Campaign screwing up the start date for Barbarossa . . . and THANK YOU for giving me a chance to redress my omission in my response to @angelicdespot . . . when I said Barbarossa’s launch date was May 15. I meant to go back and say something like “all this activity on the Balkans caused Barbarossa’s launch date to be kicked back eventually to June 22.” You saved me from being embarrassed as the “guy who doesn’t even know when Barbarossa started.” 😀
Anyway, on a high level, YES, I would totally agree (it is beyond a fact) that the campaign in the Balkans caused the postponement of Barbarossa by six weeks. What effects this might have deeper in the Soviet Union (and later in 1941) are best left to the nightmarish imagination. If the army-destroying battles of Kiev and Vyazma had taken place in the dusty summer instead of the muddy autumn? If the Battle of Moscow had reached its pitch in mid-October instead of early December? Before the winter, before the Stalin knew the Japanese were attacking Pearl Harbor instead of Siberia and he could transfer those “forty divisions” (myth-busting on that for another thread, but you know what I mean), before the snows?
Anyway, I would probably put the root cause for this delay with the Serbian coup in Yugoslavia. As we’ve both said, the Greeks were totally holding their own (and in fact counter-invading into Albania) against the Italians. Hitler didn’t care. I **believe** the British were already putting a small force Greece initially to help against the Italians. Hitler still wasn’t that bothered by it. He and Ribbontrop had been building a coalition of allies in the region, and probably felt pretty safe to launch Barbarossa in May. Everything from the German perspective revolved around that.
Then the Croatian (pro German) government in Yugoslavia gets ousted by pro Russian Serbs. This popped a whole in the Balkan coalition and immediately but a potential British ally with borders with Italy and Austria . . . which was considered part of Germany at the time after the Anschluss of 1936. So now the Germans are faced with a hostile, possibly pro-British (or at least pro-Russian) country technically ON their southern border. Yeah, they had to act on that.
I’ve always heard that the British had something to do with this. I don’t know if it was Mi6, Mi5, SOE, or some other agency. But THAT’S what caused the Germans to finally swing south and deal with this issue on Barbarossa’s right wing. Thus we have “Operation Punishment” (the name was obviously not random). I’m **pretty** sure THAT’S when the British commit larger forces to Greece (and thus derail the envisioned “second stage of Compass” in May-June 1940).
The general area around Greece at the time was in a political whirlpool, including Greece itself. Twice the Greek government turned down Churchill ‘s offer and even stated no that would bring in the Germans. The a political storm created change within the Greek government and suddenly Churchill ‘s offer had the numbers that OKed British involvement and the Germans were involved. The Italians failed to secure Hilters southern flank and Operation Punishment was the beginning of the German tidy up of that flank. Hitler had nothing more than contempt for the local armies. These were the armies of the sub-humans, but he did consider the Greeks to be humans. On the other hand is considered the British to be equals. So yes the sub-humans were revolting and the British were poking their nose’s were they did not belong.
It certainly did not help much with British special services buzzing around the Greek islands either. Later on there will be added to the growing list a pair of Spitfire MkV converted to float planes.
Like most things you need to add a few things before you have a good soup. You may have gathered the the view I was putting through was at the Political-Grand Strategy level.
Using history as an example I believe that the fall of Moscow would have been an unexpected anti-climax. Under Prussia thinking when the capital falls the war is over, check and mate. The Russian view is that if your still alive you keep fighting. The capturing of Moscow did nothing for Napoleon and I expect that it would have done little for Hilter.
I think your comparison of playing Israeli vs Arab to Fin vs Russia is close to spot on. In a Finnish army you have close to the best soldiers at the time. You don’t have many of them and you lack resources to back them up. It is like war on a tightrope one false move and that is when you remember you forgot to put up the safety net. That is why I enjoy playing the Finnish wars as you have to brighten your best game to the table. Your plan must work as you have no resources to go with plan B.
I don’t know if it is a case of opposites attract but I am surprised of the number of ill chosen armies I have encountered and you can’t really say it is not your army, it’s you.
I am hoping your articles on early & mid war desert games are exciting and you can leave home without Panthers, Fireflies and easy 8s. 🙂
@jamesevans140 – “I am hoping your articles on early & mid war desert games are exciting and you can leave home without Panthers, Fireflies and easy 8s”
Indeed, we’re just getting to the part of the war with Mark IV Specials with the long-barreled 7.5. But even at Alamein and in Tunisia, these were really rare. Maybe a few Churchills later at the Mareth Line, and some M10 Wolverines at El Guettar . . . an early Tiger at Madeth al Dab, but that’s about it as far as heavies go. 😀
@oriskany I think from here up to Alamein 2 are sum of the best wargaming opportunities for the Western Desert. Then we have to wait until Operation Torch for the next batch of opportunities. If your playing historically, ie no points, I don’t think the playing the retreat battles are not that much fun until you approach the Tunisian Frontier.
From memory 6 Churchill tanks were sent out for testing at the second Battle of Alamein. Again going from memory these were 6lbers prototypes and the swan song of the Churchill tank if they did not perform. I will have to look it up to confirm this.
Also at the Mareth line sees the first limited operational use of the 17lbers. So our colonial police forces finally transform into true field armies that will set the stage for the mastery of Europe. Of coarse on the Easter Front the Russians have just about re-learned Deep Battle.
So I am excited waiting for your next article, as I mentioned above this is my favourite part of the Desert war. At this stage the war could still have gone either way. 🙂
That’s exactly the course we’re taking, @jamesevans140 – Part Four is El Alamein (with some of the LRDG raids that took place during the build up). After that we’re skipping straight to Tunisia (the Americans have to get at least ONE battle in this series 🙂 ) for Part V.
Yes, six Churchills were deployed to El Alamein, organized into “King Force,” named after its commander, Major Norris King. I think these were Mark III Churchills, and were attached to 70th Motor Brigade / 1st Armoured Division. In this fight, they destroyed five tanks and three antitank guns with the loss of one tank. The Churchill III performed well enough in this action that two brigades of them were equipped and shipped to North Africa to fight in the rugged terrain of Tunisia (quoting gregpanzerblitz.com here).
This was good news for the Churchill, because as you say, they did terrible at Dieppe, although these were the older Mark I and IIs that I think had howitzers mounted in the hull. (?!?!)
If your interested in small games @oriskany there were some amazing clashes around the oasises near the Chad boarder between Free French, SAS, LRDG and the Italian version of the LRDG. For once the Italian’s had really good kit.
If you’re talking about Kufra Oasis, @jamesevans140 – we did this battle once in Panzer/Desert Leader (although I’m sure this wasn’t the only one 🙂 ):
BATTLE IN THE DEEP DESERT – THE KUFRA OASIS (22 Feb 1941): With the Desert
War fully underway along the Horn of Africa and the Mediterranean coast, the Free
French forces in Chad were soon ordered to open yet another desert front. With the
help of the famed British “Long Range Desert Group,” a battalion sized task force
pushed into southeastern Libya to hit the isolated Italian garrison at Kufra. However, the
Italian “Sahariana” company intercepted the LRDG, leaving the assault on Kufra to
the French, now under the command of a then-obscure Lt. Colonel Phillipe Leclerc.
Here, Leclerc’s small battle group fights to maintain its seige on the fort of EI Tag
while fending off harassment from the the “Sarahians” and the Italian Air Force.
Absolutely brilliant, @oriskany . Sorry it took so long for me to read this. Why aren’t you on the payroll of BoW?
Thanks, sir. Although to be honest, if I had to do this for cash, it probably wouldn’t be as much fun. 😀