![Make Your Own Star Wars: Legion Heroes! Rebel Agent & Officer Set Review [7 Days Early Access]](https://images.beastsofwar.com/2025/12/unboxing-atomic-mass-games-star-wars-legion-rebel-alliance-agent-_-officer-coverimage-225-127.jpg)


Ultramodern Wargaming – Ukraine 2024


Recommendations: 13001
About the Project
Lately, I've been running war games every weekend with members of the community via web conference. Players log on and play wargames with each other in real time, regardless of location, and we usually have at least a couple spectators as well. Many times it’s been Darkstar, but we’re also running wargames in Panzer Leader, Arab-Israeli Wars, and now Valor & Victory.
BoW/OTT community members @brucelea, @damon, @davehawes, and @rasmus have taken the plunge, leading battalions across thousands of meters of desert, starfleets in pitched battles across the heavens, or vicious firefights in the jungles of Vietnam, all without leaving the comfort of their home.
Hard-core, old-school command-tactical wargames can now be run (complete with spectators and recordings) in real time, with BOTH PLAYERS moving pieces across THE SAME virtual game board, thus maintaining player agency, speedy and instant results (no play by e-mail), interwoven turn sequences, any questions / feedback instantly received and addressed, and with the game being virtually recorded as it goes, a ready-made battle report can actually be created as we go.
All of this without the players having to install any new software on their computer, on any platform (PC or Mac). All that's needed is to agree on a time, a handful of dice, and a bellyful of courage!
Every weekend can now be a boot camp! All without costing me thousands of dollars in airfare, too!
Related Game: PanzerBlitz
Related Genre: Historical
This Project is Active
Kokoda Track 80th Anniversary - Valor and Victory - Dylan vs. Oriskany Jim (Conclusion)
Oriskany Jim and Elessar2590 are back to finish their Kokoda Trail game of Valor & Victory.
Jim’s Japanese own most of the table, but have been horriby mauled by Australiuan defenses. Dylan now takes his surviving Australians and Papuans on the offensive, hoping to steal back a little of the key terrain. There aren’t many Japanese infantry left to stop them, but the Australians must be wary of the deadly Japanese mountain gun.
Can a desperate Australian counter-charge clow out a smoking, blood-soaked victory? Find out!
Might make for a fun listen while hobbying or painting! Enjoy!
Kokoda Track 80th Anniversary - Valor and Victory - Dylan vs. Oriskany Jim (Part 2)
Oriskany Jim and Elessar2590 are back for Part 2 of their Kokoda Trail game of Valor & Victory.
So far, Jim’s assaulting Japanese have been ably supported by their Type 41 mountain gun and Type 89 “knee mortars”, and Australian losses have been heavy.
The Japanese “banzai” charge, however, has been slowed by thick mountain jungle, and heavily mauled by determined Australian defensive fire. Japanese numbers, however, may yet crack the thin (and bloodied) Australian defenses.
Might make for a fun listen while hobbying or painting! Enjoy!
Kokoda Track 80th Anniversary - Valor & Victory - Dylan vs. Oriskany Jim (Part 1)
Australians meet Japanese in this desperate 1942 battle in the jungle-smothered mountains of New Guinea in the South Pacific.
The Japanese wanted Port Moresby on the far side of New Guinea, which would have given them deadly air and sea access to much of Australia. Denied a seaborne invasion route by the Americans in the Battle of the Coral Sea, the Japanese were forced to do things the hard way and push overland to Port Moresby via the Kokoda Track.
Here they met determined Australian and Papuan resistance in a legendary battle against impossible odds and withering mountain jungle conditions.
Oriskany Jim and Elessar2590 sit down for an all-out, no holds barred game of Barry Doyle’s Valor & Victory, in a scenario recreating part of one of the initial defensive battles along the vital jungle route.
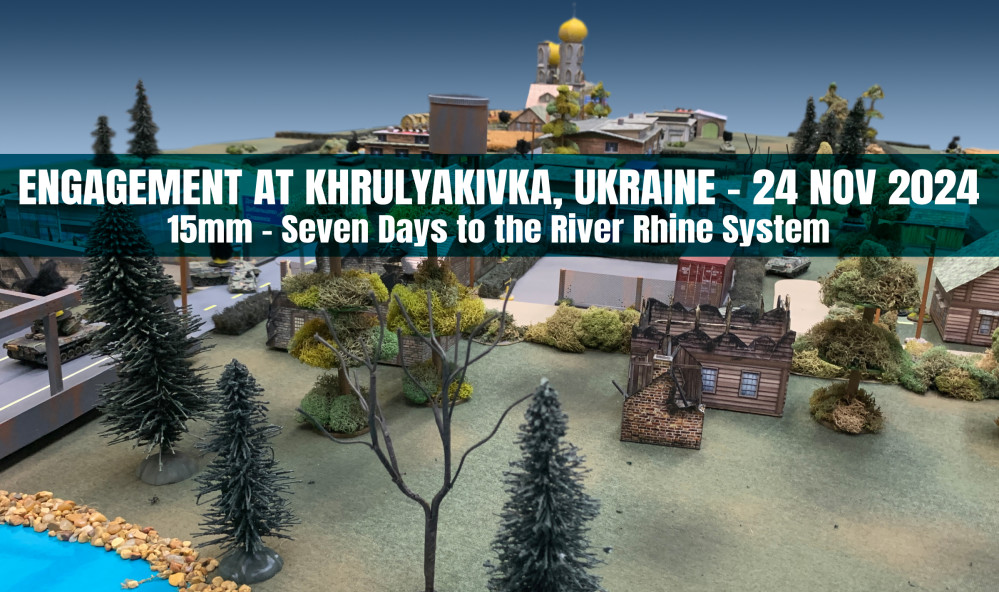
Seven Days to the River Rhine - Capture Scenario (Piotr vs Arek)
Piotr and Arek are back for another 15mm tabletop game, this time trying Seven Days to the River Rhine by Great Escape Games. Once again it’s the late 1980s, the Soviets have invaded West Germany, and the French have committed their forces to help stop the incursion.
The game on the table is a “Capture” scenario, where the attacking Soviets get double points available of the Defending French. But the Soviets have to assault and take all the objectives from the French, who are able to hide the deployment of some of their forces.
PanzerBlitz Gameplay Video - Rasmus v. Oriskany
Wow, what a game! Here is the replay of Sunday’s live stream, where myself and Rasmus had an absolute killer deathmatch of Avalon Hill’s PanzerBlitz.
It literally comes down to the last die roll!
The scenario is a small part of Manstein’s Backhand Blow, a series of German counterattacks that miraculously stabilized the Eastern Front in the wake of Stalingrad.
We’ve got Tigers crunching through the snow, mass T-34 charges, desperate close-quarters battle in the ruins of a Soviet town, everything that has made PanzerBlitz the classic that it is!
The Backhand Blow - Germany's Last Victory?
In the wake of their disastrous defeat at Stalingrad, German forces in southern Russia were confronted with a huge gash in their lines, through which Soviet armies poured into eastern Ukraine and towards the Black Sea.
To stabilize the situation, German Field Marshal Erich von Manstein launched a stunning series of counterattacks, in many cases using the Soviet’s own mass and momentum against them. In what history calls “the Backhand Blow”, the Germans outmaneuvered, savaged, and shattered the Soviet onslaught, halting their post-Stalingrad advance and stabilizing the Axis positions in southern Russia.
One of the culminating moments in this campaign was the Third Battle of Khar’kov, part of which we will look at in today’s game, reviewing the assault of Kampfgruppe von Strachwitz (Panzergrenadier Division “Grossdeutschland”) against positions on the Soviet 12th Tank Corps (cross-attached to 69th Army).
2PM East US Time, 7PM UK
Sitrep Podcast YouTube
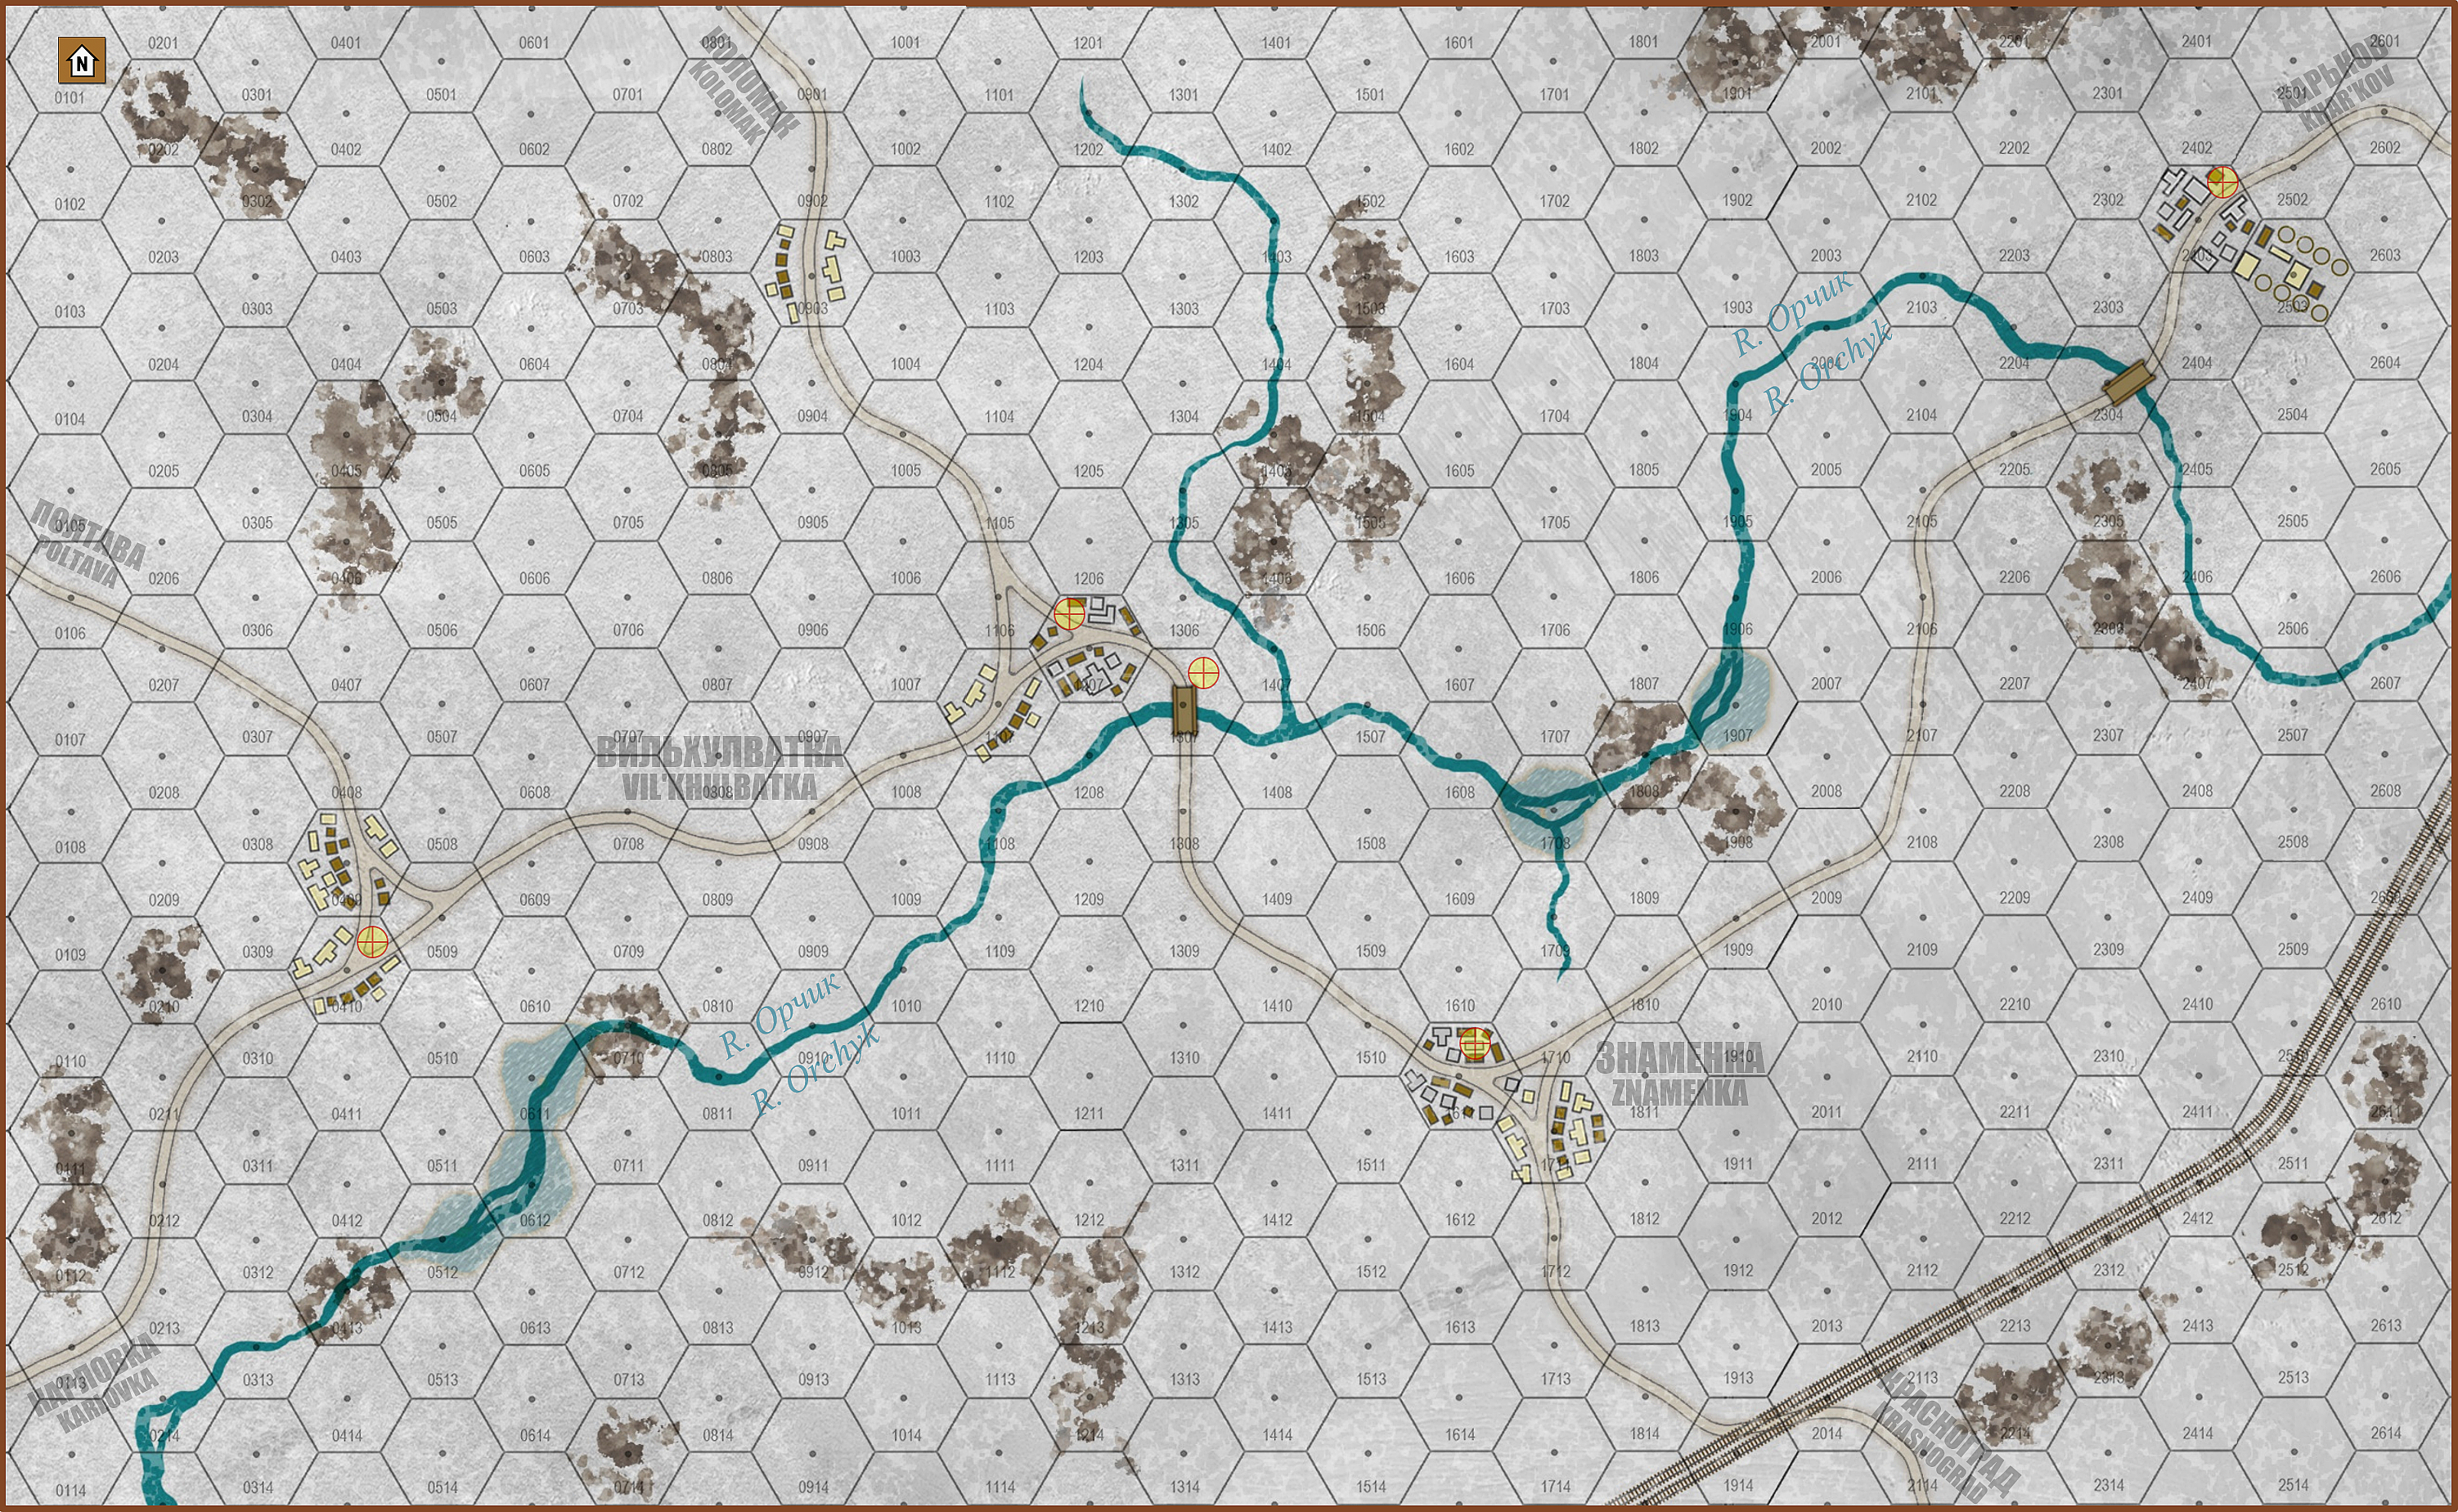 The map for today's battle.
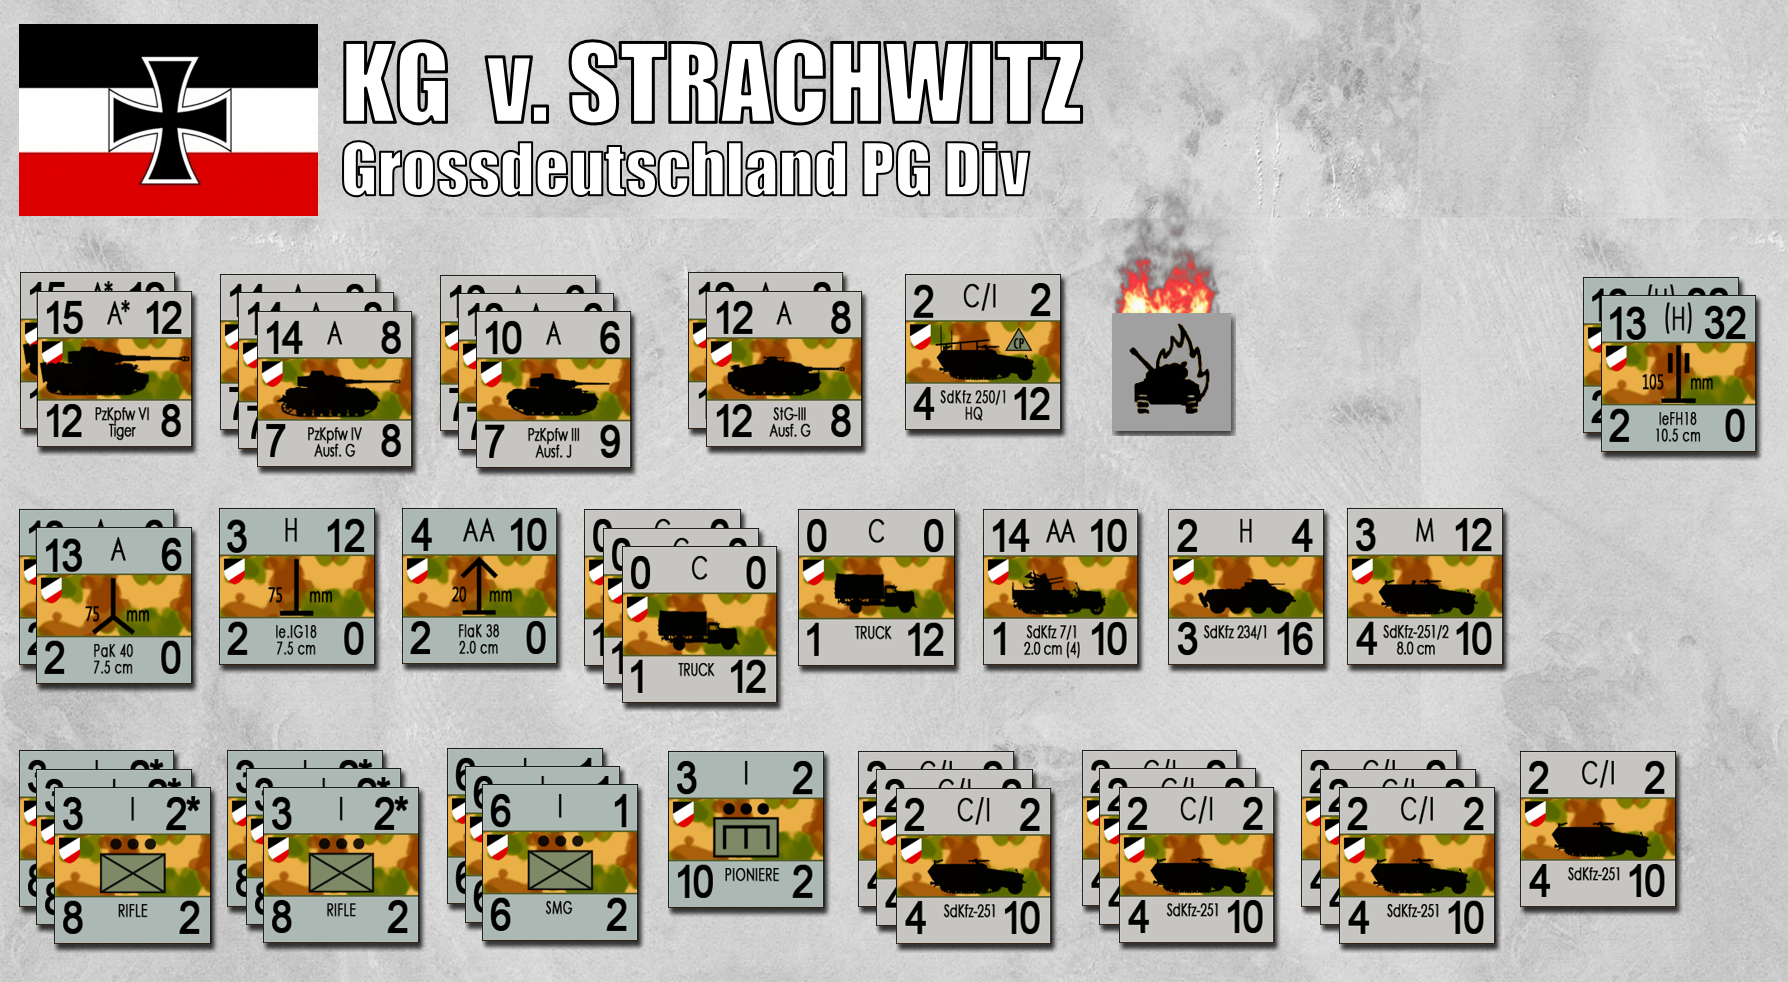 German forces under the "Panzer Count" - Graf von Strachwitz - commanding the spearhead of the Grossdeutschland Panzergrenadier Division
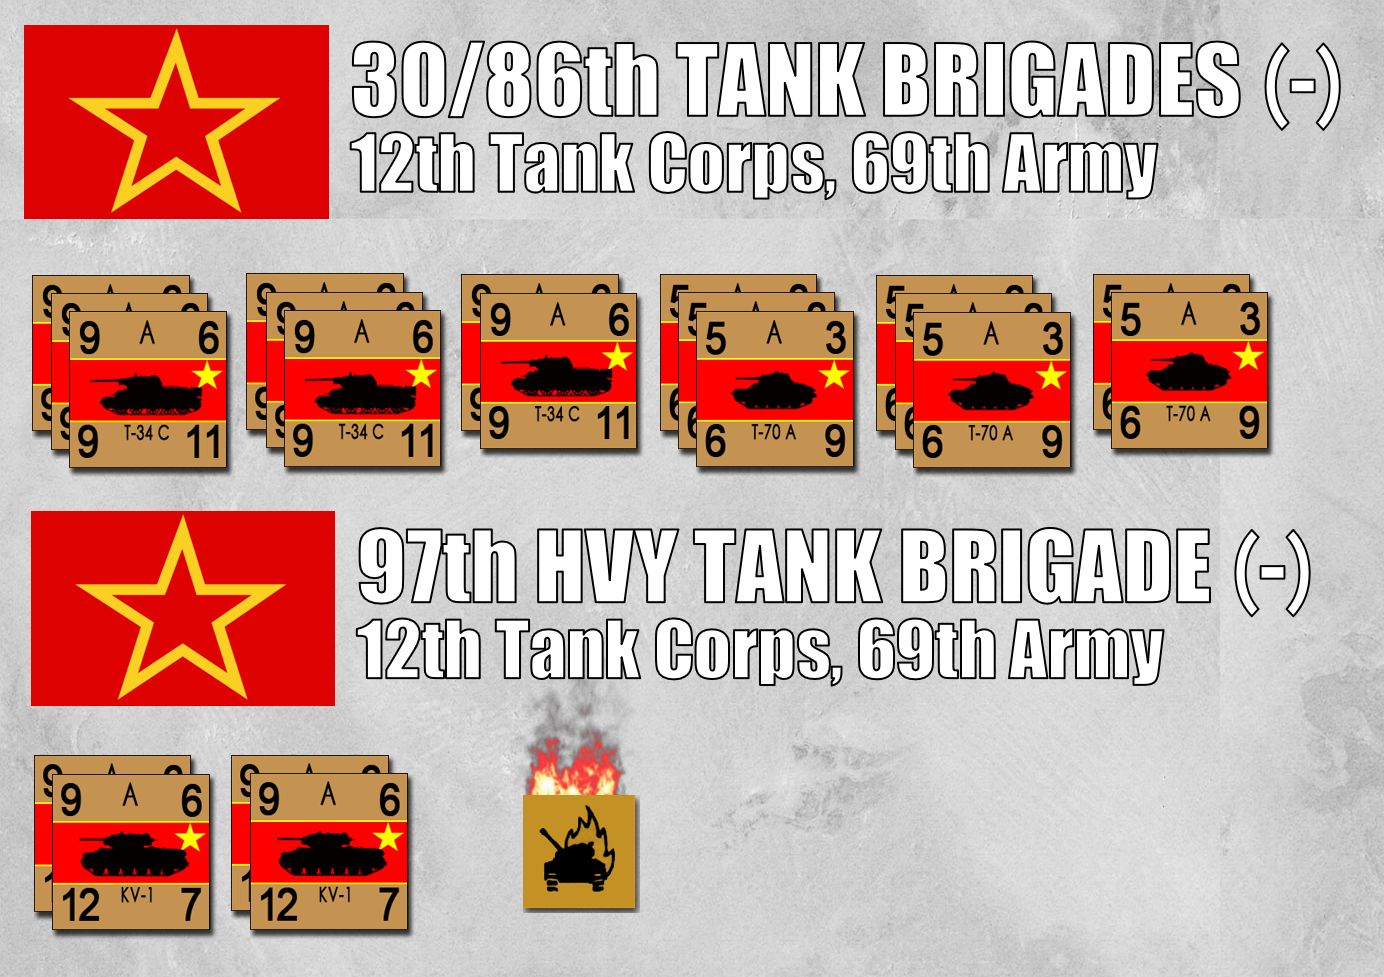 Understrength elements of 30th and 86th and 97th Tank Brigades, comprising the bulk of Soviet 12th Tank Corps. Remember the RKKA was not using the tank or armored "division" command structure in this period. Normally part of 3rd Tank Army's OOB, 12th Tank Corps had been attached to neighboring 69th Army for this fight.
 Tanks are nothing without infantry support. Again, this formation is well understrength after a month of headlong Soviet advance acorss southern Russia and into eastern Ukraine.
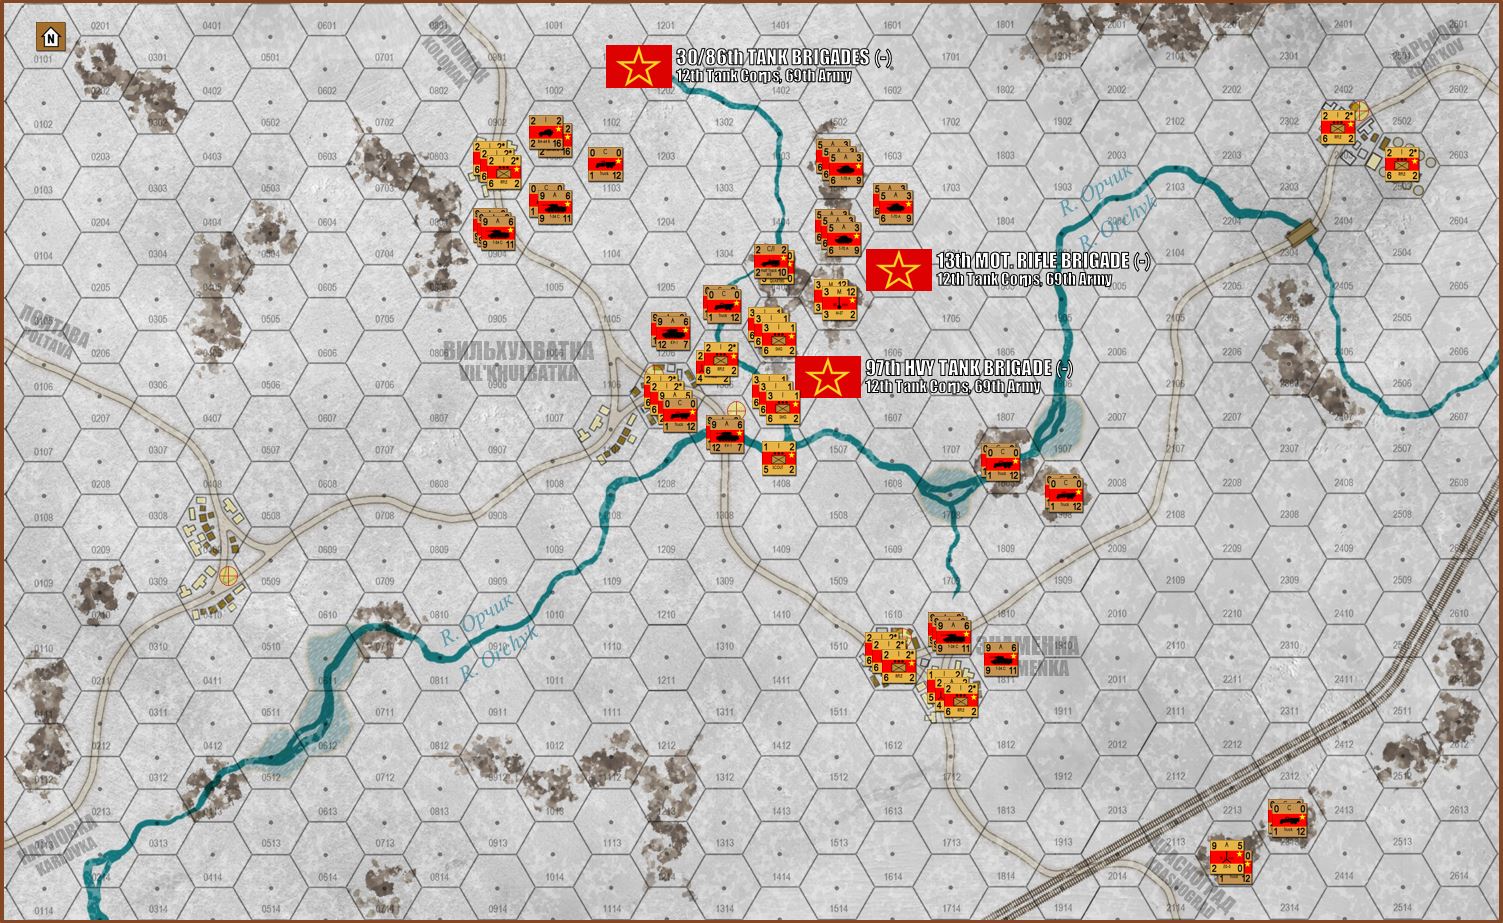 Soviet setup, awaiting von Strachwitz's counterattack out of the southwest.
 Sitrep Podcast Episode (20Aug2022)
Join Oriskany, Piotr, and Marty for another episode of the Sitrep Podcast, where we discuss what’s new in the world of Historical Military Wargaming, go over what we’ve been doing in the hobby, and review some great hobby contributions from the Sitrep Podcast Community!
Our topic today is Private Military Contractors and other “irregular” forces in wargaming.
There’s been some talk on our Discord lately – Looks like HK Ops might make a limited comeback. Maybe four-episode run or some such. This again brings up the idea of Military Role-Playing and the specific obstacles that sub-genre tends to present. One potential way around these issues: the PMC.
Partisans, insurgents, and militia are other possible routes, presenting opportunities where people can be involved in a conflict no matter their age, nationality or even gender.
Now … how does that work in wargaming?
How does it work when your toy soldiers don’t necessarily have to do what you tell them to?
Might make for a fun listen while hobbying or painting. Hope you enjoy!
Team Yankee Battle (French v. Syrians - 75 pts)
Piotr and Arek return for another 75-point game of Team Yankee. This time Piotr’s French square off against Arek’s Syrians, perhaps in a theoretical 1980s engagement where France attempts to tame her former “mandate” colony.
The French are heavily outgunned, with a smaller high-tech armored recon force facing off against a heavy spearhead of Syrian armor and motorized infantry. But the Syrians are on the assault, charged with aggressive “breakthrough” objectives on a tight timeline, and must contend with French artillery and air support.
Have you tried Team Yankee scenarios beyond the traditional “1980s Germany” setting?